
In this blogpost you’ll find the comprehensive Trello guide for new users, as well as powerful tips and tricks for advanced users.
Overview of the Trello Guide:
- Getting started with Trello
- User guide for Trello Cards
- List functionality in Trello
- The Trello Board user manual
- An introduction to Trello Power-ups
- Advanced Tips & Tricks for Trello
Starting at the beginning, Trello is a project management tool owned by Atlassian. It is generally considered to be easy to use, especially compared to other project management tools. There’s little argument that you’ll find it provides a fluid, visual toolset for managing tasks and projects.
If you need more complex functionality then you might consider Jira (also owned by Atlassian). We’ve made a separate Jira guide for that. However, if you’re working on a project that doesn’t require complex rules and regulations, then Trello may be the thing for you. What’s more, it’s easy to learn and highly intuitive – as this guide will illustrate. And Trello doesn’t just make task management simple but it is often actually cited as making it fun!
Let’s get started with “the Easy Trello Guide for all user levels.”
Getting started with Trello
What is Trello?
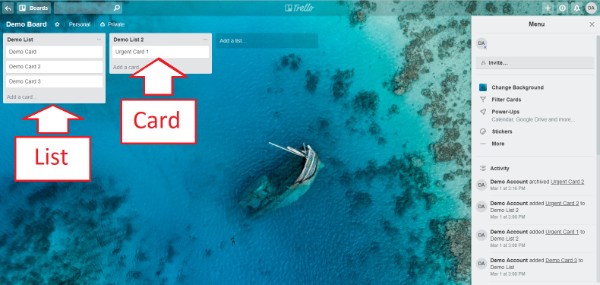
At its most fundamental level, Trello allows you to create Cards to track tasks. These are placed on Lists, which organize Cards and can be used to mark stages of progress. Multiple Lists then fit together to form a Board, representing a single project.
Trello can be used to track almost anything, whether planning your family Christmas, managing a development team or running a business – or even just for keeping track of notes or CVs.
Example: You’re using Trello to track your to-dos for the Christmas party. Then you might create a board called “Christmas Party”. You create cards for things like “buy a turkey” or “decorate the house,” and you move the separate tasks from a column “to do” to “doing” to “done”.
Creating a Trello Board
The first thing that you’ll want to do is go to Trello.com and sign up for an account. And don’t worry: standard/basic accounts are free. What’s more, Trello is highly localized and will detect your language, making it a little bit easier to get started, whatever language you speak.
Once you’ve done that, you’ll want to create a Board. You can have as many Boards as you like on your account. For example, design businesses often have a separate Board for each client, in order to keep everything clear and defined.
Other teams only use one board to set up team sprints on product development.
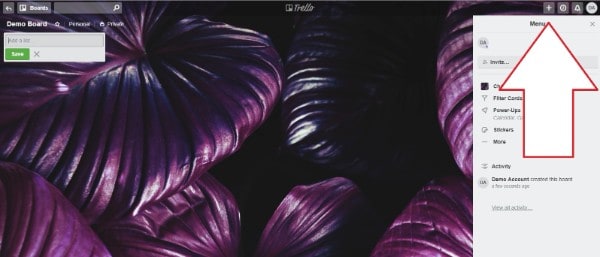
To create a Board, go to the “+” symbol in the top right of the screen and click “Create Board”.
You then just need to name your Board and choose the background that will appear behind your Cards.
You can also set your Board to be public, private, or Team Visible – and, unless it’s useful for the Board to be accessible to the general public, it’s best to make it private or Team Visible.
We’ll get to how to invite people to your board later, but it’s also worth noting that only people you invite to private boards can see them. That means that it’s perfectly possible to use Trello, or Trello alternatives, for work and to also have a private Board for things you need to do at home.
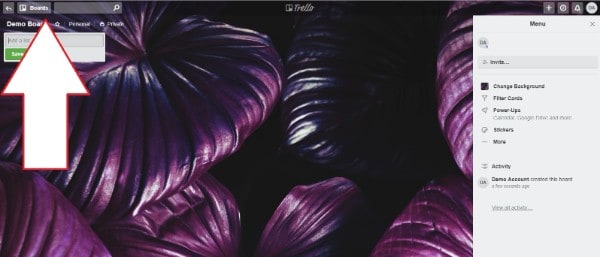
To find all the Boards associated with your Trello account, go to the Boards button in the top left of the screen.
Using Lists
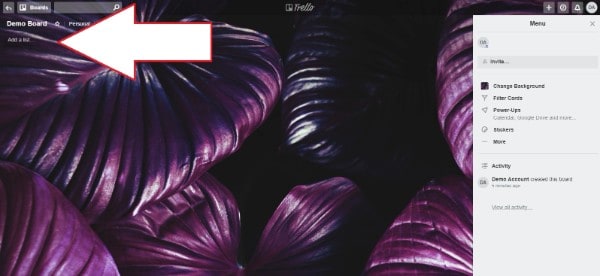
Next, to populate your Board, you’ll want to create Lists. Note that you can create as many Lists as you like.
The universal basic board would consist of the 3 columns “To Do,” “Doing” and “Done,”. But they could be anything you like – for example, “marketing-related tasks” or “food-related items.”
Tip: Trello also provides good examples of boards for marketing brainstorms, hiring, Scrum, Lifestyle,… . Check out their example template for more inspiration on board types.
To change the title of a List, simply click on the title field. If you want to move your Lists into a different order, just click on the title field and drag it to where you want it. Lastly, if you want to add more Lists, click the “Add a list” button on the right of the screen.
Simple right? That’s why people love Trello.
Adding Trello Cards
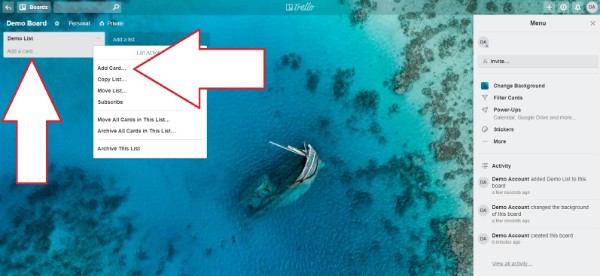
With your Lists in place, you can now begin adding Cards. You can do this by clicking the “Add a card” button on your list or clicking the “…” next to the List’s title and clicking “Add Card.”
Pro tip: For even faster Card creation, write the titles as cells in a spreadsheet and then paste them into a Card title. Voila! Each line-separated item will be turned into a new Card.
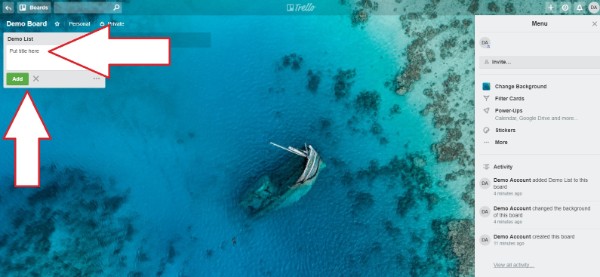
Next, you need to give your card a title, and then press “Add.”
You’ll be able to assign cards to certain members of your team. We’ll get to more detail on assigning roles later in this guide.
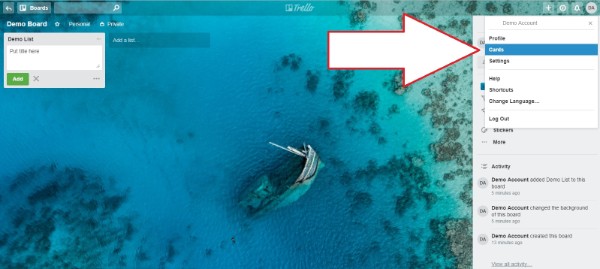
For now, it’s useful to know you can find all the individual Cards assigned to you across all your Lists and Boards. To create a list of all your cards, click on your avatar in the top right of the screen and then click “Cards” on the dropdown.
User Guide for Trello Cards
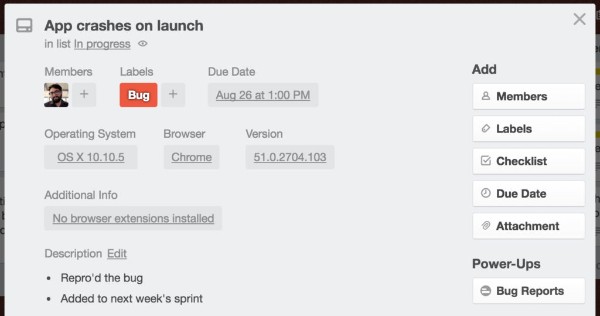
Trello Card Back with rich data
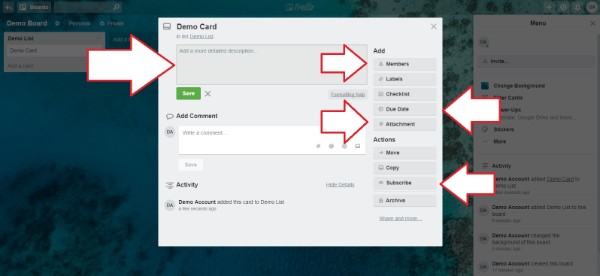
Trello cards are known as “super boosted Post-it notes”. That’s because of the incredible amount of rich information you can add to the Card Back. To do this, just click on your Card.
In the box marked “Add a more detailed description” you can do just that.
And with the buttons on the right you can give the card a due date and add attachments.
Attachments can be anything from images to video files, to links.
Pro tip: If you attach a .jpeg, .gif, or .png then this will appear on the front of the Card when viewed on the Board.
Membership & Subscriptions
You’ll note that you can add Members of your team to your Card as well as “Subscribe” to Cards.
What’s the difference between a membership and a subscription?
In the first case, members will be linked to the Card – most likely because it’s a job that they have to do.
Subscribing to a Card simply means that you will be kept updated about changes to the Card. This comes in very useful when filtering cards by who is added to them.
Pro Tip: To add yourself to a Card from the Board view, just hover over it and press space.
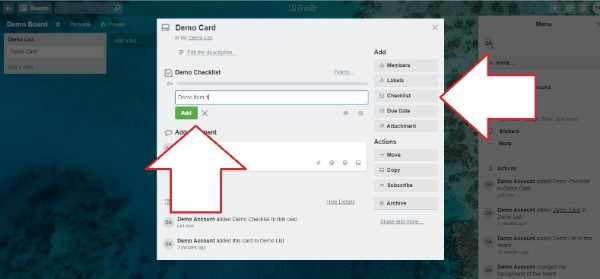
Checklists for your Trello Card
You can also add a checklist of sub-tasks to the Card, that can then be ticked off as they are completed. If you later find that you don’t want the checklist, it’s easy to delete it as well.
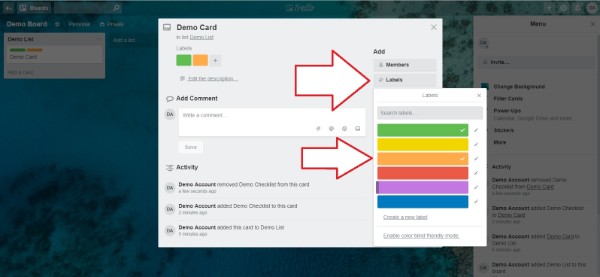
Card Labels
Using the “Labels” button, you can also color code and tag your Cards.
This can be extremely useful – for example, for labeling Cards as belonging to marketing, describing a software issue, or perhaps relating to a specific client.
Commenting on Cards
You can also add feedback and comments under “Add Comment.”
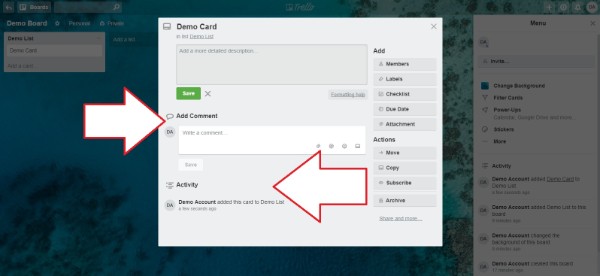
Within individual Comments, you can add attachments and emojis, point Comments at specific Members and add links to other Cards.
Activity History
Below Comments is the Card’s “Activity” section. Which helpfully lists all the changes that have been made to the Card.
That way you’ll be able to establish what happened when, and who did it.
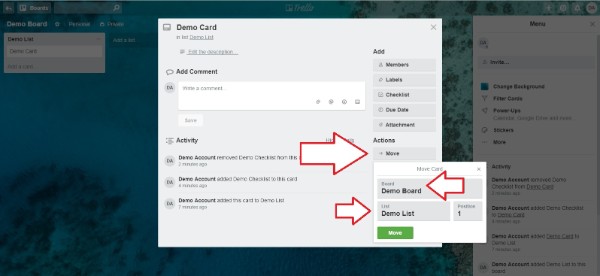
How to move or copy a Trello Card
With the Move button, under “Actions” you can send the Card to another Board or List.
“Copy” allows you to replicate a Card elsewhere.
How to delete or Archive a Trello Card
There is no direct Delete button to remove your Trello Cards.
However, you can “Archive” the card, which will remove the Card from the Board. If you go to the “More” button on the Menu, then “Archived Items”, you can then delete the card.
If you have realized that you need to keep the Card on the Board, go to the same location and click “Send to Board” to restore it.
Additional Options for Your Trello Card
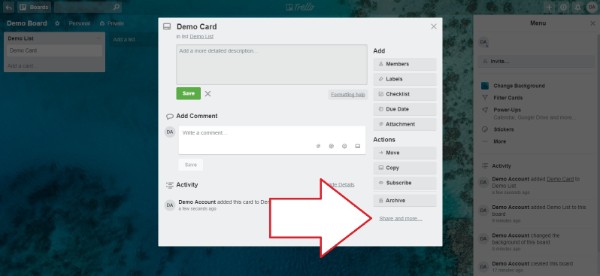
If you click “Share and more,” in the bottom right of the Card back, there are several additional options available.
This includes: allowing you to print the Card; grab a link for the Card; and add Comments to the Card by email via a designated address (which is unique for every user).
Pro tip: You can also export changes to the card to JSON and embed the card as a widget to appear on a webpage.
List Functionality in Trello
Looking at a List from the Board view, click the “…” button in the top right.
This has a few options that are worth looking at, including “Archive All Cards in This List” and “Archive This List,” which remove the lists from showing up on the Trello Board.
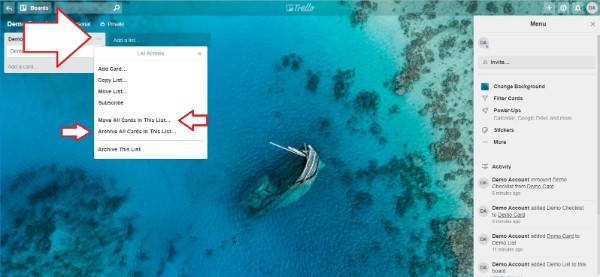
You can also subscribe to all updates to all Cards on a specific List from this menu.
Now that we have Cards on a List you can also experiment with them, drag and drop them wherever you want from the Board view.
The Trello Board User-Manual
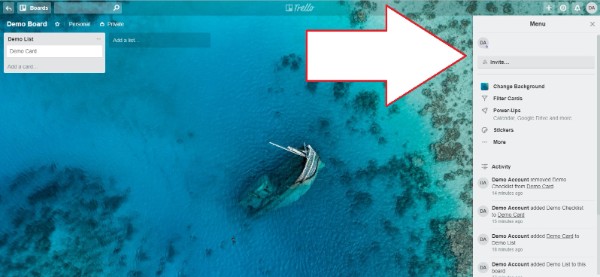
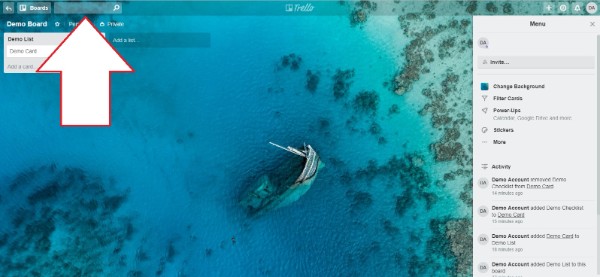
Every Trello board has a menu, which gives you top-level tools on what’s going on.
You’ll find the menu at the top right of your Trello Board.
Adding users to your Trello Board
If you’re using Trello to track a workflow, you may well want to add other individuals. You can do this with the Invite button, either inviting an existing Trello user by email or by account name, or emailing someone with an invite to use Trello.
If you want to add a group of people, click “Invite people by giving them a special link” and you can then just share the link with them rather than adding them individually to the Board.
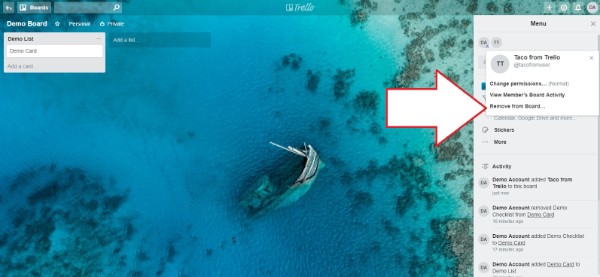
Removing users from your Trello Board
To remove Members from a Board, click their avatar at the top of the Menu, and select “Remove from Board.”
By default, all Members can add and remove other Members from Boards.
You can also remove yourself from a Board if you want to leave it.
Manage User Permissions
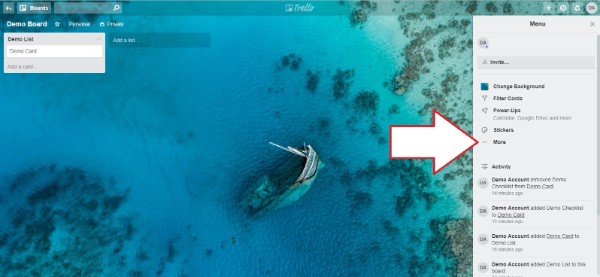
To change the ability of other Members to add and remove other users, click “More,” then “Settings,” then “Add/Remove Permissions,”.
Switching this to be Admin only. From the “More” page you can also edit how Labels appear and find your Archived items (if you’ve dismissed them from the Board prematurely).
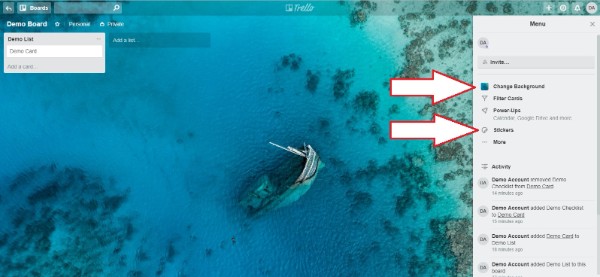
Trello Background and stickers
“Change Background” allows you to.. well, change your background.
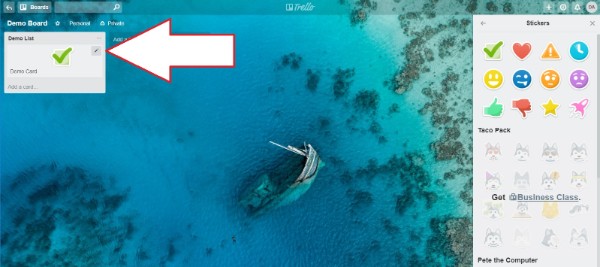
While “Stickers” allows you to drag and drop images onto your cards.
If you decide that you want to remove stickers, just hover over the Card and click the pencil icon in the top right; then click on your sticker and click “Remove.”
With Trello Gold, you can even add animated GIFs to Card covers.
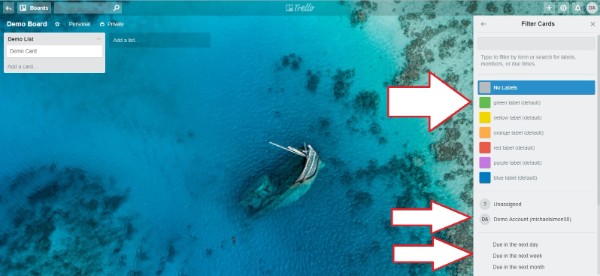
Filtering a Trello Board
The next Menu option is “Filter Cards” – which allows you to view the Board only for Cards with specific Labels or that have specific Members.
This is especially useful if you’re working on a scrum board with different team members and you’d like to filter your own tasks.
Pro Tip: Hitting “Q” on the keyboard allows you to only display Cards that are assigned to you.
You can also filter by the due date if you’d want to identify tasks that have a major urgency status.
To dig even deeper, you can use multiple Filters at once.
Searching a Trello Board
The Search bar offers an easy way to find whatever you need across your Boards.
This also comes with several operator functions.
For example:
- Searching @me will return Cards assigned to you;
- searching for due: week will give you all the Cards with due dates in the next week;
- and label: green will give you all Cards with the green label attached to them.
You can also use more than one operator at a time – for example, searching for green-labeled cards assigned to you and due in the next seven days.
Change History
At the bottom of the Menu is the Activity section, listing all changes made to all Cards on the Board.
Closing a Trello Board
You can also close your Board entirely – though do note that closes it for everyone else as well.
If you have accidentally closed your Board, fear not, as it can be retrieved from your Boards page by clicking “See closed boards” and then clicking “Re-open” – and not “Delete!”
An Introduction to Trello Power-ups
Power-ups allow Trello to integrate with other apps to add new features and functionality.
You can use a single Power-up with a free account. If you want to use more, you will need to upgrade to Business Class.
I’ll quickly run you through a couple of notably useful power-ups in this intro. However, I will not be able to discuss all of them in this guide, since there are too many to mention. You can find the complete list of power-ups on the Trello Blog.
You can select the power-ups listed in the power-ups tab in the menu at the top-right of the board.
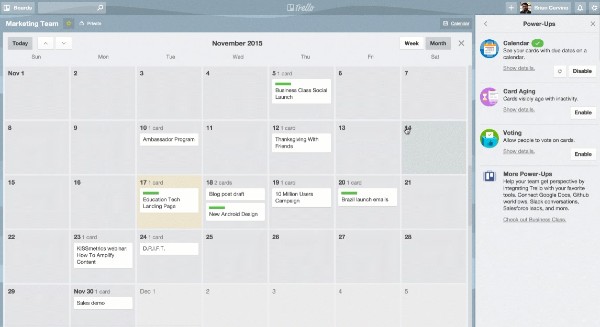
Trello Calendar
This is one of the most useful Power-ups out there. As it allows you to access Cards from a calendar view, organized by their due date.
This makes it easy to schedule tasks in a visual way as well as get a visual representation of what tasks lay ahead.
The custom fields power-up
This Power-up gives you the ability to add new, customizable fields to Card front and backs.
While this might not sound exciting, it allows you to:
- mark Cards as being completed;
- add start and end dates to Cards;
- add drop-down lists;
- or add contact information fields to Cards.
- …
If you have a Business Class or Enterprise account, you can also include information from Custom Fields when exporting CSVs of Boards – providing complete visibility on everything that is happening.
Jira Integration
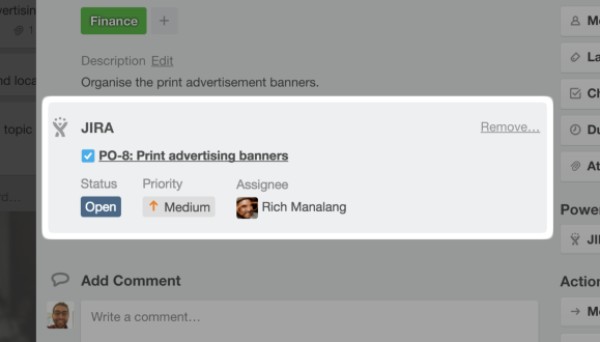
Across different departments, many companies use both Trello and Jira. So this Power-up, which connects the two, can be extremely powerful.
It allows you to create Issues in Jira from Trello, and to attach Jira Issues to Cards.
If you need to send tasks and queries to your engineering team via Jira, this Power-up will make it easy.
Note: if you’re wondering by now if Jira or Trello would be a good fit for you. Have a look at our blog post on “Trello VS Jira: Why Jira is the Superior Tool for Non-Developers”
Other notable power-ups in Trello
– Integrations with Google Drive, Dropbox, and OneDrive to attach files to Cards
– The Card Aging Power-up, which causes Cards to fade if they are not updated
– Plus there are integrations with Slack, Salesforce, Evernote, and GitHub, among others (including options for those who want to understand how to export data from Trello to spreadsheets for advanced reporting).
Advanced Tip & Tricks for Trello
Advanced tips and tricks
– For bulk Card creation, write the titles as cells in a spreadsheet and then paste them into a Card title. Each line-separated item will be turned into a new Card.
– A useful trick to know is that you can create Cards by email. To do this, go to the Menu on the right, click “More” and then “Email-to-board Settings.” You can now create Cards by sending messages to this address.
– Want to create a List between two existing Lists? Just double-click there.
– For rapid check listing, you can create multiple checklist items simultaneously on a Card by simply copying a line-separated list into the field.
– To attach a web link to a Card, simply paste the link into the attachment field, or drag and drop the link onto a Card from the Board view.
– YouTube videos can also be embedded into cards by pasting a video link into a comment.
Keyboard shortcuts
– Hitting “Q” on the keyboard allows you to only display Cards that are assigned to you.
– We’ve already mentioned that you can add yourself to a Card from the Board view, by just pressing space while hovering over it. If you’d like to add other Members, though, click “M.”
– While hovering over a Card, hitting “L,” meanwhile, will bring up the Label menu, so you can label Cards from the Board level.
– Hovering over a Card and pressing “E” will take you to the quick edits view;
– Hovering over a Card and pressing “D” takes you to the due date.
– You can also use the arrow keys to navigate around the Board; “<” and “>” to move Cards between different Lists; “Enter” to open a Card and “/” to start searching.
– And you can even copy, cut, and paste cards by hovering over them and pressing Ctrl/⌘+C or Ctrl/⌘+X and then Ctrl/⌘+V to paste.
Conclusion
The founder of Trello, Michael Pryor, called its product “project boards with superpowered post-it notes”. And I understand completely why he used that phrase.
Trello is extremely intuitive and easy to use and yet still offers powerful functionality. This makes Trello a great fit for both individuals as well as teams using straightforward workflows.
Whether you want to use it for setting up business task-tracking or for comparing notes on an archive of material, Trello will make it fast and simple.
It’s not quite as flexible as Jira (another Atlassian tool), but way more user-friendly and straightforward when just starting out.
Using the tips and tricks above, meanwhile, should make your journey a bit easier, and accelerate your progress. What’s more, the basic version of Trello is free to use so you have nothing to lose by trying it out.
Now back to you. Is there anything else you’d like us to cover in this guide? Have you tried out Trello before? What did you think of its usability? What features did you like most? Or haven’t you tried it? Why not? Let us know in the comments below!
Recommended Reads:
- A guide to Jira workflow best practices (with examples)
- Dissecting Jira pricing: How much does a Jira license cost?
- How to implement a Jira Migration (a step-by-step guide)
- How to set up the perfect Jira notification Scheme
- Jira Bitbucket Integration: the complete guide for 2023
- Jira Confluence Integration: The complete 2023 guide
- Key Updates of Atlassian Products 2023 (what you should know)
- 10 Expert Tips to 10x Your Productivity in Jira