

This article was written by Maxime-Samuel Nie-Rouquette from Tempo.
This starter guide will provide you with the basics of Tempo Timesheets. We’ll cover benefits, best practices, tips & tricks, simple set-ups, and everything there is to know to get started for time tracking with this popular Jira add-on.
Here’s what you’ll learn:
- What is Tempo Timesheets?
- How to log and track time using Tempo Timesheets
- Tips and tricks for using Tempo Timesheets to log time anywhere in Jira
- Some Best Practices for time tracking
- How to customize the Tempo Worklog Menu for your use case
- Best Practices for customizing Tempo Worklogs
- How to organize your data using Tempo Accounts and Tempo Teams
- How to use Tempo for reporting (Tempo Reports)
- Best Practices on reporting with Tempo
- What are some Frequently Asked Questions about Tempo Timesheets?
Time tracking is an essential part of developing an agile workflow. Here’s why you should care.
Three reasons why you should track time:
From a user’s perspective, time tracking is a powerful way to:
- See where your time is being allocated to promote improvements to productivity
- Understand how much your team can realistically tackle to avoid overcharging your workload
- Facilitate communication for added transparency.
Why time tracking matters:
Your company might be very interested in tracking time to better understand the costs associated with tasks and projects.
Tracking time allows for better decision-making and forecasting. And it allows for better allocation of resources to optimize the business.
It might also be necessary to the operations of a business- for example, invoicing.
What is Tempo Timesheets?
Because time tracking is so vital for any agile team, let’s discuss one of the best ways to go about it – Tempo Timesheets.
Simply put, Tempo Timesheets is:
A time-tracking and reporting solution that seamlessly integrates with Jira to help teams and managers track time for accounting, payroll, billing, compliance, enhanced efficiency, and forecasting.
The add-on can be found on the Atlassian Marketplace, or purchased through your local partner (such as our friends at Idalko) and is compatible with Cloud, Server, and Data Center.
When the Atlassian App is installed there will be slight changes to Jira’s interface as a result of having Tempo Timesheets installed.
One of the most noticeable is in the menu at the top of the page:
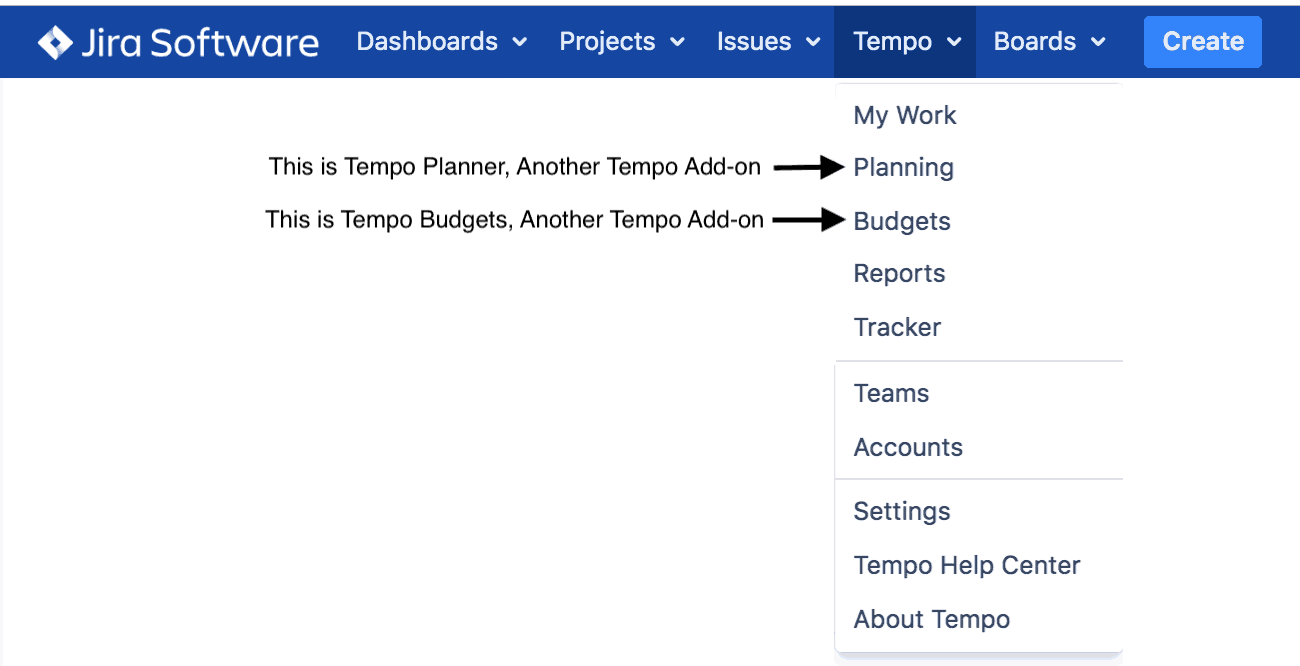
The Tempo menu, which can be found alongside the rest of the Jira menu at the top of the page, can be accessed anywhere within Jira.
Please note that if only Tempo Timesheets is added, “Planning” and “Budgets” will not be available. As they correspond to functionalities from Tempo Planner and Tempo Budgets (other Tempo apps).
How to log and track time using Tempo Timesheets
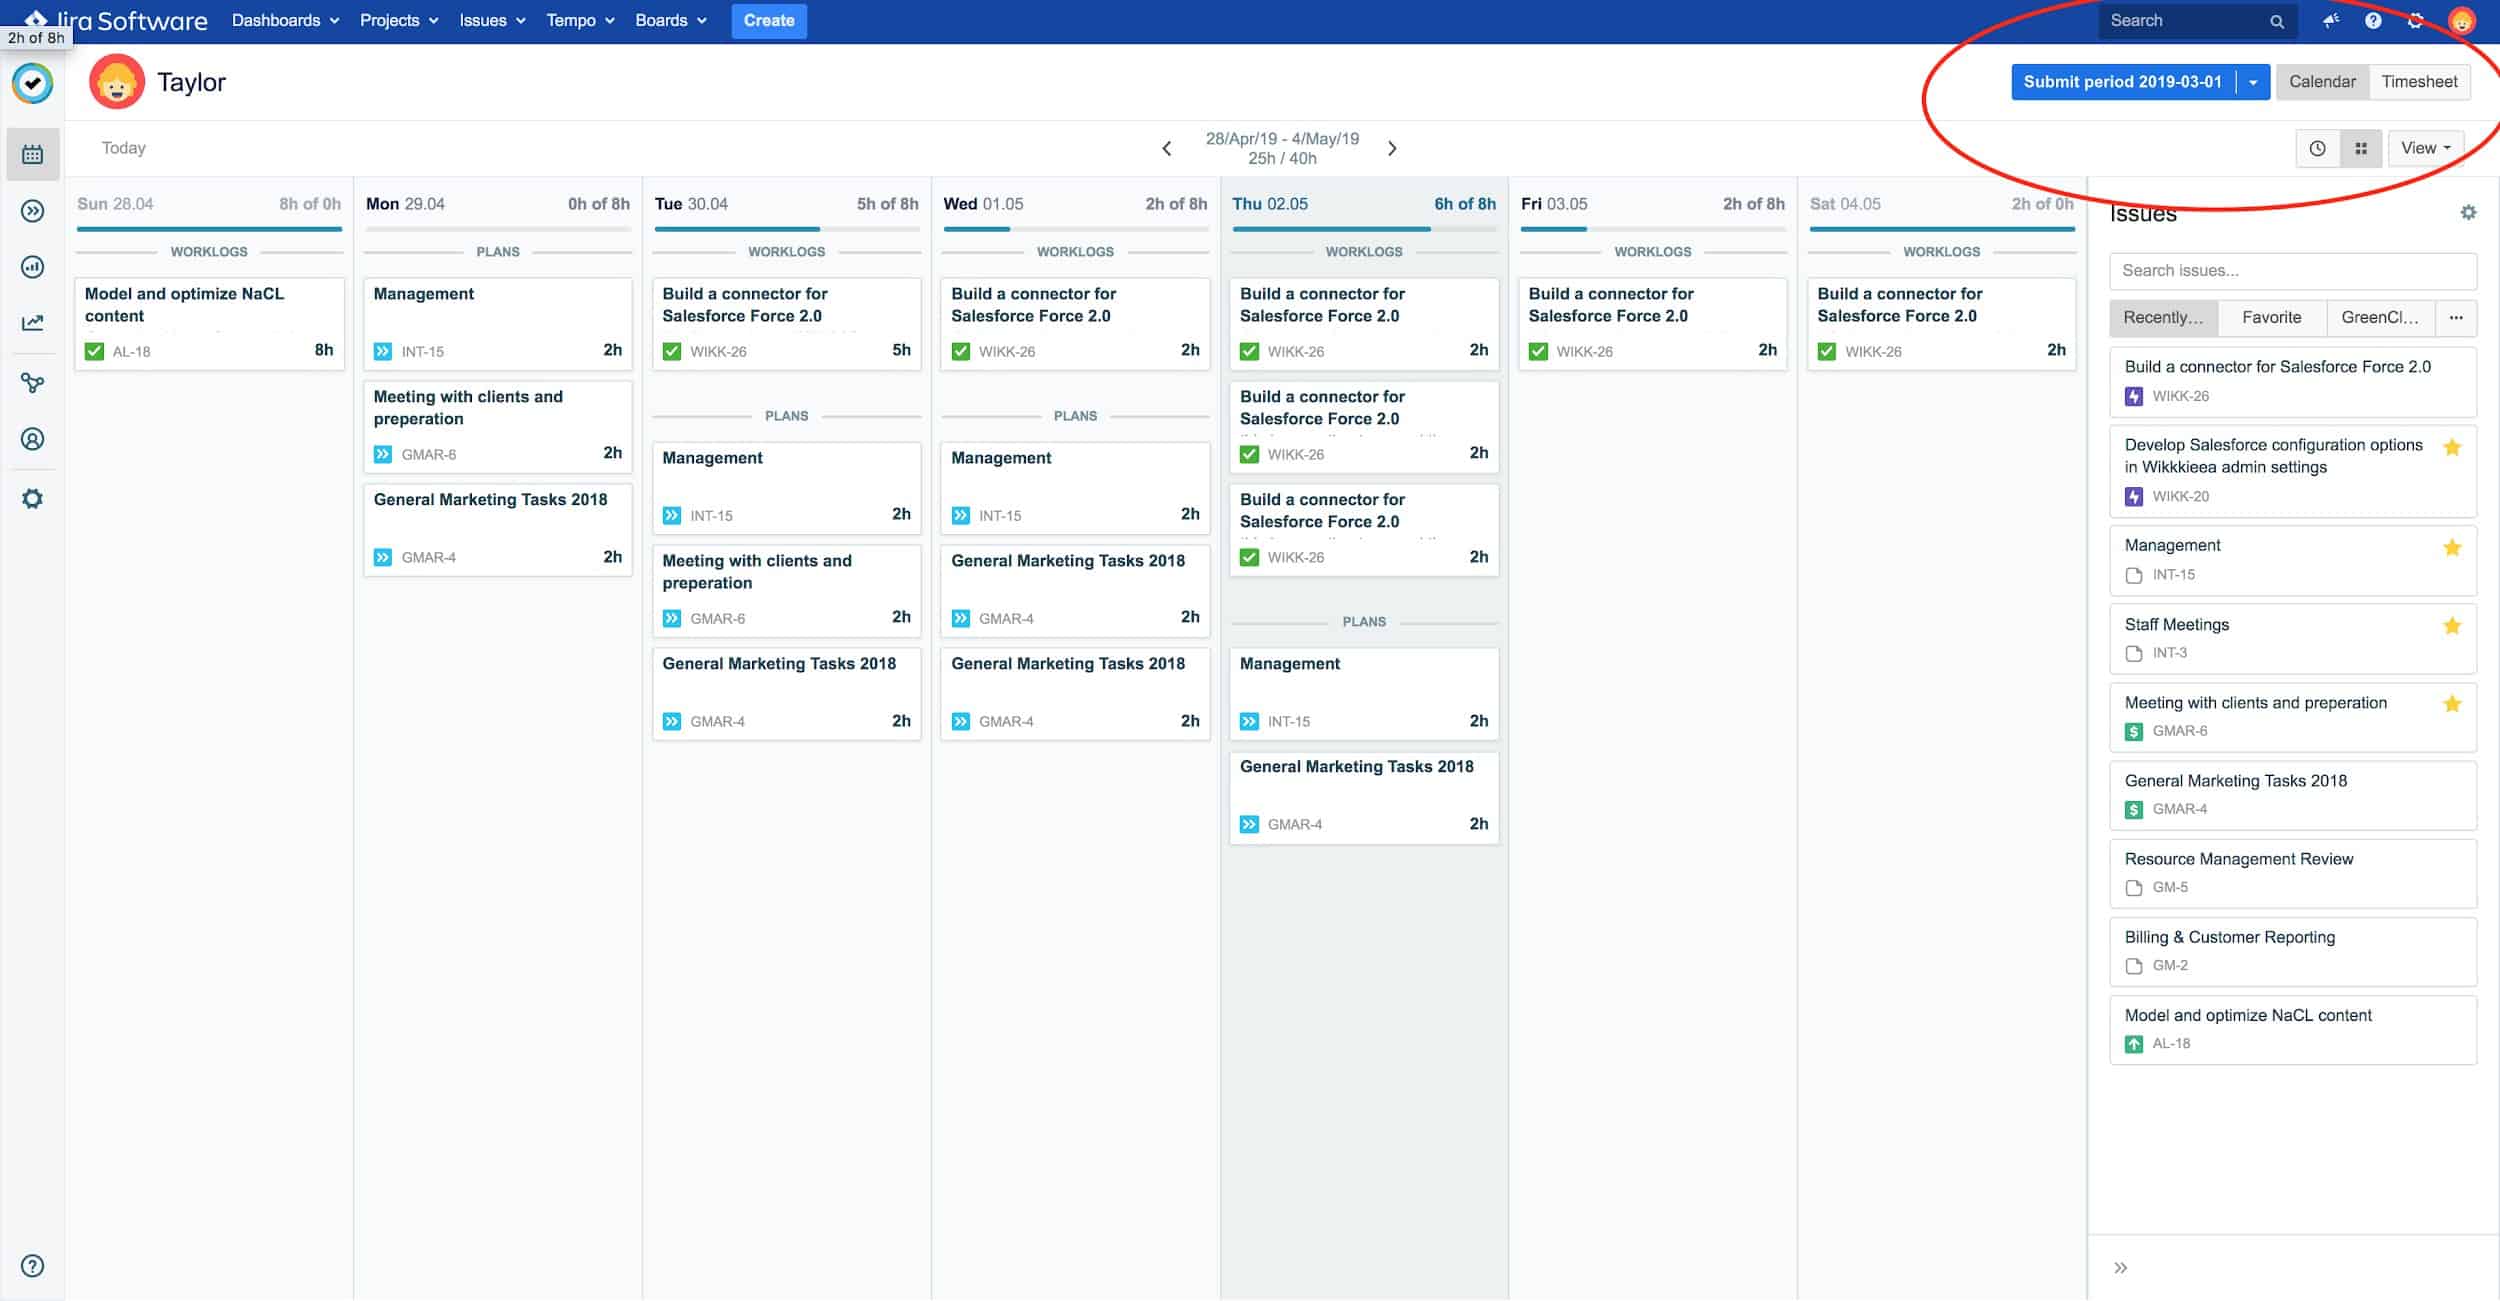
This is the calendar view for “My Work”.
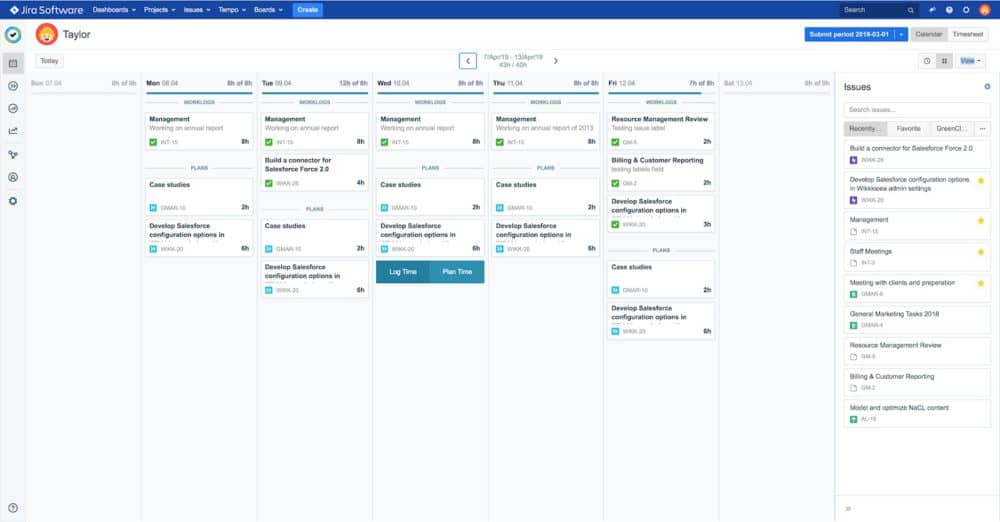
From this page, the other Tempo functionalities can be accessed from the left side of the page (with the icons). Or with the Tempo Menu at the top of the page.
My Work calendar cards correspond to the rectangles that can be seen in the middle of the page. In this view, the length of time does not impact the size of the card. The cards with the green checkmark correspond to time logged. Whereas the cards with the blue arrows correspond to the time that is planned.
In this section, we’ll show you a few methods to track and log time.
One of the biggest challenges our clients face is getting their employees into the habit of logging time on a consistent basis. We hope to make this challenge a thing of the past if a user is able to find the right fit for their schedule and work behavior.
The My Work page is the home base in Tempo. When you visit My Work, you will be welcomed with an overview of tasks that are planned for the week and the current progress on the timesheet.
This page offers several ways to log time. We’ll show you the three main ones here.
Logging time via the calendar view
You can log time into the timesheet using numerous methods.
One of the simplest: go to the date you would like to log time and press the “log time” button that will appear when you hover over the date.
The benefit of this approach is that it is very visual and helps you immediately see the day’s progress.
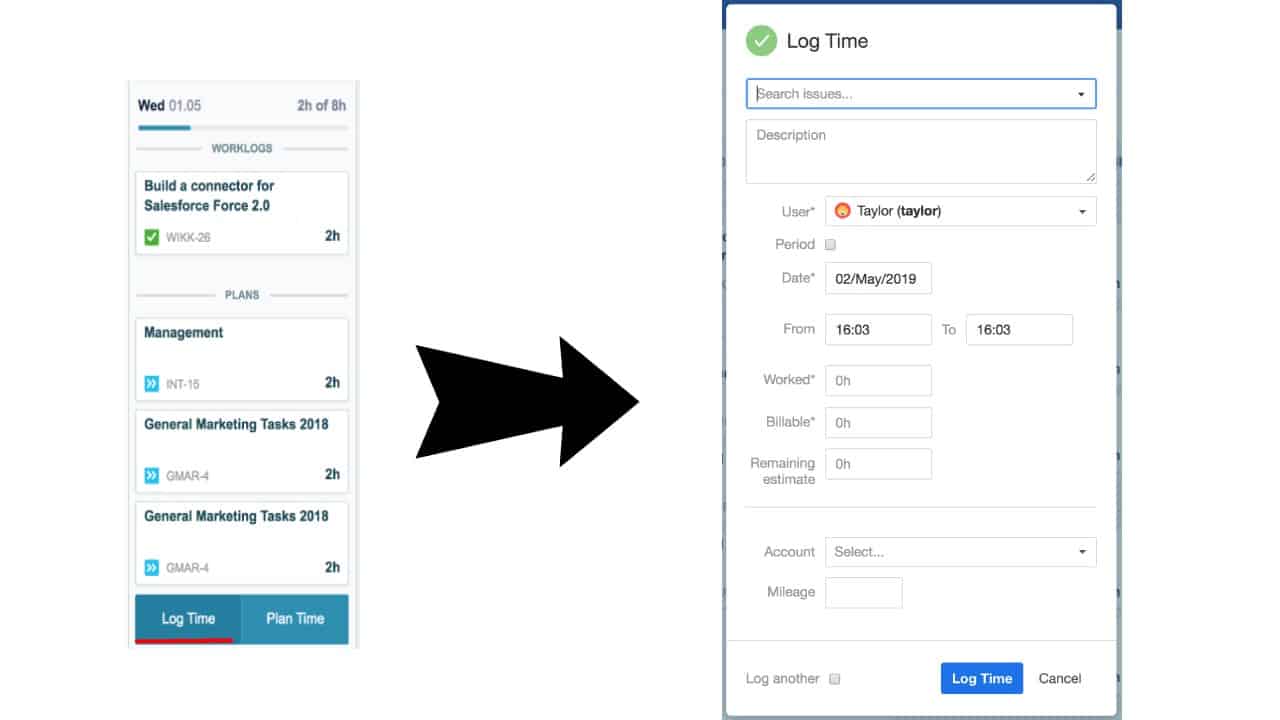
Pressing “Log Time” will open the Worklog menu. Note that the worklog window might appear slightly different depending on the way your organization was set-up.
Trick of the trade: You can also move a calendar card (the rectangle that shows the time spent on an activity) to another date – so if you entered the time at the wrong date, simply drag the calendar card to the right time period.
Pro tip: You can save even more time by duplicating a calendar card! Press the shortcut (Window = Ctrl + Shift + Click, Mac = Cmd + Shift + Click) and drag it to another time period. This removes the need to constantly re-create repetitive tasks.
Drag and drop method from the right side of the screen
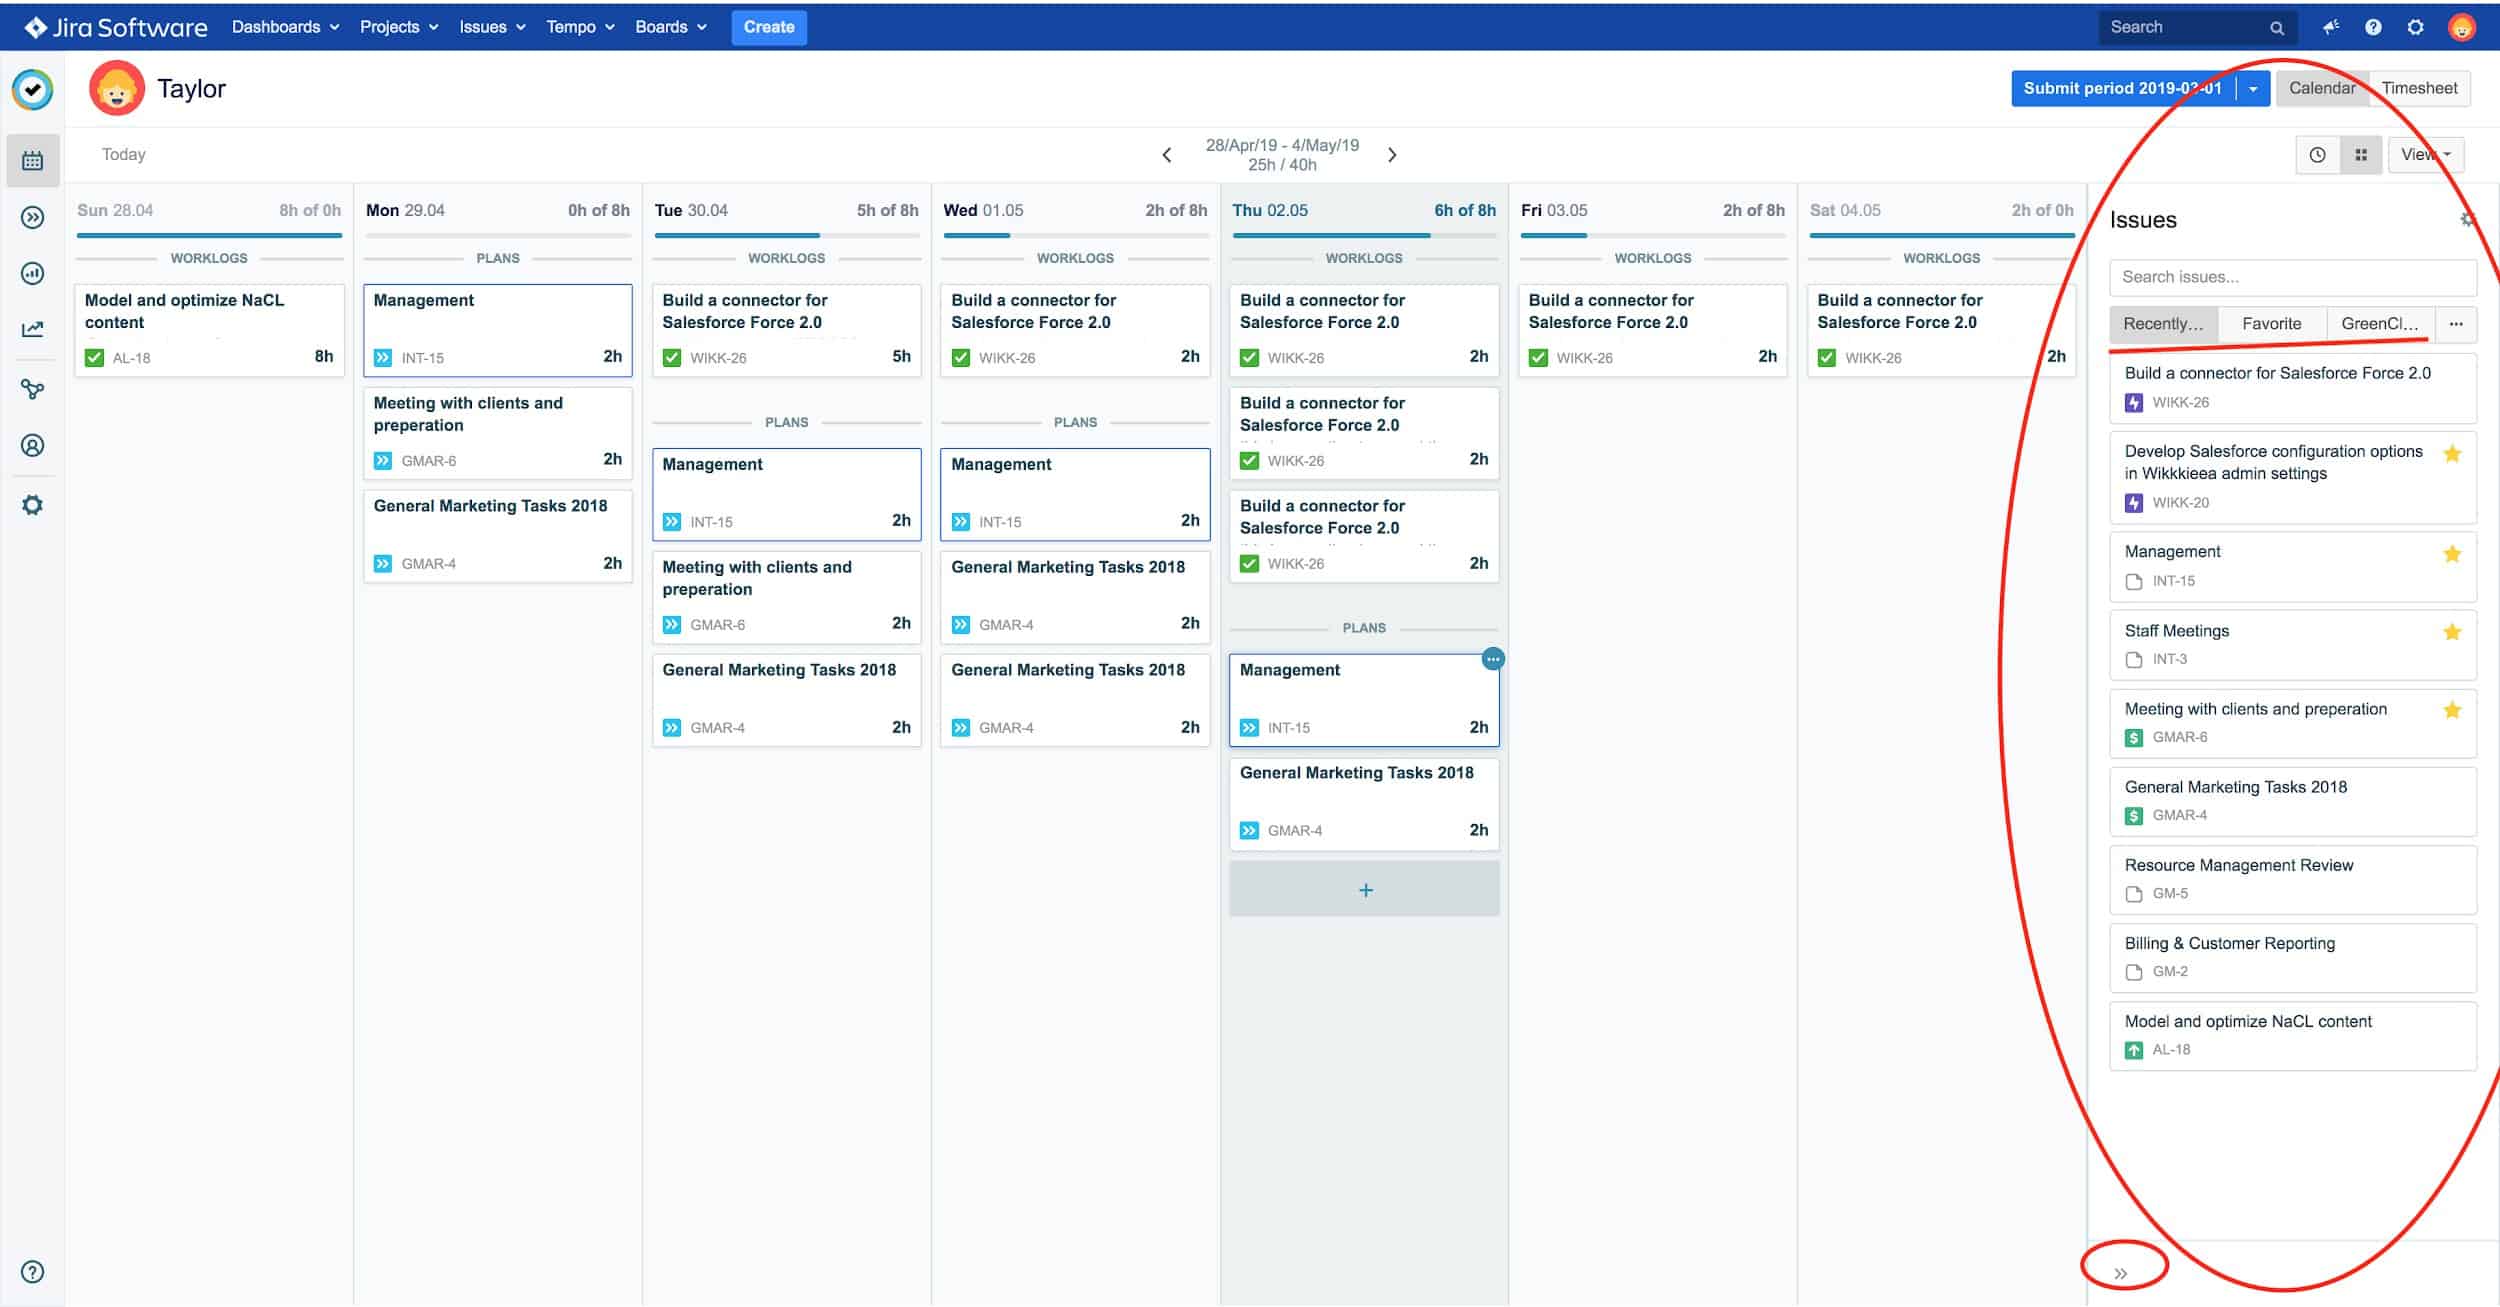
The right side of the screen features a search bar to find the right issue or tabs to navigate and find recent issues, favorites, issues from projects, etc.
You can use this to log time by dragging and dropping these issue directly into the current day. This will prompt the worklog menu.
This method may be preferred if you’ve recently worked on an issue, have starred it as a favorite, or if it’s part of a team/project that you’re involved in, as it will be easier to find.
The alternative views
The upper right corner of the My Work page offers alternative views that can set as preferences. Such as the “Time” view ( 
A. The My Work Time View: Fusing an agenda and a timesheet
Maybe you or your organization prefer to organize time worked in an even more granular way.
The Time View offers a view that is similar to an agenda, to help better visualize how each hour of the day is planned or has been used – the best of both worlds!
A great benefit of this method is for its analytical purposes: you have the ability to go back and see where and when time was used, which can help better optimize the day to day operation of the organization.
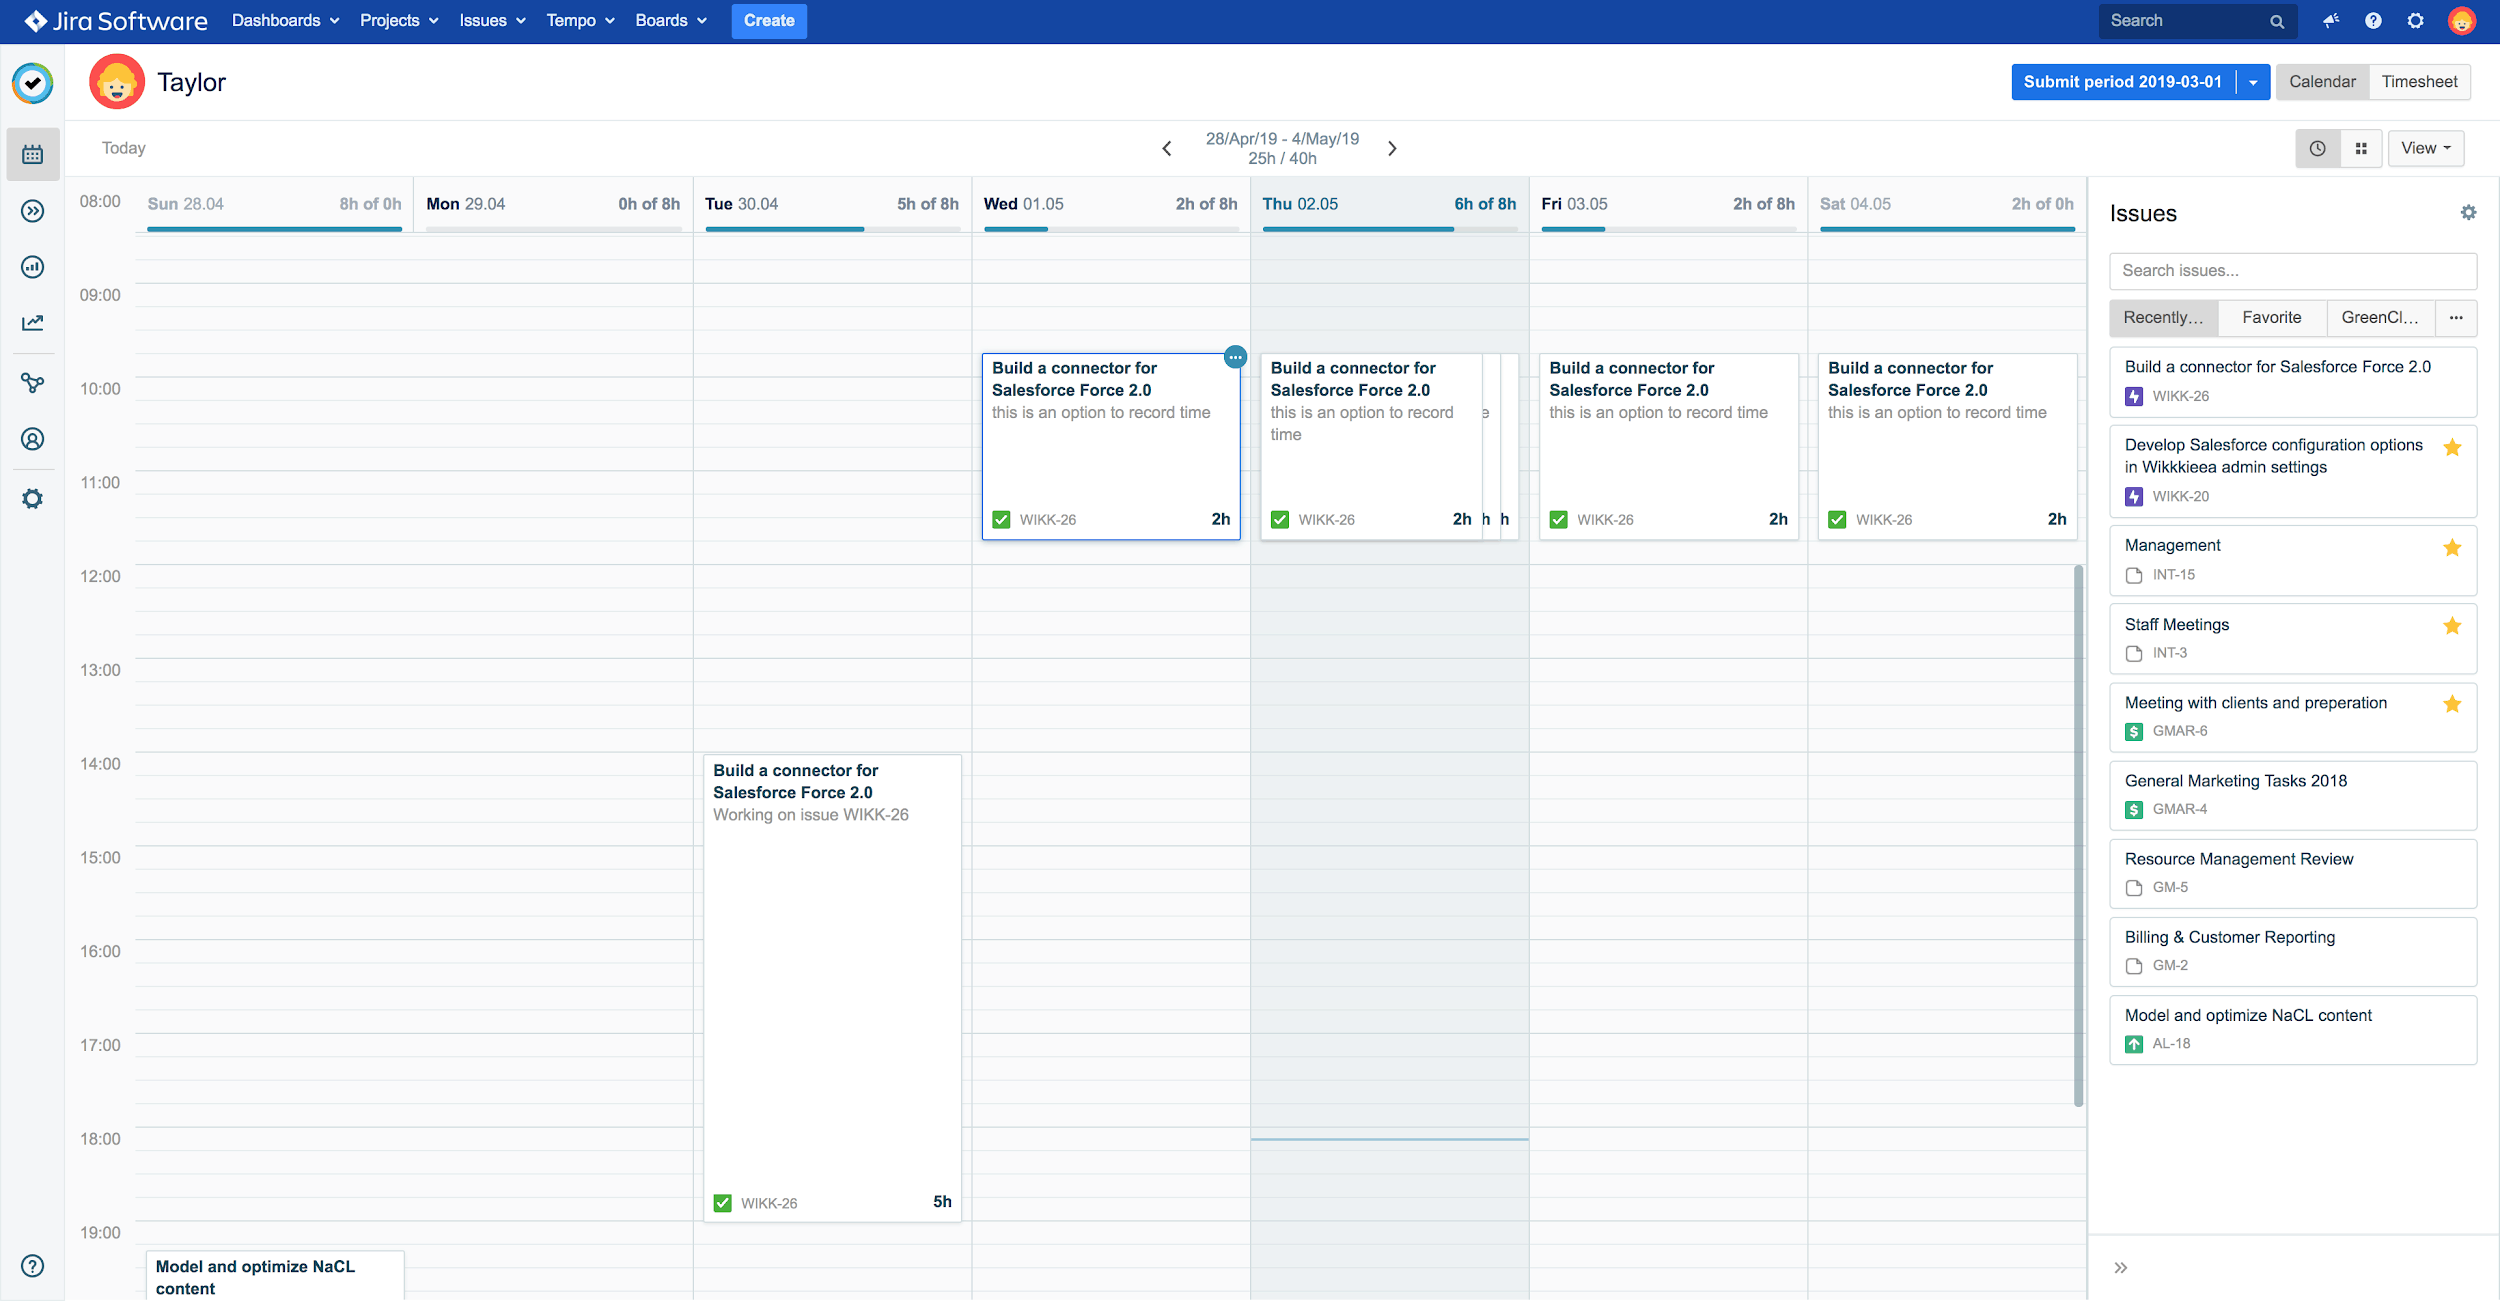
As shown above,there are multiple issues on Thursday at the same time, creating an overlap. This could spell trouble if this view is used consistently as it would show a scheduling conflict.
Please note that the list view can be accessed via the icon ( 
B. Timesheet View: A lean way of breaking down hours
This view may remind the user of the Tempo “reports” as they share numerous functionalities. These include selecting specific time periods, grouping by certain elements (e.g: issues, accounts, projects, etc.), or modifying the view through the grid view or giving the option to download the data.
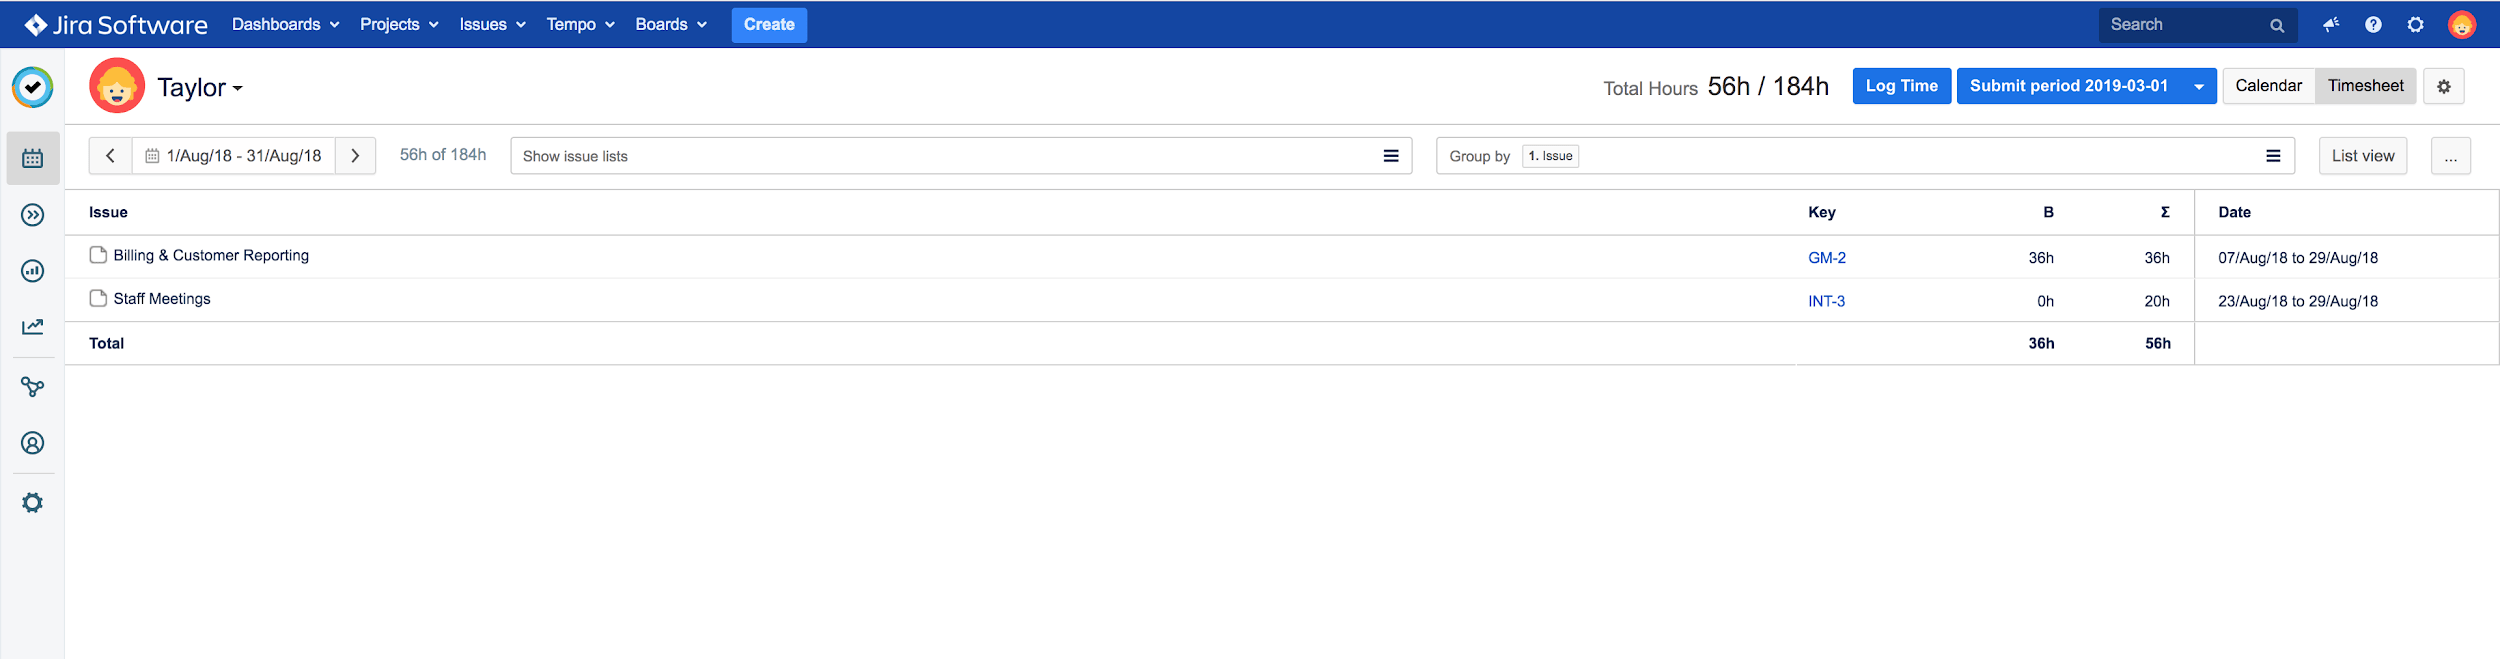
The Timesheet view may be the most useful view (accessible from My Work) to analyze and reflect on the total time spent during a selected period of time (days, weeks, months, custom periods).
From this view, you can log your time by pressing the “Log Time” button found at the upper right corner of the screen (next to the sum of total hours logged).
Because the Timesheet view is a more condensed/leaner view, it’s easier to make edits to logged time – very useful when it comes time to submit timesheets for approval.
The timesheet view can be found in the upper right corner of the My Work page next to the “Calendar” view.
Tips and tricks for using Tempo Timesheets to log time anywhere in Jira
When someone is working on a task, they might not want to go back to the “My Work” page in Tempo.
Here are three options that make logging and tracking time super easy, anywhere in Jira.
Map Tempo hotkeys for easy access
Pressing the designated hotkey will immediately open the worklog menu anywhere in Jira. It is currently “w” but may be changed by the Tempo development team in the future.
This option is convenient and quick for users who have just finished working on an issue/task. Or are opening Jira to log their time.
Take advantage of the real-time tracker in Tempo Timesheets
The real-time tracker is an accessible way to get into the habit of time-tracking.
And it can be a very helpful tool for users who want to track time on a certain task but are often interrupted by meetings, calls, breaks, etc.
In fact, the real-time tracker works in a similar fashion to a media player: the play button starts the timer, there is a pause button, and there is a stop button that, when pressed, will make the worklog menu appear with the time already filled in.

Note that the minimum unit of time a tracker will log in the worklog menu is minutes. When an edit is necessary, the user can easily modify their time directly in the worklog window.
The Real-time tracker can be accessed anywhere within Jira. Even in the settings and add-on pages from the Tempo menu at the top of the page.
Pro tip: If you create a tracker directly from an issue’s page (for example from the Projects tab or the Issues tab), the tracker’s time will already be associated with the issue. Making logging time even quicker. This can be perfect for users that have an issue already open on their computer.

As seen above, creating a real-time tracker while navigating an issue (e.g: from the Projects menu or the Issues Menu) will create a tracker that is linked to the issue in question, as seen in the bottom right corner of the page. As a result, when the timer is stopped and the worklog window appears, it will have both the issue and the time worked already filled in.
Log time directly in the issues’ page or the project’s page
Time can also be logged directly from an issue under the Tempo section (in the middle of the issue page).
Or with the “+” sign on the right side of the page. This is a good method for users who use a Jira window on a second monitor.
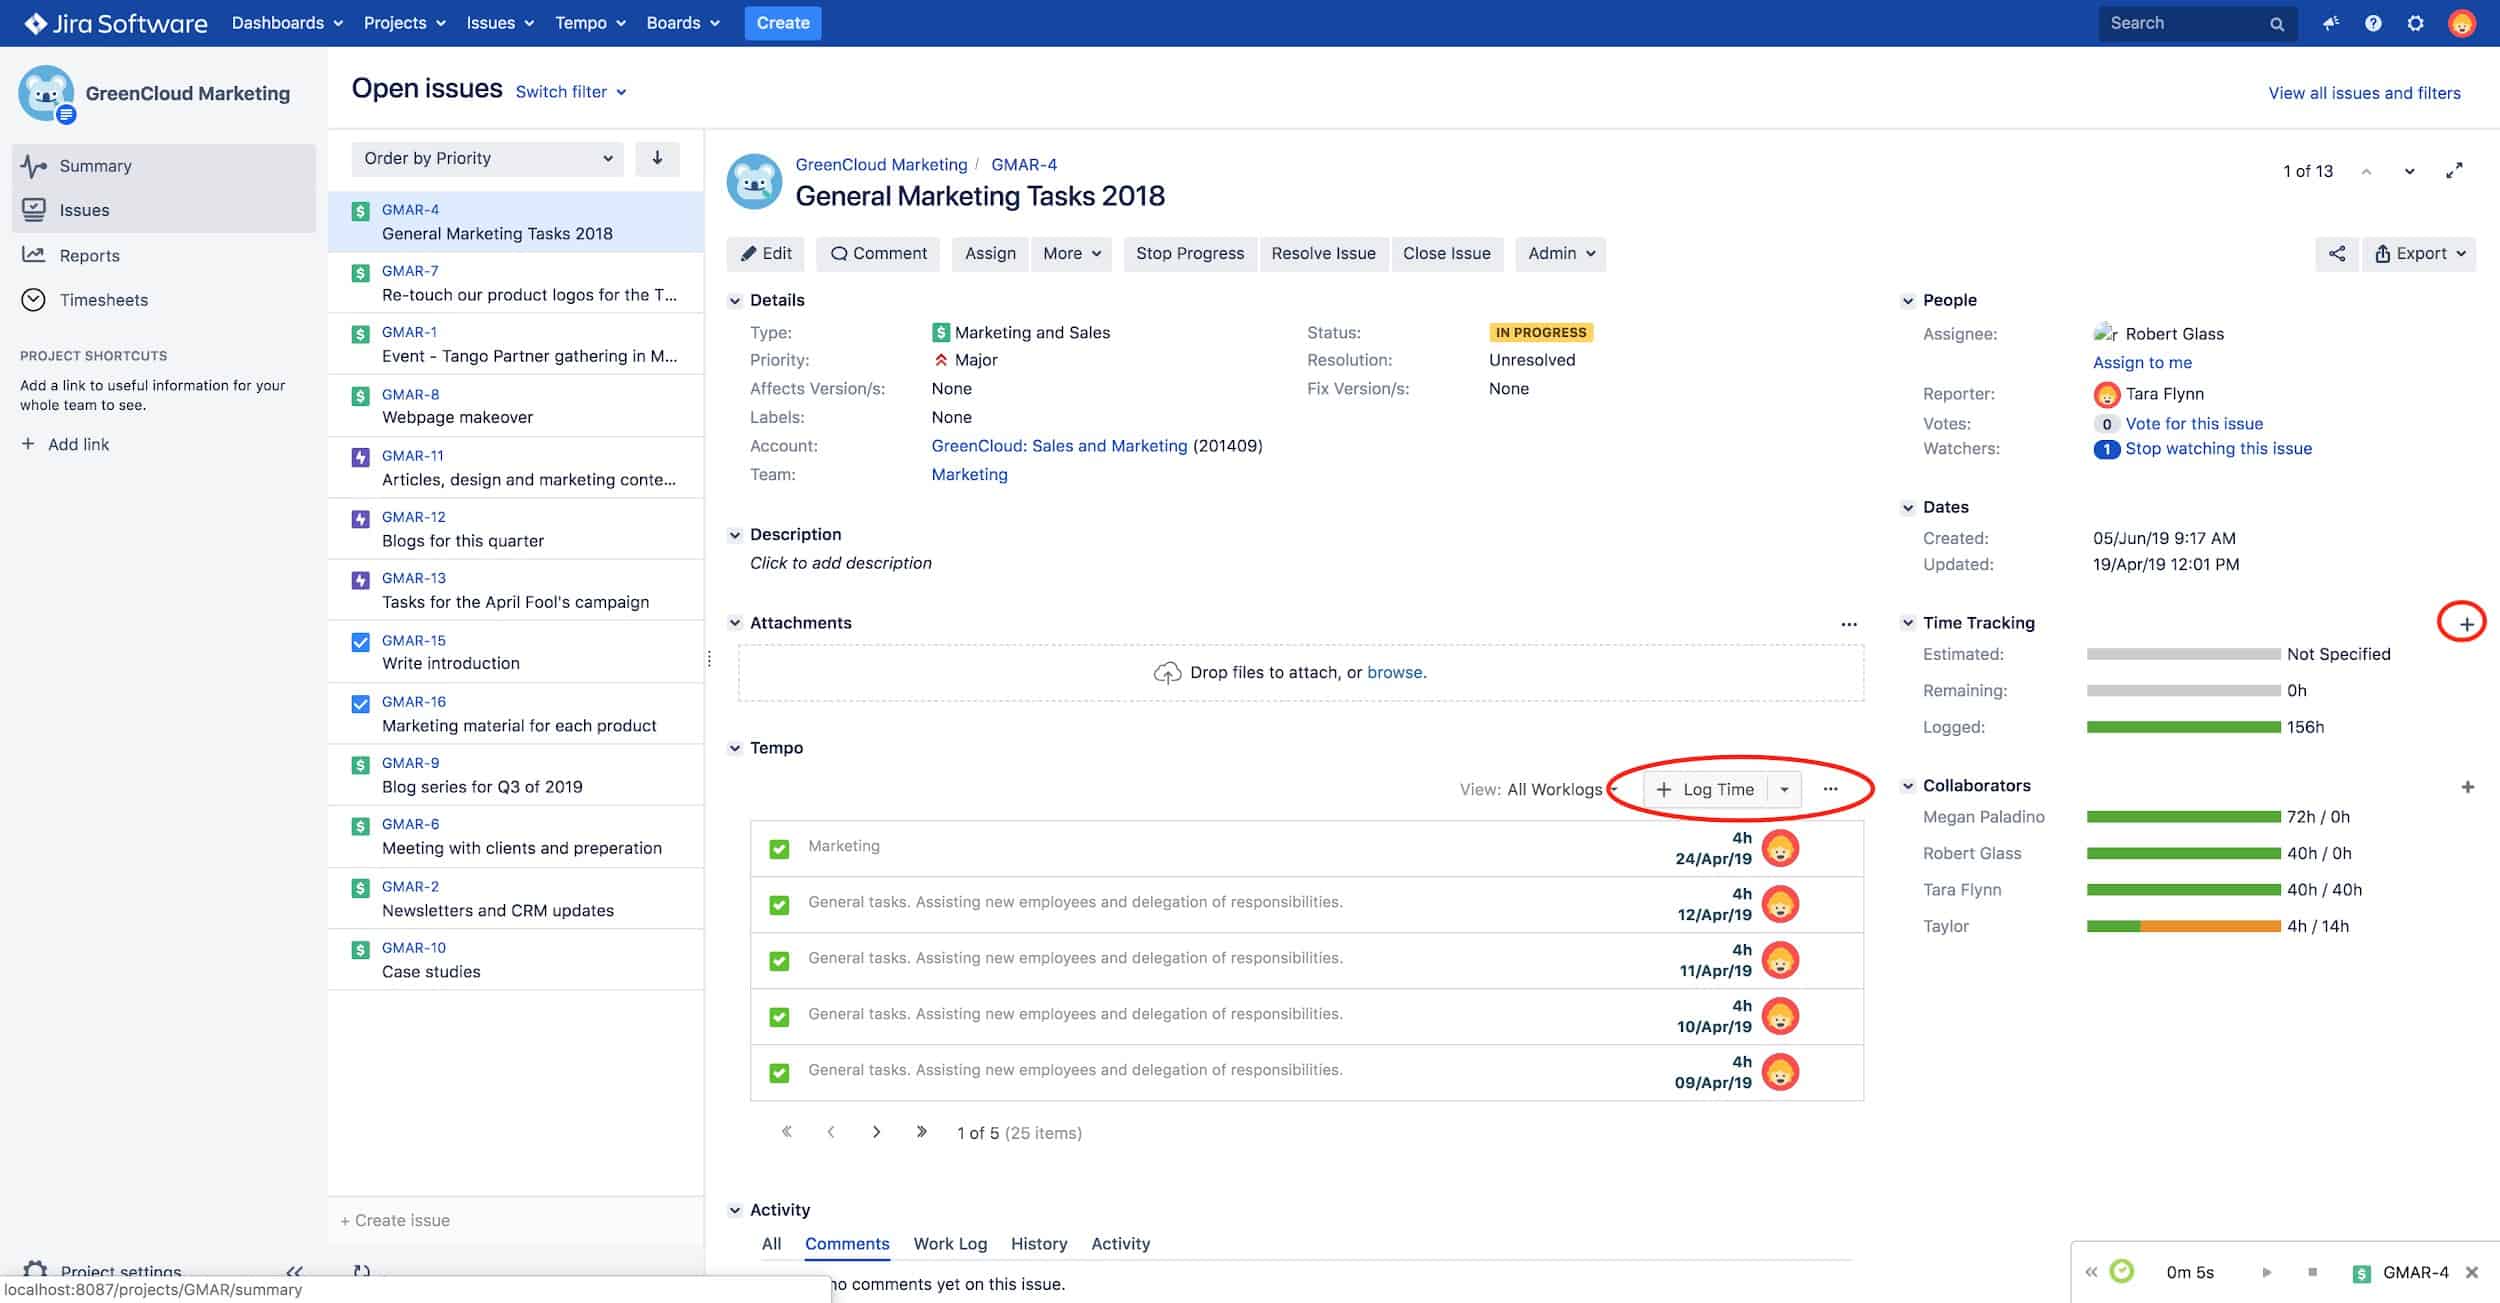
From this page, there are 4 easy ways to log time. Can you find them all?
Some Best Practices for time tracking
To track time like a pro you must first understand your work patterns within Jira and your routine at work.
Here are some examples of best practices for time tracking;
- Do you always have your current Jira issue open on a second monitor? Maybe logging time directly from that window will be your best bet to consistently log time.
- Do you often find yourself swapping between tasks or navigating other Jira pages/apps? Leveraging the hotkey may make the tool work best for you.
- A good way to get into the habit of time tracking could be to use the real-time tracker as it does the tracking for you.
- Another great method to cement your new habit could be to take some time at the end of the day to log your time so that issues worked on are still relatively fresh in your mind.
Note that the more granular your logged activities are, the more your team, your company, and you will be able to benefit from your tracked time.
How to customize the Tempo Worklog Menu for your use case
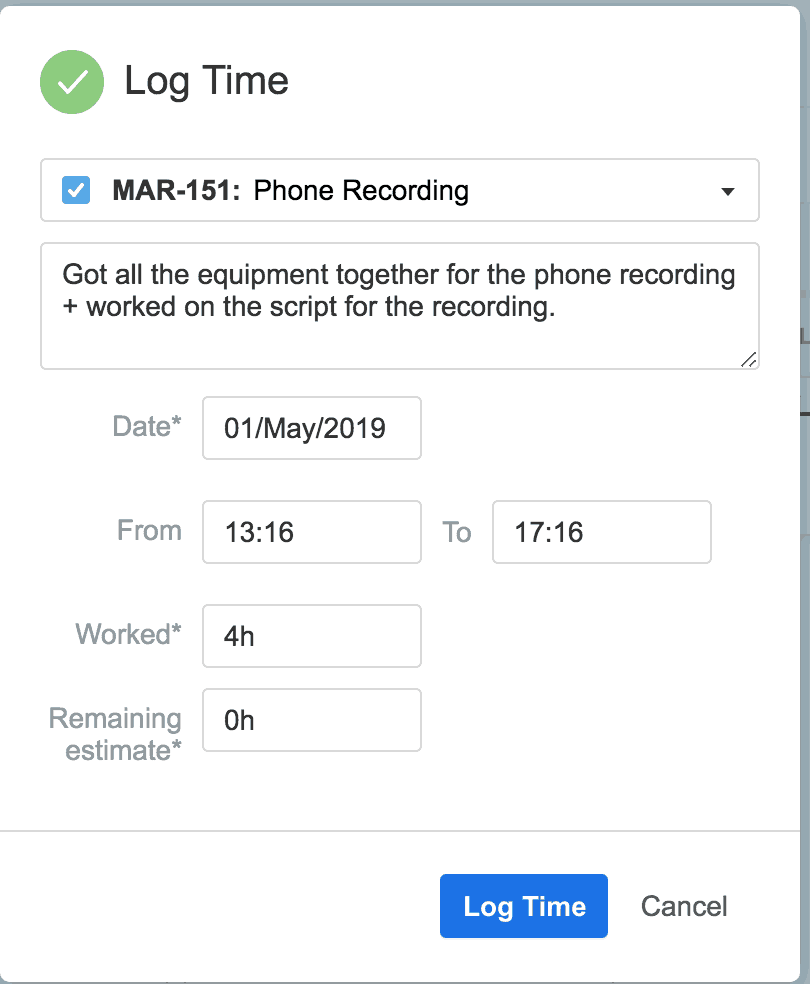
Above is the default Worklog window. It provides a simple way to log time for a given period of time on a given issue.
You’ll see a search bar that is almost identical to the one seen on the right side of the My Work page, a box to modify for the date, time, and amount of hours worked on the issue, and the estimated time remaining.
Depending on how you enter the worklog window, the information will already be filled in (e.g: Date).
We’ve already explored numerous options to open the Worklog window above.
The default window may be sufficient for your needs. But if you’d like to make modifications, you can do so with the right permissions. The worklog window can be customized to better capture the needs of the organization and maximize the value of the data collected.
Let’s quickly look at implementing billable time and work attributes.
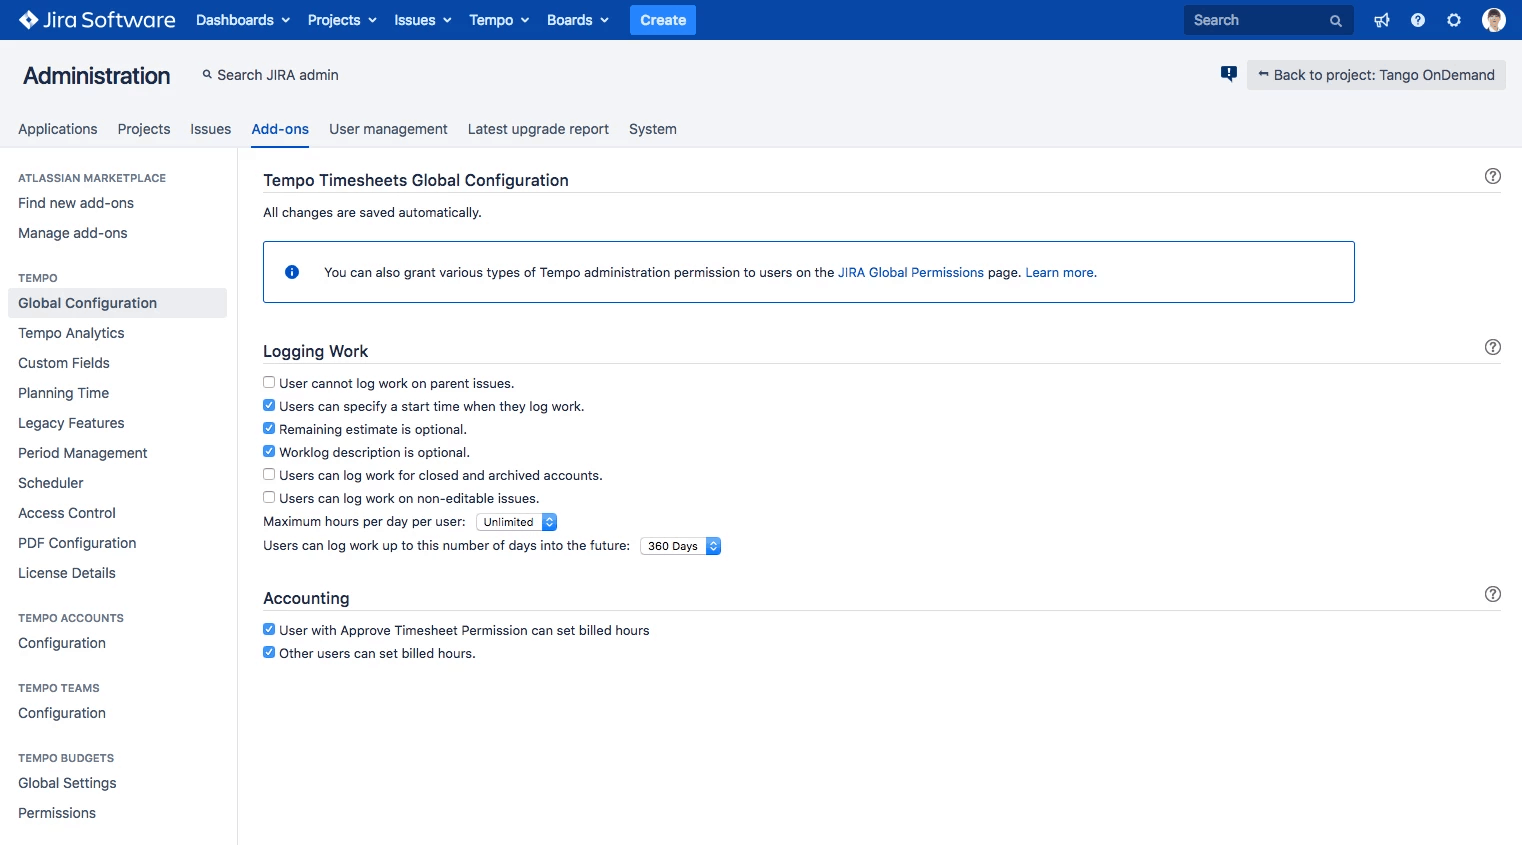
Adding billable time via Global Configuration
Robert, a manager at a software development company, wants to be able to compile the logged time of his team to send invoices to his clients.
Assuming Robert has Jira Administrator permissions, he could check the “User with Approve Timesheet Permission can set billed hours” box found in the Tempo Global Configuration settings.
Robert will then be able to determine the total billable time.
Your organization can set permissions for who can set billable time. If desired, anyone can set billed hours.
When the option “include billable hours” is activated, an additional box will appear (Billable) under the “Worked” box. The amount of time you input in “Billable” can differ from the amount in” Worked”.

In the end, Tempo Timesheets removes as many steps outside of Jira as possible to provide value for users. Adding billable time might improve the user experience and convenience.
2. Using work attributes
Work Attributes elevates Tempo to the next level and provides the added layer of customization you might require.
For example, if your organization wants to track overtime, you can navigate the Tempo settings and implement an overtime option by defining the values and type.
The worklog would be modified to include the custom field.
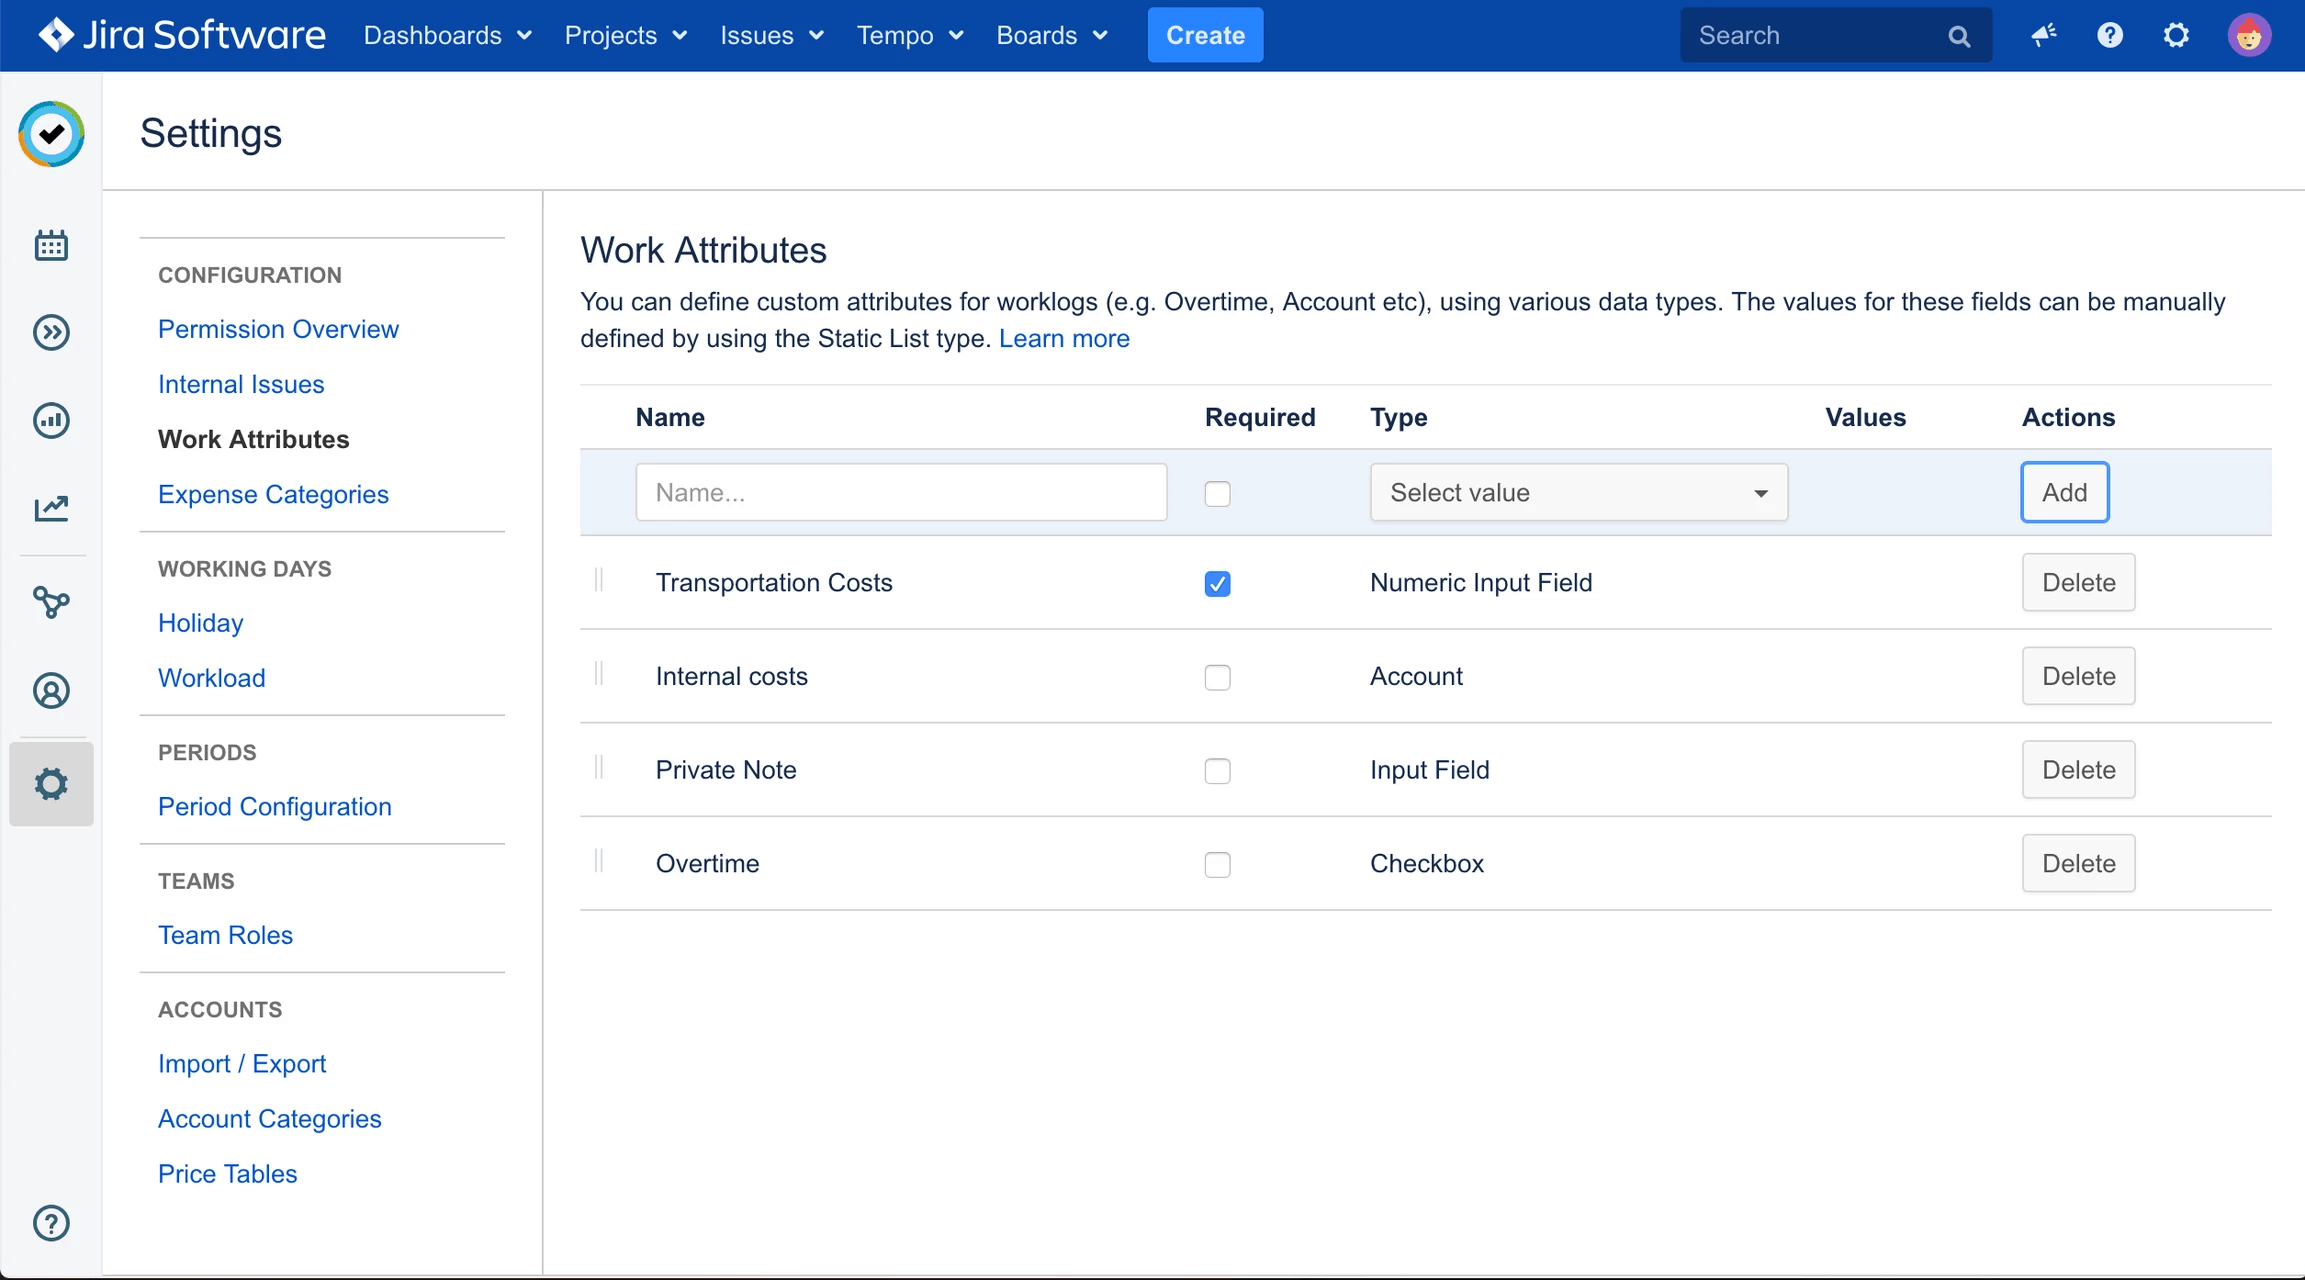
With the right permissions, Work Attributes can be accessed from the Tempo Settings (available anywhere within Jira from the Tempo menu at the top of the page). Work attributes may have different types, meaning that the values inserted in the respective fields may vary (e.g: a checkbox or a numeric value).
These custom fields add extra granularity to your worklogs, and can be a great way to add firepower to the analytical capabilities of the Tempo reporting functionality.
In other words, data can be further organized in a way that reveals more insights about the operations and enables decision makers to reach better conclusions.

Work Attributes will appear in the Worklog window under “Remaining Estimate”.
Work Attributes can be mandatory or optional.
Best Practices for customizing Tempo Worklogs
You should always understand why “X” is being tracked.
If you don’t understand the reasoning behind “X” being tracked, you will find it harder to log time for it. That’s an unfortunate reality that we often hear from our customers.
It is important to look at the overall picture. For example, tracking overtime can be important to:
- help determine extra costs to be billed to the client,
- extra wages to pay employees,
- whether there are enough resources allocated to projects,
- additional vacation accrued, etc.
If your reasons are well communicated to the users of the organization, time tracking may be easier to implement.
Did you know?
When a user logs time, that data is immediately updated in the system,e.g: Values in Reports will have the new information, Issues will show it under the Tempo section and My Work will include it as well. As a result, you and your team won’t have to manually calculate and compile the data – it’s done for you, in real-time.
A caution though, while capturing more data can provide more insights, finding the right balance is key so as not to deter users from using the system.
How to organize your data using Tempo Accounts and Tempo Teams
We’ve explored how to collect data. Now let’s look into your options for reporting it.
You’ve got Tempo Accounts and Tempo Teams features.
These often overlooked Tempo core features can help you keep your sanity when it comes the time to analyze your data.
Let’s take a high-level look at the value these two elements can offer.
1. Tempo Accounts
Tempo Accounts enables you to track time across multiple teams and multiple projects.
For instance, if you are working on “Project Dogma” for Acme Corp, you might be interested in finding time specifically for that project and that company.
Tempo Accounts provides a clean and organized layout to Tempo Reports. It highlights valuable insights.
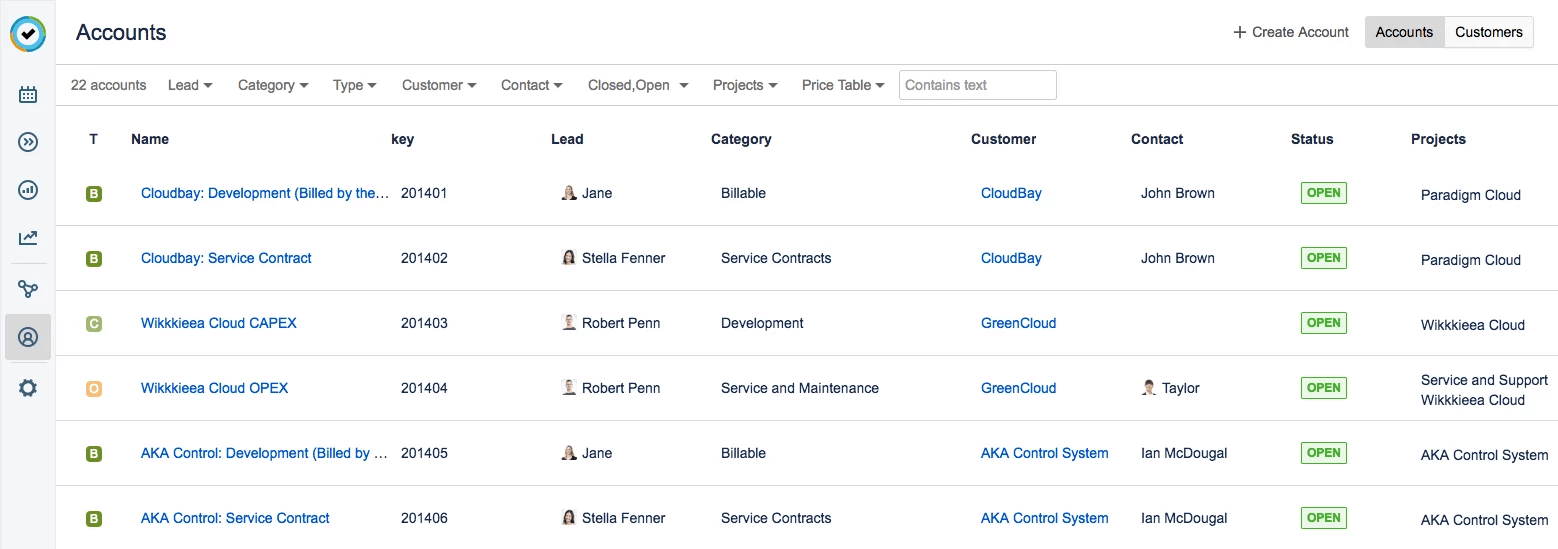
Tempo Accounts can be found in the Tempo menu at the top of the page.
An Account page allows you to create and manage customers and accounts, a way of categorizing and segmenting logged time.
These modifications can be done if you are a Tempo Accounts Administrator.
2. Tempo Teams
Similar to Tempo Accounts, Tempo Teams adds a level of granularity to your reports.

Tempo Teams are not only used for reporting. Team leaders and managers can use it to see a quick overview of the time logged for team members on different projects.
From the team’s Timesheet (nearly identical view to the “Timesheet” view on the “My Work” page), team leads and managers can approve their members’ timesheets.
You can use Timesheets to calculate wages, approve billable time, and confirm that data is accurate.
How to use Tempo for reporting (Tempo Reports)
Why use Tempo Reports
We’ve quickly looked at all the elements you can combine to make Tempo Timesheets a powerful tool. Both from a user and a business perspective.
However, Tempo Reports is where you make use of all that data.
With Tempo Reports you can learn:
- where you or your staff spend time,
- how much time was spent on a particular project,
- how many of those hours are billable,
- and more.
In other words, it provides the analytics and insights on teams, projects, and the overall business.
As an example, Tempo Reports can be used for billing and invoicing.
For example, Robert needs to send his monthly invoice to one of his customers, Acme Corp.
Leveraging Tempo Accounts and/or Tempo Teams, Robert can quickly group and filter the data to compile the billable hours he should send to Acme.
This process can be done in less than five minutes.
Robert can offer better transparency to his clients, and drastically reduce the operating costs associated with the creation of the invoice (as opposed to an alternative method).
How to use Tempo Reports
Tempo Reports can be accessed through the Tempo menu at the top of the page.
Multiple templates are offered, such as Team Report, Account Report, Project Report, etc.
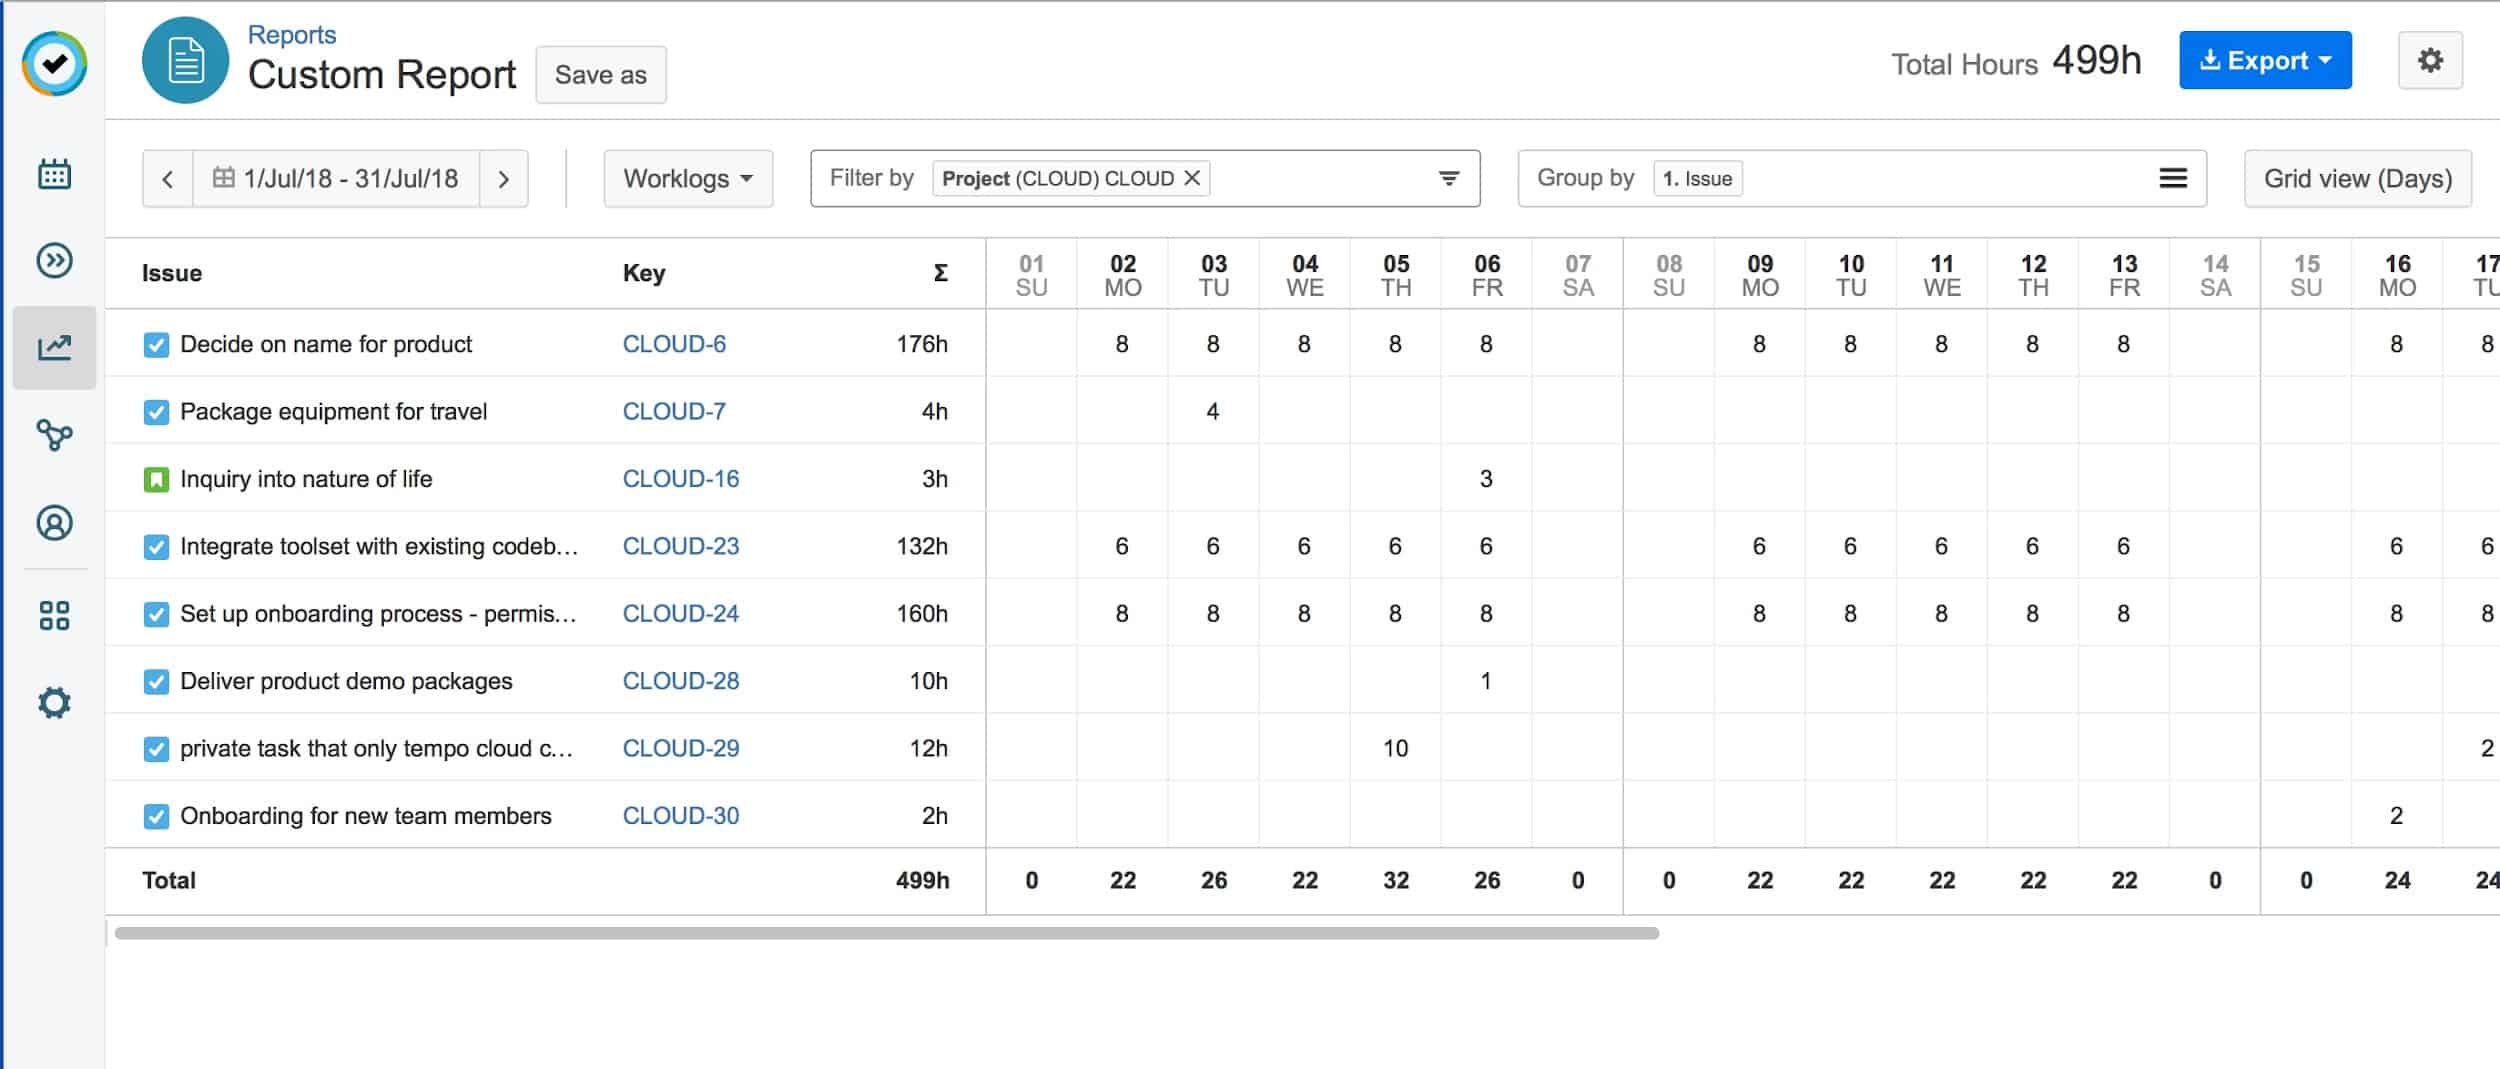
Values can be filtered and grouped based on reporting requirements. In the image above, a custom report has been created to analyze the time spent on a project. The report can also be printed and exported to different file formats (PDF, CSV, etc.) to allow for further processing of the data.
Best Practices on reporting with Tempo
Remember that all of Tempo’s reporting options provide added layers of granularity to allow you to better organize your data and gain valuable insights on your business.
Without the proper set-up, which is unique to your organization and use case, the insights you will have access to will be limited. Understanding your end goal will help you create a clear picture of the steps and processes to implement in order to reach the goal.
Note that reports can be saved to be accessed later, avoiding the need to set-up the parameters of the report again.
Unless you’re given the proper permissions, you might not have access to view certain teams/projects–in other words, having access to Tempo Report does not mean that anyone under an organization can see and review all the data.
What are some Frequently Asked Questions about Tempo Timesheets?
What are apps/add-ons, why should I care, and where do I find them?
Out-of-the-box Jira is a marvelous tool, but sometimes it won’t do things exactly as you’d like to be able to do them, which can be expected since every company has a unique structure and way of working.
This is where apps/add-ons come in: they provide added layers of services, features, and benefits so that Jira complements your organization’s work methodology and maximizes ROI.
These apps can be found in the Atlassian Marketplace.
How do I know Tempo Timesheets is not an add-on that will have no support or stop development 3 months from now?
Tempo is a team of 100+ employees that are continuously improving the product to support teams at 12,000+ companies—SMBs and large-scale enterprises.
Over the years, Tempo has grown to become one of the largest, award-winning, top-selling developers in the Atlassian ecosystem.
How much time can a user log? What do I do if we work on different schedules?
By default, the workload scheme is set for 8 hours per day, Mon-Fri, 40h/week.
However, it is possible for a user with the right permissions to modify the scheme so that it fits the working hours of the company. This also includes adding holidays.
Which version should I get?
We would recommend talking about this with your Atlassian Solutions provider to guide you in your buyer’s journey, and help you find the right fit.
How do I install Tempo?
You can either install it yourself by following the instructions here or asking iDalko to do it for you.
Does this guide include all the information I need to know?
Not quite.
This guide provides a high-level overview of the different functionalities that Tempo Timesheet provides. So that you understand the value of the features and get started.
However, there are many topics that you can explore in depth, such as permissions, work attributes, teams, timesheets approval, timesheet planning, accounts, and more. Learn more about these topics in the Tempo Knowledge Center, or iDalko.
Conclusion
In this Tempo starter guide, we’ve looked at the basic layout of the Tempo Timesheets add-on and some components of the main features that are included with the app.
We’ve touched on the why, how and best practices of time tracking. As well as different alternatives available to make the process of time tracking easy and consistent.
We’ve covered how you can customize Tempo Tmesheets to fit an organization’s unique needs.
Finally, we’ve discussed a variety of different use cases for time optimization, improved productivity, added layers of transparency and easier progress communication.
From a business perspective, managers and executives gain the ability to analyze where time is spent so they can better allocate and optimize their resources. This leads to improved decision making and a boosted ROI due to reduced operating costs.
For more information, we recommend visiting the Tempo website.