

As companies grow, the need to integrate data between different platforms becomes more inevitable. For instance, if you’re working in ServiceNow and you have a partner or a client who uses Jira, then a ServiceNow Jira integration seems to be the best solution for seamless collaboration.
So in this guide, we will discuss the need to integrate ServiceNow Incidents with Jira Issues. (Note that this process can also be applied to other entities like Problems, Cases, Change Requests, etc.) We will cover why you would set up a ServiceNow Jira integration in the first place, and how to choose the right technology to configure the integration. Then, we will cover the step-by-step process of how to set it up.
Note: In this tutorial, we will be using an integration solution called Exalate to set up the integration. You will learn more about this, as well as other integration options.
Here is an overview of what we will cover:
- Why Integrate ServiceNow and Jira
- Getting Started with Your Jira ServiceNow Integration Project
- How to choose the right technology for setting up the integration
- How to set up the ServiceNow Jira integration (step-by-step process)
- Additional Information on Exalate as an Integration Solution
ServiceNow Jira Integration Guide
Learn how to achieve a seamless Jira ServiceNow integration, step-by-step.
Why Integrate ServiceNow with Jira
Thinking of IT Service Management, ServiceNow has become a mainstream choice for CIOs & the head of IT departments to consider. Started as an innovative niche cloud platform to manage ITSM processes based on ITIL best practices, ServiceNow has gained enormous traction in recent years. They currently have more than 20.000 customers worldwide and are growing rapidly.
On the other hand, when thinking of Agile Software development, Jira springs to mind immediately. As part of the Atlassian product offering, Jira manages issues and projects for Software teams. And it integrates nicely with other software development tools of Atlassian.
In short, for many software teams, Jira is the natural choice for issue/project management. This is especially true when other Atlassian products are used for software development too. With the above positioning of ServiceNow and Jira in the IT Service Management and software development space in mind, the need for integration becomes obvious.

Information exchanged with such an integration can bring visibility and transparency within teams and help everyone be on the same page.
Common Use Cases for a Jira ServiceNow Integration
Here I’ve summed up 2 possible scenarios for a Jira ServiceNow integration:
- A company’s IT department uses ServiceNow to provide users with a One-Stop-Shop portal for all IT services. This includes reporting issues on software. In-house Software teams use Jira to manage issues/projects. They generally prefer the Atlassian suite because it is used for Coding/Collaboration.
* Incidents reported by a user on ServiceNow need to be forwarded to Jira as an issue to be solved by the development team.
* When the development team encounters infrastructure issues, they need to be forwarded to ServiceNow as an Incident
- A company uses ServiceNow for ITSM and one or several software packages are provided by an external software vendor. The software vendor tracks issues on the software from all customers with Jira. Then the incident in ServiceNow needs to create an issue on Jira and get status updates.
We have seen some common use cases for a Jira ServiceNow integration, but how do we implement such an integration?
Getting Started with Your Jira ServiceNow Integration Project
An integration project is just like another IT or business project. It requires weighing different options and outlining strategies to deliver a long-lasting and reliable integration. As an integration project owner, you must make some tough and necessary decisions to convince the stakeholders of how you wish to take the integration forward.
In-House Development or Third-Party Solutions: Making the Right Choice for Your Business Needs
ServiceNow users more often, have been developers and technically-inclined individuals. For them, the first obvious choice is to develop an in-house solution, and rightly so, they are naturally wired that way.
Of course, ServiceNow APIs also make the task much easier, and you can seamlessly connect with another tool. But what about scalability and the costs associated with its maintenance? With changing integration requirements, will it be easy to start rebuilding the code that you spent building in the first place? And what about maintaining it? It’s an operation team’s nightmare come true.
Let’s not even consider the time and effort that useful resources will spend on developing it in the first place.
We have seen a lot of companies build one, and then come right back to a situation where they consider buying a third-party solution. The licenses are flexible, deployment models are aplenty, and they have a ready-on-full-throttle support team, handy documentation, and custom-made features catered toward integrations.
These solutions have been handling integrations as their core business, so it’s easy to get them onboarded and up and running faster.
However, there are some factors you need to consider before choosing an integration solution.
How to Choose the Right Technology for Setting up Your Integration
- Decentralized Integration (Autonomy): The platforms at each end of the integration have the means to independently control what information is sent to the other side and how incoming information is interpreted. Changes in the platforms, like modifying the information to be exchanged, shouldn’t break the integration. Rather they should be easily reflected in the integration.

- Deployment Models (On-premise or Cloud): A lot of big enterprises have security concerns over deploying applications over the cloud. They have specific requirements for the tool to be deployed on-premise or adhere to their firewall policies. Companies often don’t want to expose sensitive customer ticket information to teams they are integrating with. Finding tools that can accommodate most of these considerations and having some other security features like single tenancy, ACLs, encryption of data, etc must be given preference.

- No code or Low-code: We have been stressing about not having to write code to develop integrations, but honestly this is not always the case. For advanced or complex integration use cases, there is a need to go beyond pre-defined templates. Such use cases can be possible with some scripting logic. Possibly, a tool that can get you the benefits of both sides: no-code predefined templates for simple use-cases and scripting interface for deep integrations.
- Handling Historical Data: By the time you realize you need an integration, there must be bulk information already present in your Jira or ServiceNow that you want to integrate. Tools that can handle transferring bulk information over to the other side, or connecting information already present on the two systems will be effective.
- Reliability: A reliable integration is one that always works for the user – even when the other side is not available for whatever reason (such as maintenance). Operational maintenance capability is important to ensure always-on integration.

ServiceNow already provides integration between Jira and ServiceNow through IntegrationHub’s Jira Spoke. However, it requires a longer onboarding time, is a costly affair, and has limited integration scope and ServiceNow leads the way in facilitating the integration. So there is a need to explore some other tools.
For this guide, we’ll set up the integration using Exalate. Precisely because Exalate was built to fulfill the above requirements. And it meets the criteria for the described ServiceNow Jira integration scenarios.
In the chapters below I will show you how Exalate addresses the above aspects in more detail. But first, let’s go through the step-by-step process of how to set up the integration!
How to Set up a ServiceNow Jira Integration (a Step-by-Step Process)
We’ll now get to the step-by-step process of the ServiceNow Jira integration.
Step 1: Install the Exalate app on your ServiceNow Instance
To install Exalate on your ServiceNow instance, you’ll have to use an “update set”.
You can find the step-by-step instructions for the Exalate agent installation for ServiceNow on the Exalate documentation.
Or you can install Exalate via the Atlassian Marketplace to connect Jira and ServiceNow.
Note: Not a fan of docs? Watch this video instead: how to install Exalate on ServiceNow.
Step 2: Install the Exalate app on your Jira Instance
In order for Exalate to work, it needs to be installed on both sides of the integration. This means you’ll also have to install Exalate on Jira. This will be a straightforward process like installing a Jira app.
You can find the step-by-step instructions for installing the Exalate agent on your Jira instance here:
Step 3: Have a Quick Look at the Exalate Console
The Exalate console provides a user interface for system administrators to configure & maintain the integration. After installing, the Exalate console should be directly accessible as an Application on the ServiceNow instance:
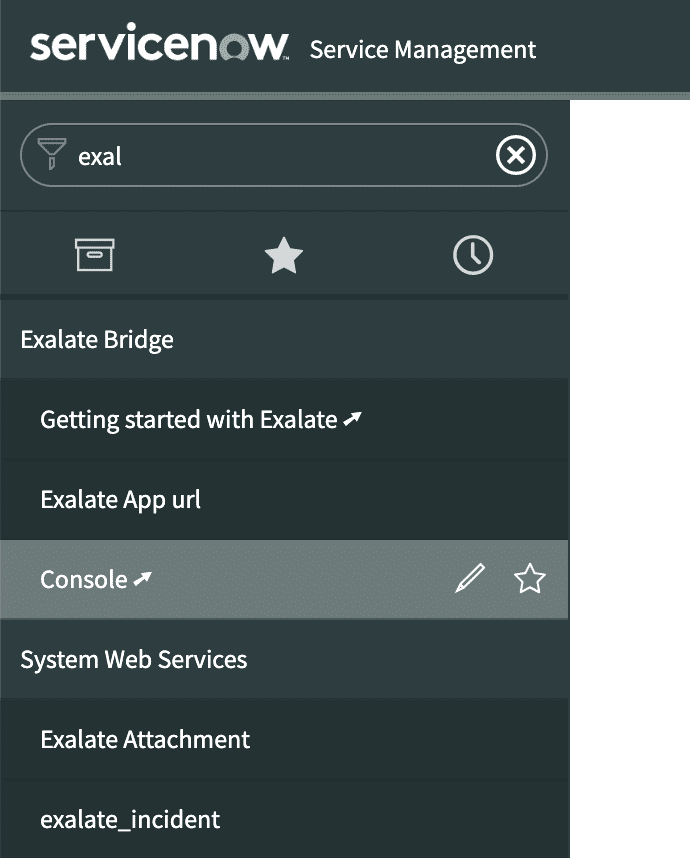

But, let’s move on to setting up a connection between your Jira and ServiceNow instance.
Step 4: Establish a Connection between Jira and ServiceNow
Once the Exalate agent is installed on both ServiceNow and Jira, you need to set up connections between the two Exalate agents. Either side can initiate the Connection or else accept the Connection invitation from the other side.
Below you have step-by-step instructions to set up the connection between the 2 systems:
- Set up a Connection on Exalate ServiceNow
- Set up a Connection on Exalate Jira Cloud
- Set up a Connection on Exalate Jira on-premise
But here’s a recap of what it boils down to. You’ll first have to “Initiate connection” in the Connections tab in the Exalate console.
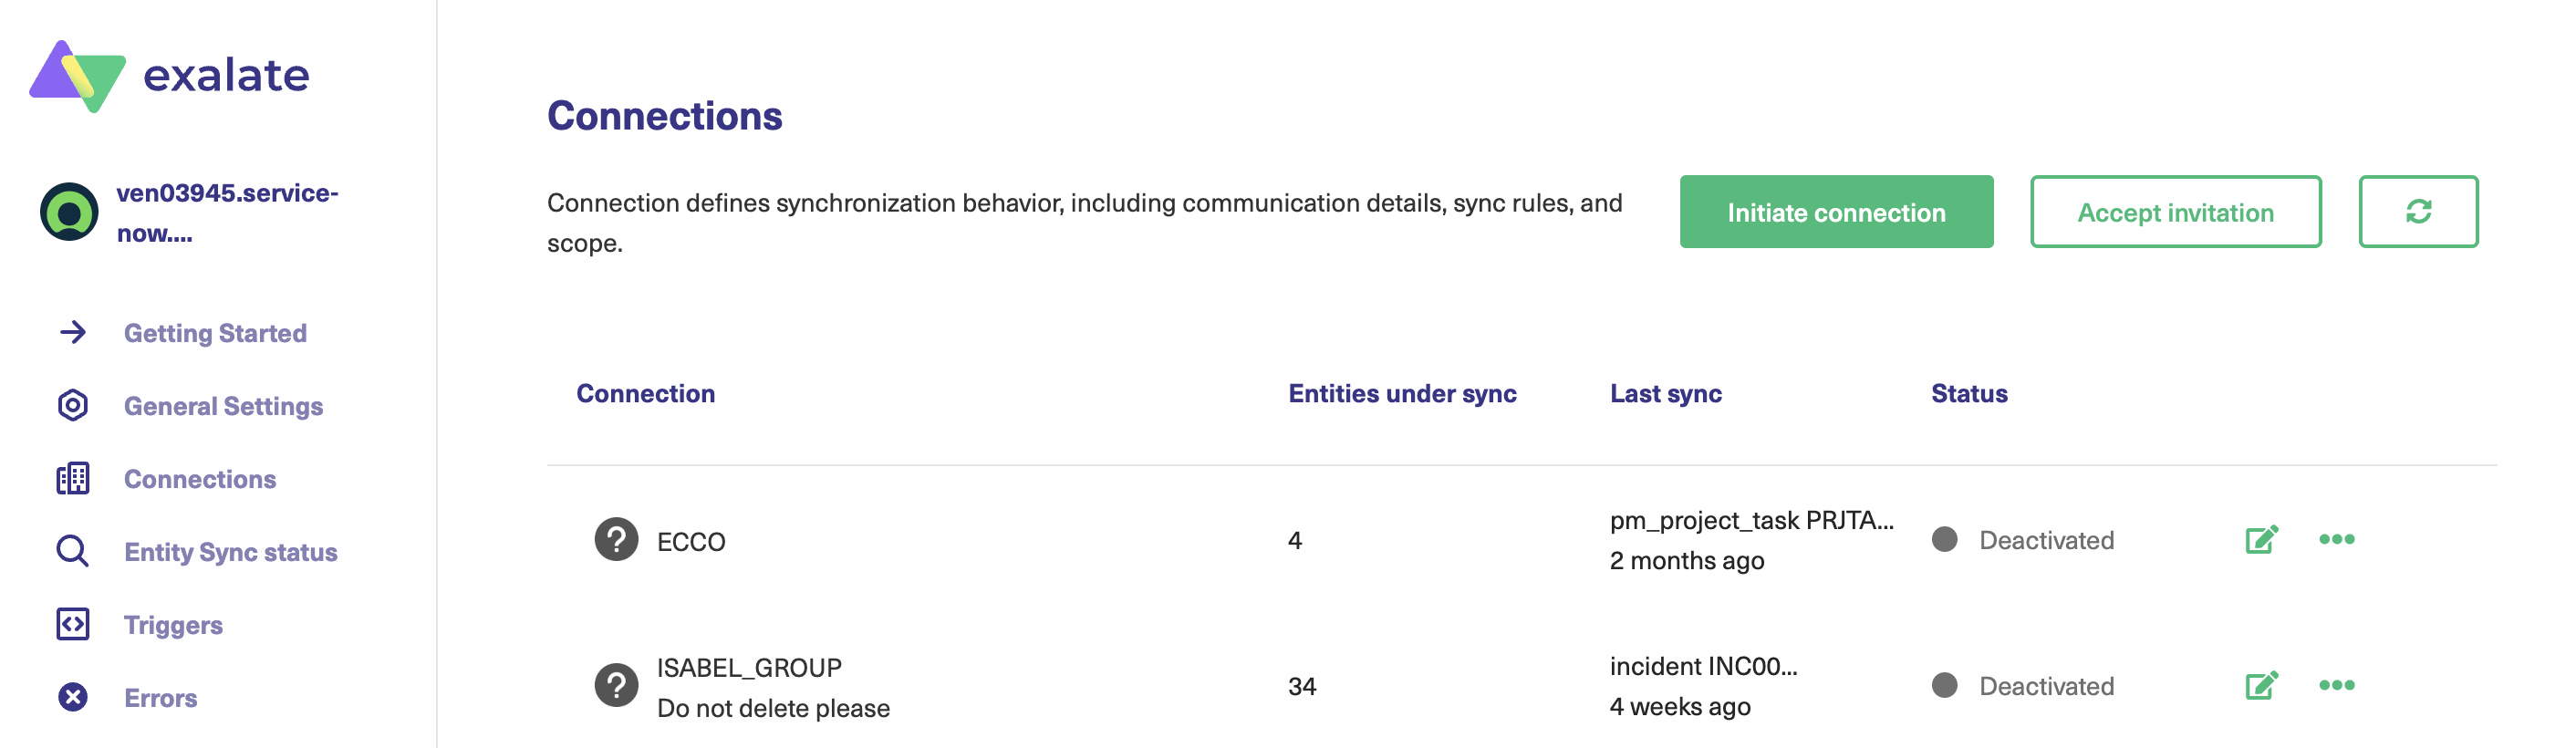
If there are connections that already exist, they will be displayed in the Connections tab.
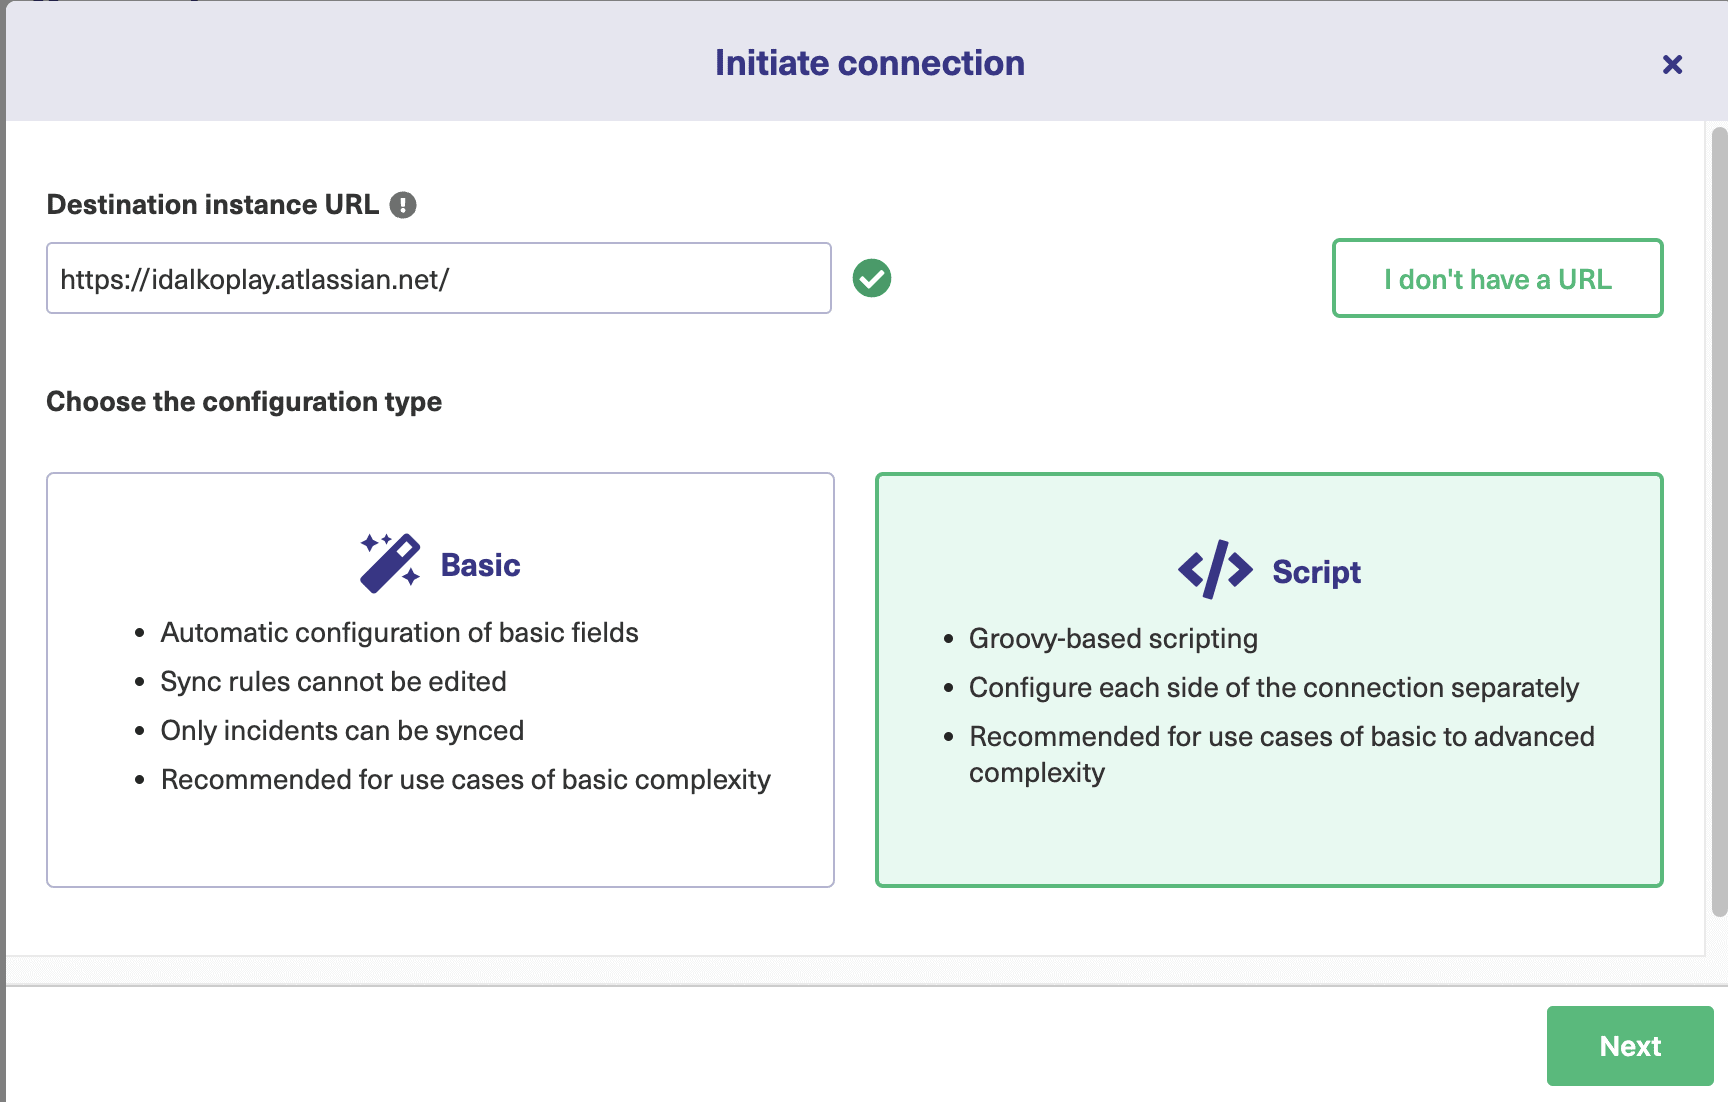
You will then be prompted to enter the URL of the destination instance. Assuming we have initiated the connection from the ServiceNow side, the destination URL will be that of Jira.
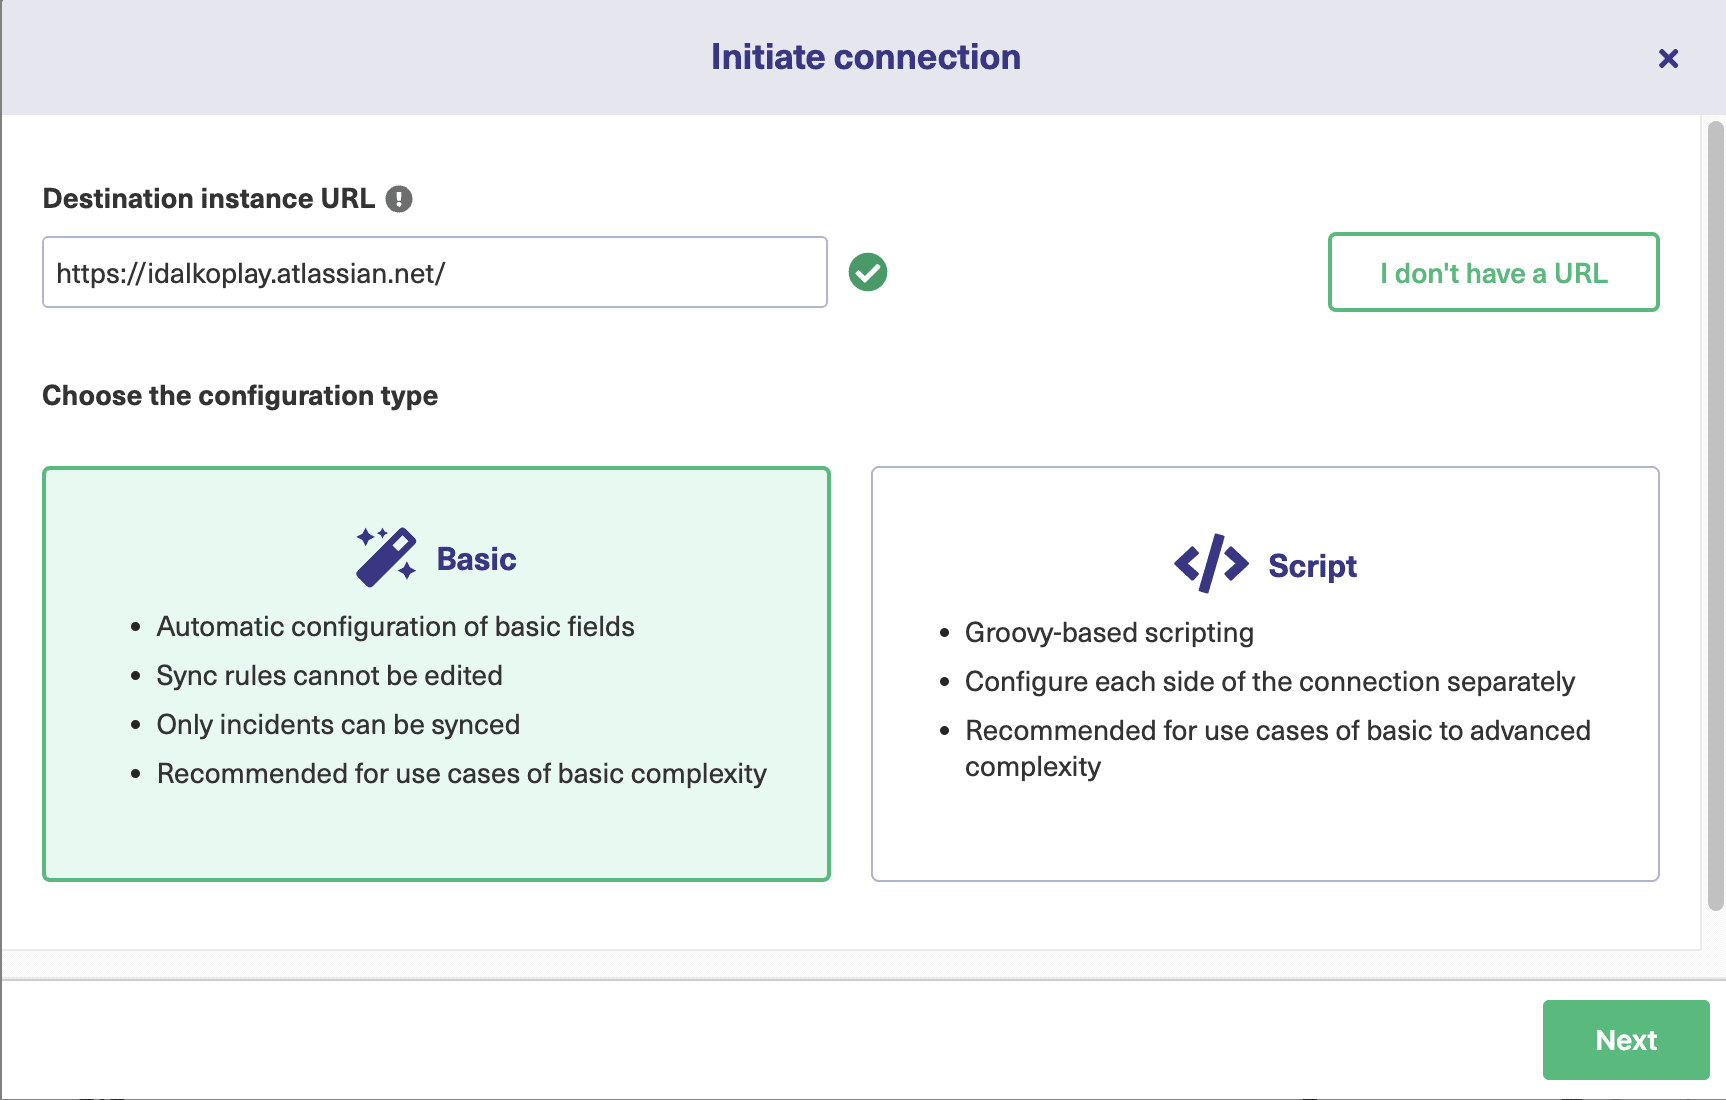
Exalate supports 2 configuration modes: Basic and Script.
The Basic mode allows you to establish a connection with pre-existing sync rules. These cannot be configured or changed. It is suitable for simple integration use cases. You can only sync issues and incidents with this mode. Exalate offers a Free Plan so that you can experience it firsthand. The Free plan only supports the Basic mode.
To use the full functionality of Exalate with advanced features and configurations, we recommend that you use the Script mode. You can configure it to suit your unique integration case. You can even upgrade from the Free Plan to the Premium Plan in Jira and in ServiceNow anytime you want!
Let’s now have a look at both the Basic and the Script mode one by one.
Continue with the Basic Mode
Note: Maybe you prefer to follow a video tutorial to set up your sync in the Basic mode?
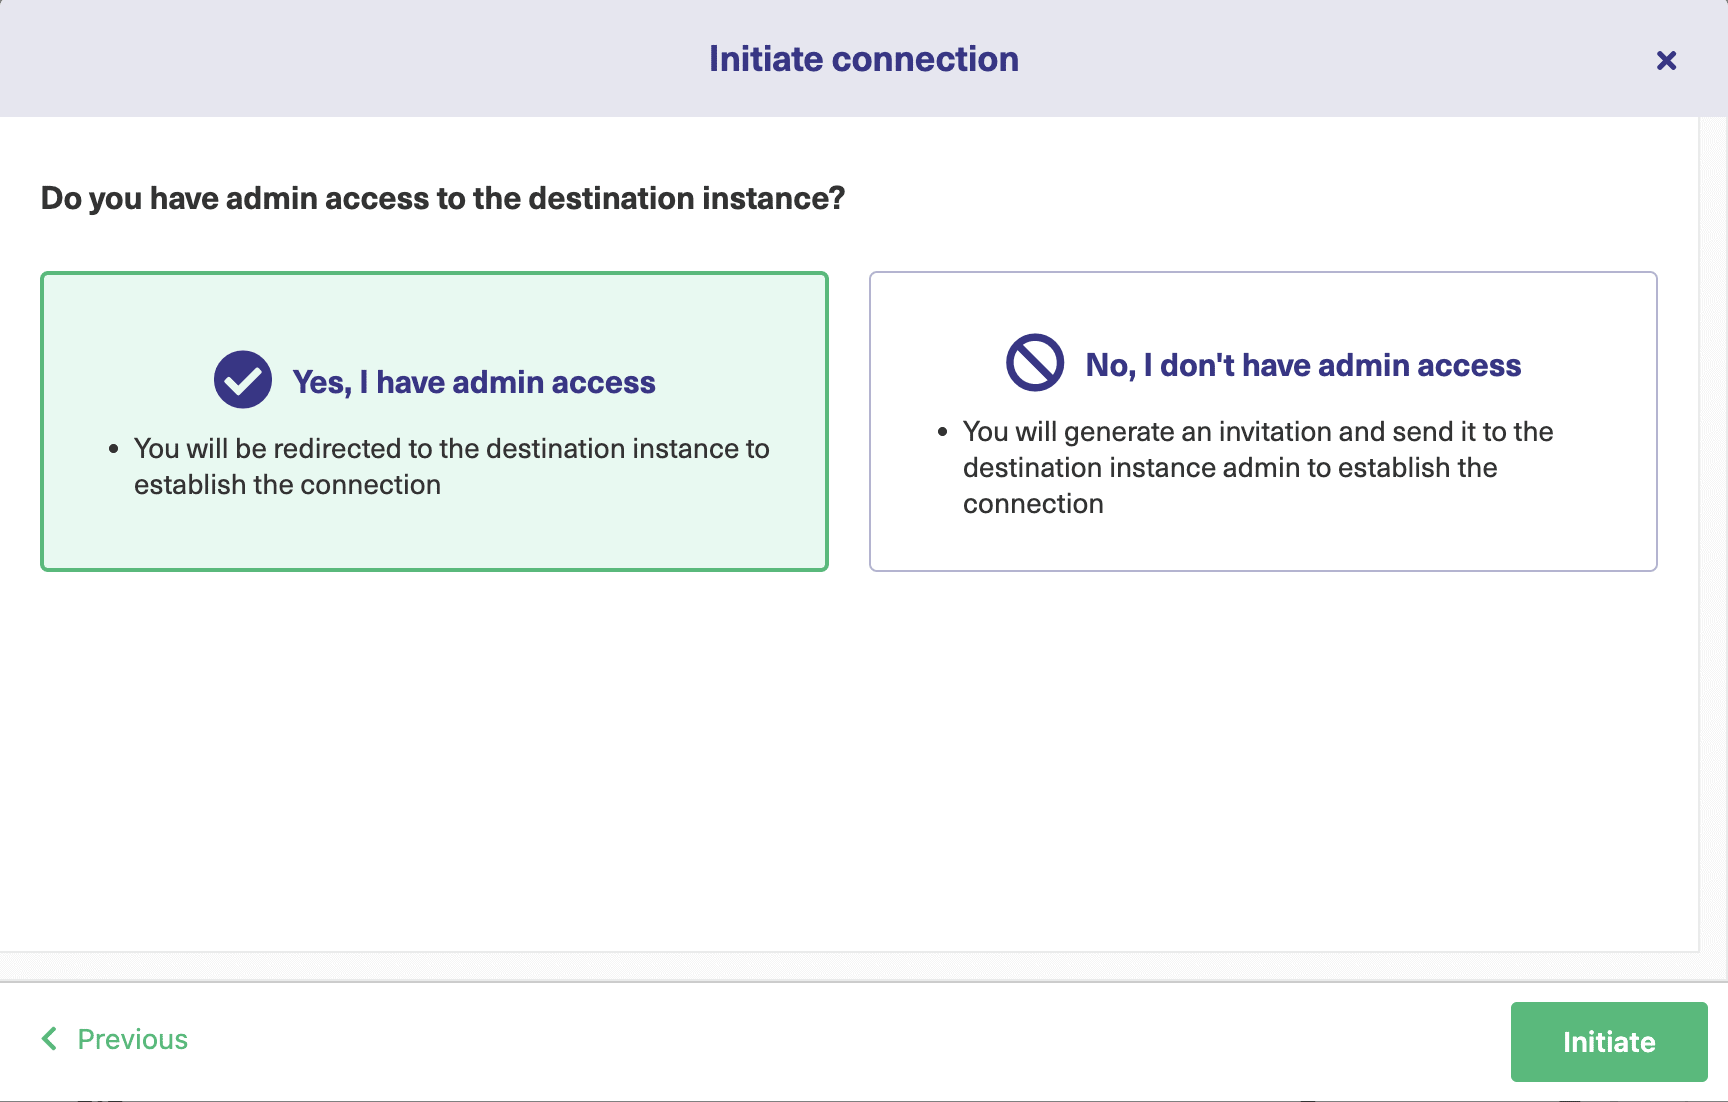
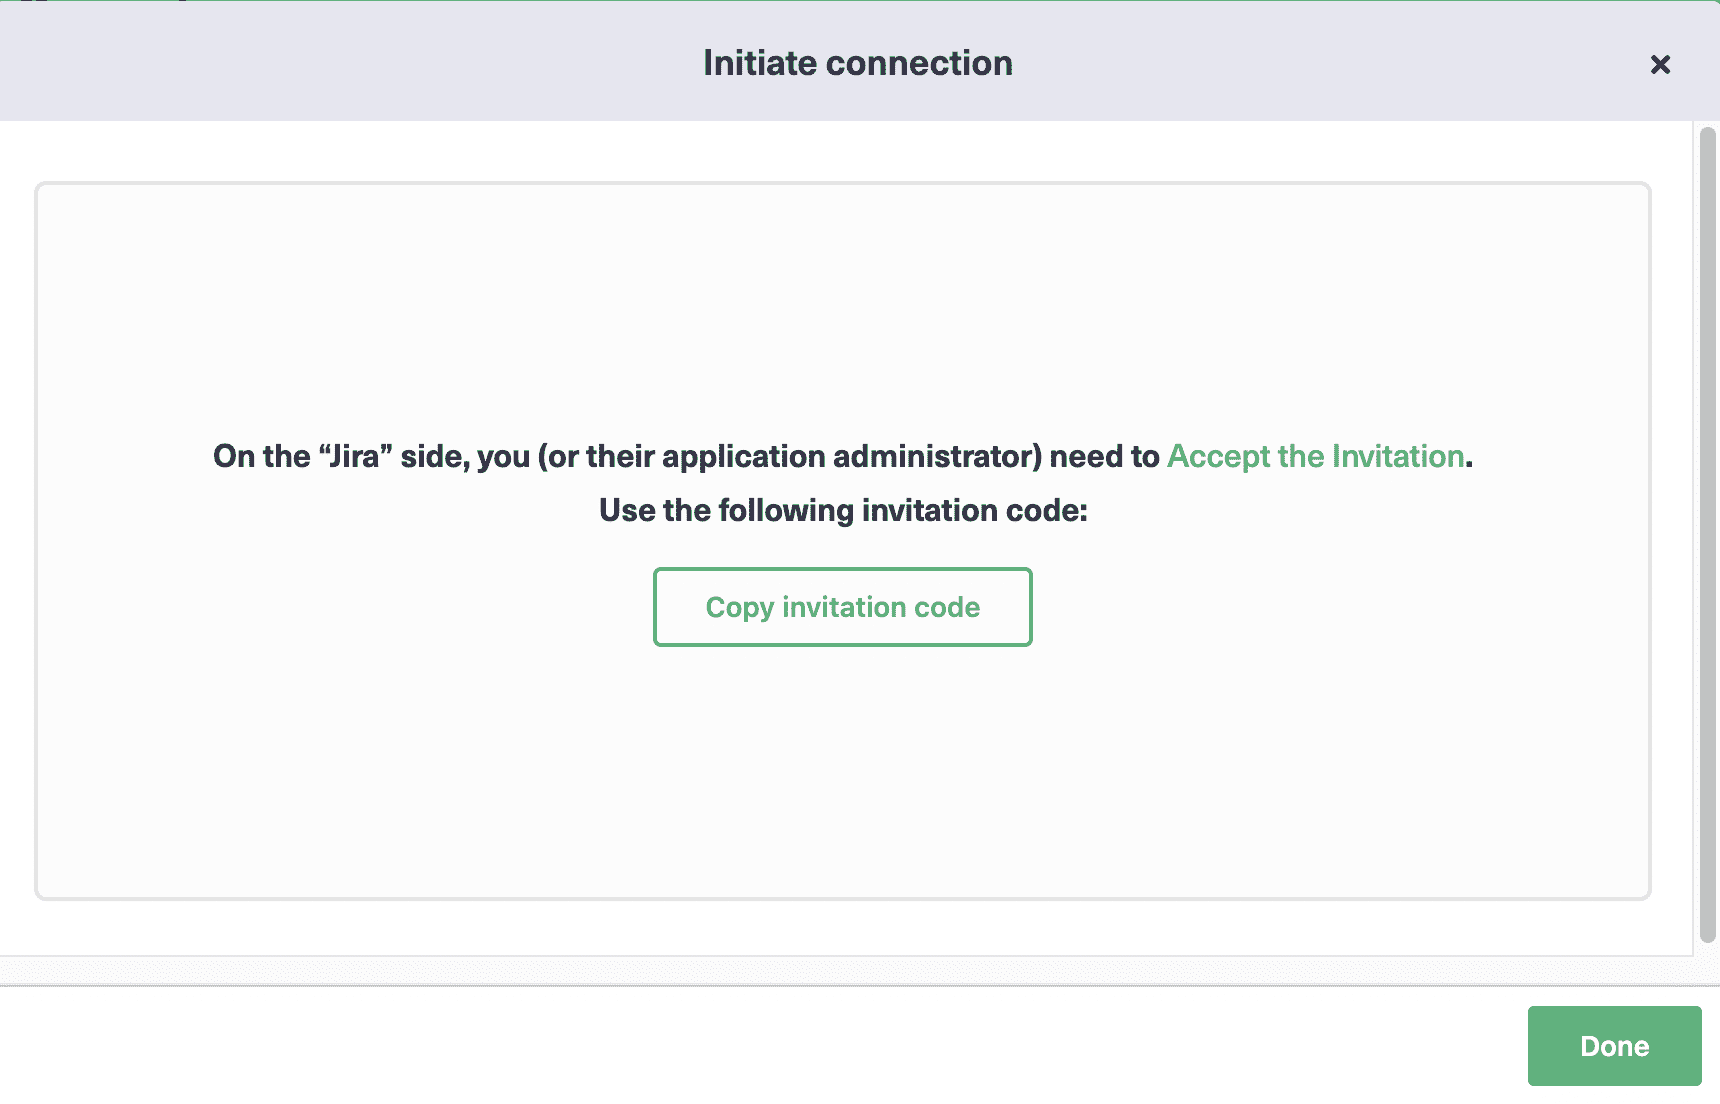
Click “Next” when you select “Basic” on the screen above. You will be required to verify admin access to the destination side, Jira in our case. Click “Yes, I have admin access” since we have access already, and click “Initiate”.
If you don’t have access, an invitation code will be generated. You need to manually copy and paste it on the destination side to establish a connection.
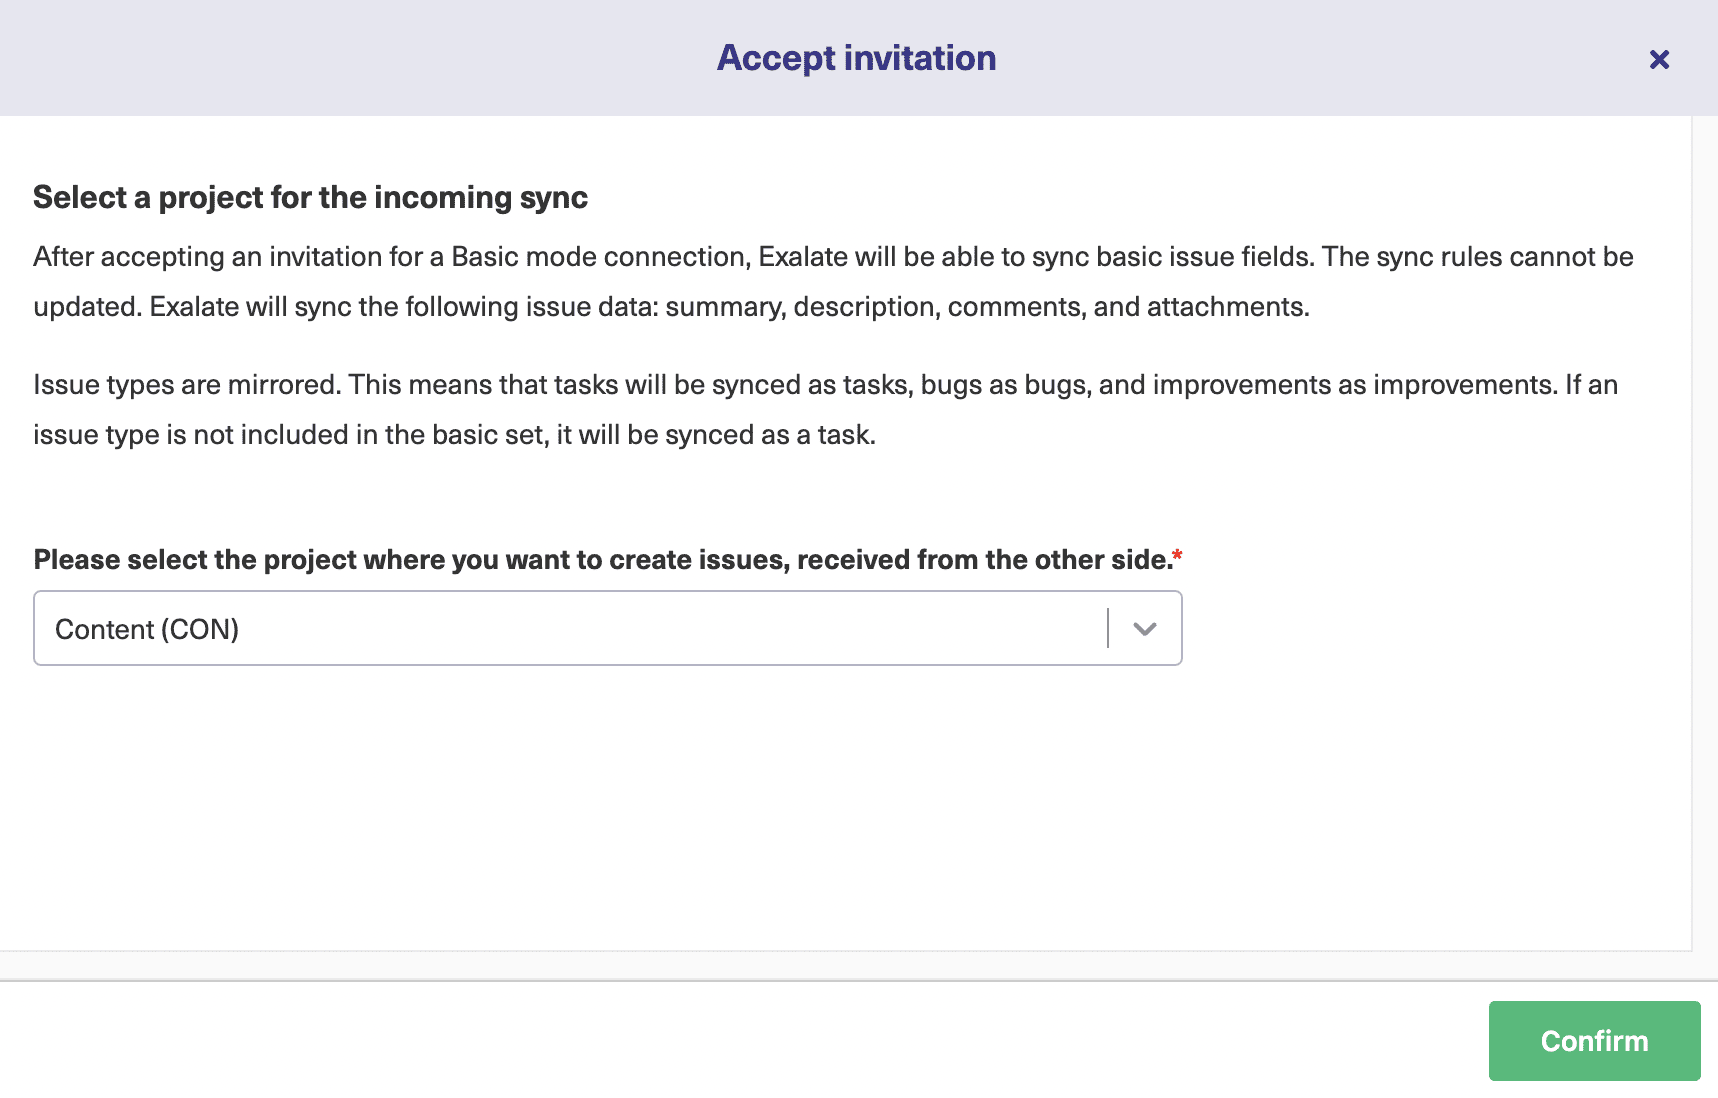
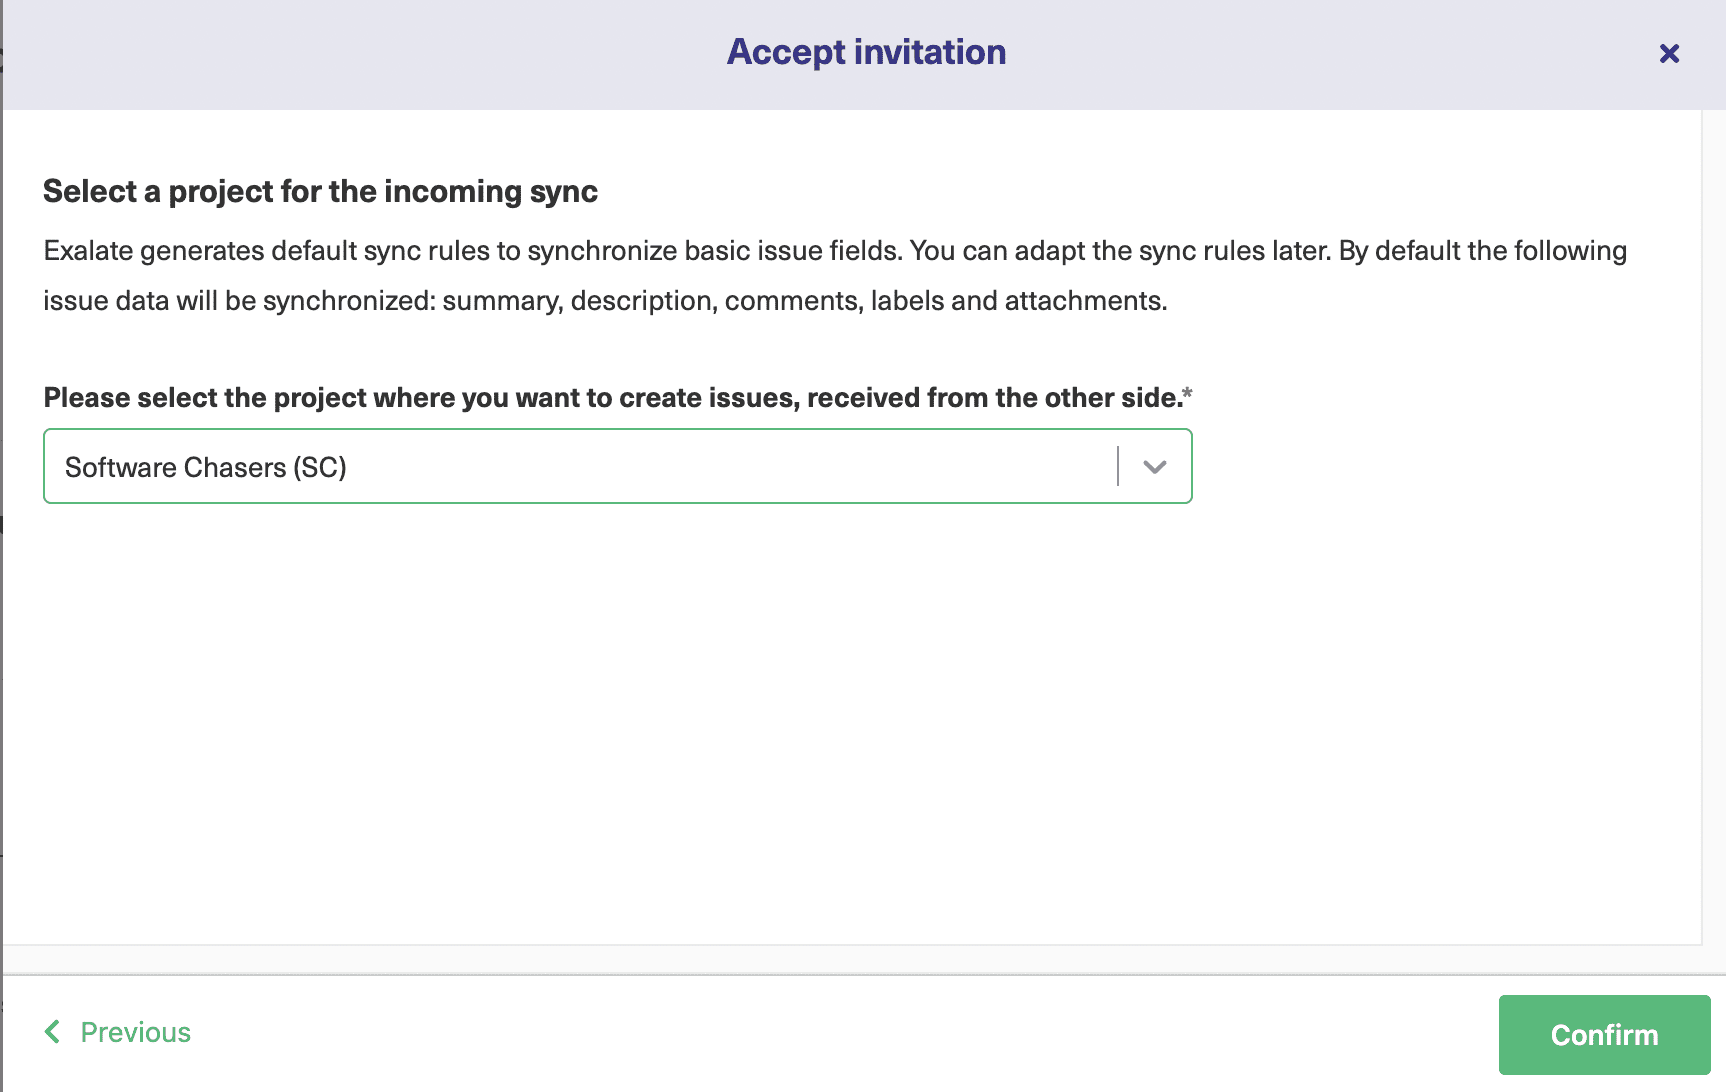
After selecting the appropriate one from the drop-down list, click “Confirm”.
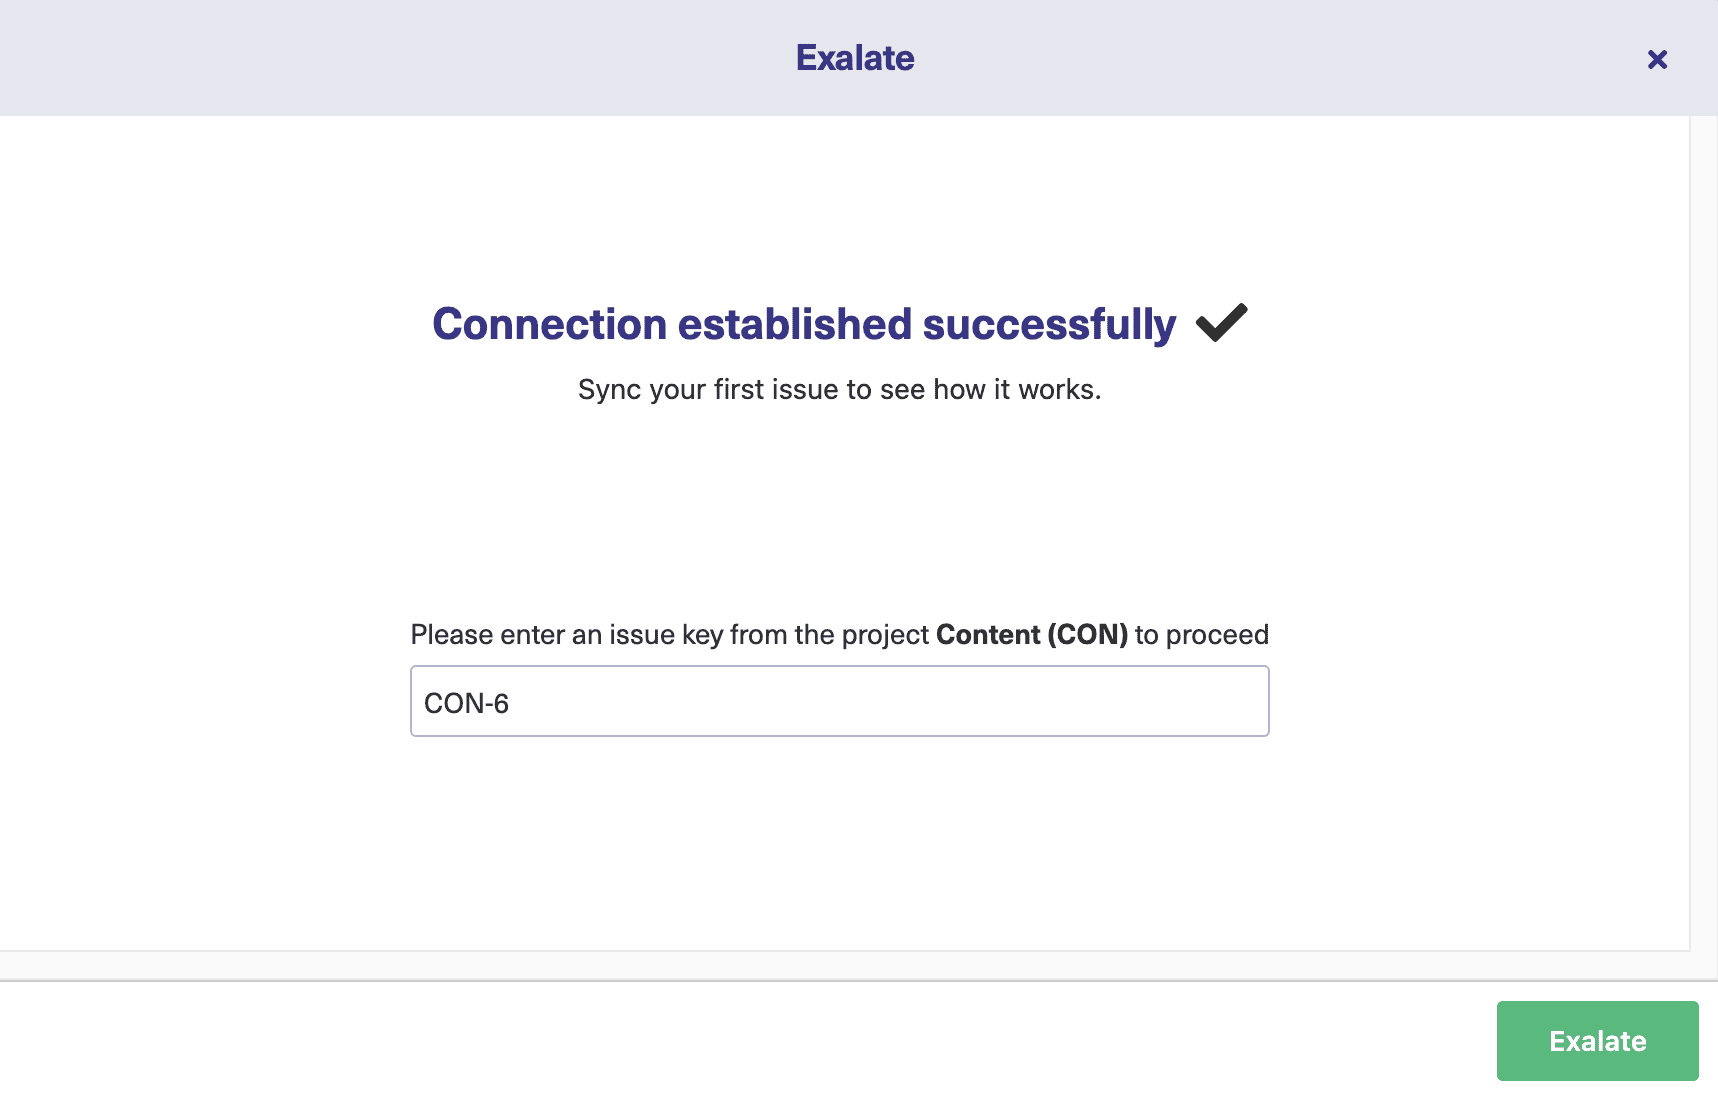
Wait for some time for successful synchronization.
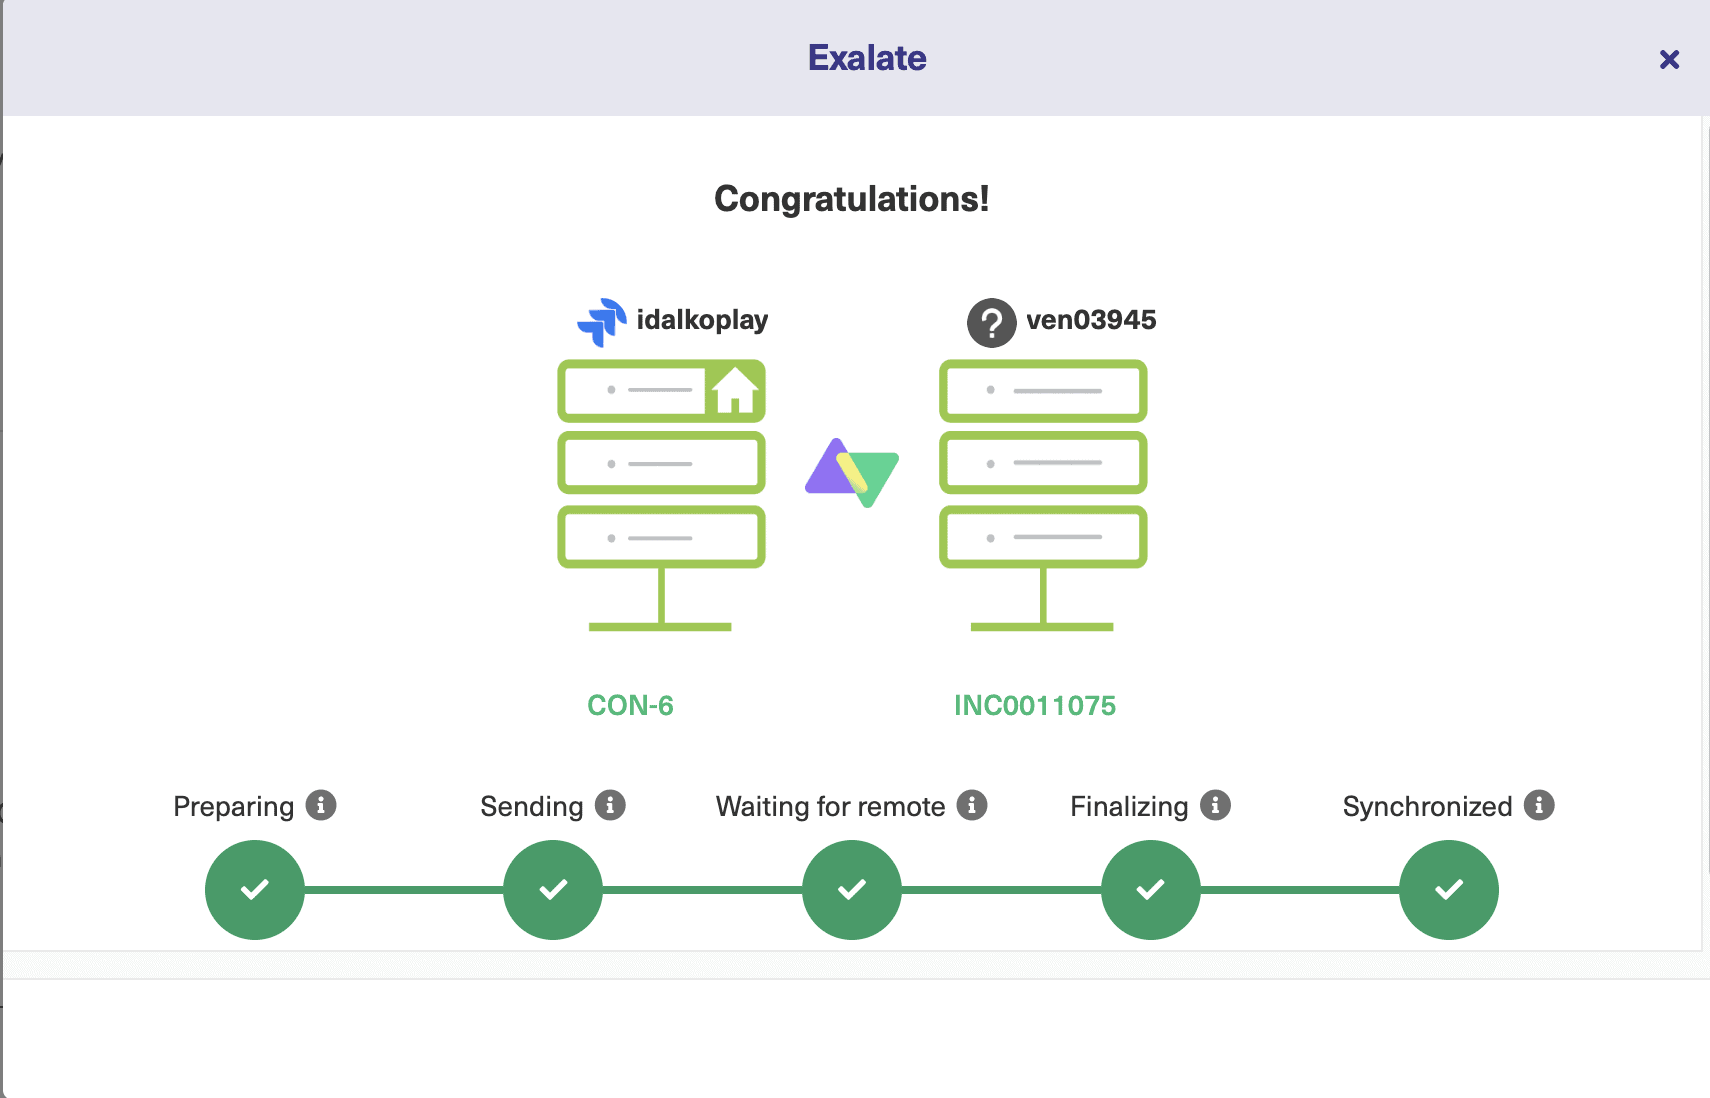
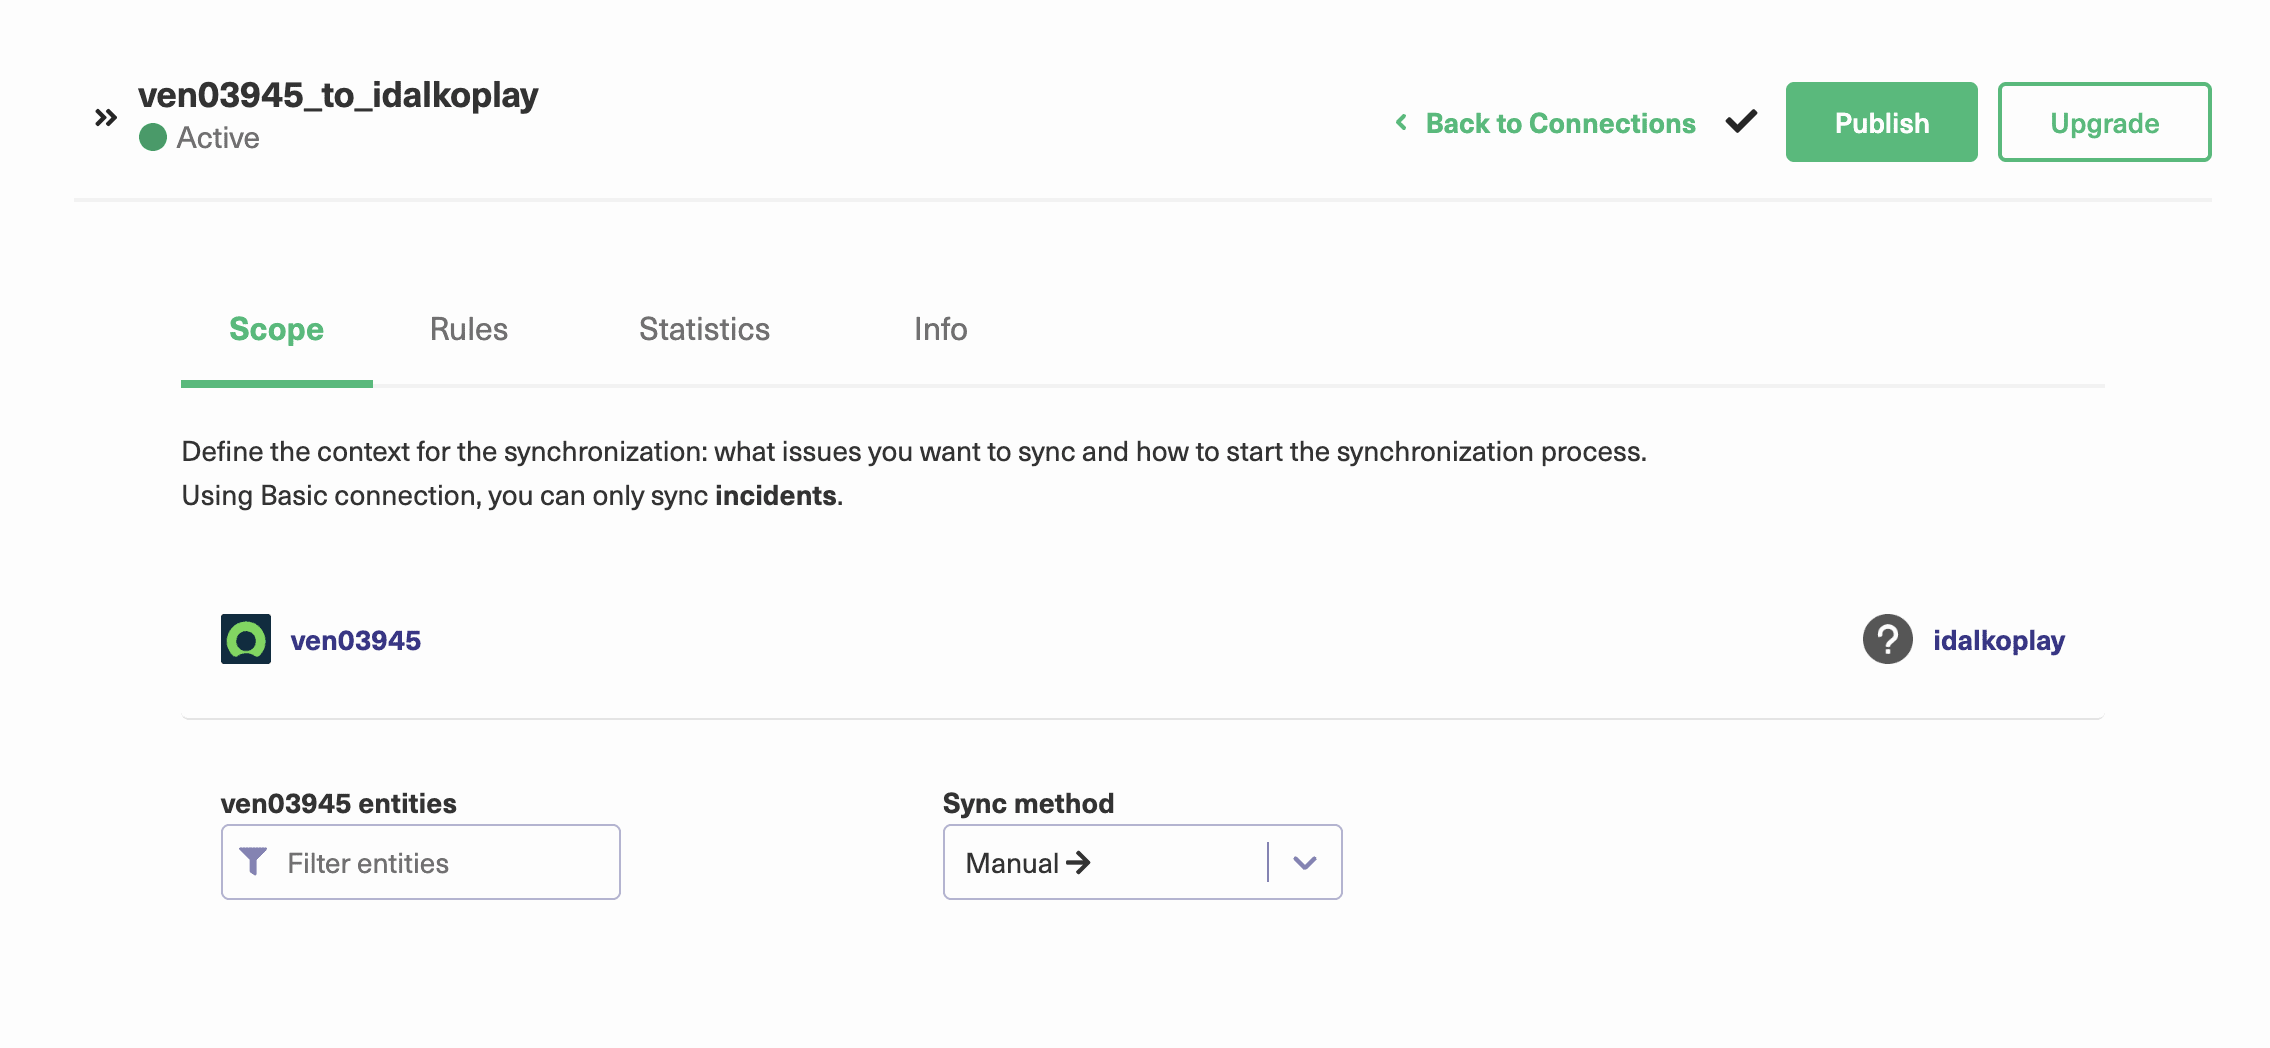
The Basic mode connection just created can be viewed in the “Connections” tab. If you click the edit connection icon in front of its name, you can see the default mappings.
You can choose to upgrade the connection if you want.
Continue with the Script Mode
Keep reading or watch this tutorial to learn how you can set up the sync in the Script mode:
In this mode, one side sends an invitation code and the other side accepts it. Let us see how it works.
1. Send an invitation code
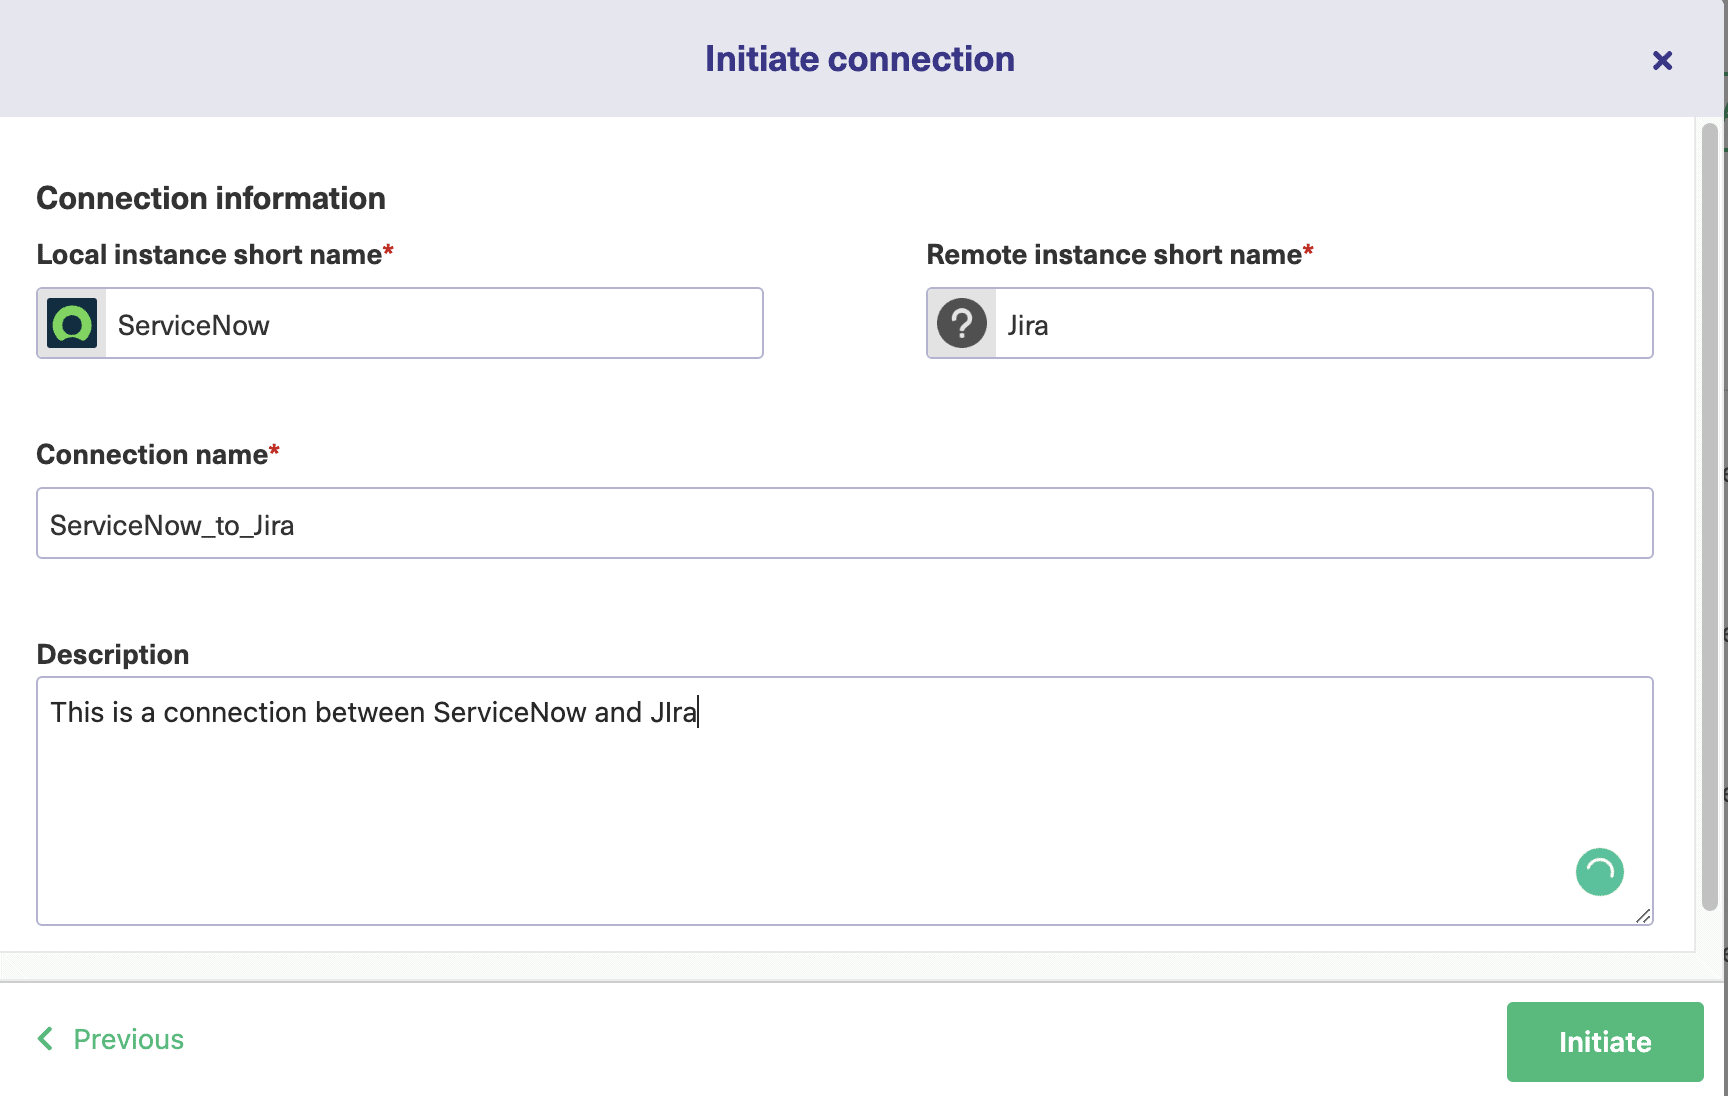
We are sending an invitation from the ServiceNow side and accepting it on the Jira side. For this, choose “Script” on the screen shown below and click “Next”.
Don’t forget to add a description to the connection. This will help you identify the connection when you have a lot of them.
Click “Initiate” when you are ready.
2. Accept the invitation code
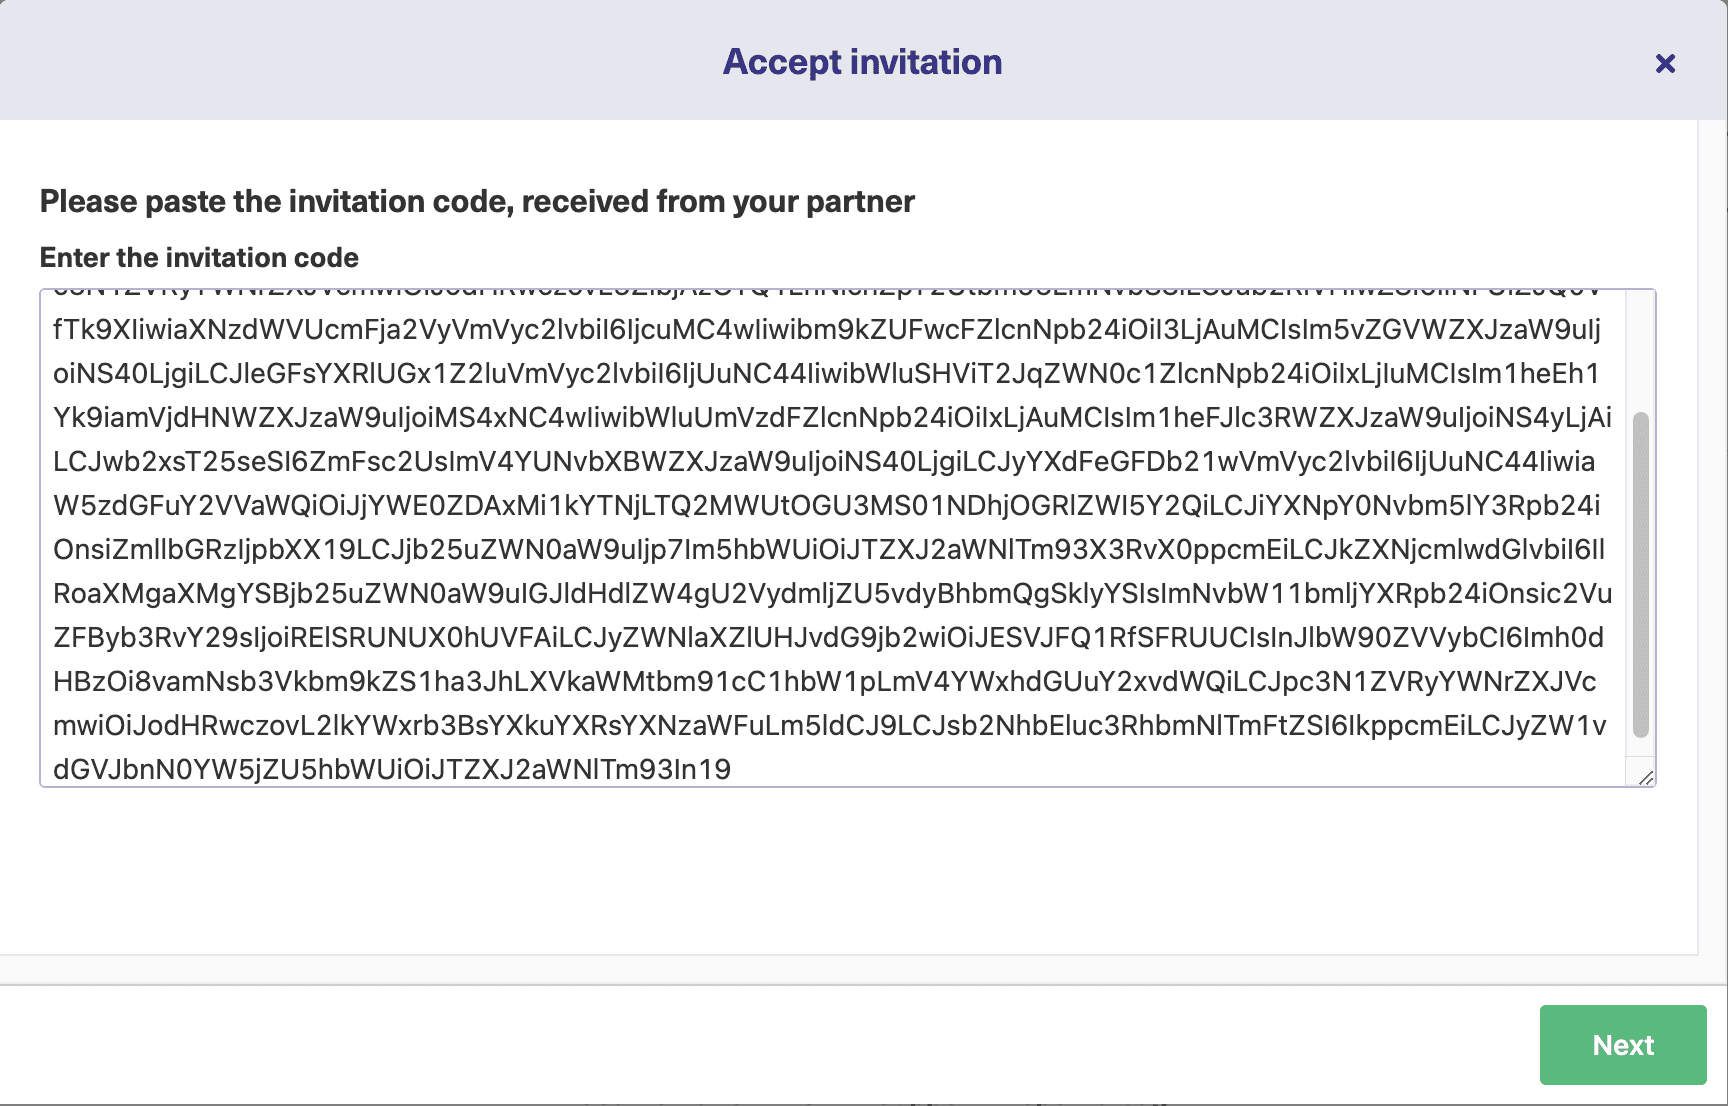
That code you’ve just generated is what you will use to accept the invitation on the other side. So, move over to your Jira instance or by navigating to “Connections” in the Exalate console in Jira and clicking “Accept Invitation”.
Go ahead and paste the code there:
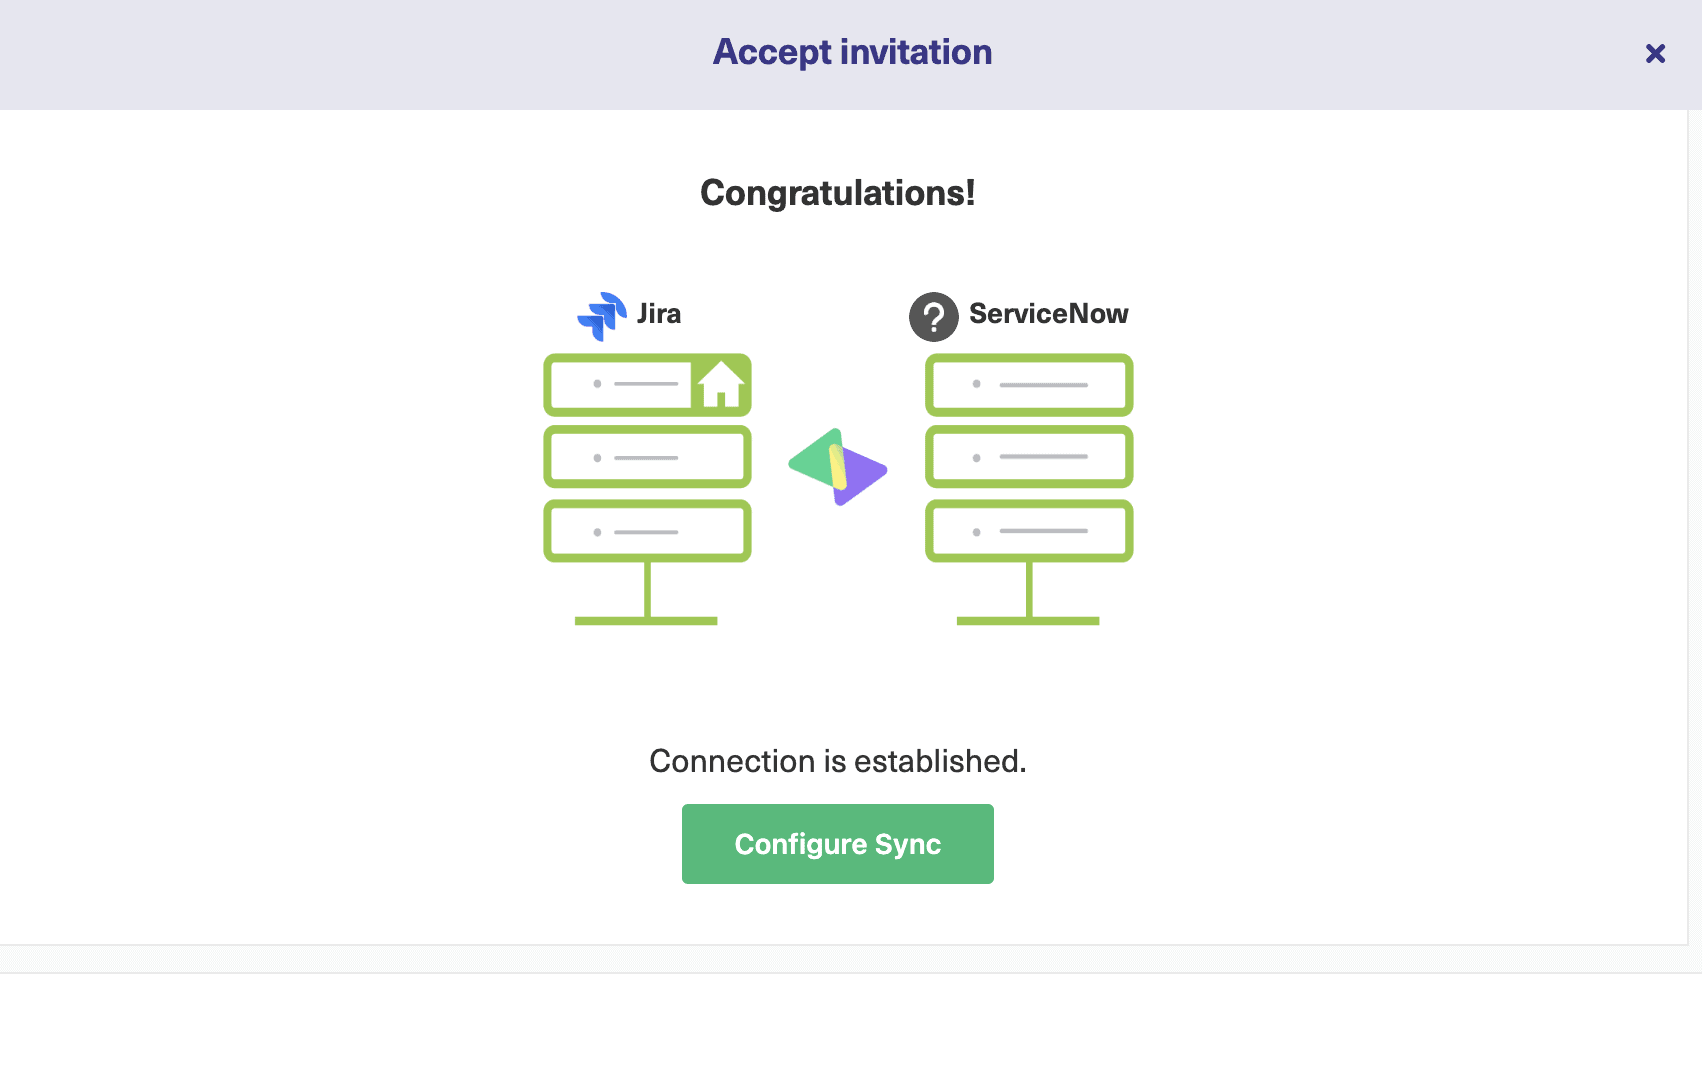
After you’ve accepted the invitation and a connection has been established, we can move on to setting up a rule that will trigger the synchronization.
Step 5: Configure your Synchronization Triggers to Determine When to Sync
Once a connection between ServiceNow and Jira is established, the main work of integration can start.
How to Create Automated Synchronization Triggers
At this stage, close cooperation between the Incident/Issue manager is needed to determine when an Incident on the ServiceNow side needs to create an issue on the Jira side or vice versa. The agreement can be defined on ServiceNow Exalate and Jira Exalate independently, allowing all possible scenarios.
However, it’s also possible that you’re an admin on both sides.
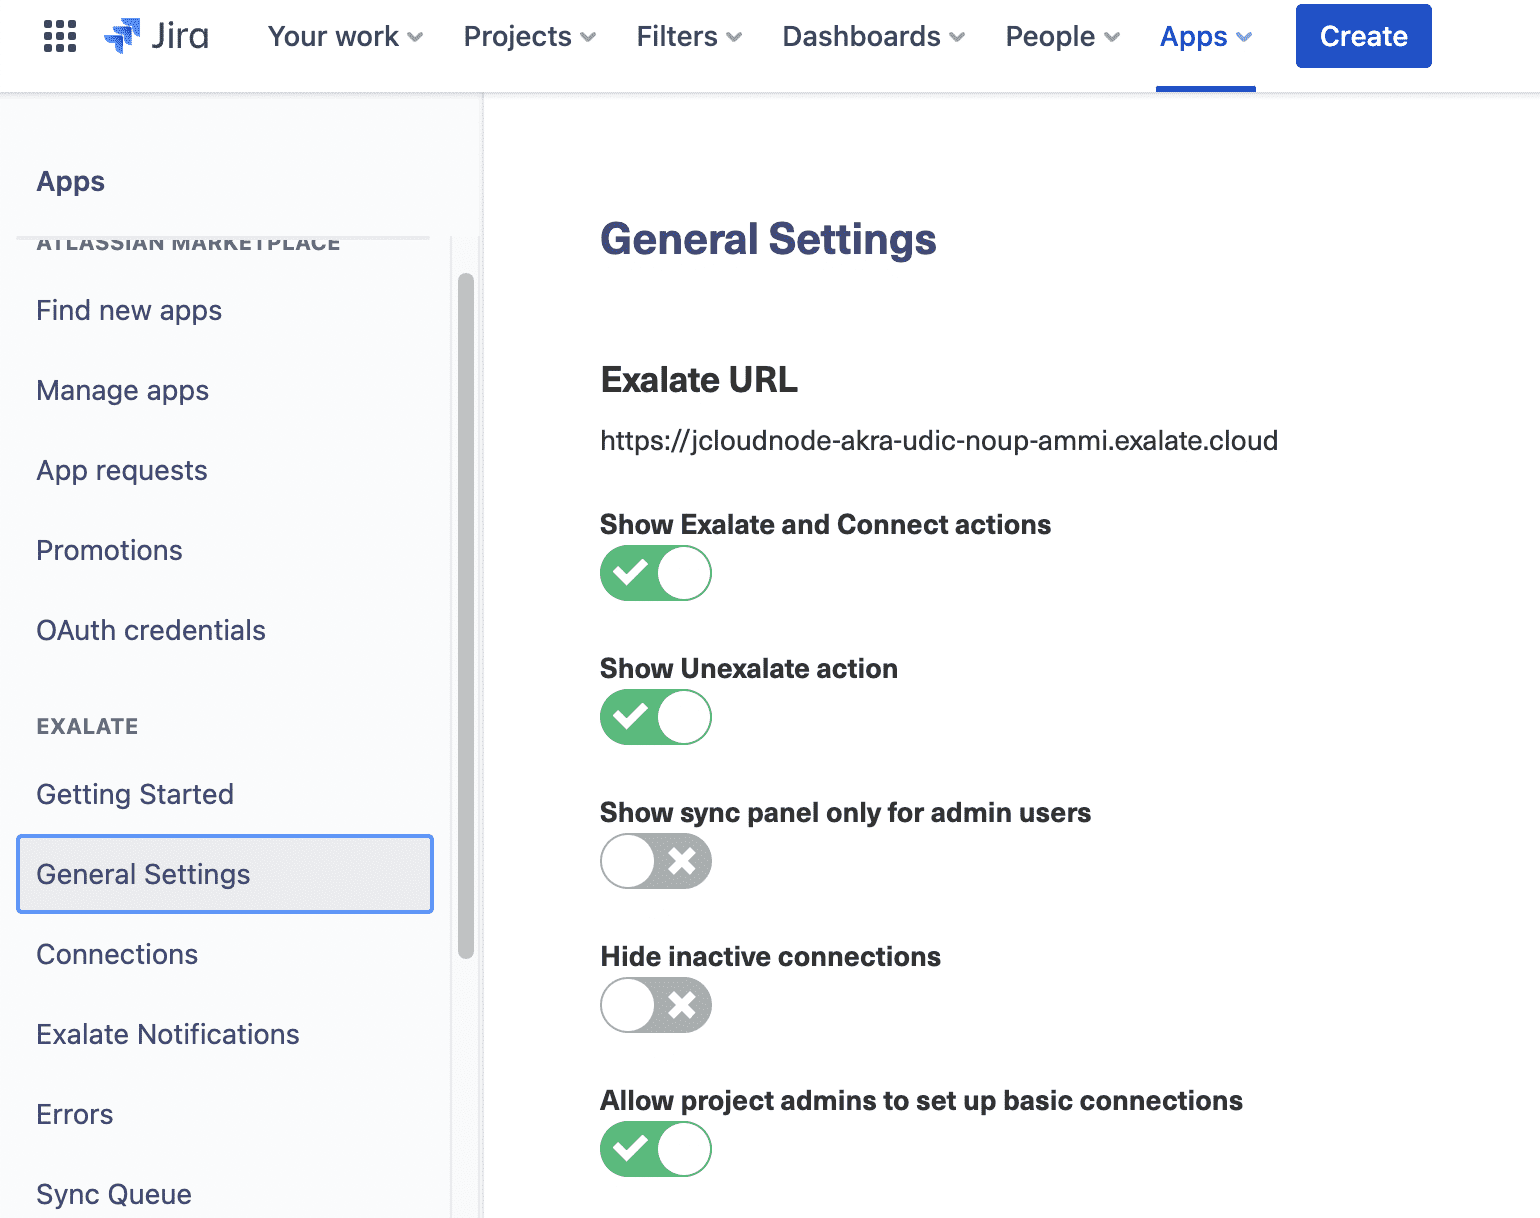
To create triggers, click the “Triggers” tab in the left-hand Exalate console. If there are any existing triggers, they will be listed here, but the first time you use them, they will be blank.
Note: You can also create Triggers by clicking on the “Configure Sync” button when the connection is established and choosing the Triggers tab.
Click the “Create trigger” button to get started. On the “Add trigger” pop-up that appears, there are several fields you can interact with. The entities you want to apply triggers to can also be selected now.
The entity selection will differ from platform to platform. You can then set the conditions that cause the trigger to activate. In Jira, triggers are written using the JQL query language. You can read more about that here. ServiceNow search syntax is used for the ServiceNow side.
Click the “Active” button to activate the trigger and then click “Add”.
Note: Incidents, Problems, ChangeRequests, RITM, Cases, and CatalogTasks are the popular ServiceNow entities that are synced with Exalate. But you can sync any entity in ServiceNow using Exalate’s intuitive scripting engine.
Set up your First Trigger
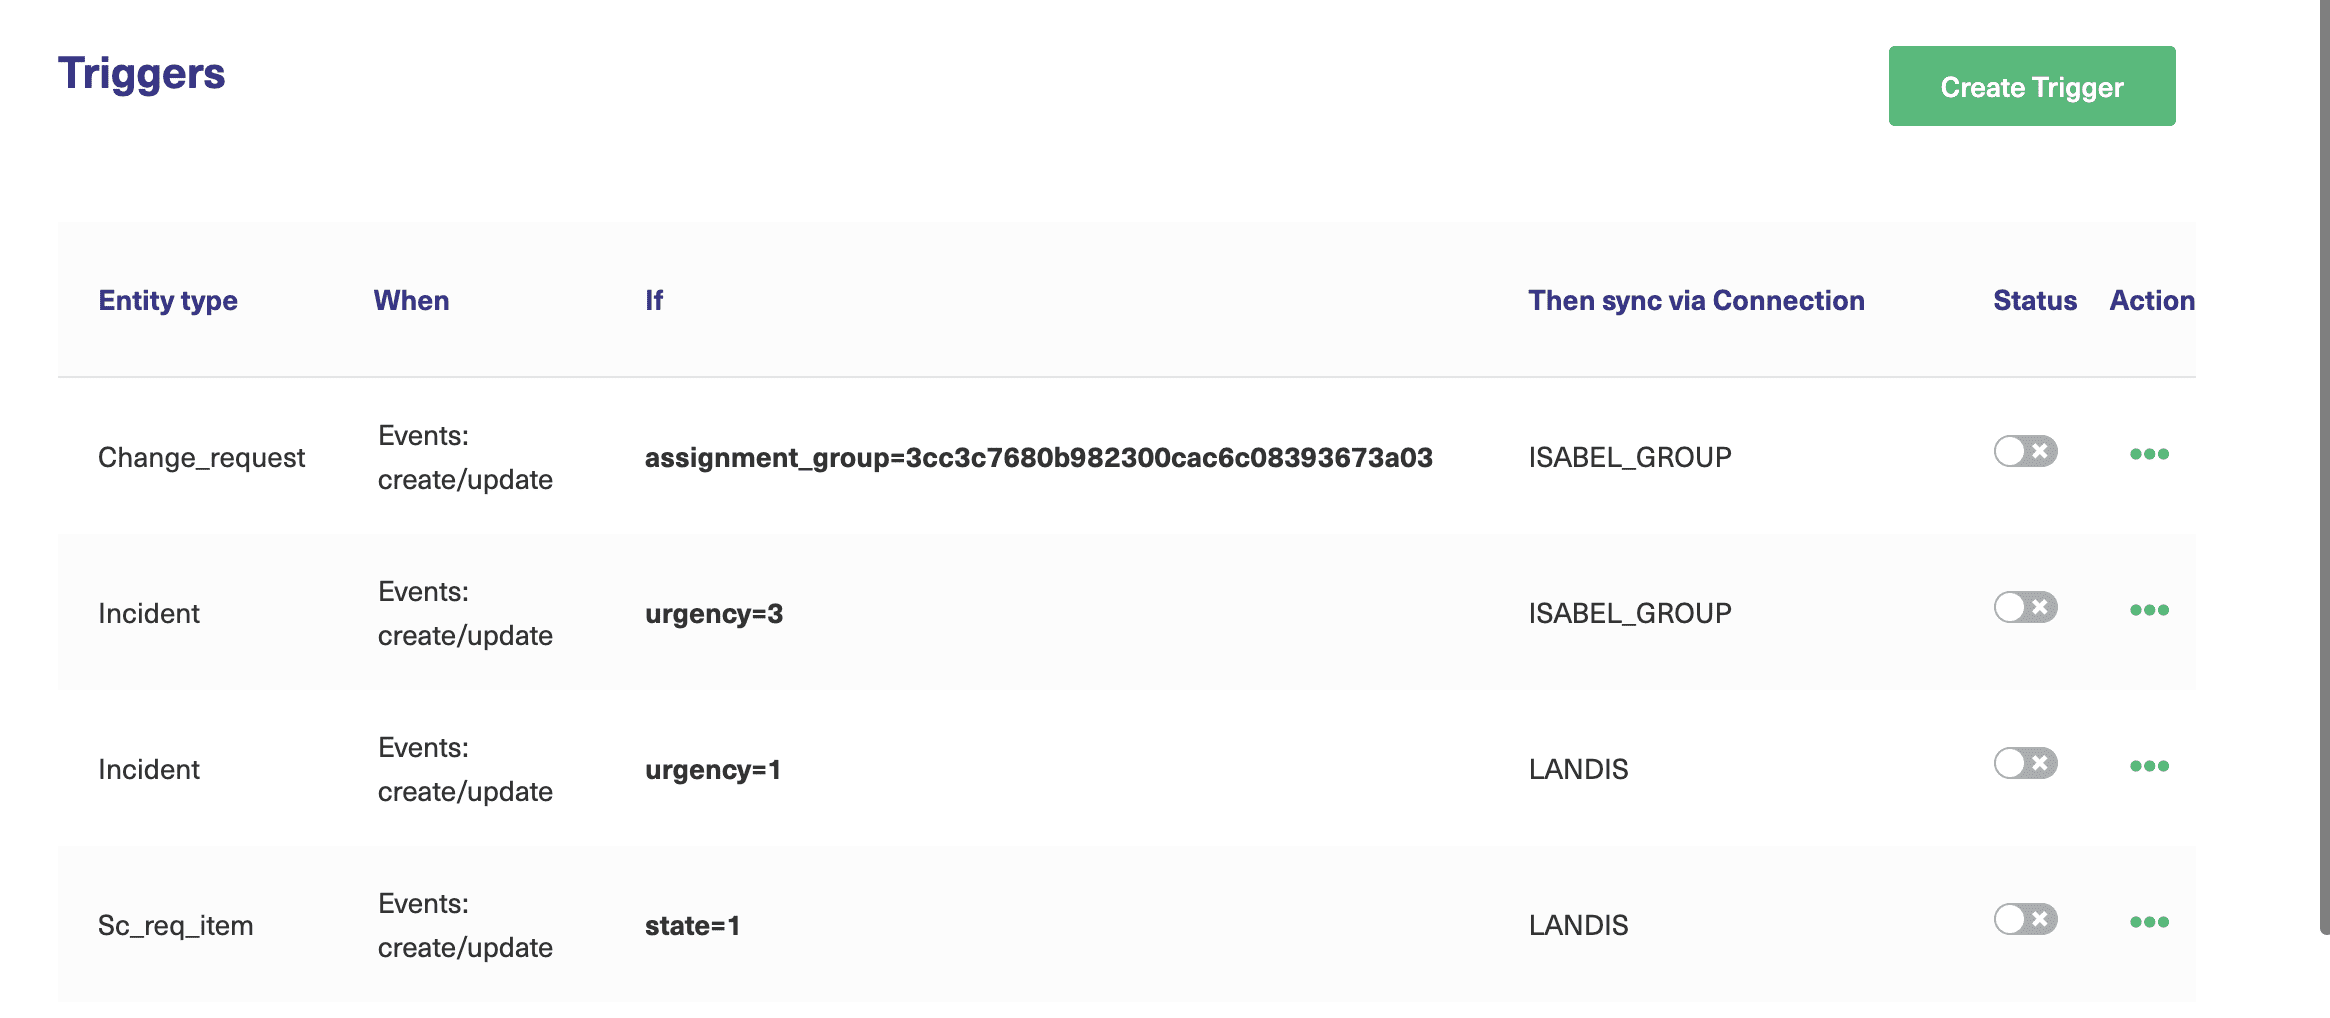
If the process managers have determined that whenever an Incident is assigned to an Assignment group called Application Development, an issue needs to be created on the Jira side.
The Trigger defined in Exalate ServiceNow looks like the following:
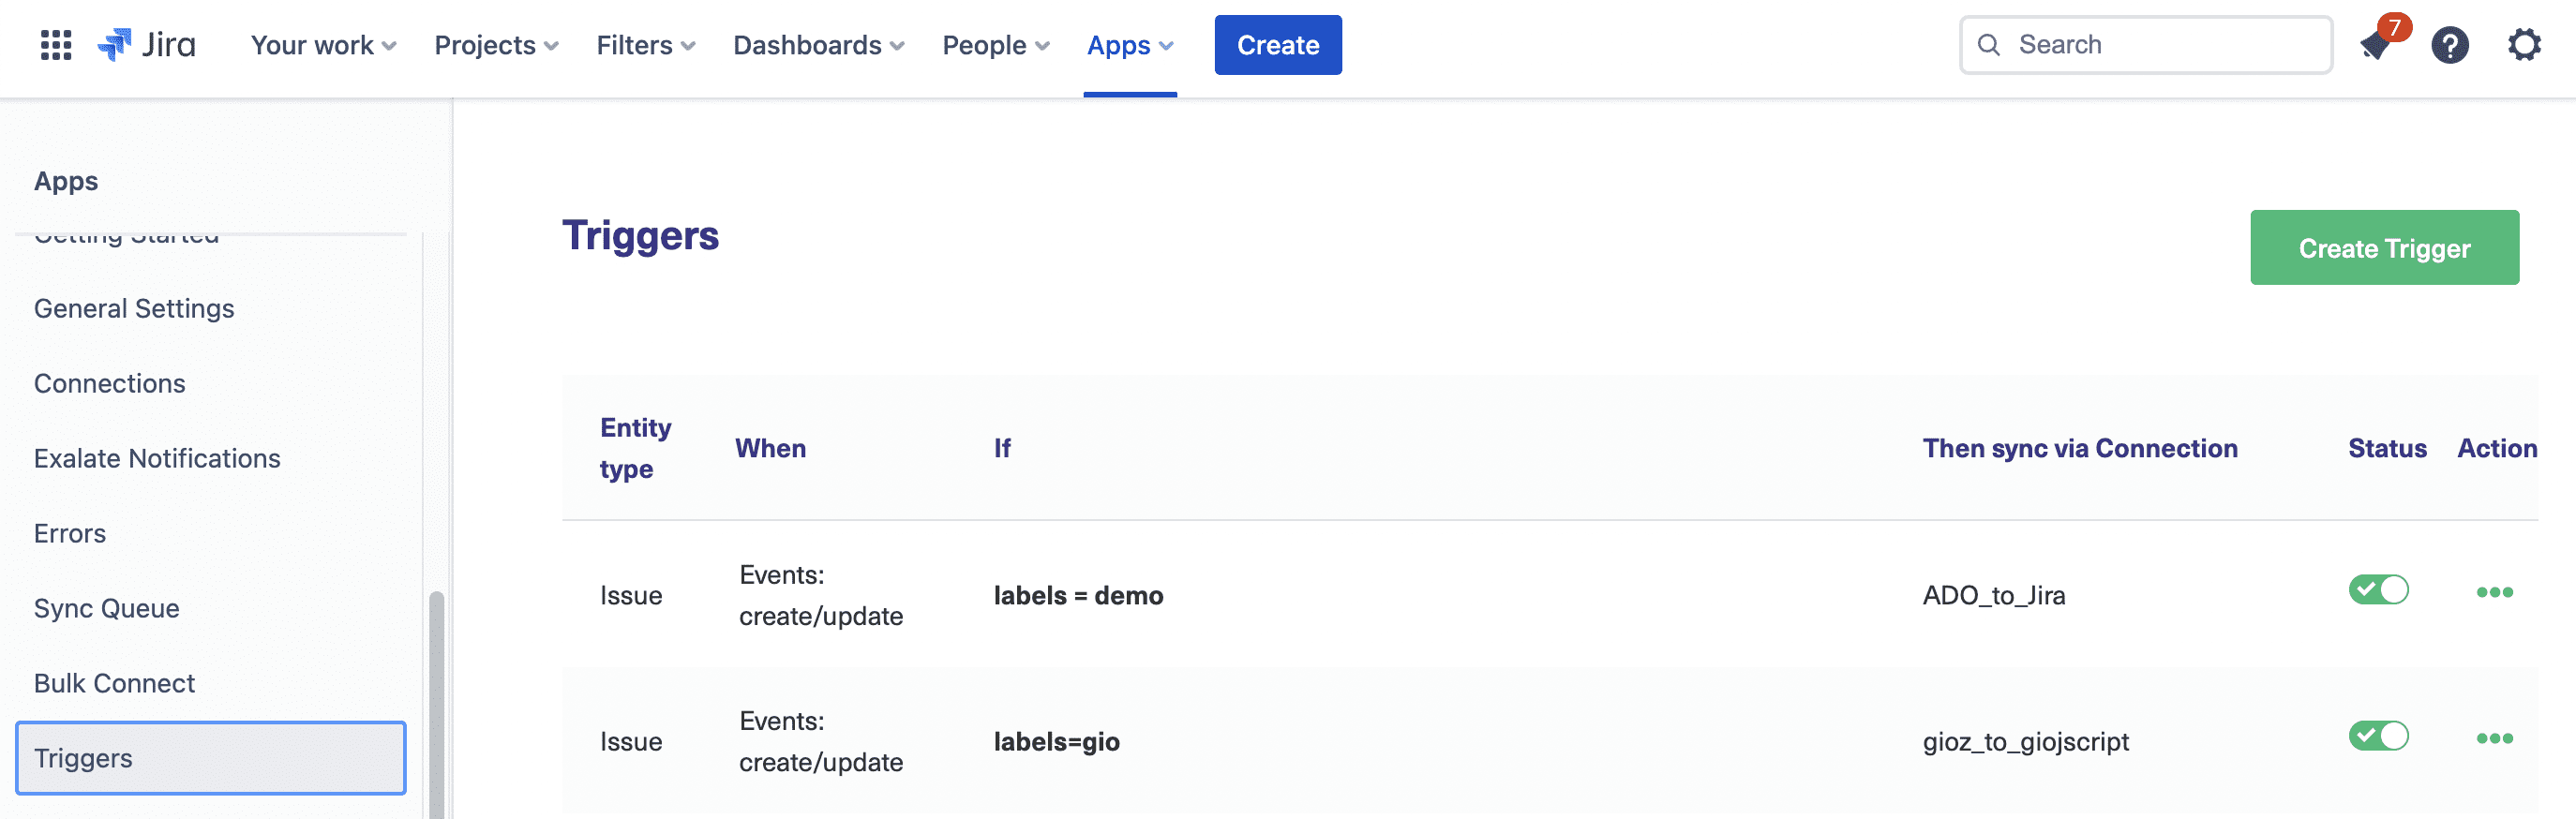
The Trigger defined in Exalate Jira looks like the following:
Step 6: Configure your Connection to Determine the Information to Send
Once an Incident on ServiceNow fulfills the conditions defined by the Trigger, the ServiceNow Exalate will receive access to the Incident through the REST API. The same applies to Jira issues that fulfill the condition defined by the Trigger as well.
Configure the outgoing sync
What information is sent to the Jira Exalate is defined in the Connection Sync Rules -> “Outgoing sync”.
Note: The same Outgoing sync on the Jira side will determine what information is sent to ServiceNow.
Here’s what it looks like:
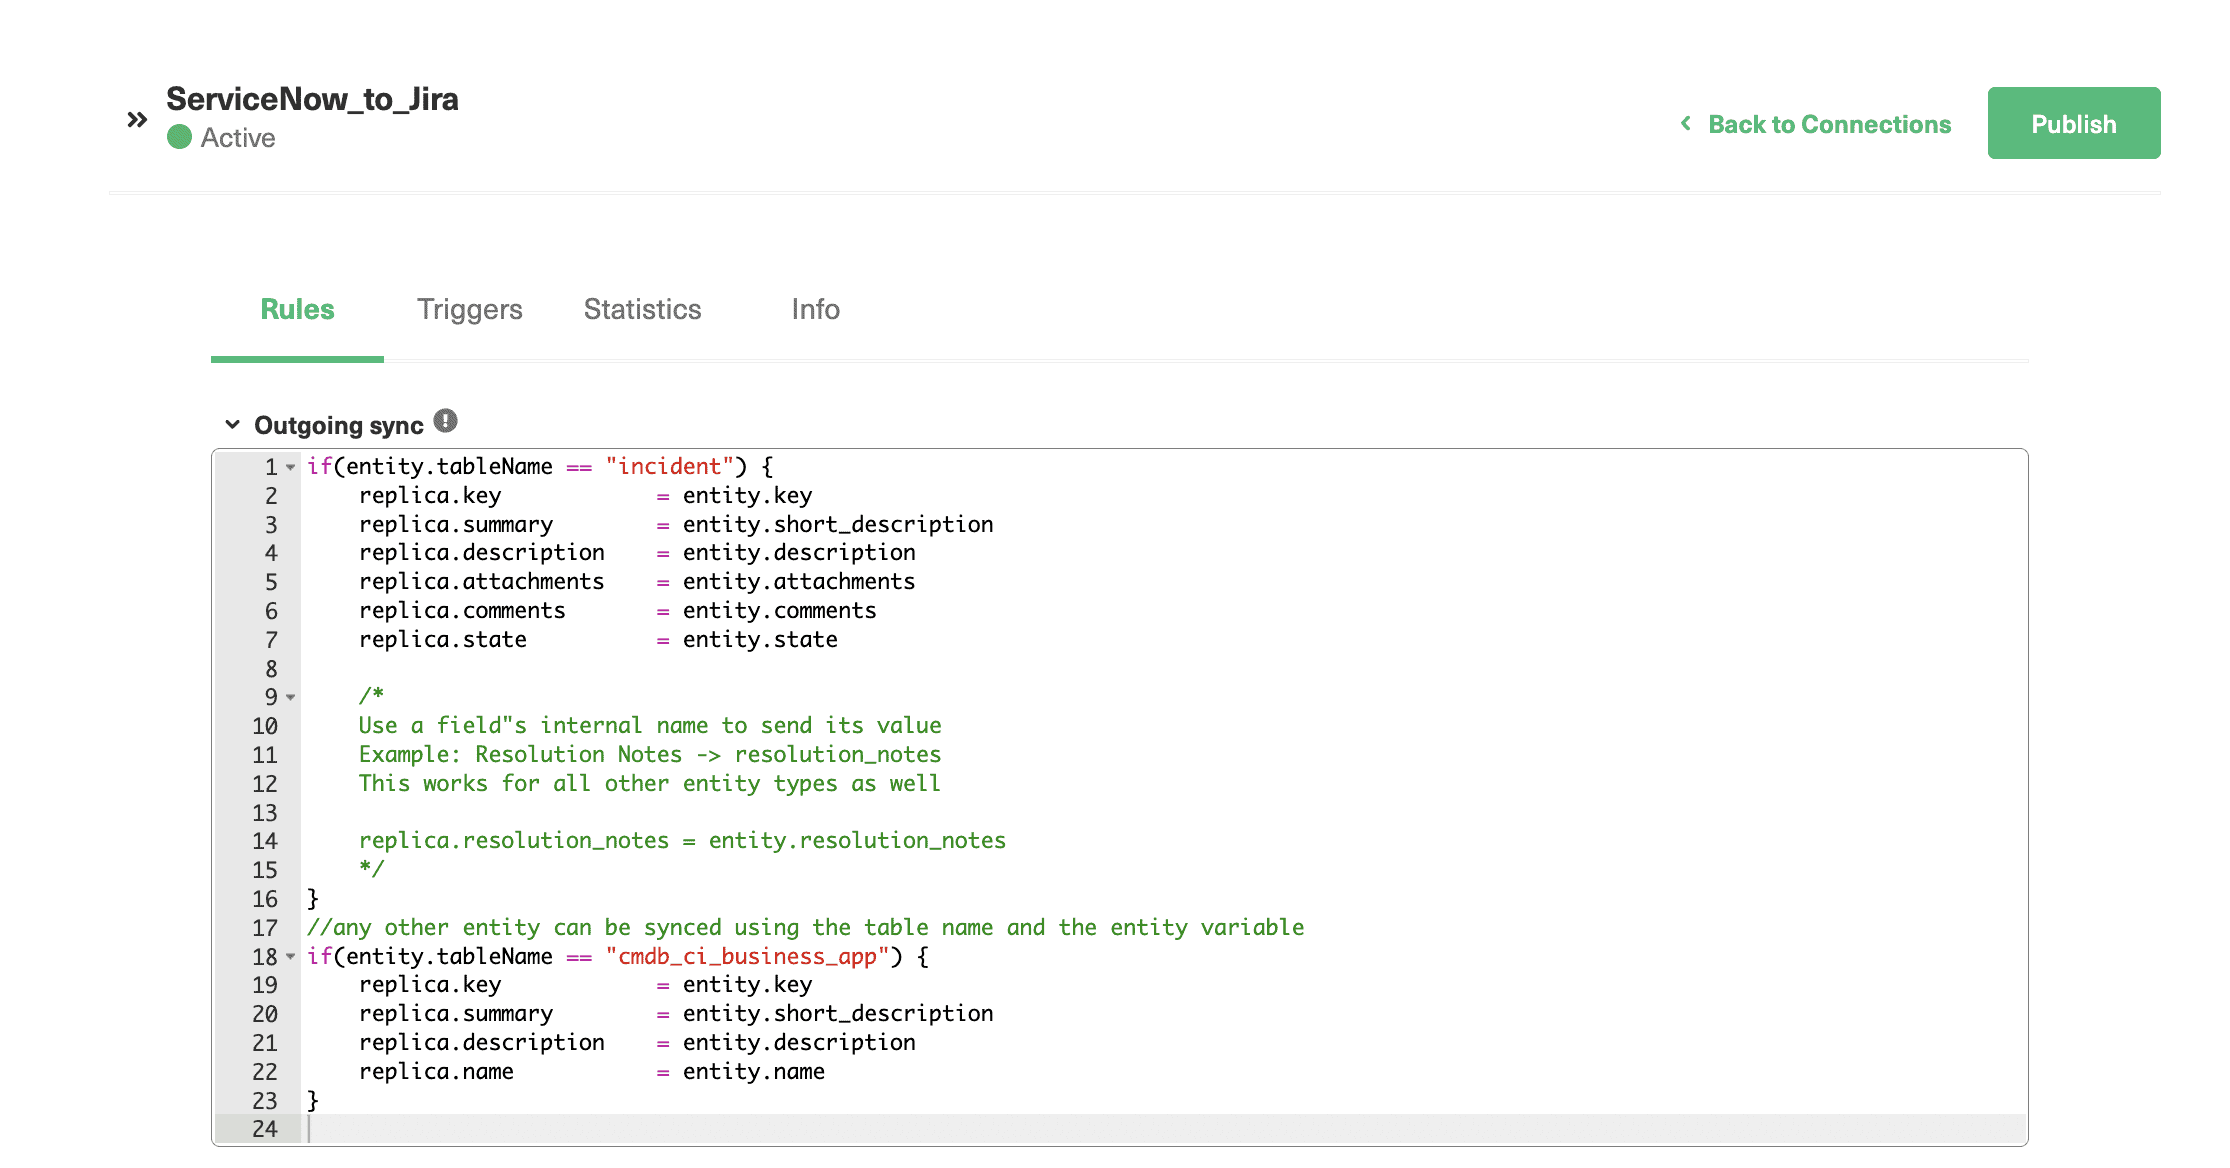
- replica.<attributes> represents the message attributes. In our case, it represents Jira Exalate.
- entity.<attribute> represents the local record attributes. In our case, it represents Servicenow Incidents.
The above example is an out-of-box, straightforward mapping. However, more complex mapping can be defined using Groovy scripts.
Exalate provides a number of Script Helpers to reduce the effort to script yourself.
Configure the Incoming Sync
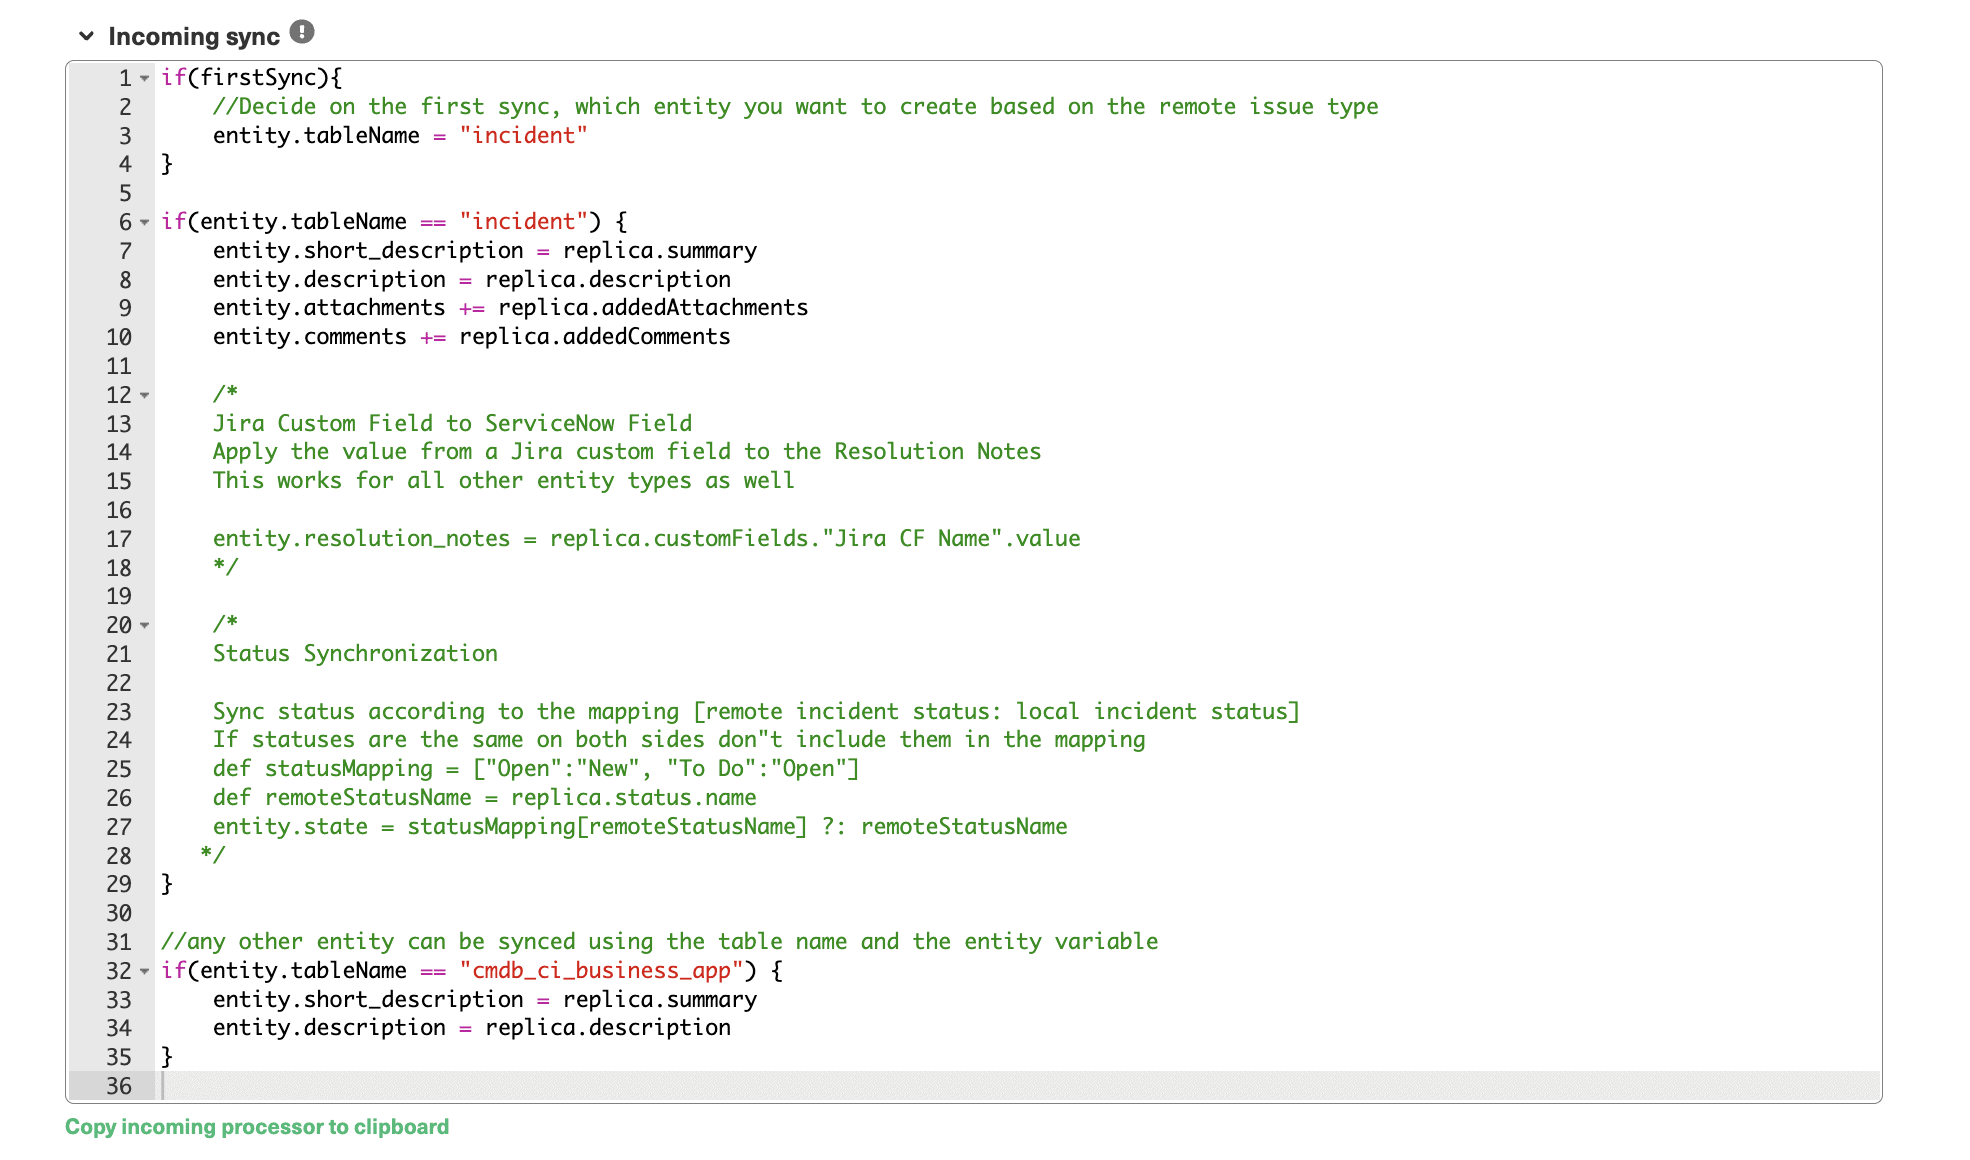
The incoming sync will determine how to interpret the information received. The rules for interpreting the incoming data are configured in the Connection Sync Rules as well.
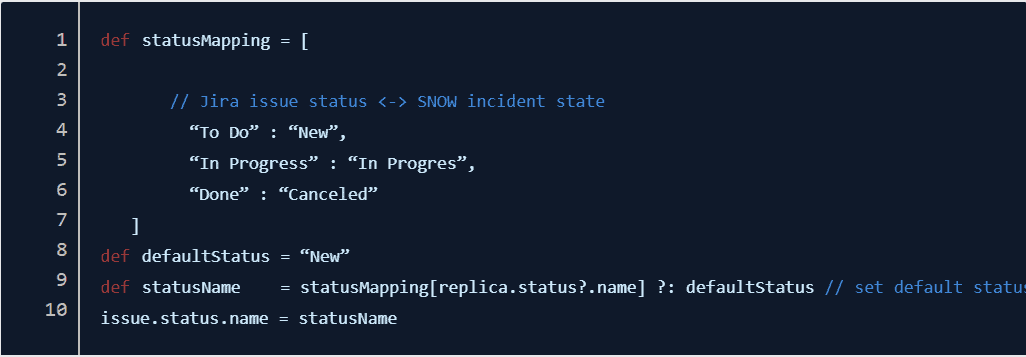
On the ServiceNow Exalate’s “incoming sync”, there is a distinction for when an Incident is created or updated. In the example shown below, an incident will be created if it’s the first sync. Otherwise, details like summary, description, attachments, and comments of an Incident already present will be updated.
Note: The Incoming sync on the Jira side represents how to interpret information received from the ServiceNow side.
Note: You can also refer to the Getting started guide on Exalate documentation for a step-by-step process of setting up a ServiceNow Jira integration.
Additional Information on Exalate as an Integration Solution
Since we used Exalate to set up the Jira ServiceNow integration, you might have some questions about this solution. Here I’ll explain a bit more about Exalate’s architecture and security.
On Autonomy in Architecture (Decentralized Integration)
The basic architectural setup of Exalate as an integration enabler between two systems is depicted below:
![]()
- Letters A -F depicts the information flow between the systems. ServiceNow and Jira communicate with each other through the dedicated Exalate agent, keeping the autonomy of your system
- Your (ServiceNow connected) Exalate Agent controls what information is sent and how incoming information is mapped.
- Exalate agent is available for ServiceNow instance, Jira Cloud, Jira On-Premise, Salesforce, HP ALM/QC, Github, Zendesk, and more to come
On Security
Exalate is an intelligent middleware that transports data between ServiceNow & Jira. The Security consideration is described in great detail in the following whitepaper, free for download: “Exalate Security and Architecture Whitepaper”. The below image explains the different deployment models Exalate is supporting. Exalate for ServiceNow can be deployed either in the cloud or on-premise.
![]()
Comparison between Exalate and the IntegrationHub with the Jira Spoke
ServiceNow itself has a capability called IntegrationHub that allows reusable integrations with third-party systems and calls them from anywhere in the ServiceNow platform.
Using IntegrationHub requires you to get a separate subscription. The Standard package of IntegrationHub includes a Jira Spoke with a (limited) number of Actions that allow ServiceNow to manage issues, users, stories, and groups in Jira. And it retrieves Jira data to use in a flow. Jira spoke V3.0.5 uses bi-directional webhooks and subscribes to Jira with a ServiceNow callback URL.
Note: You can also have a look at a detailed comparison between IntegrationHub and Exalate.
So, why use a third-party tool, like Exalate, to set up the integration? Below I’ve added some considerations:
- Use Exalate when
- The integration is bi-directional. Then both sides will be able to trigger the integration and decide on the information to be exchanged.
- The integration is point-to-point between the 2 systems.
- Use IntegrationHub when
- ServiceNow has the orchestration role to create an automated flow, involving several systems.
- ServiceNow controls the trigger of integration, remote system (in our case Jira) is the receiver of the commands
Conclusion
Many ITSM teams adopt ServiceNow as a best-in-class solution. While development and project management teams still widely consider Jira as the ideal solution. As efficient collaboration is crucial for any effective organization, integrations between these systems are increasingly common.
When considering the right technology to set up the integration, it’s important to keep into account the following three aspects:
- Does each side have autonomy over outgoing and incoming information and how it is interpreted?
- Is the solution reliable enough to continue working, independently from changes to the other side of the integration?
- Is the solution flexible enough to cover a wide variety of use cases and evolve with your way of working?
In this guide, we set up the integration using Exalate. And we described the step-by-step process of how to complete this integration.
Recommended reads:
- How to Set up a Jira Salesforce Integration
- ServiceNow Integrations: Integrate ServiceNow and Other Systems Bidirectionally
- How to Set up a Jira Zednesk integration
- How to Set up a Jira Azure DevOps
- Jira to Jira Sync: How to Synchronize Multiple Jira Instances in 9 Steps
- Jira GitHub Integration
- ServiceNow to ServiceNow Integration: Set up a Two-Way Sync