Zendesk is an amazing tool for customer support, while Jira is the go-to choice for a lot of development teams. So, effectively integrating both solutions means you’ll create a powerful collaboration between these teams. You’ll synchronize development and support into a seamless communication process. That means no more manual copying of data. An effective Jira Zendesk integration indicates that synchronization between the two platforms happens automatically.
In this guide, we’ll walk you through a step-by-step process on how to set up a Jira Zendesk integration. By doing so, you’ll save a ton of time for your development team and customer service reps.
Note: In this tutorial, we will be using an integration tool called Exalate to set up the integration. You will learn more about this, as well as other integration options, throughout this guide.
You’ll likely want to integrate Jira and Zendesk and set up a flexible synchronization for 2 general reasons:
1. Saving Time by Synchronizing (instead of Copying Data)
Instead of exchanging support tickets via email, or manually creating Jira issues for every ticket, a Zendesk to Jira integration enables you to automatically create linked issues whenever a ticket is generated. You can also sync multiple Zendesk tickets to a single Jira issue.
If you’re manually adding issues in Jira, you’ll also need to manually update the Zendesk ticket whenever a new one is added to the issue. Not a great use of your team’s time!
By synchronizing both tools automatically, less information is lost in comparison to the manual route. As less information will fall through the cracks, you’ll not only save time, but it will also result in you providing a better experience for your users.
2. Driving Effective Collaboration between the Service desk and Development Teams
The general reason most teams will want to integrate Zendesk with Jira is to “experience a seamless collaboration between their development and support teams”. Development teams and customer service teams generally don’t have the same type of workflows, and that’s perfectly fine.
But the Development processes for a Software/Product/Service are inter-connected with the Support processes. Either side is also used to working in its familiar environment. Zendesk for support teams and Jira for development teams.
Teams perform best when they use their own systems and unique workflows. Integrating Zendesk and Jira correctly enables each team to stay in their system, while still communicating with the other side. And they keep their own workflows. The development team doesn’t need to leave Jira to communicate with customer support. And customer support doesn’t have to learn Jira to provide detailed reports to the dev team. So everybody’s happy in this scenario!
Note: To find out more about aligning your service desk and development teams, you can download this free ebook and read all about it.
How to Choose the Right Technology for Setting up a Jira Zendesk Integration
Before we can integrate both systems, we will first have to choose a suitable integration solution. When designing an integration between 2 systems, you must take into consideration 3 essential features: decentralized integration, flexibility, and reliability.
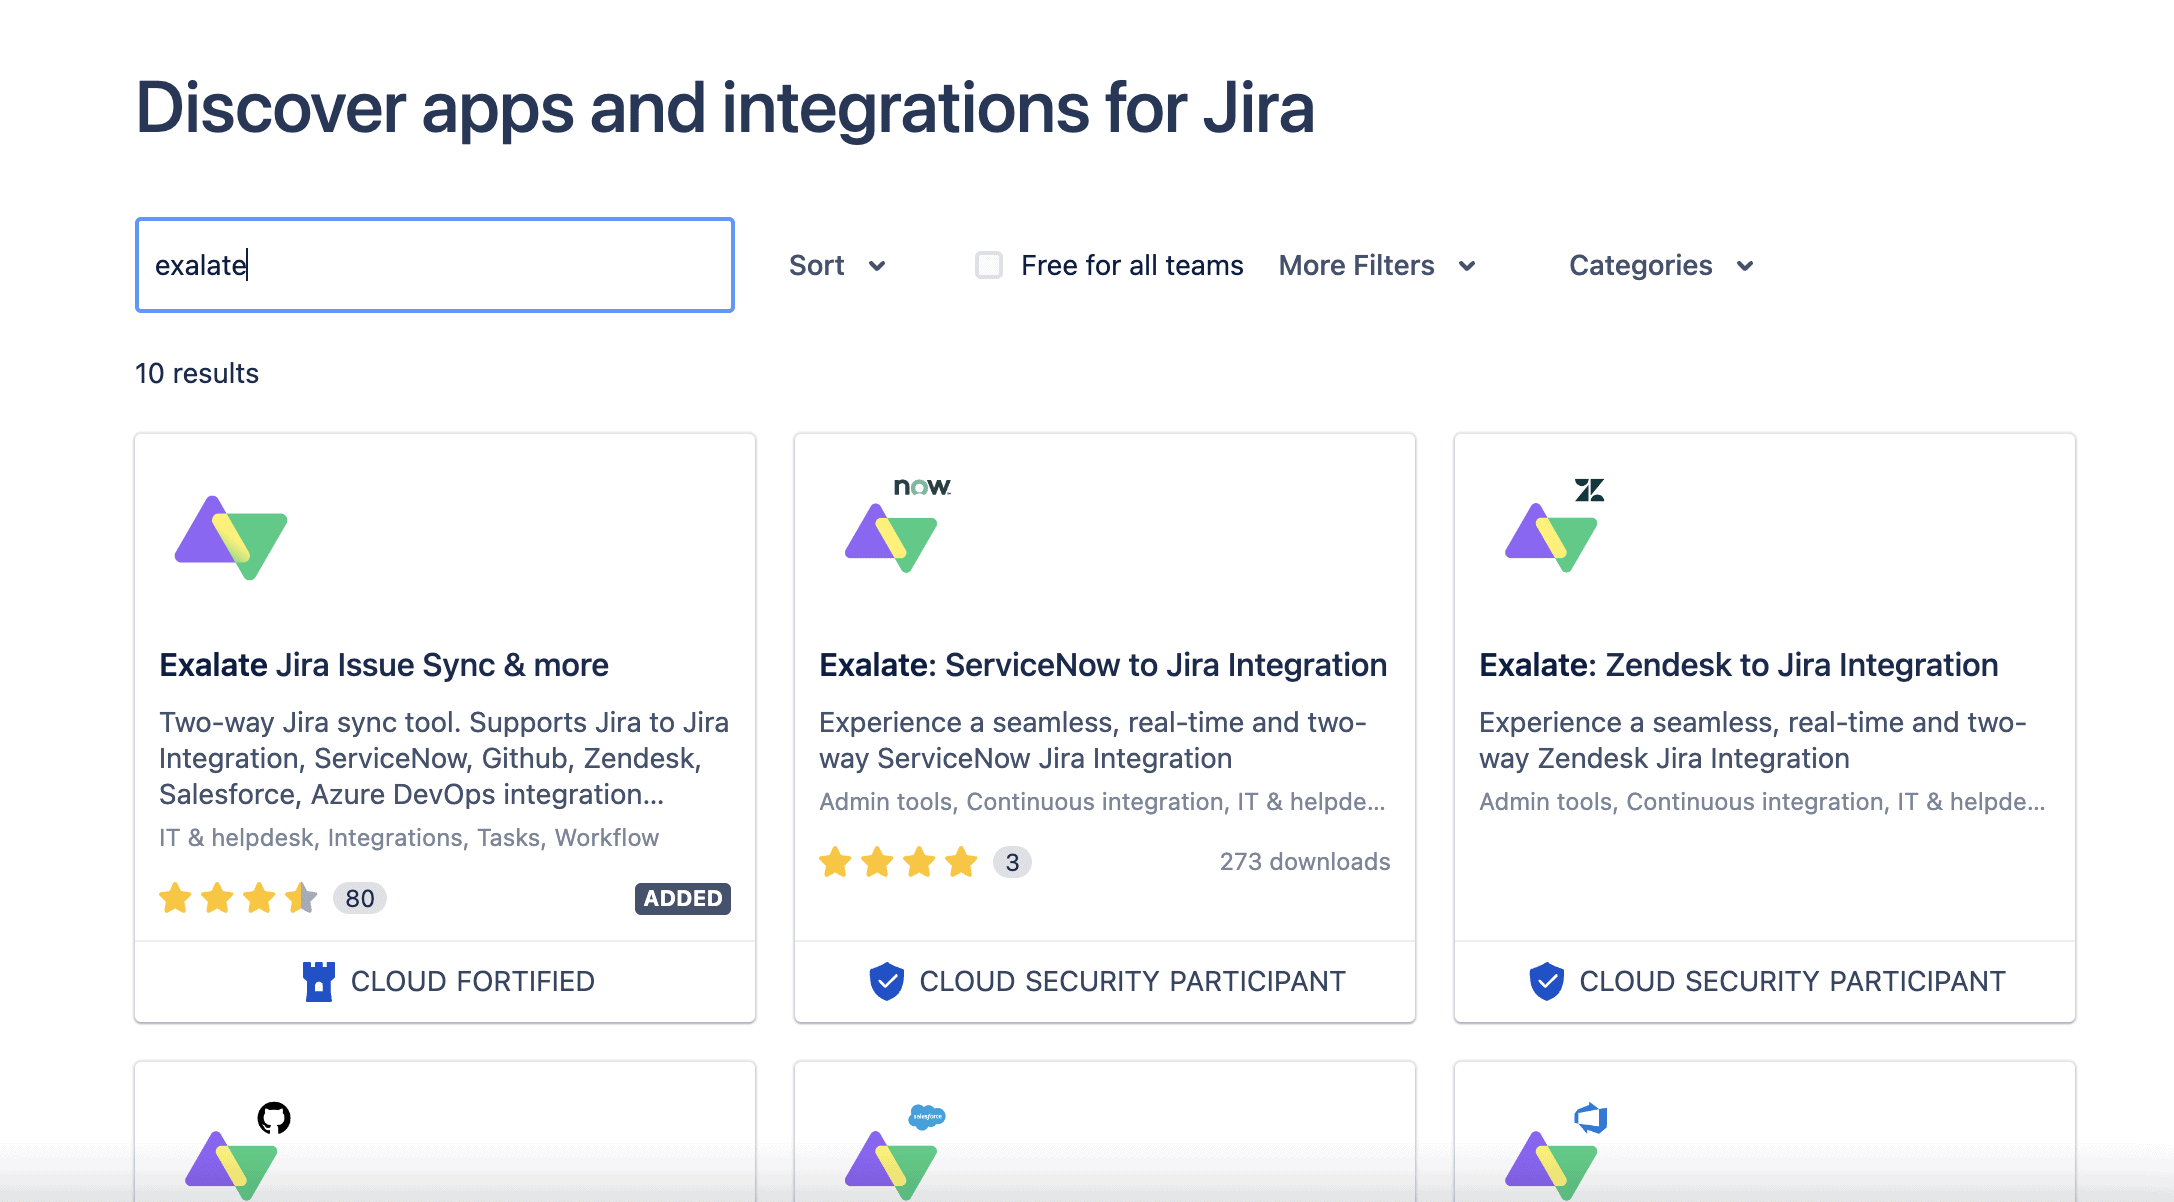
In this blog post, we use an integration solution called Exalate. As you may or may not know, there is also a general Zendesk add-on for Jira. But there are some important reasons we’ve chosen Exalate for this article.
First off, Zendesk for Jira requires the support of an engineer to select the target project. Whereas with Exalate, this selection can be automated based on the properties set on the ticket.
So for instance, if a Tag called “todev” is assigned to a particular ticket, a trigger can be created such that all these tickets automatically create an issue in Jira under a particular project. Status updates, comments, attachments, etc can then be passed back and forth.
There’s also the need to keep both sides autonomous (decentralized integration).
What this means is that both teams working in Jira and Zendesk can reconfigure the synchronization without consulting each other every time. So the information to be sent and received is controlled independently on both sides.
This increases the security of the integration because the autonomy (and hence the control of information flow) is embedded separately within Jira and Zendesk. Exalate provides this feature and is the only application to do so.
But the real value comes with the two-way sync Exalate provides. With this type of integration, your team can:
Synchronize any field you need in custom Jira configurations
Automatically get bidirectional updates when one side is modified
Use native comment exchange for all existing comments
Link a single Zendesk instance to multiple Jira instances
Customize workflow synchronization
Sync with multiple instances at the same time
All of the above cannot be done using Zendesk for Jira.
Plus, it’s easy to set up triggers and rules to automatically generate synchronized Jira issues when a Zendesk ticket is created.
Zendesk for Jira is also limited to Jira Cloud – on the other hand, Exalate for Zendesk is natively integrated into Jira and is available for Jira Cloud, on-premise, and can also be installed via docker.
Note: Exalate also supports Jira Service Management.
How to Set up a Jira Zendesk Integration (a Step-by-Step Process)
Now we’ve decided what we want to achieve and picked a tool, let’s look at how to set things up. We’re going to run through installing Exalate on both platforms, setting up a connection between them, and then look at how we can configure that connection to do what we want.
We’ll start by installing it on each platform.
But before we dive in, would you rather watch a tutorial than read a guide? Then check out this video:
Note: You can also have a look at this step-by-step Getting started guide on Exalate documentation to learn how to set up your first sync.
Step 1: Install Exalate on Zendesk
First, we’ll install Exalate on Zendesk. To do that, we have to create a proxy user that will be used when we install the app. Exalate cannot synchronize issues created by the proxy user so it is best to have a dedicated user account to use just as a proxy. For more information, have a look at the Exalate installation guide for Zendesk.
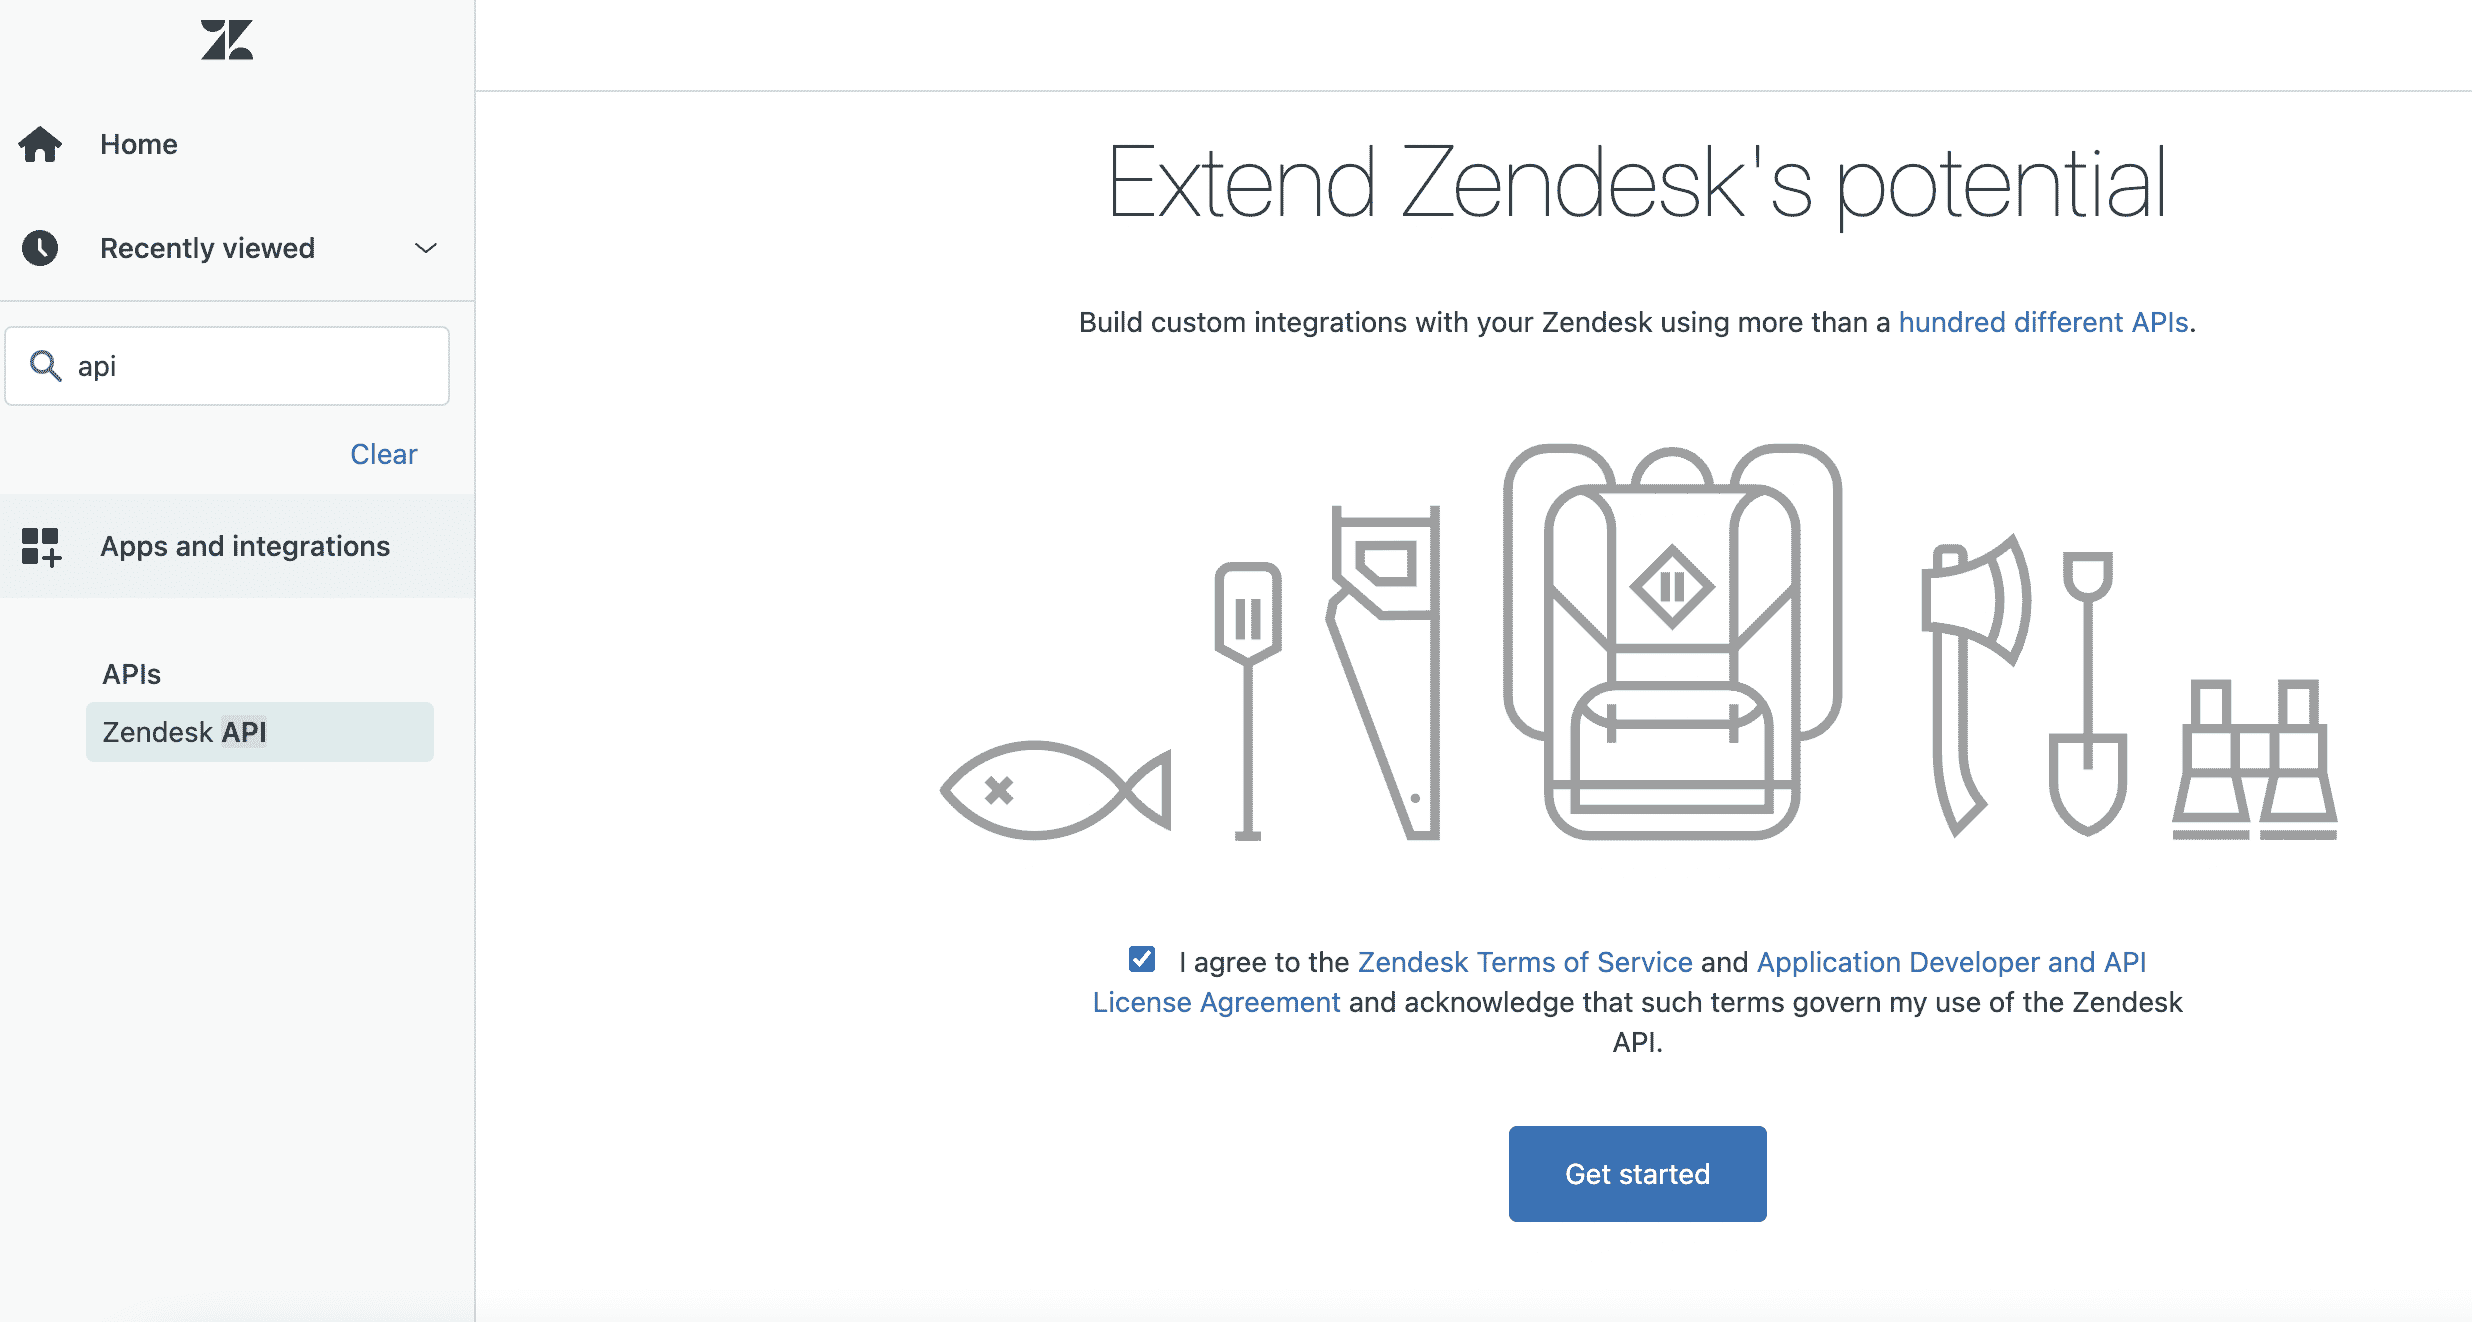
You need to generate a token for this user, so when you’re logged in, go to the Zendesk Admin screen, by clicking the cog-shaped icon in the left-side menu. Then select “API” under the “Apps and Integrations” heading.
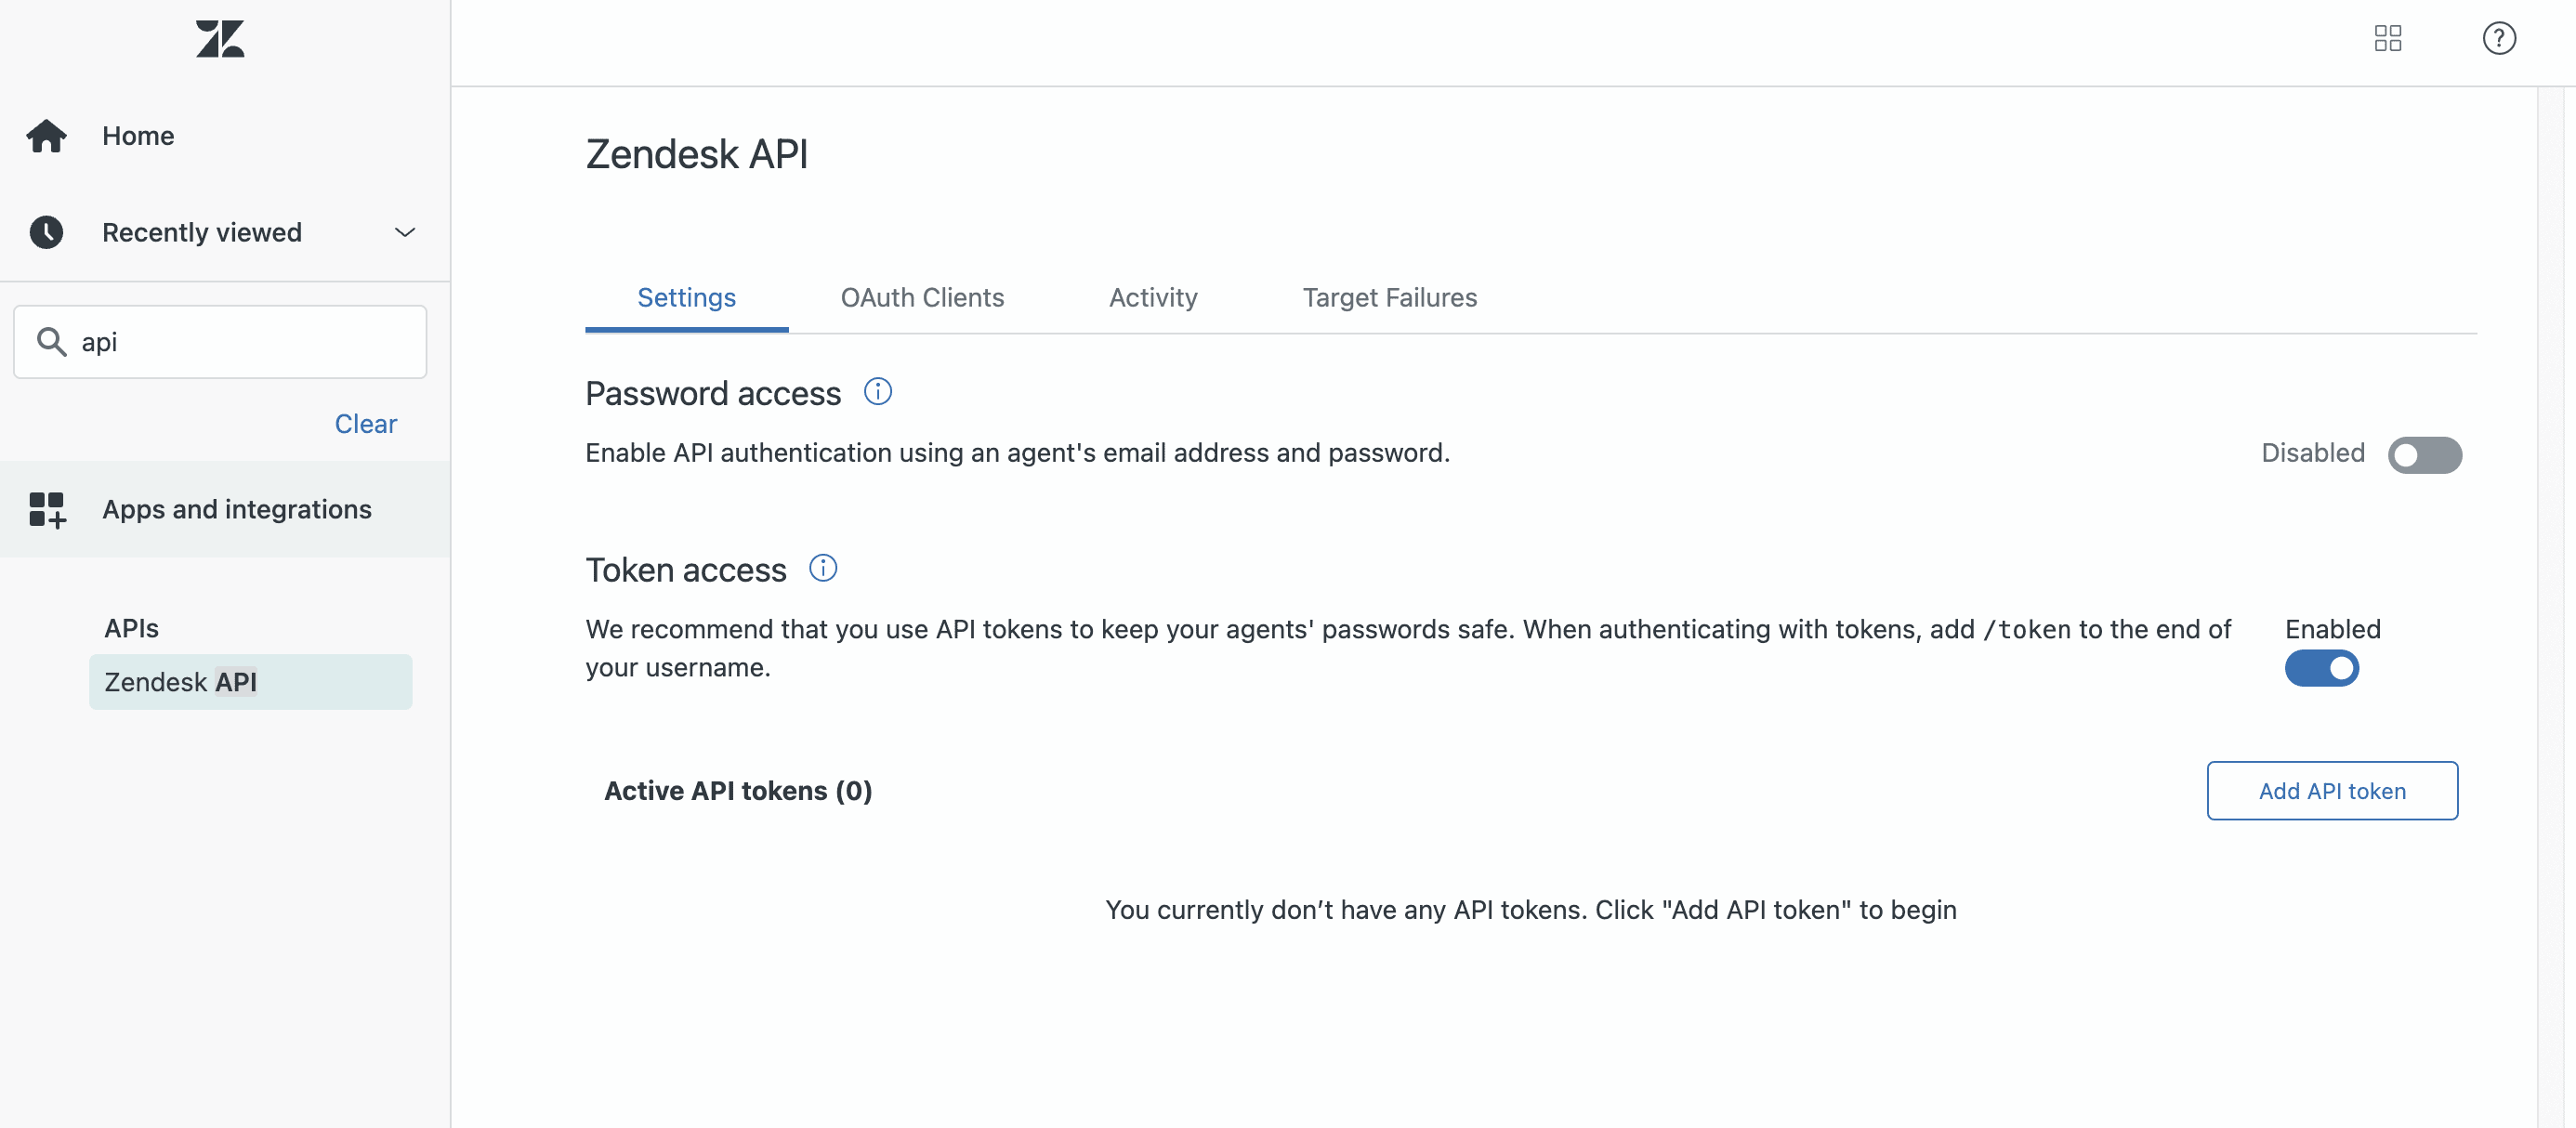
If you haven’t used this section before you’ll need to agree to some terms and conditions, and then click the “Get started” button to proceed. On the next screen, you’ll see a “Token Access” heading. This will probably be disabled. If that’s the case, flip the switch on the right of the screen to enable it.
Your screen should then look something like this. Click the plus icon to add an API token. You can give the token a description to help you identify it in the future. This is very useful, particularly if you have multiple tokens later on.
The generated token is a string of text, which you should now copy somewhere safe. You are only shown the token once, so if you don’t copy it properly you’ll have to repeat this process.
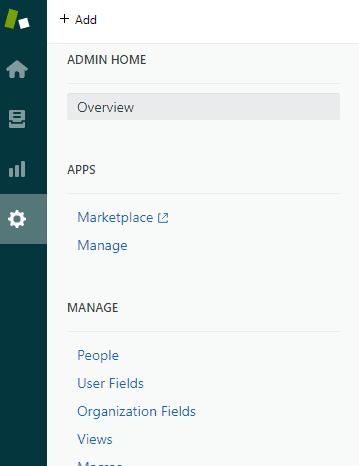
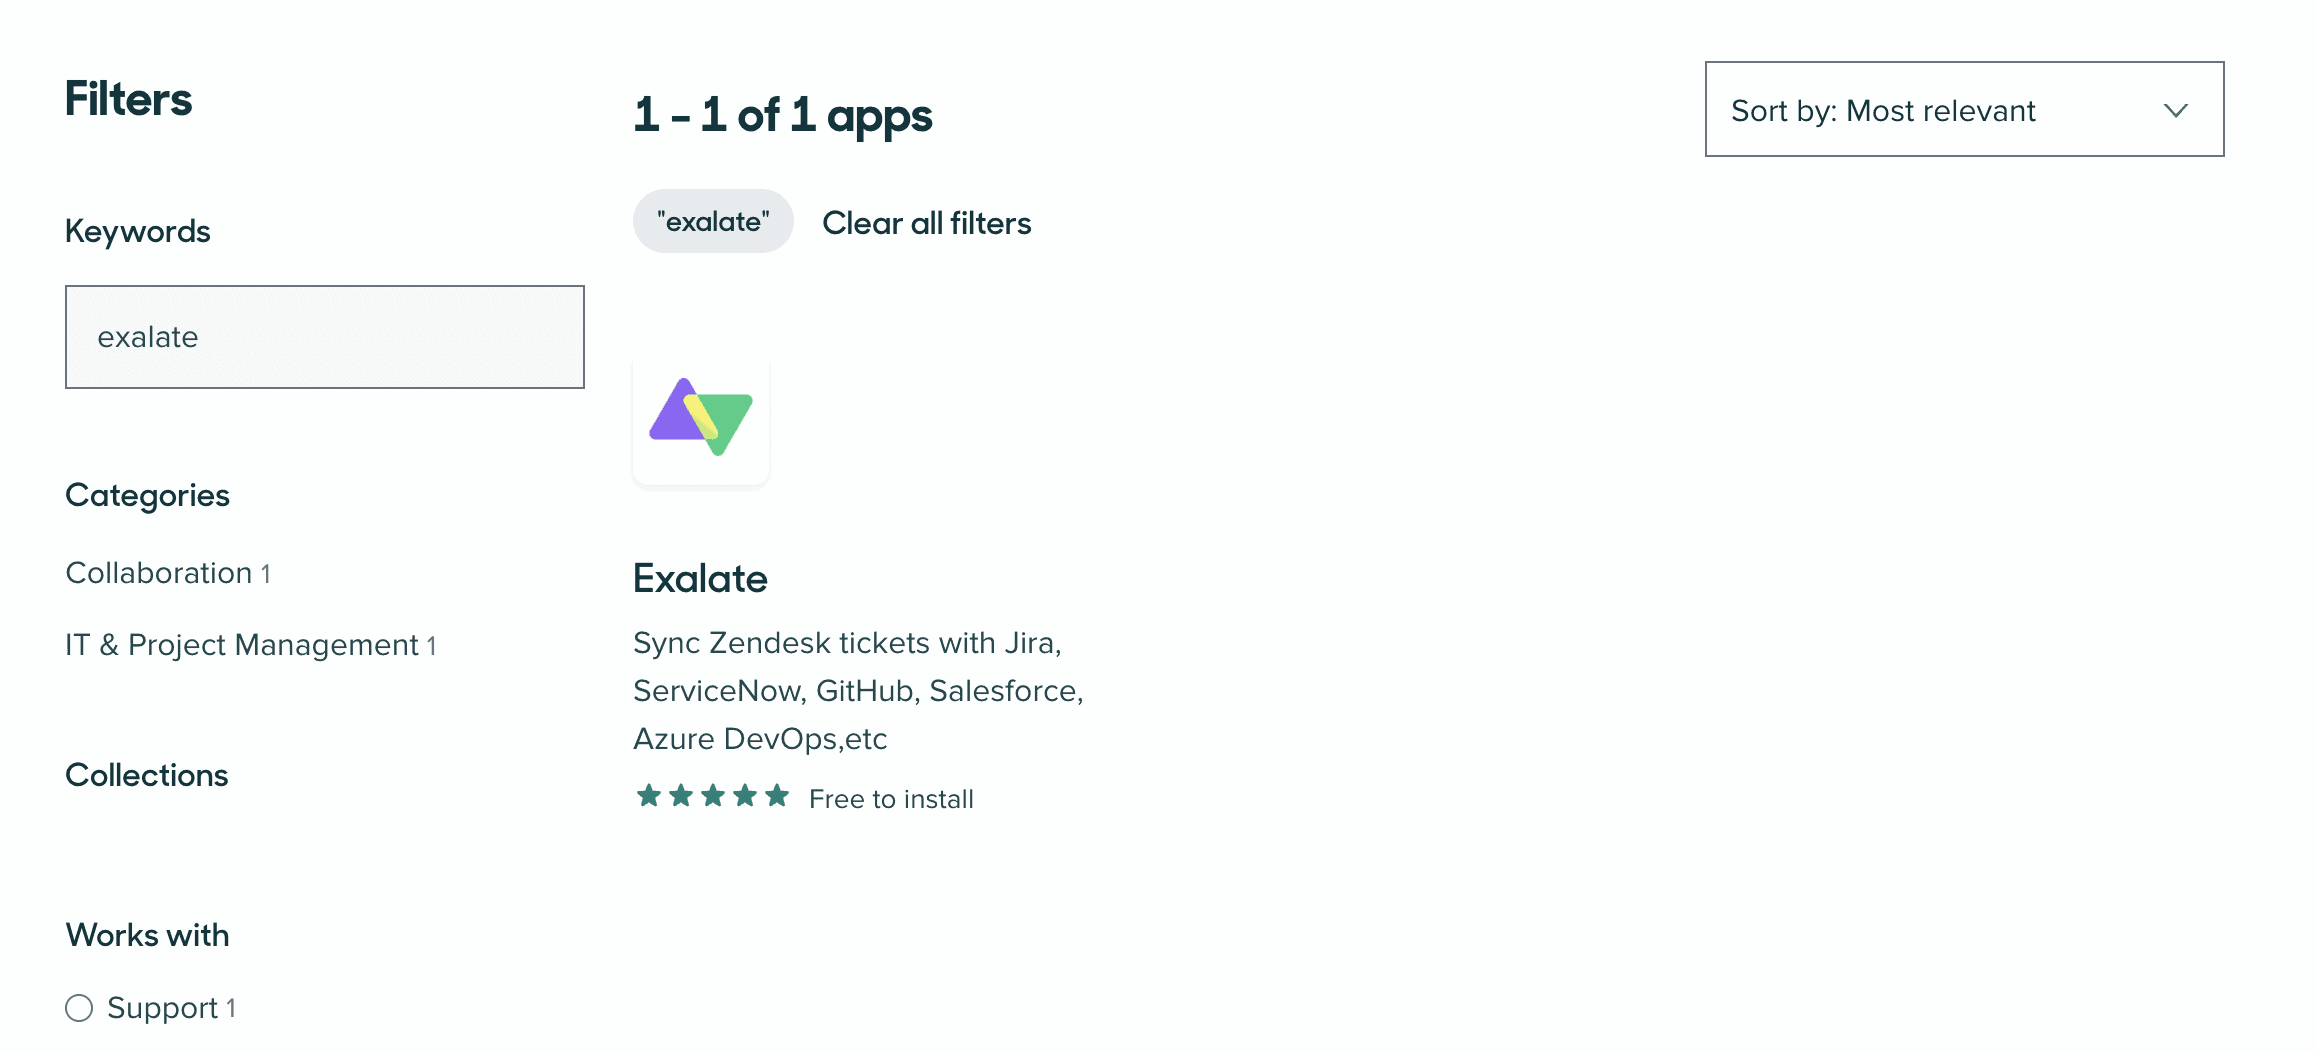
Now, we need to find the Exalate app in Zendesk’s marketplace. Log in to Zendesk, then click on the cog-shaped admin button on the left side menu.
Next click on “Marketplace”. The marketplace should open in a new window. If it doesn’t, check your browser isn’t blocking you from opening new windows.
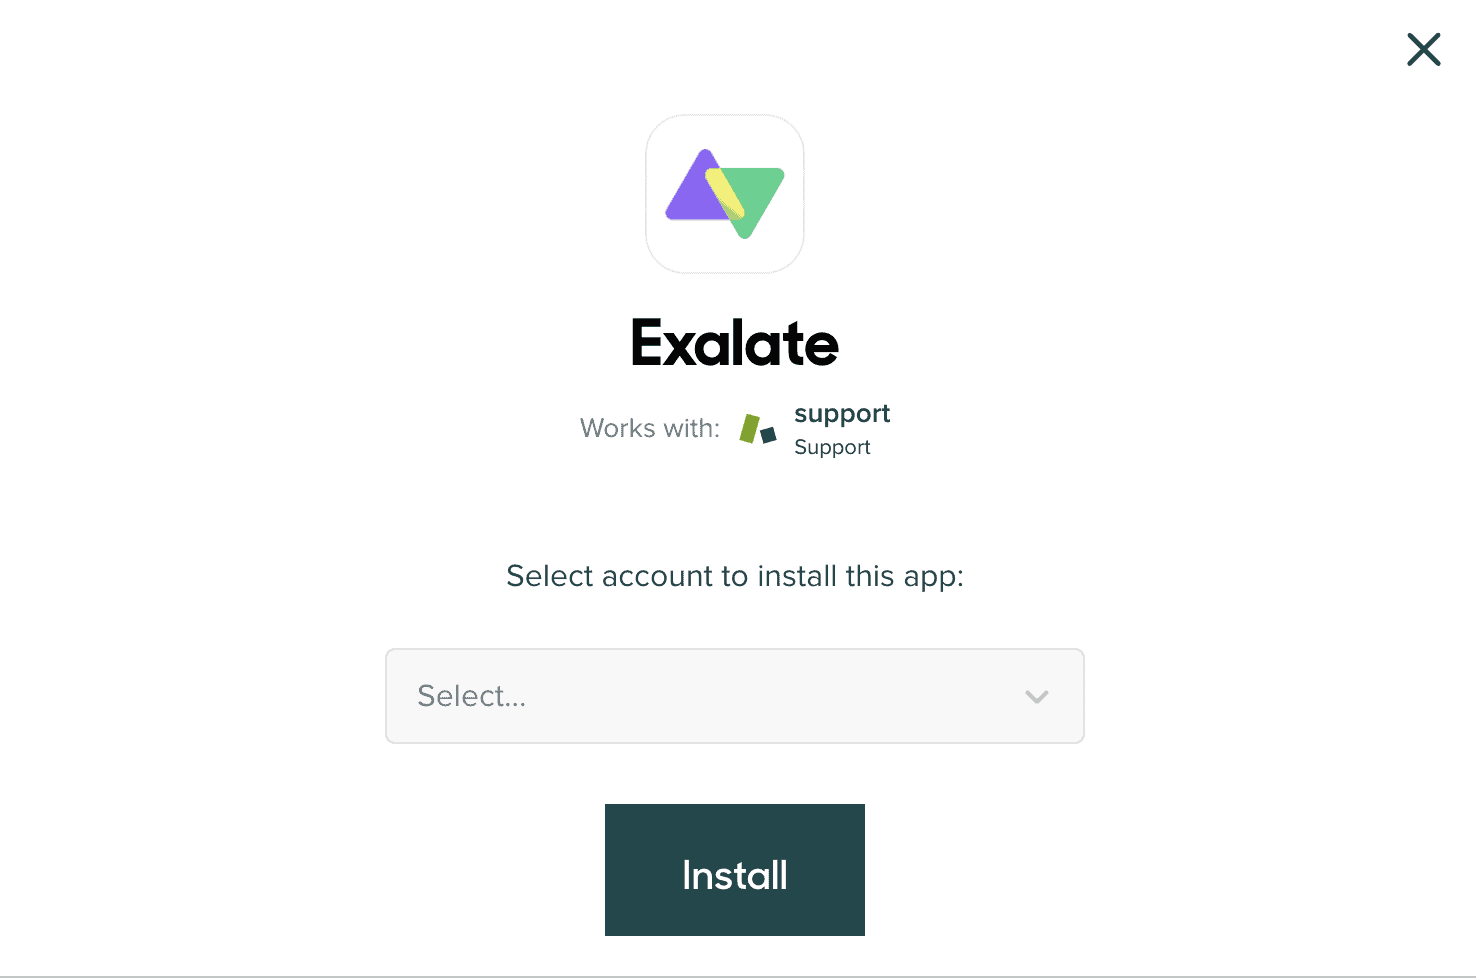
Type “Exalate” into the search field and you should see the app appear. Click on Exalate and you’ll be taken to the app’s page. Click the “Install” button. Make sure the account you want to use is selected in the popup that appears, then click “Install” again. You’ll need to enter the token created earlier and the details of the proxy user who created it.
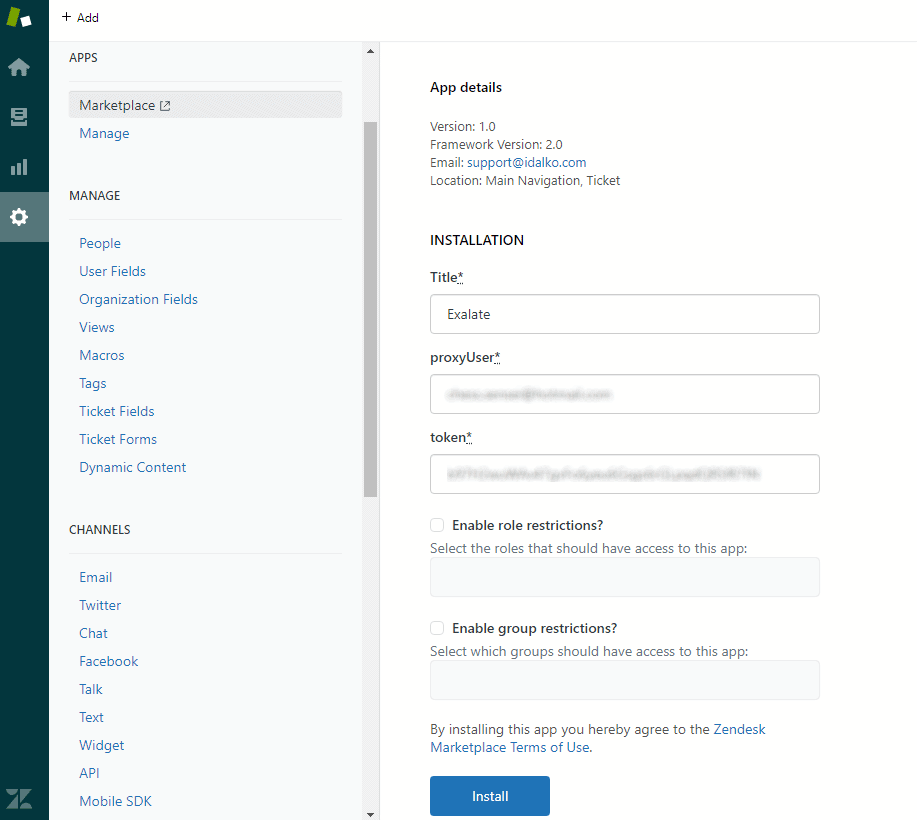
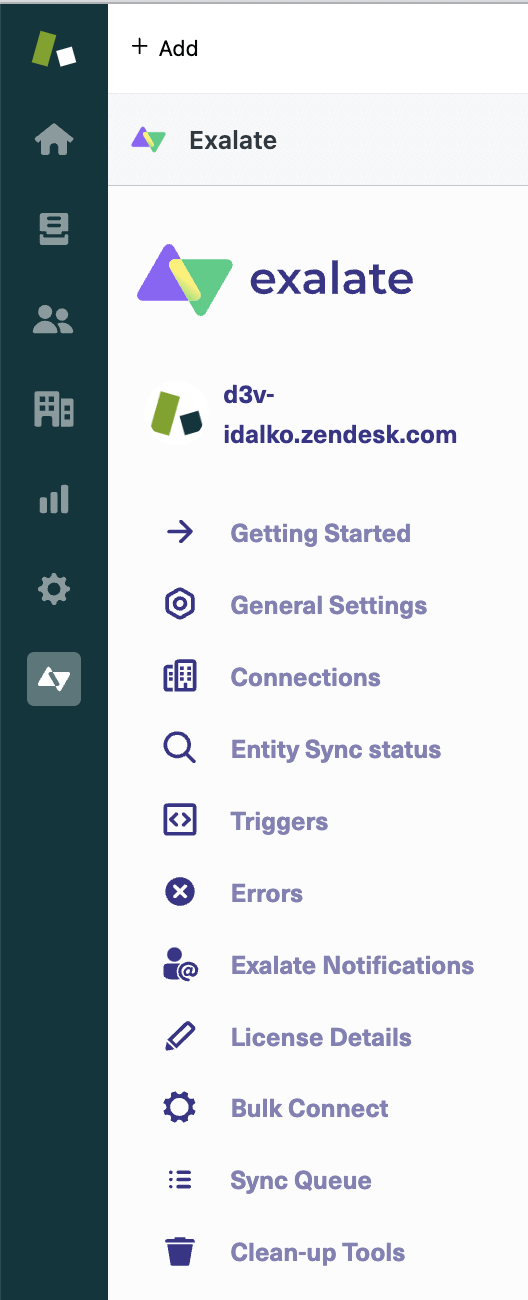
Enter the email of the proxy user into the user field. There are also boxes to tick to restrict the roles and groups that have access to the app. You can ignore this for now, but if you want to control who can use Exalate, this is where to set that up. Click the “Install” button and Exalate will be installed on Zendesk. Now we need to register for an Exalate node. Read more about that in the documentation. Click “Exalate” in Zendesk left-hand menu if you aren’t there already.
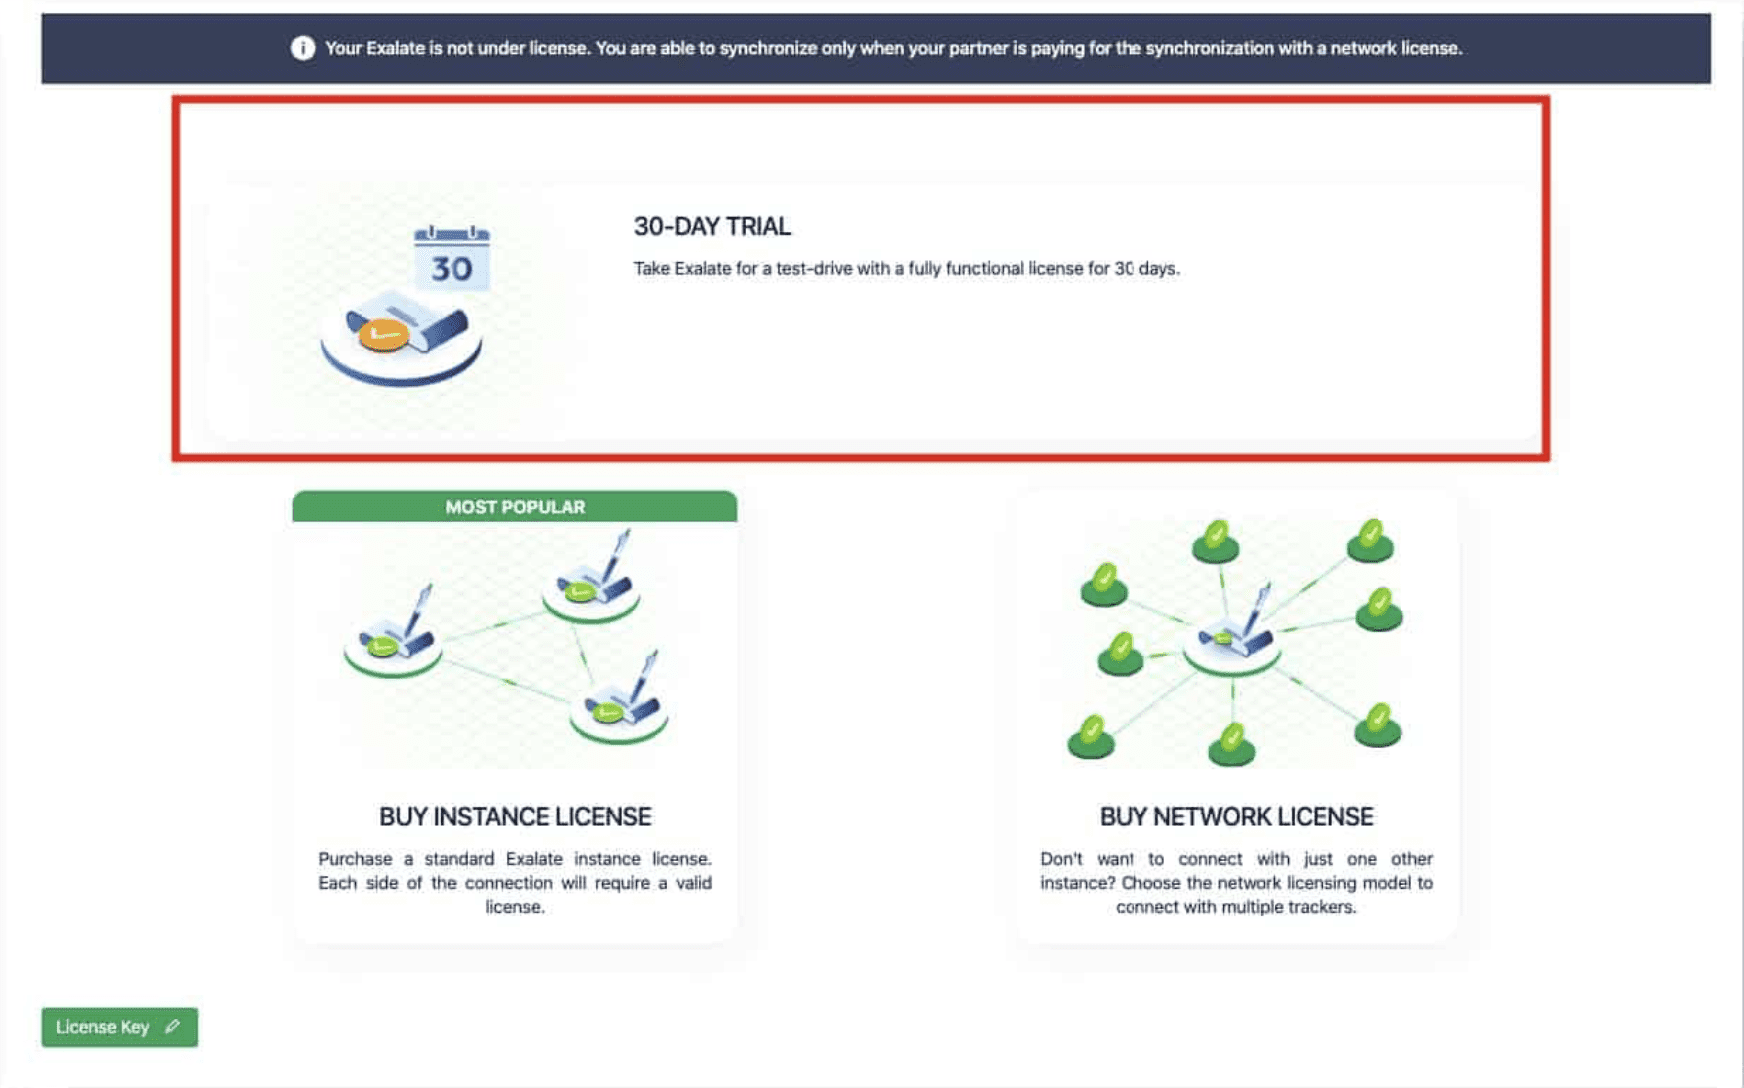
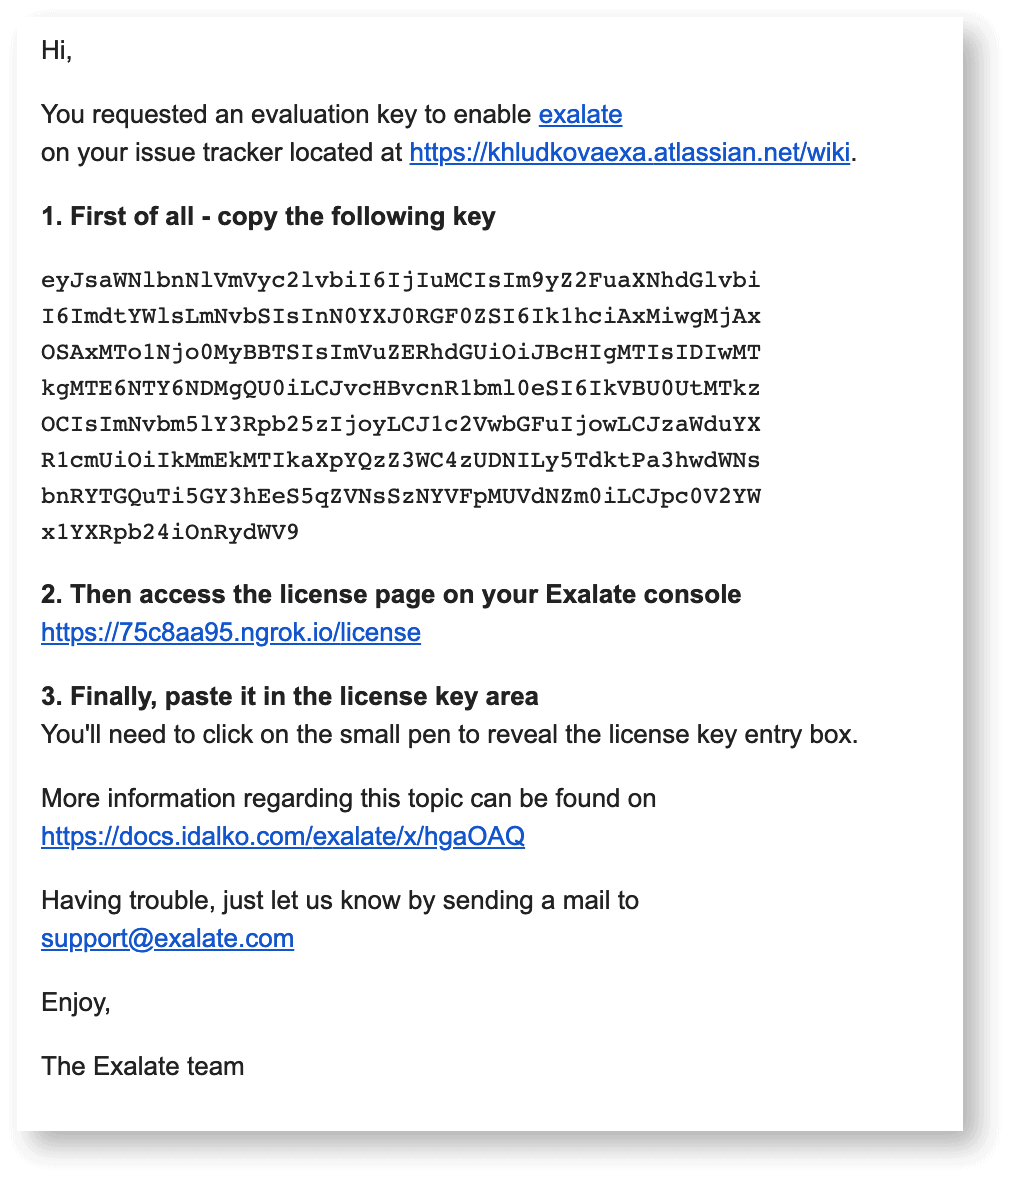
It might take Exalate a few seconds to load the first time you use it, so don’t panic if the menu doesn’t appear immediately. On the licensing page, click the area that says “30-day trial”. A pop-up will appear. Enter your email address into the pop-up field. Click the “Send” button. You’ll then get an email containing an evaluation key. Copy the key to your clipboard by highlighting it with the mouse and pressing the copy keyboard shortcut. That’s control+c for Windows and Linux, or command+c for Mac users.
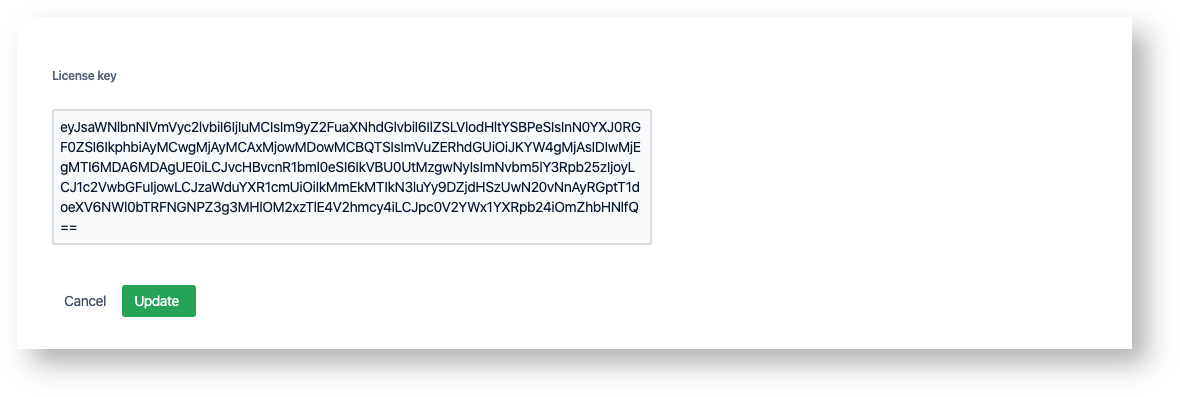
Then look back at the Exalate license details page and click the “License Key” button at the bottom left. You may have to scroll down if it isn’t visible. Paste the license key into the field that appears with control+v, or command+v (Mac users). Then click the “Update” button.
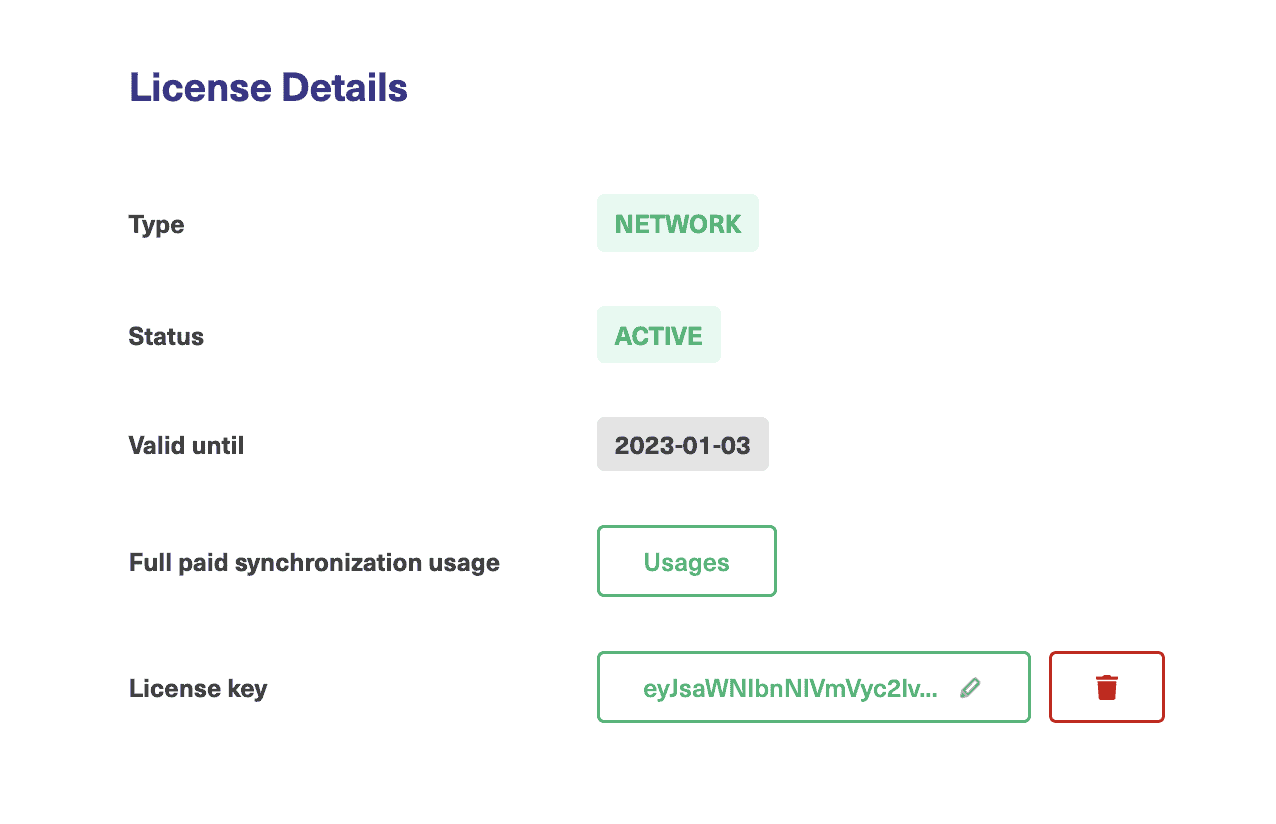
Your Exalate installation is now licensed for 30 days on Zendesk. We’ll come back later to set up our connection, but first, we need to install Exalate on Jira.
Step 2: Install Exalate on Jira
There are 2 main versions of Jira, Jira Cloud, and Jira Server. There is also a Jira Data Center for Enterprise users. Exalate works on all of them, though the installation process is slightly different.
Once Exalate is set up, it gives you a common interface across all platforms, making it easy to deploy and adapt to your needs.
To read more about installing Exalate on Jira Cloud, check this link. If you’re running your own Jira Server or Data Center, then check here. For the rest of this tutorial, we’ll be using Jira Cloud.
Start by logging in to your Jira instance.
As with Zendesk, we need to find Exalate in the marketplace first. Click the cog-shaped settings button in the top-right of the screen, and select “Apps”. You’ll be taken to the Atlassian marketplace. Type “Exalate” in the search field. You should see several results.
Click “Exalate Jira Issue Sync & More”. Next, click the “Try it free” button.
A pop-up will then be displayed, where you need to click the “Start free trial” button. After some time, you’ll be taken back to Jira, where you’ll see a confirmation.
Click “Get started” and you’ll be ready to go on Jira. Now we have Exalate installed and ready on both platforms. Let’s see how to connect them.
Step 3: Connect Zendesk and Jira
To create a connection, we go into one platform, enter a few details, and generate an invitation. We then go to the other platform and accept the invitation.
It doesn’t matter which platform we start with, but for this guide, we’ll use Zendesk first.
As mentioned above, one advantage of Exalate is the common interface in different platforms makes it easy to work with. Once you’ve done something on one platform you can do the same thing elsewhere.
In Zendesk, get to Exalate by selecting its icon from the left-side menu. If you haven’t already accepted Exalate’s EULA, you may be asked to do so on this screen.
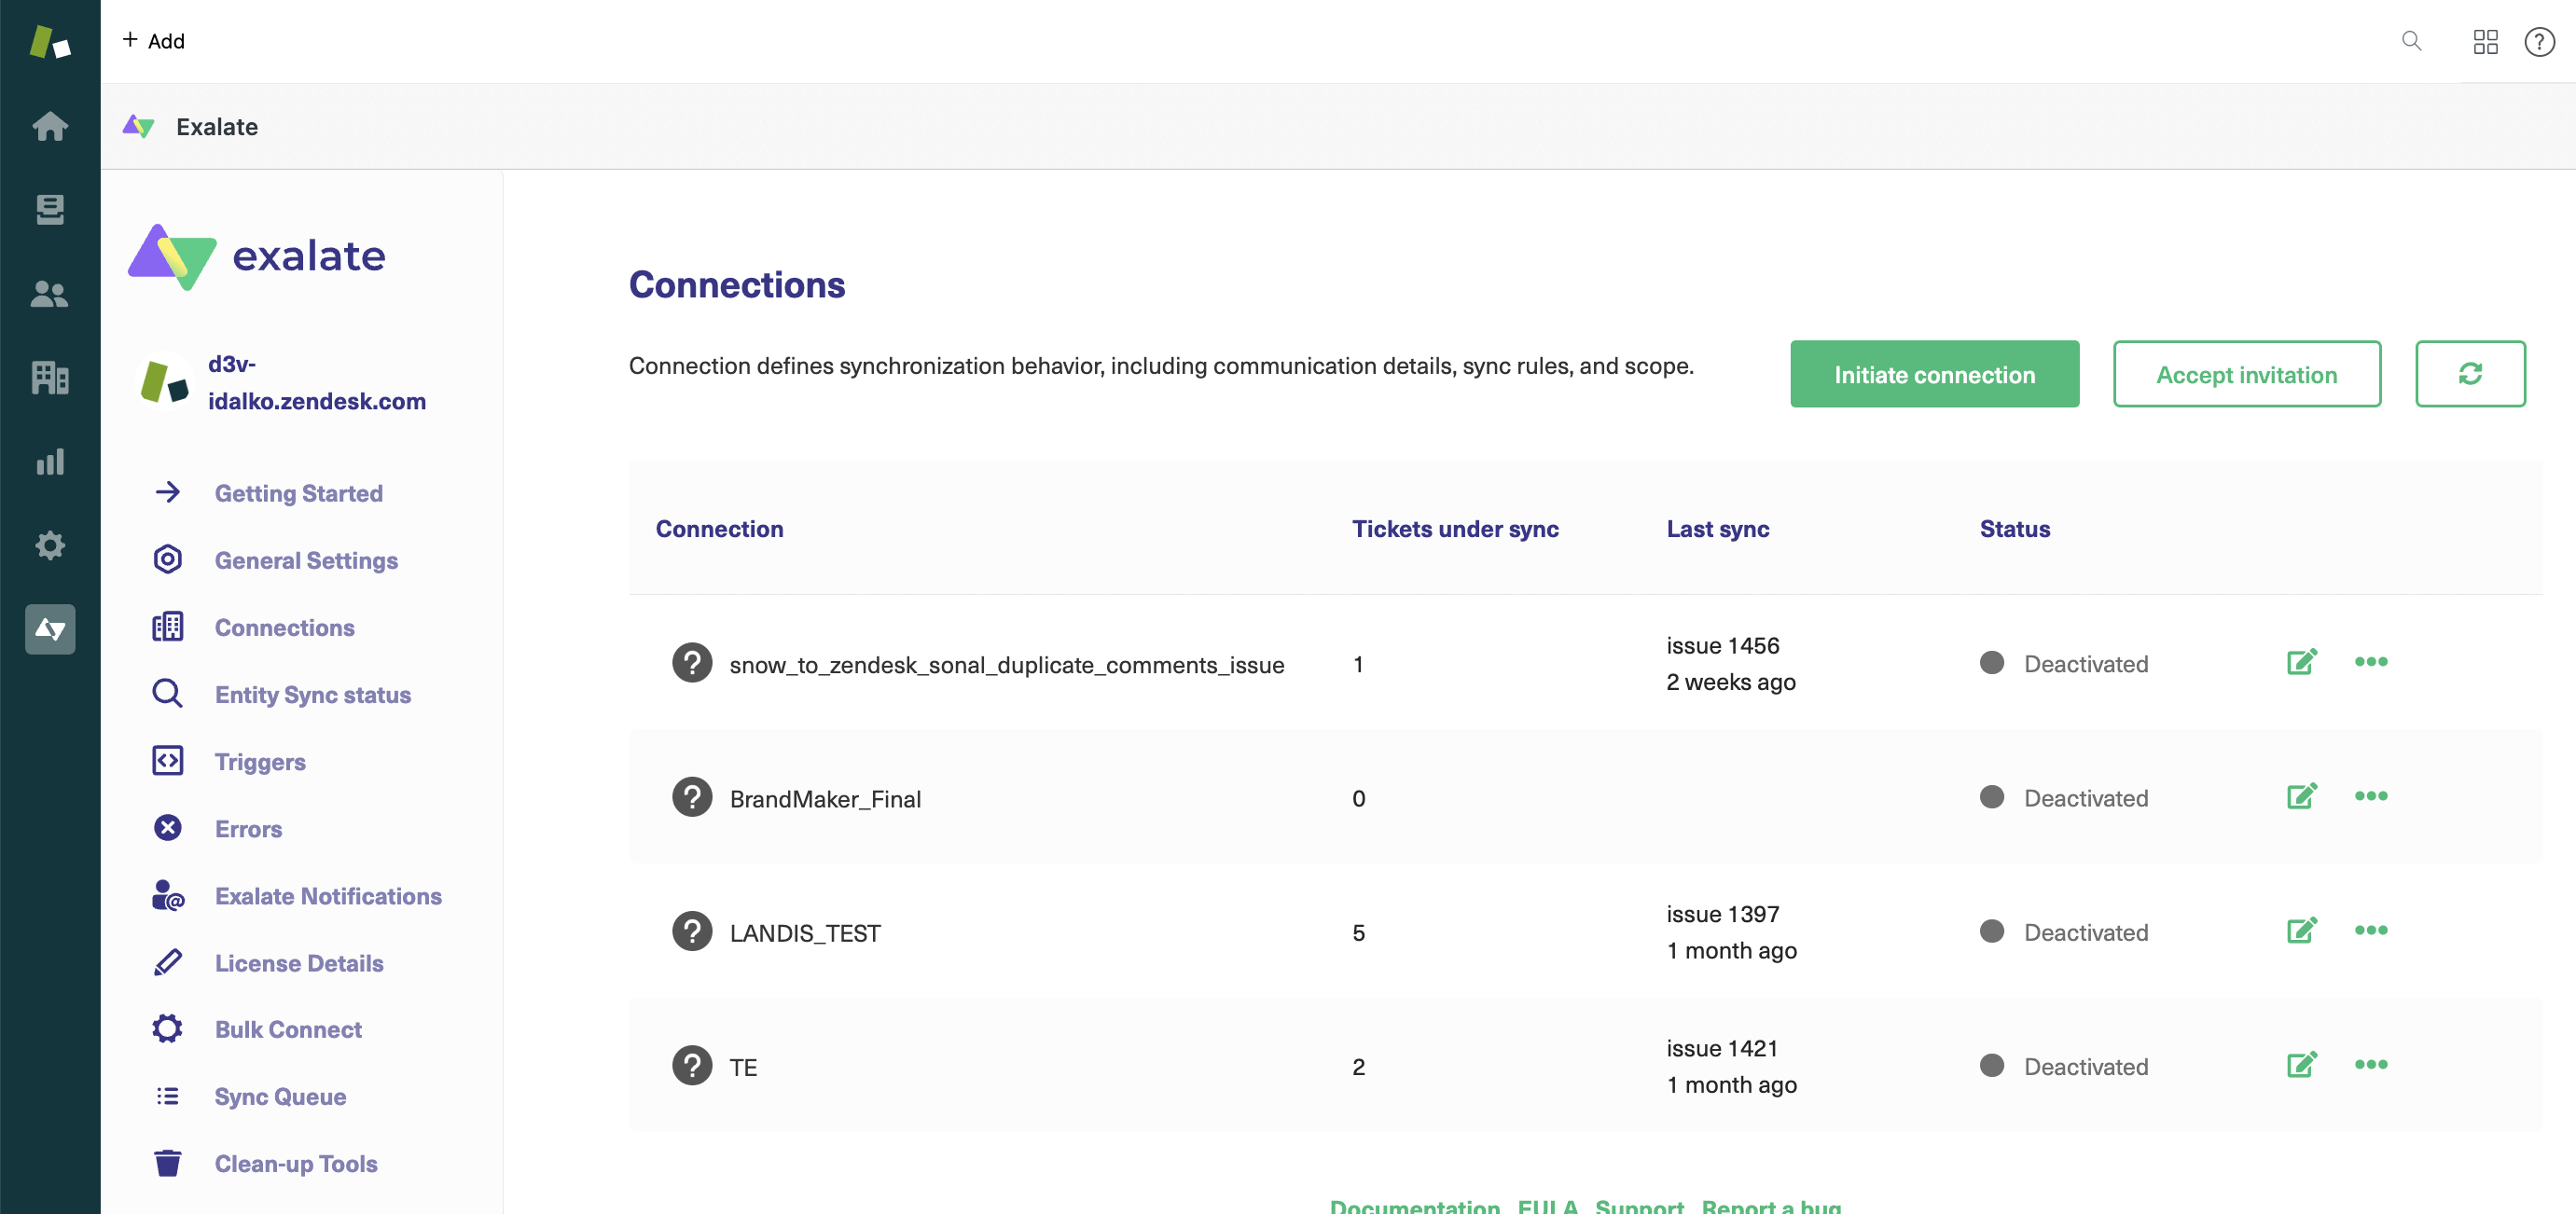
Click on the connections screen if you aren’t there already, and you should see something like this screenshot. Your connections will be listed here.
Firstly, click the “Initiate connection” button at the top right of the screen.
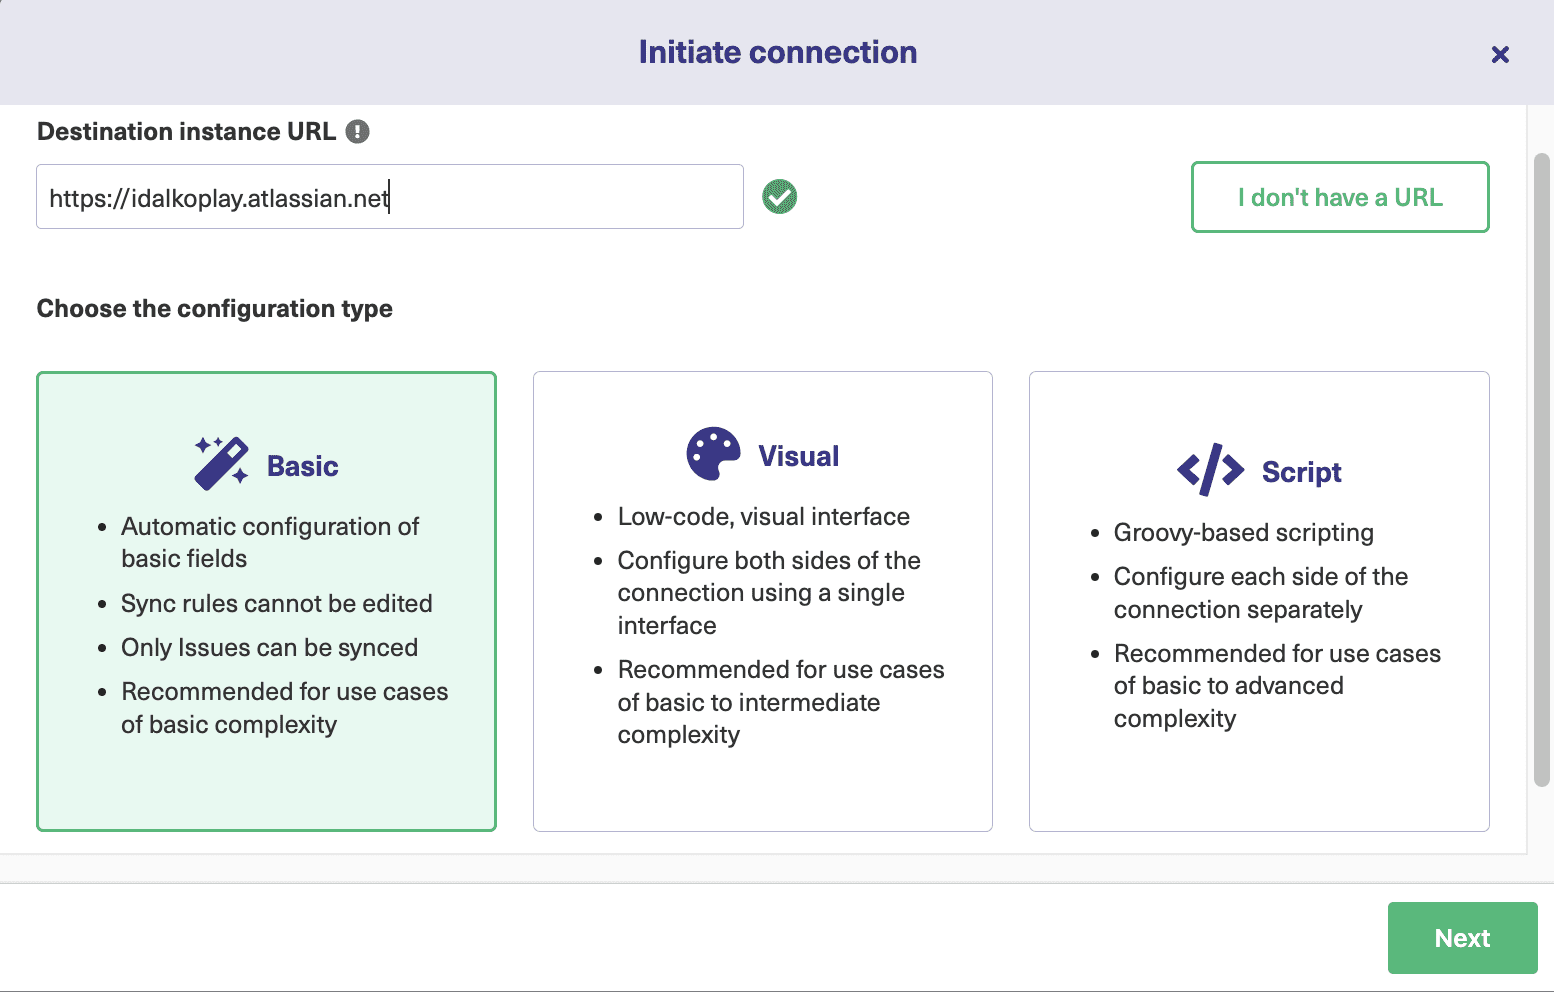
After this, you will be prompted to enter the URL of the destination instance, in our case the URL of the Jira node. Verification is performed to check if Exalate is installed on the destination or not.
Click “I don’t have a URL” if you don’t have one and follow these steps.At this point, you can choose one of the three ways to continue.
Exalate allows you to set up your connection using 3 modes: the Basic Mode, the Visual Mode, and the Script Mode.
The Basic Mode allows you to work with preset sync rules that are generated automatically and cannot be modified. This mode is recommended for use cases with basic synchronization needs.
The Visual Mode has a visual interface and does not require code. It gives you an easy way to set your connection up to share what you want, at the time of your choosing.
If you prefer a deeper more flexible integration, you can use the Script mode. The Script mode lets you use more advanced features and configurations using programming logic. It also allows you to sync almost anything. You can modify the sync rules using the “Groovy Scripting” language.
We will have a look at all of these modes one by one.
Continue with the Basic Mode
To get started with the Basic mode, click “Next” after selecting it.
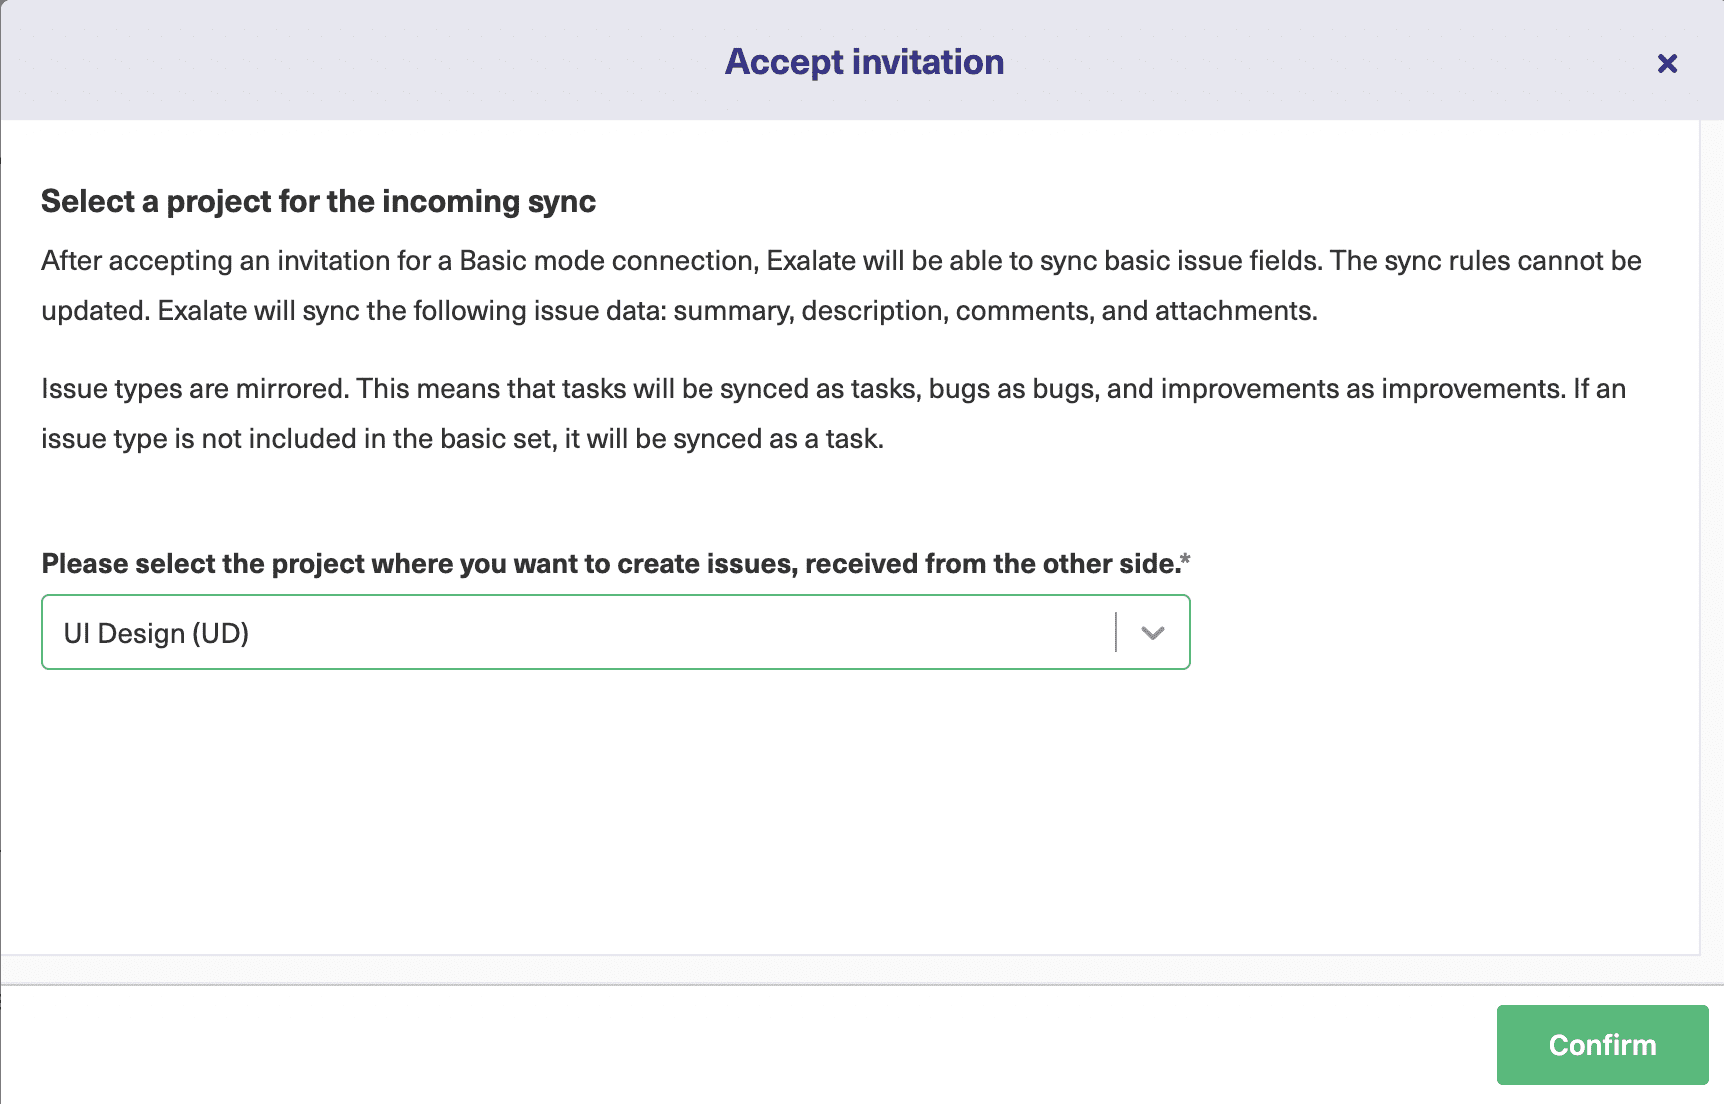
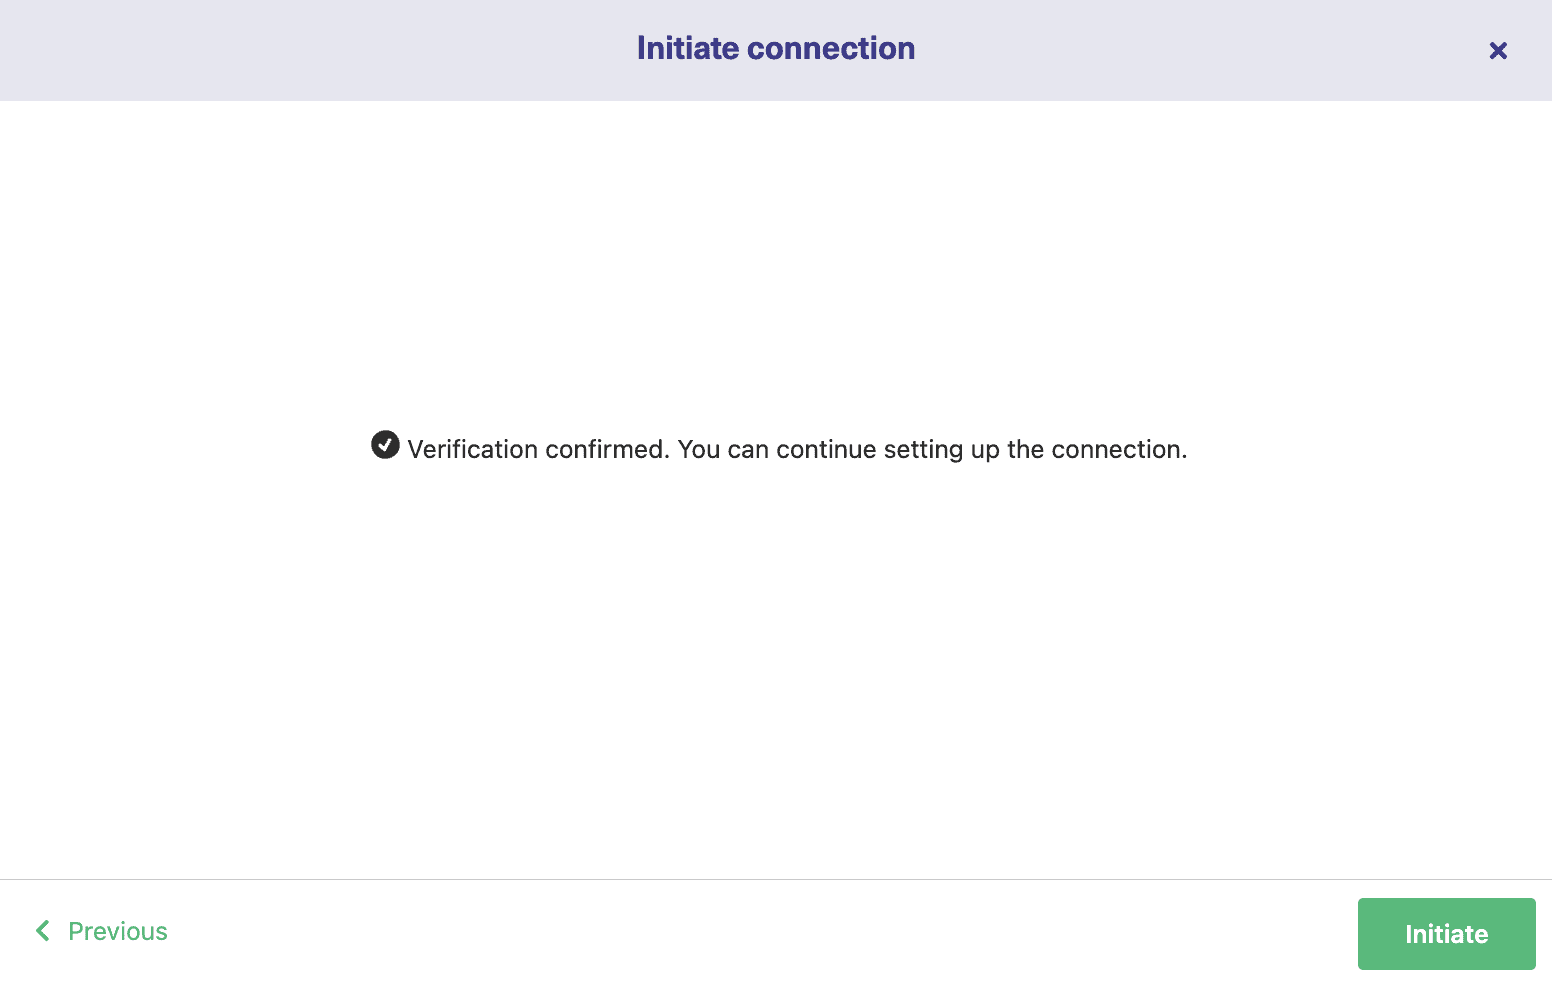
This will take you to a screen where you must confirm if you have admin access to the Jira side. Click “Yes, I have admin access” and then “Initiate”. If you don’t have access then you will be required to copy and paste an invitation code manually from the Zendesk to Jira instance. After the admin access on the Jira side has been verified, move on to selecting a project. Select it from a drop-down list and click “Confirm”. This successfully establishes a connection between Zendesk and Jira.
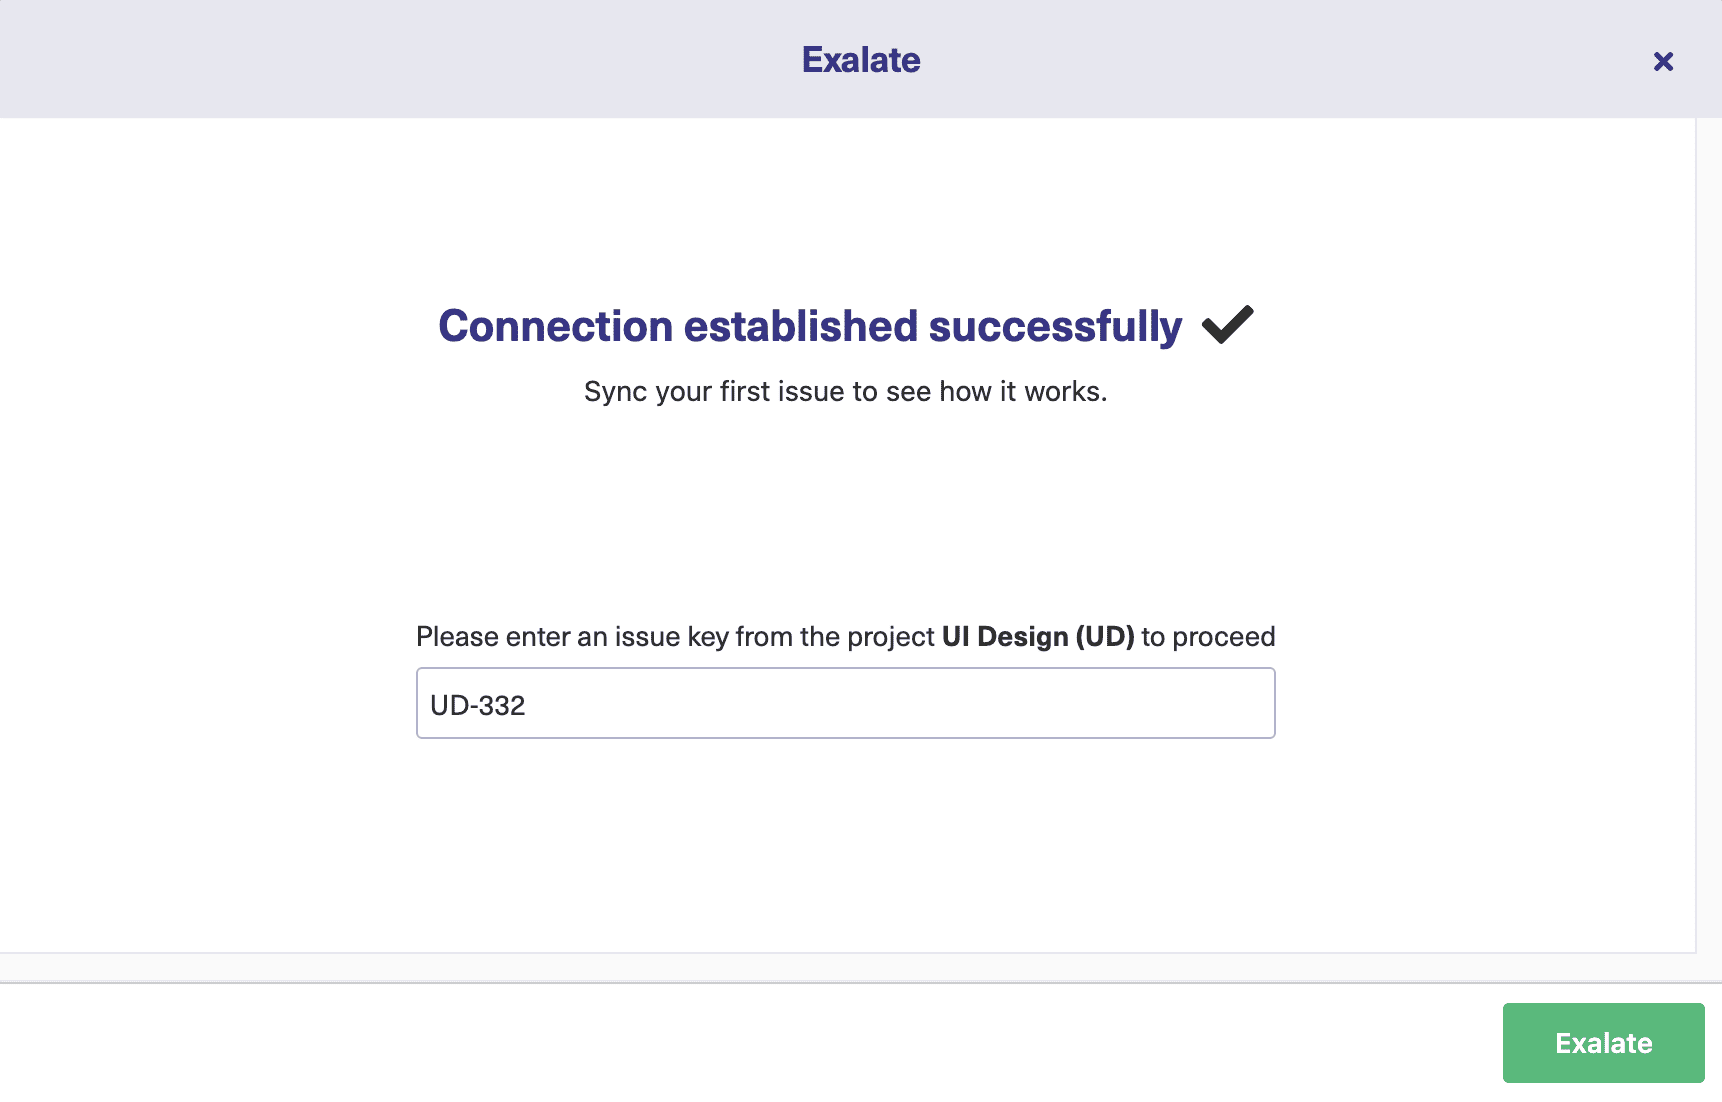
Now you can sync your first issue by directly entering the issue key as shown below, or by creating a trigger.
You can even synchronize your issues in bulk. The same screen on the Zendesk side will prompt you to enter the ticket number. Enter the issue key and click “Exalate” to synchronize it.This means an issue synchronized from the Jira side will generate a ticket on the Zendesk side.
The synchronized issue status looks like this. You can view the ticket that has been generated by clicking on the ticket number. You will be redirected to the Zendesk console where you can view the ticket details. Continue with the Visual Mode
If you want to use the Visual mode instead, make sure to select it and click “Next”. Now you’ll see a screen where you name your local and remote instances. Doing this will generate a connection name automatically, but you can edit it further if you like.
There’s also a field to enter a description. It’s best to enter as much information as possible here, to help you identify and differentiate this connection from others later on.Next, you’ll be asked if you have admin access to the other node.
If you select “Verify admin access”, you will be redirected to the Jira instance for verification. After successful verification, you can proceed and set up the connection by clicking the “Initiate” button. After some time, it will tell you the connection is established and a green ‘Configure sync’ button will appear.
Click it.
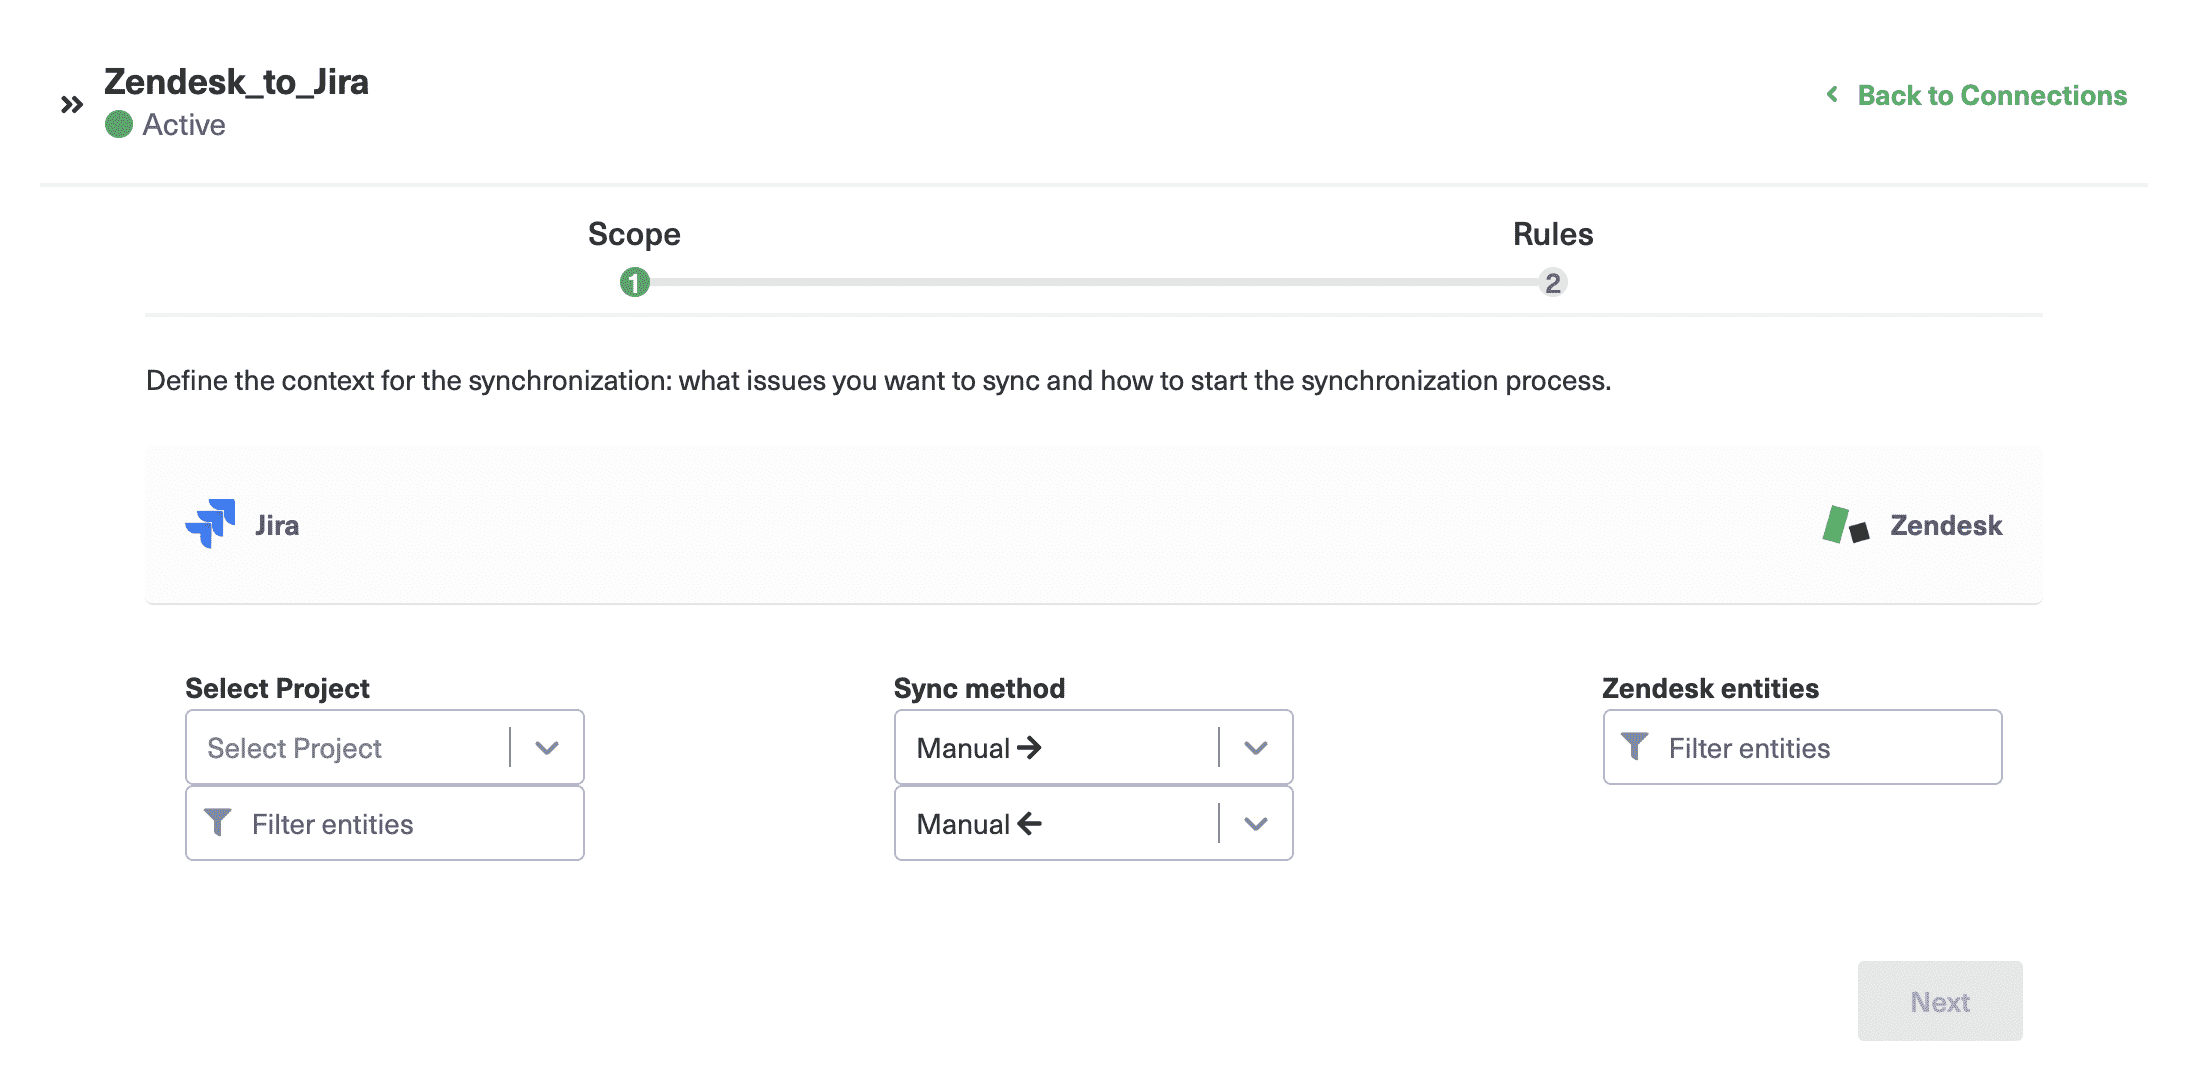
Here’s how the visual configuration looks. The exact arrangement will depend on whether you set up the connection in Jira or Zendesk – this is how it looks from Jira.
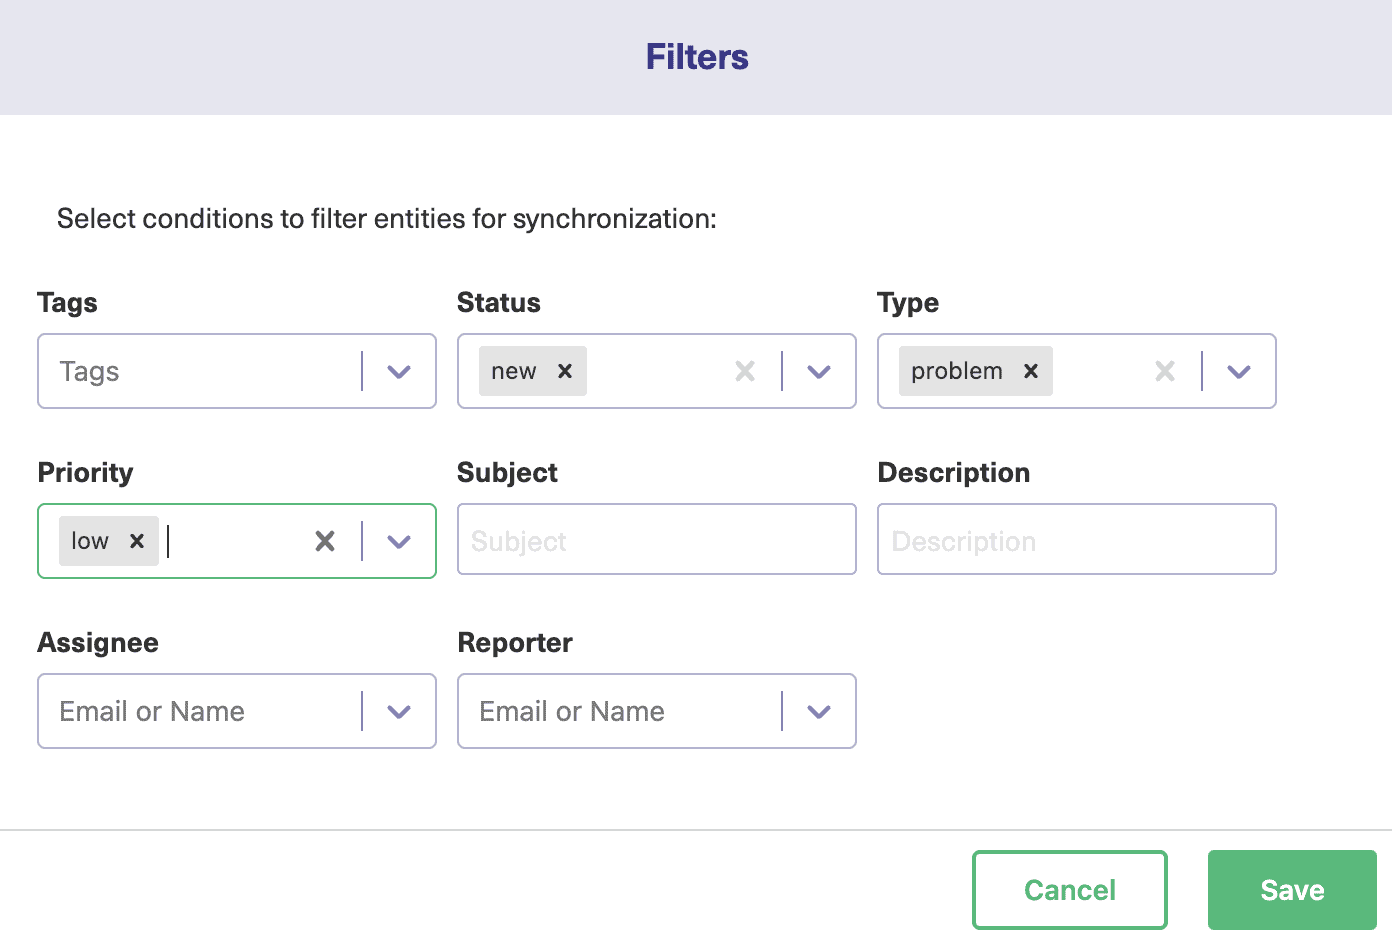
There are several options here, on the Scope screen. If you click the ‘Filter tickets’ button, a further pop-up will appear like the one below.From here, you can choose the properties of the tickets you wish to synchronize. You can select various properties from the dropdown boxes. You can choose specific tags as well as filter by status, type, or priority.
There is also a ‘More’ button which will give you further options. If you click that, you’ll be able to enter a subject and a description.
When you’ve chosen the filters you want, click the “Save” button.
Back on the Scope screen, there are drop-down boxes to choose your Sync method. You can choose whether syncing is done manually, automatically, or disabled altogether.
There are 2 of these boxes, one to control each direction. In this case, one controls tickets sent from Zendesk to Jira, and the other controls tickets sent from Jira to Zendesk.
There’s also a drop-down box on the right that lets you choose which project will be used for synchronization. You can also choose to “Filter entities” on the Jira end. This will be the same screen you saw above but customized for Jira.
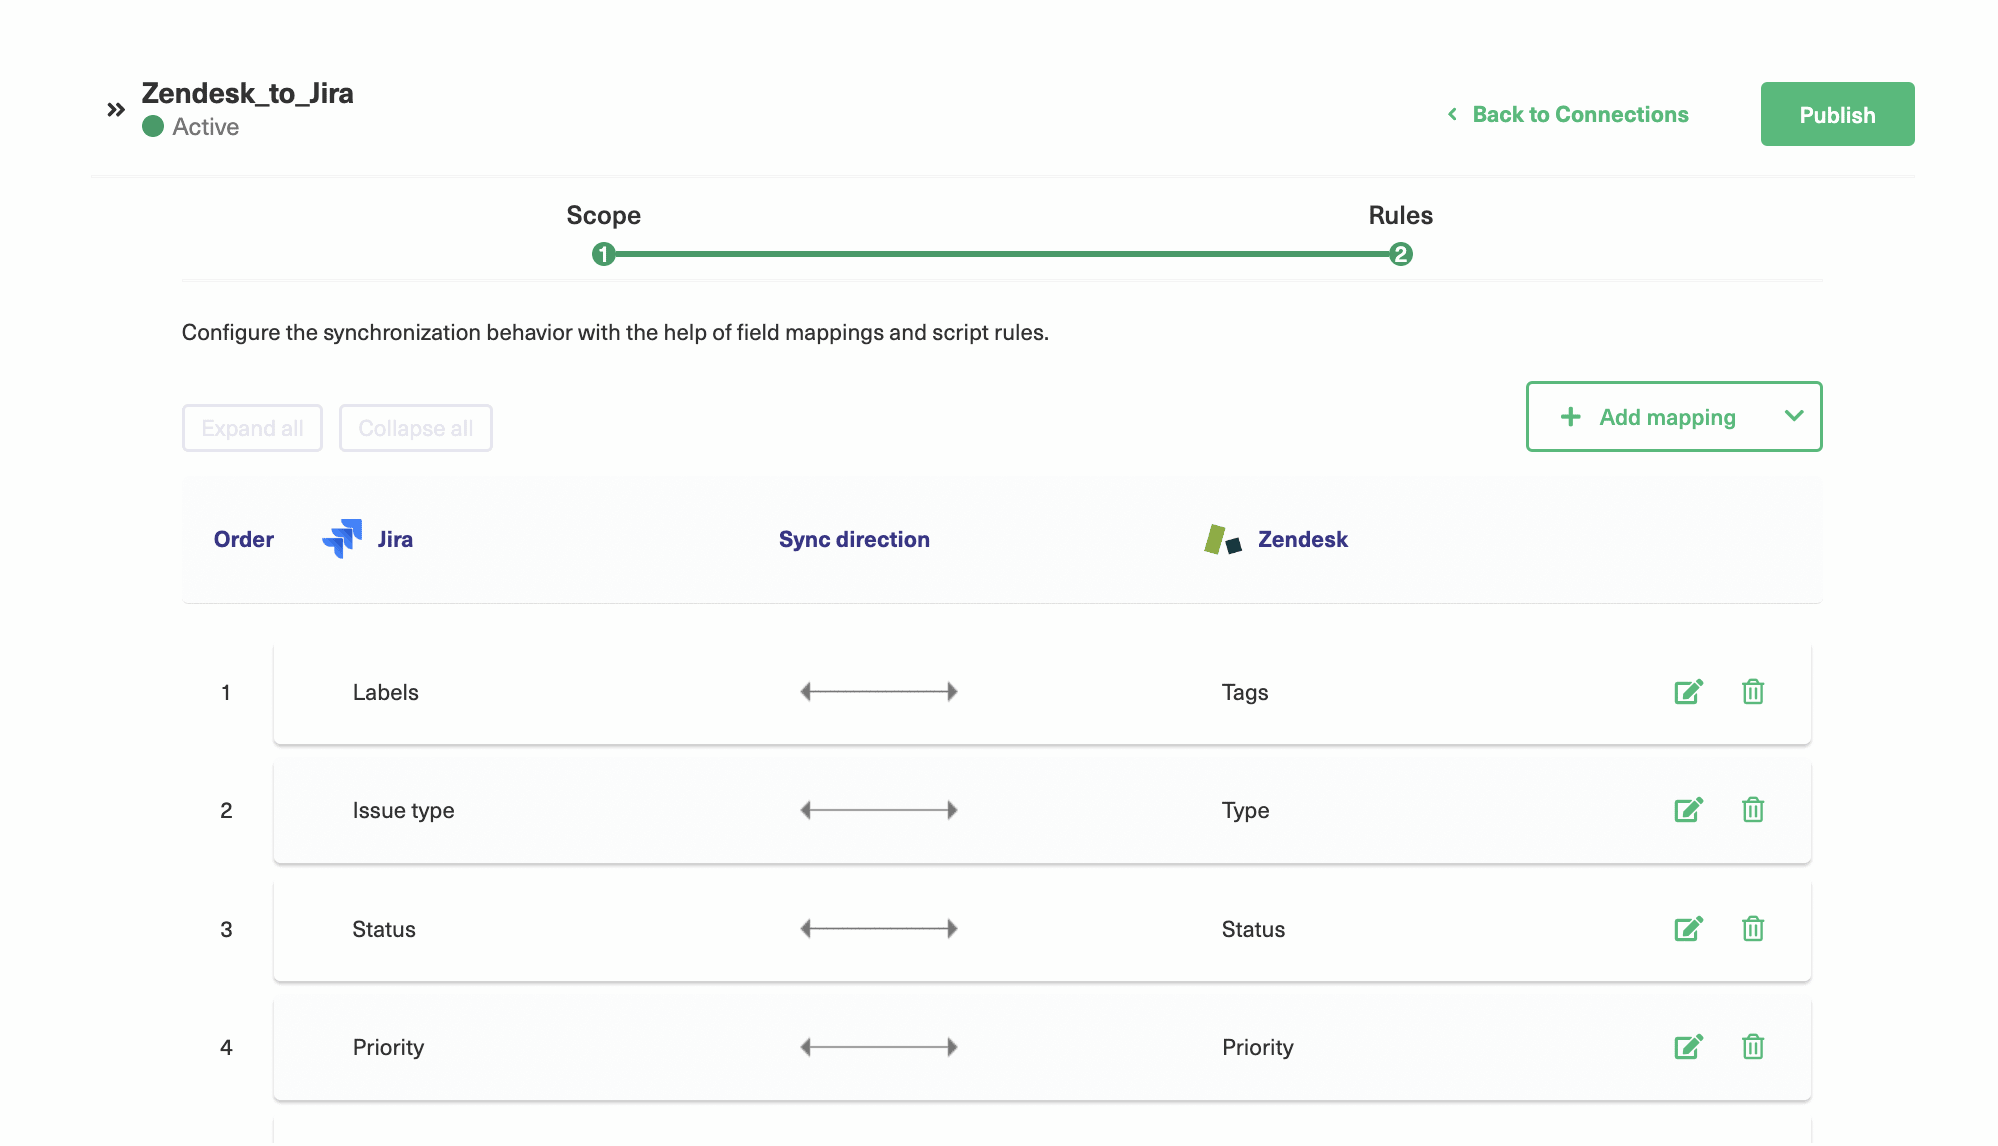
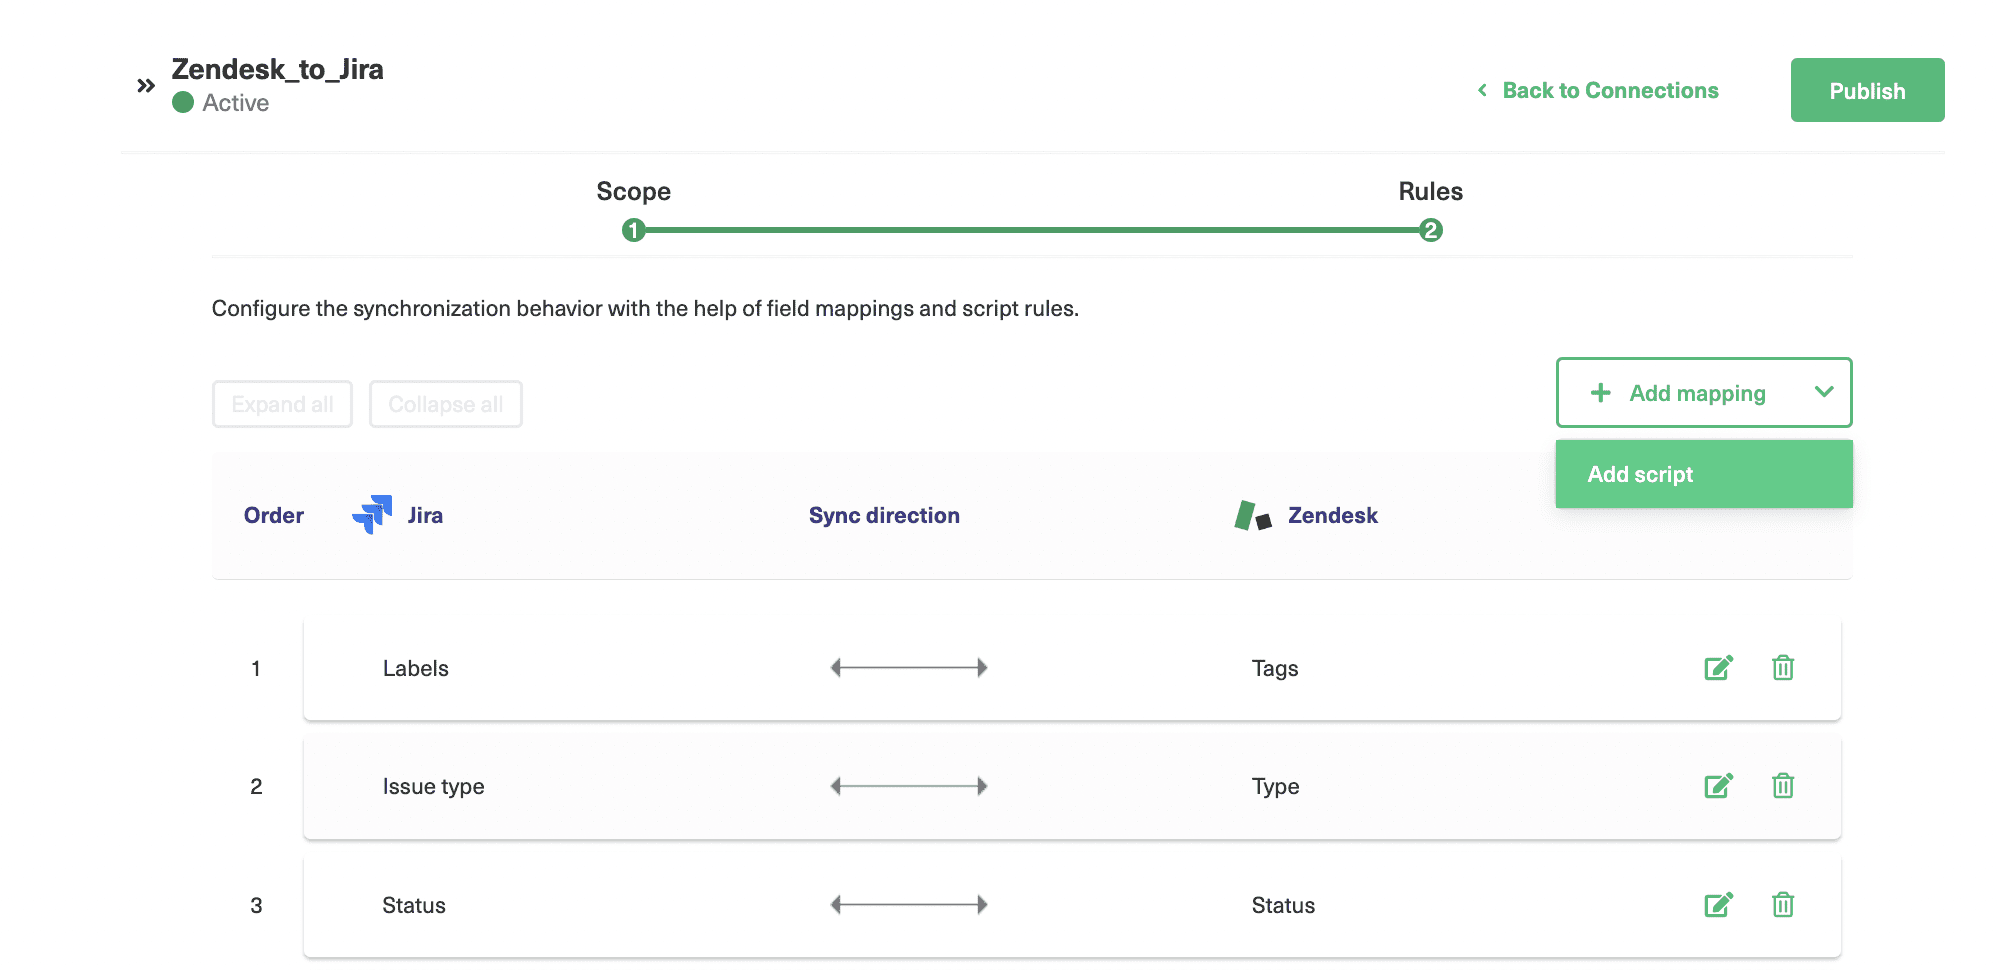
Once you’re done with the Scope, click “Next” to configure the Rules.On the Rules screen, you can see a list of fields on each platform and how they are mapped onto one another. Some fields have the same name, and these are obviously paired. Others such as “Tags” and “Labels” are different names for similar properties that naturally map together.
Exalate will choose sensible defaults for you, but you are free to change, add, or delete any of them as you see fit.
Sometimes you might feel a team only needs a particular bit of information, in which case you can delete the fields you don’t want to be synced.
Other times, you may feel a field should be mapped to a different one.You can drag the mappings up and down to change their order. Each one has a delete icon on the right and an edit button to the left of that.
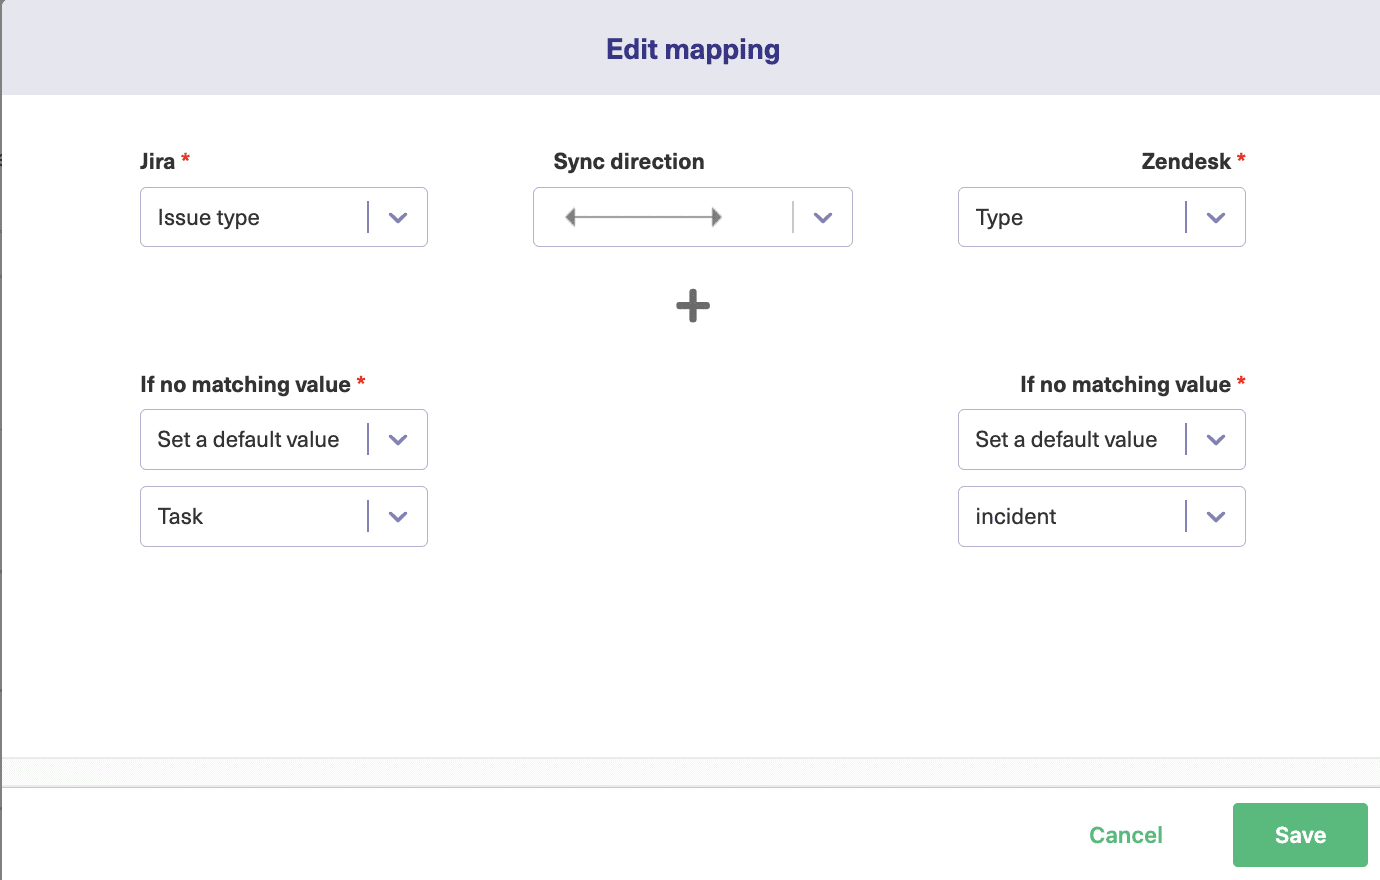
If you click the edit button, the following screen will appear.Here you can select which fields to sync from all the available choices, using the drop-down boxes under the connection side names. In this case, those are Zendesk and Jira.
Between those, another drop-down allows you to choose the sync direction.In this case, it is set to two-way sync, but you can have a one-way synchronization by choosing a one-directional arrow pointing whichever way you need it.
You can also choose what Exalate does if there isn’t a value when it syncs the tickets. You can choose to set a default value, report an error, or do nothing.
If you choose “default value”, there will be a further drop-down letting you select the default value to use.Click the “Save” button when you’re done.
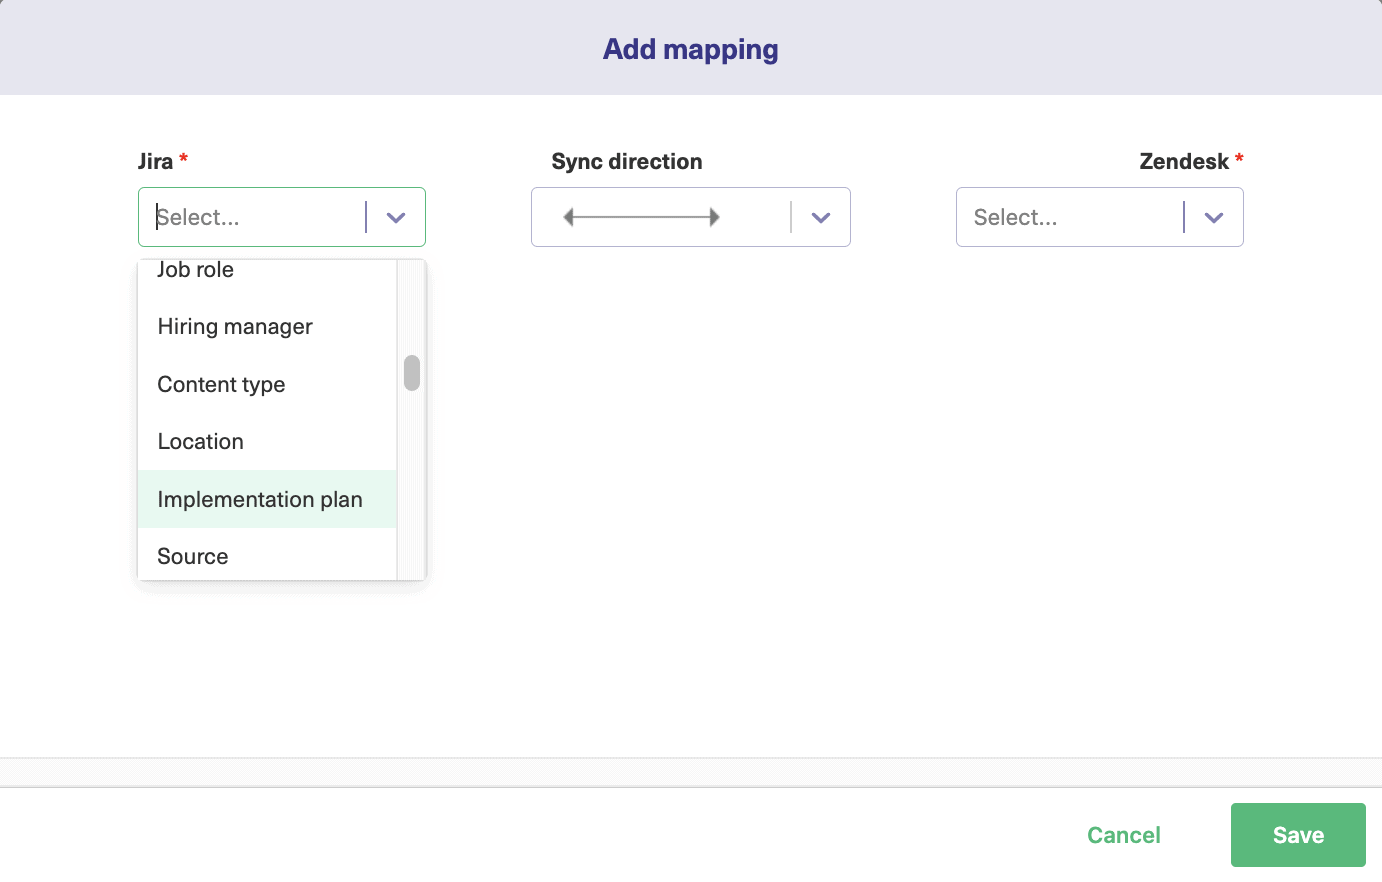
Back on the “Rules” screen, you’ll see an “Add mapping” button. If you click that, a screen like the one below will appear.This works similarly to the “Edit mapping” screen, except you have to choose the fields to map to get started. You should choose fields of a similar data type. You’ll see a warning message if you pick fields that can’t be matched.
Again, click “Save” when you’re done.
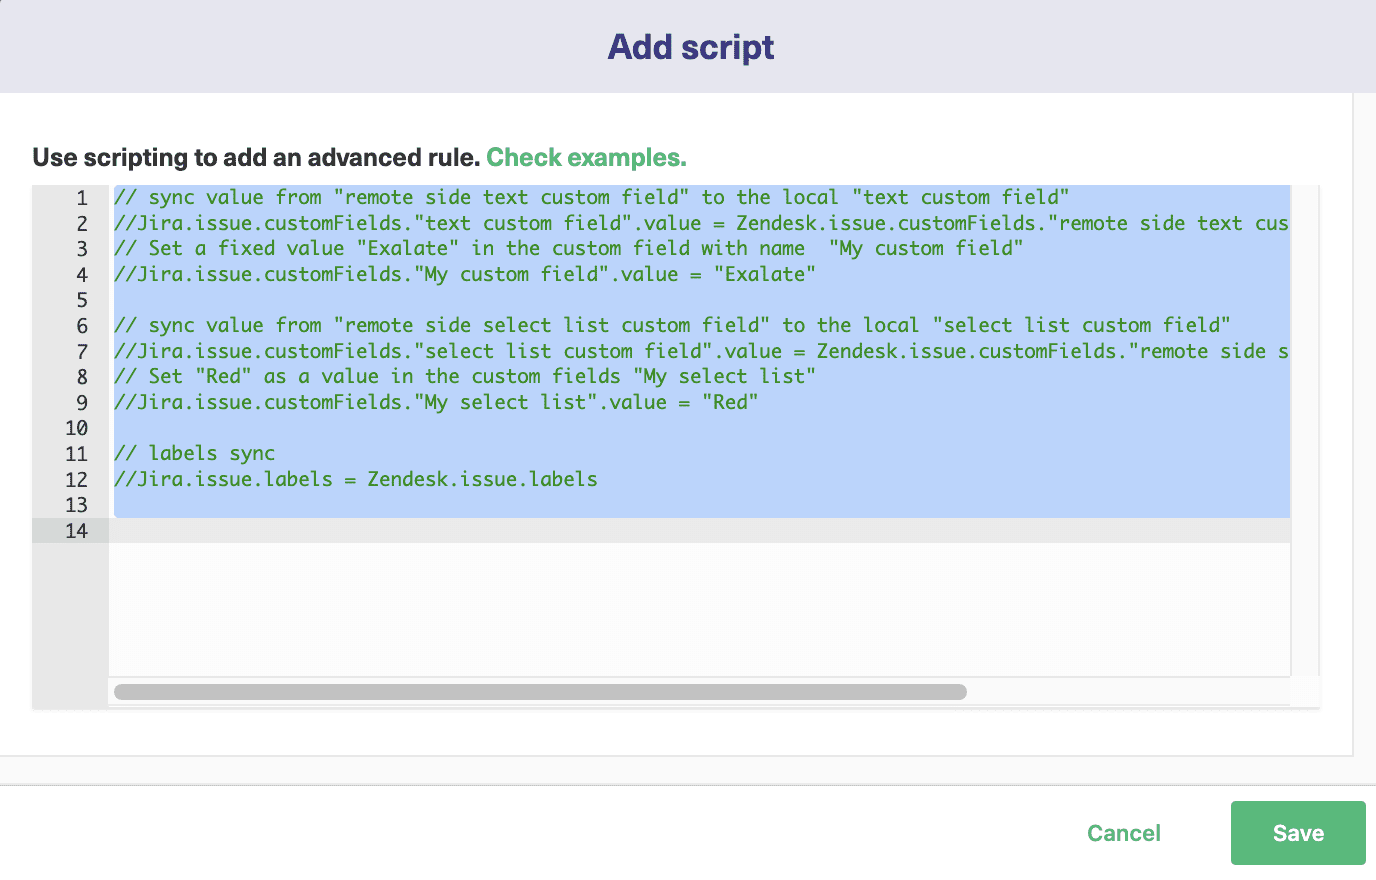
If you click the small arrow on the right of the “Add mapping” button an “Add script” button will appear. Click this to see the “Add script” screen.
Here, you can create and edit advanced scripting rules.
If coding isn’t your thing, you may want to skip this. But if you want to learn more about it, click the “Check examples” text, which will take you to some useful documentation.That will teach you many of the useful things you can do with scripts. You can assign fields to others, give them specific values, or even use programming logic to make decisions on what fields to synchronize.
When you’ve finished editing everything, click the “Publish” button, and the connection will be created.
Continue with the Script Mode
If you don’t want to use visual mode, select the other option, Script mode. On the next screen, you need to enter the URL of the destination instance, in this case, the Jira node URL. It will ask you to fill in the name for the connection and some other details, just like you did for the Visual mode.
Click “Next” once you finish. On the final screen, click the “Copy invitation code” button to copy the generated code to the clipboard. It’s best to paste this somewhere safe, so you don’t accidentally overwrite it.
Now that our connection is set up on the Zendesk side, we need to move over to Jira.
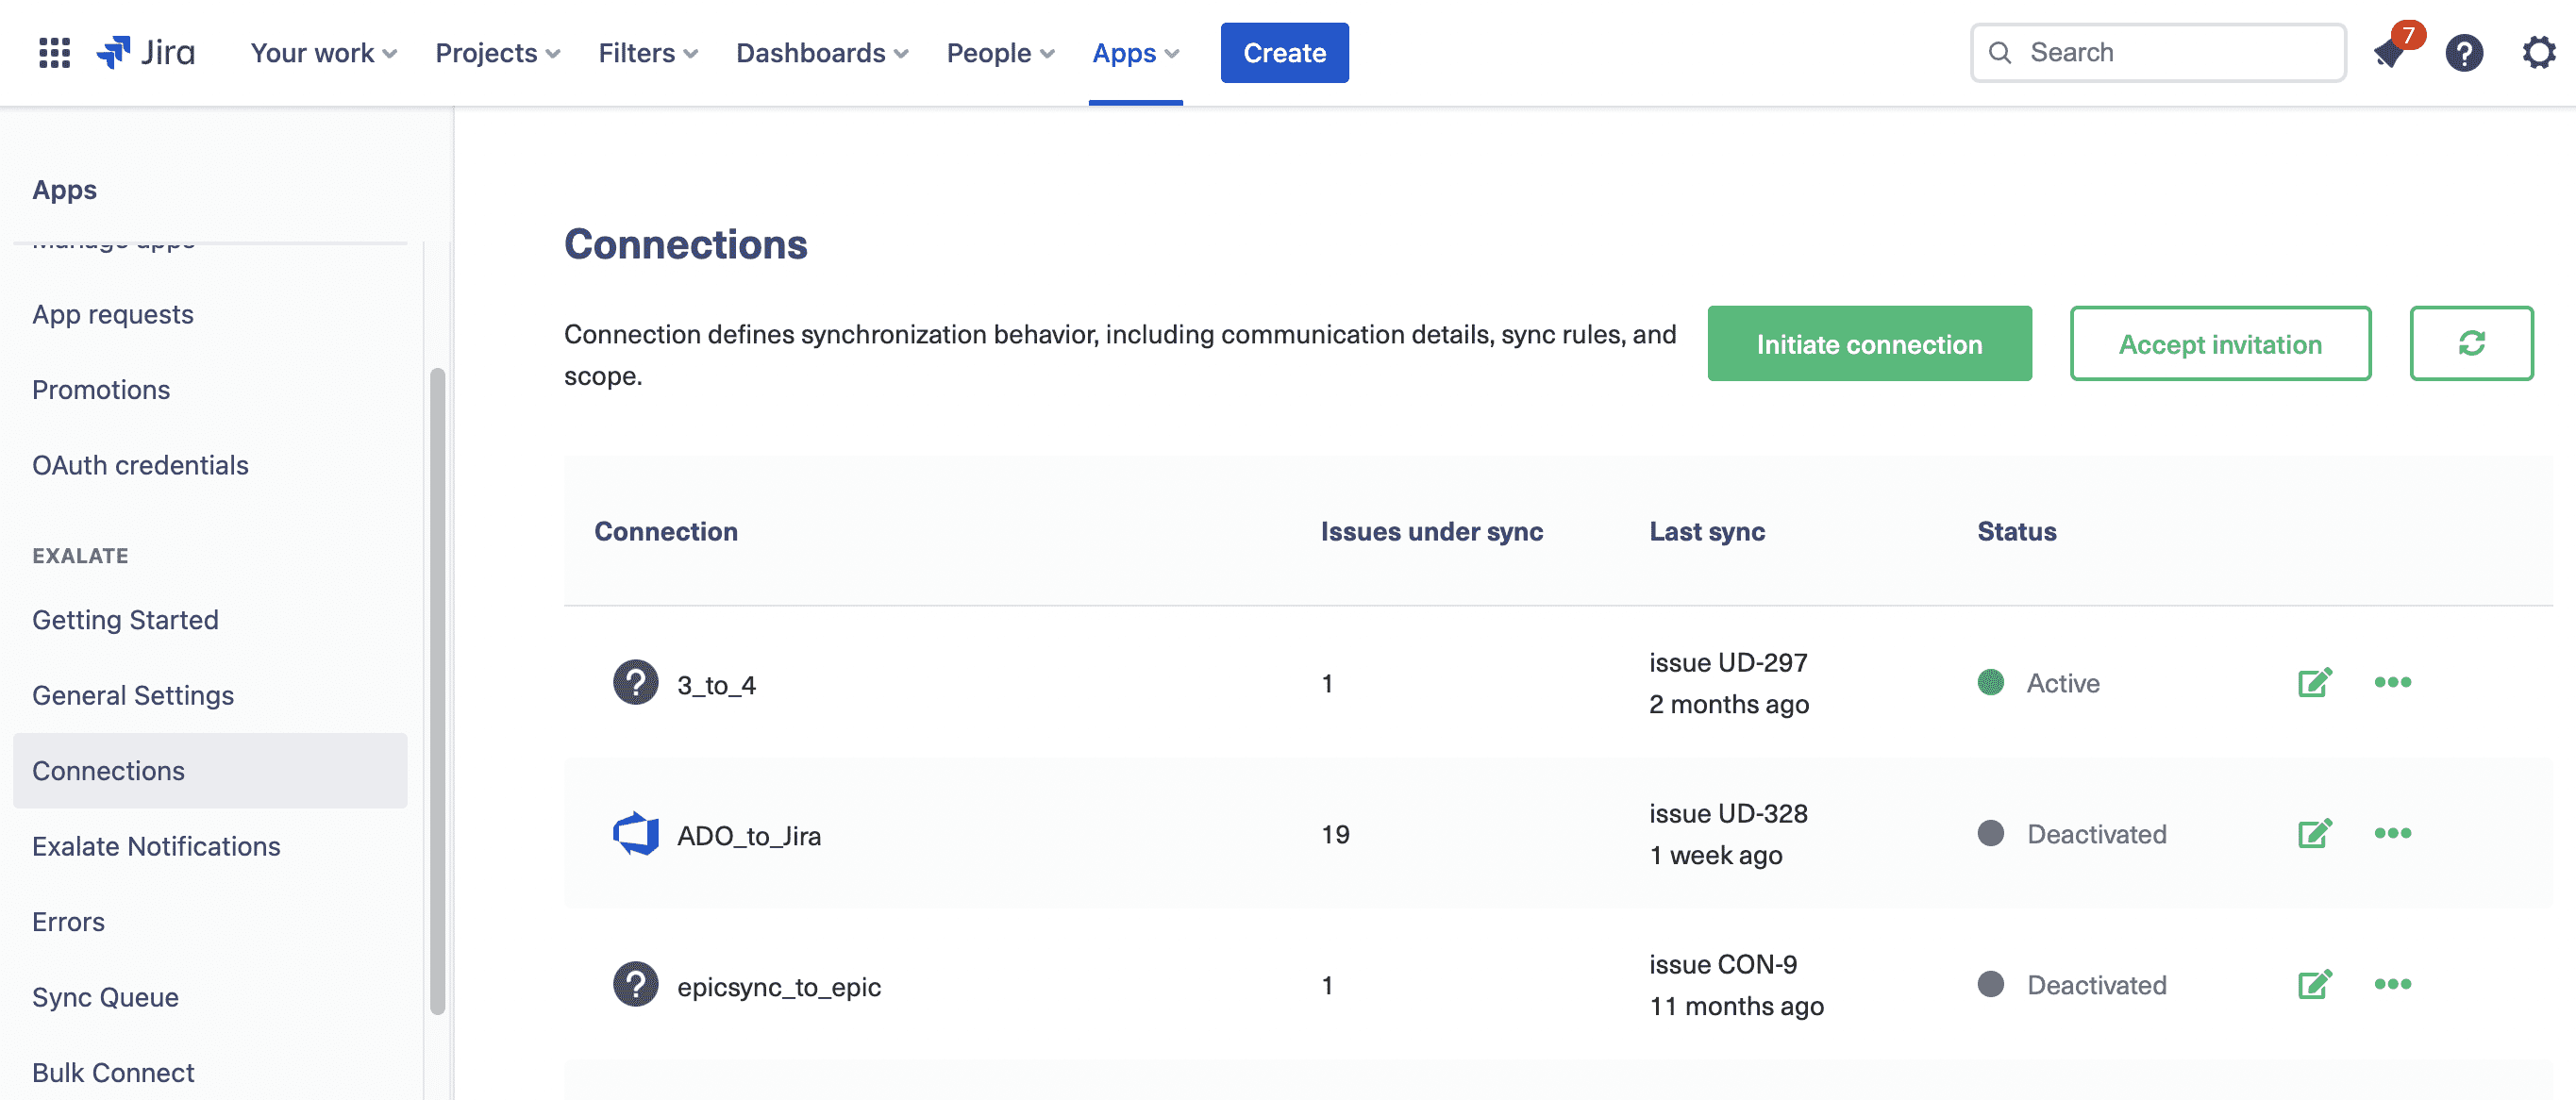
Log in to your Jira instance if you haven’t already. Click “Apps” from the top menu. Look in the Exalate section on the left-side menu and click “Connections”.As you can see in the screenshot, our Jira Cloud instance already has a couple of connections to other platforms. We’re going to add a new one to Zendesk.
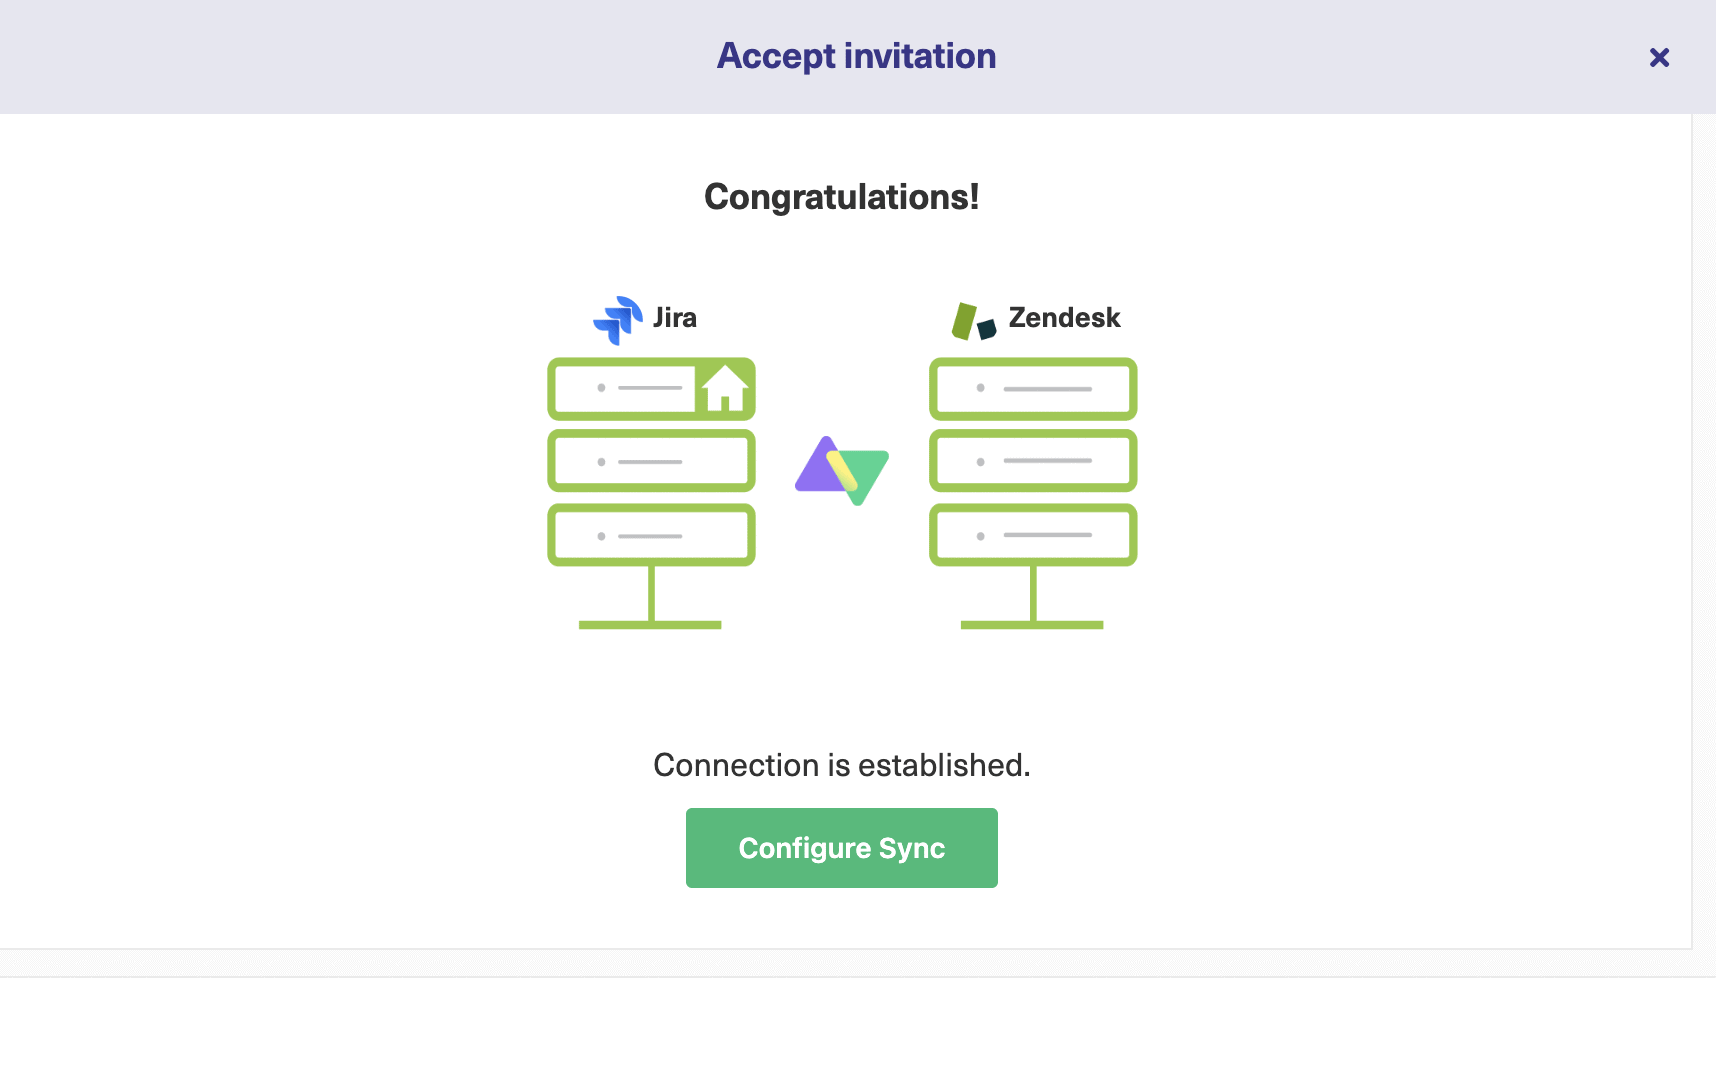
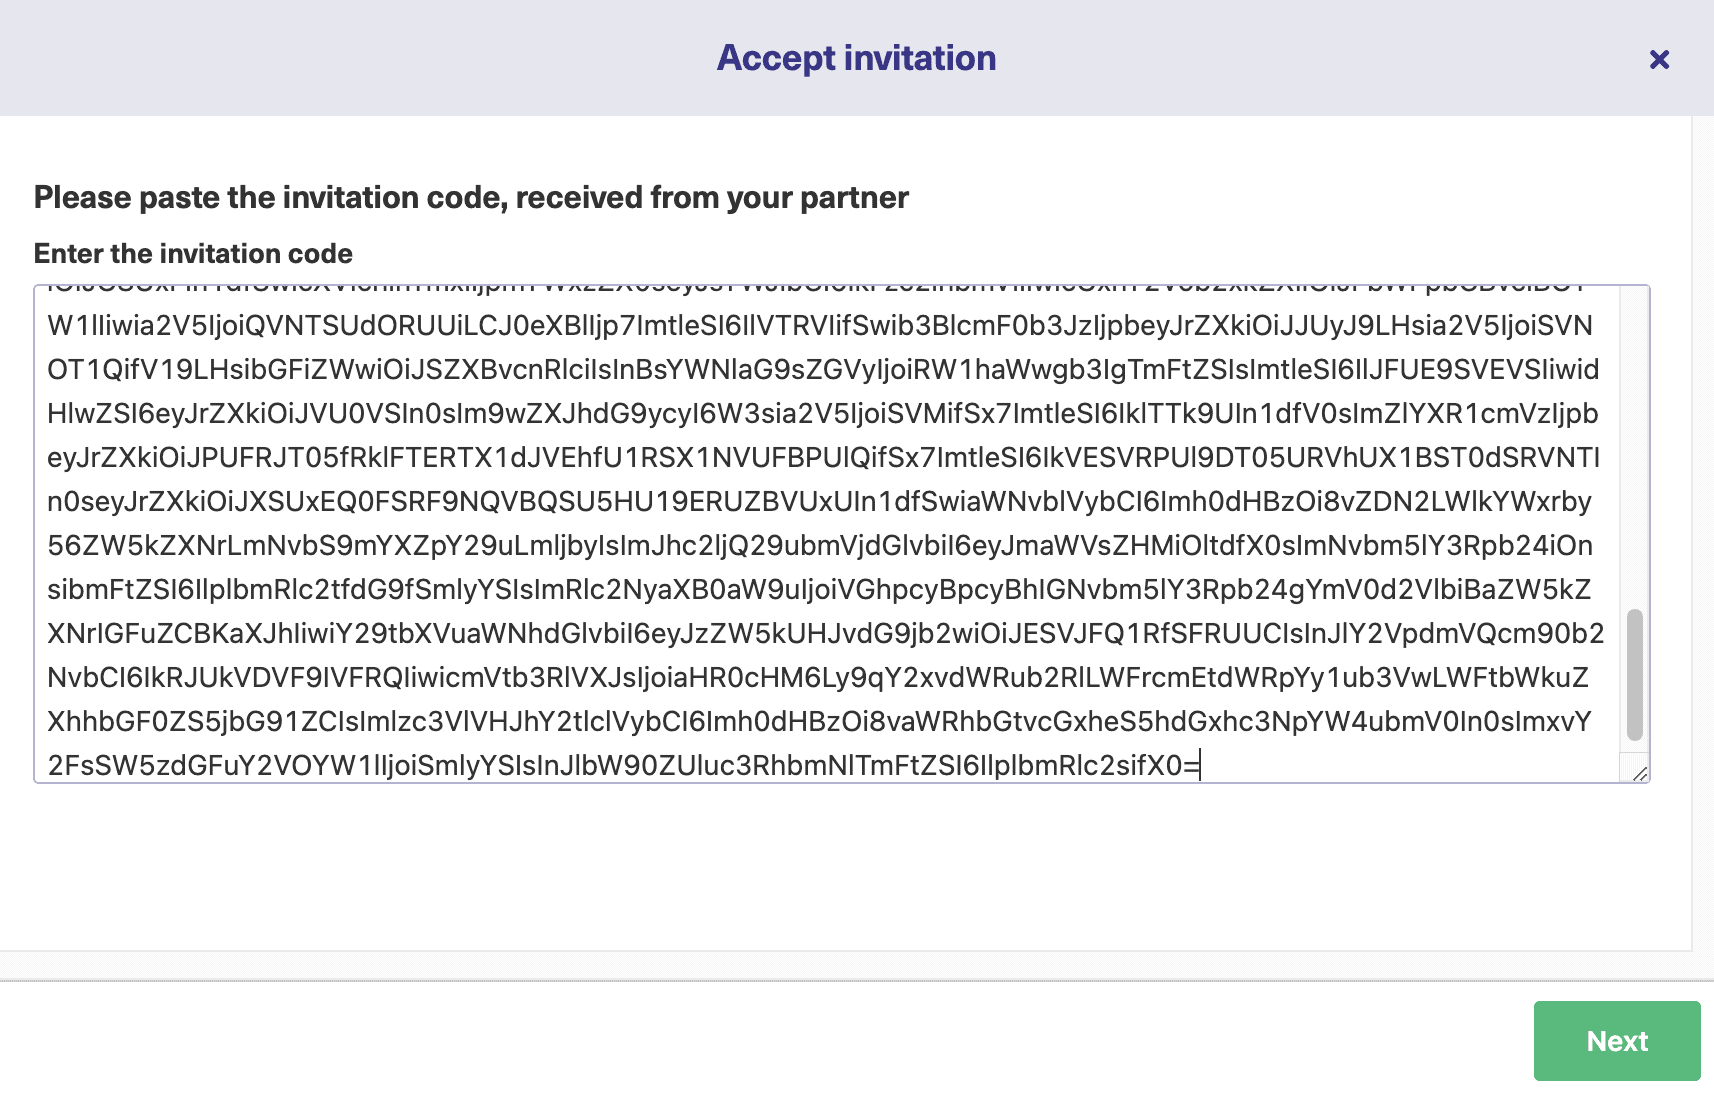
Click the “Accept invitation” button to continue.On the next screen, paste in the invitation code we generated in Zendesk and click “Next”.
Now is the time to select a project on the Jira side. Select one from the drop-down list. Click “Confirm” and Exalate will start setting up the connection. A screen will appear while this is done.
As it says, this may take some time, so why not make yourself a cup of coffee?Now that our connection is ready, we can see it listed under the “Connections” tab. We can immediately configure it by clicking the “Configure Sync” button or going to the next step.
Either way, we’ll see how we can control what it does.
Step 4: Configure Your Connection to Determine What Information Gets Shared
To configure our connection we can change the rules that control how data is mapped from one platform to the other. This can be done on either platform. We can control what happens to outgoing data and what happens to incoming data on each side.
Let’s use Zendesk as our example. First look at the connections page, which you reach by clicking “Connections” in the left-hand menu under the “Exalate” heading. Find the connection you want to edit and click the “Edit connection” icon that appears when you hover the mouse over it.
Note: Alternatively, you can even click the “Configure Sync” button that pops up after the connection is established. You’ll see a few headings: Rules and Triggers. We’ll look at Triggers in the next section.
There are also statistics showing you what has been exchanged and an “Info” tab with a few useful details.
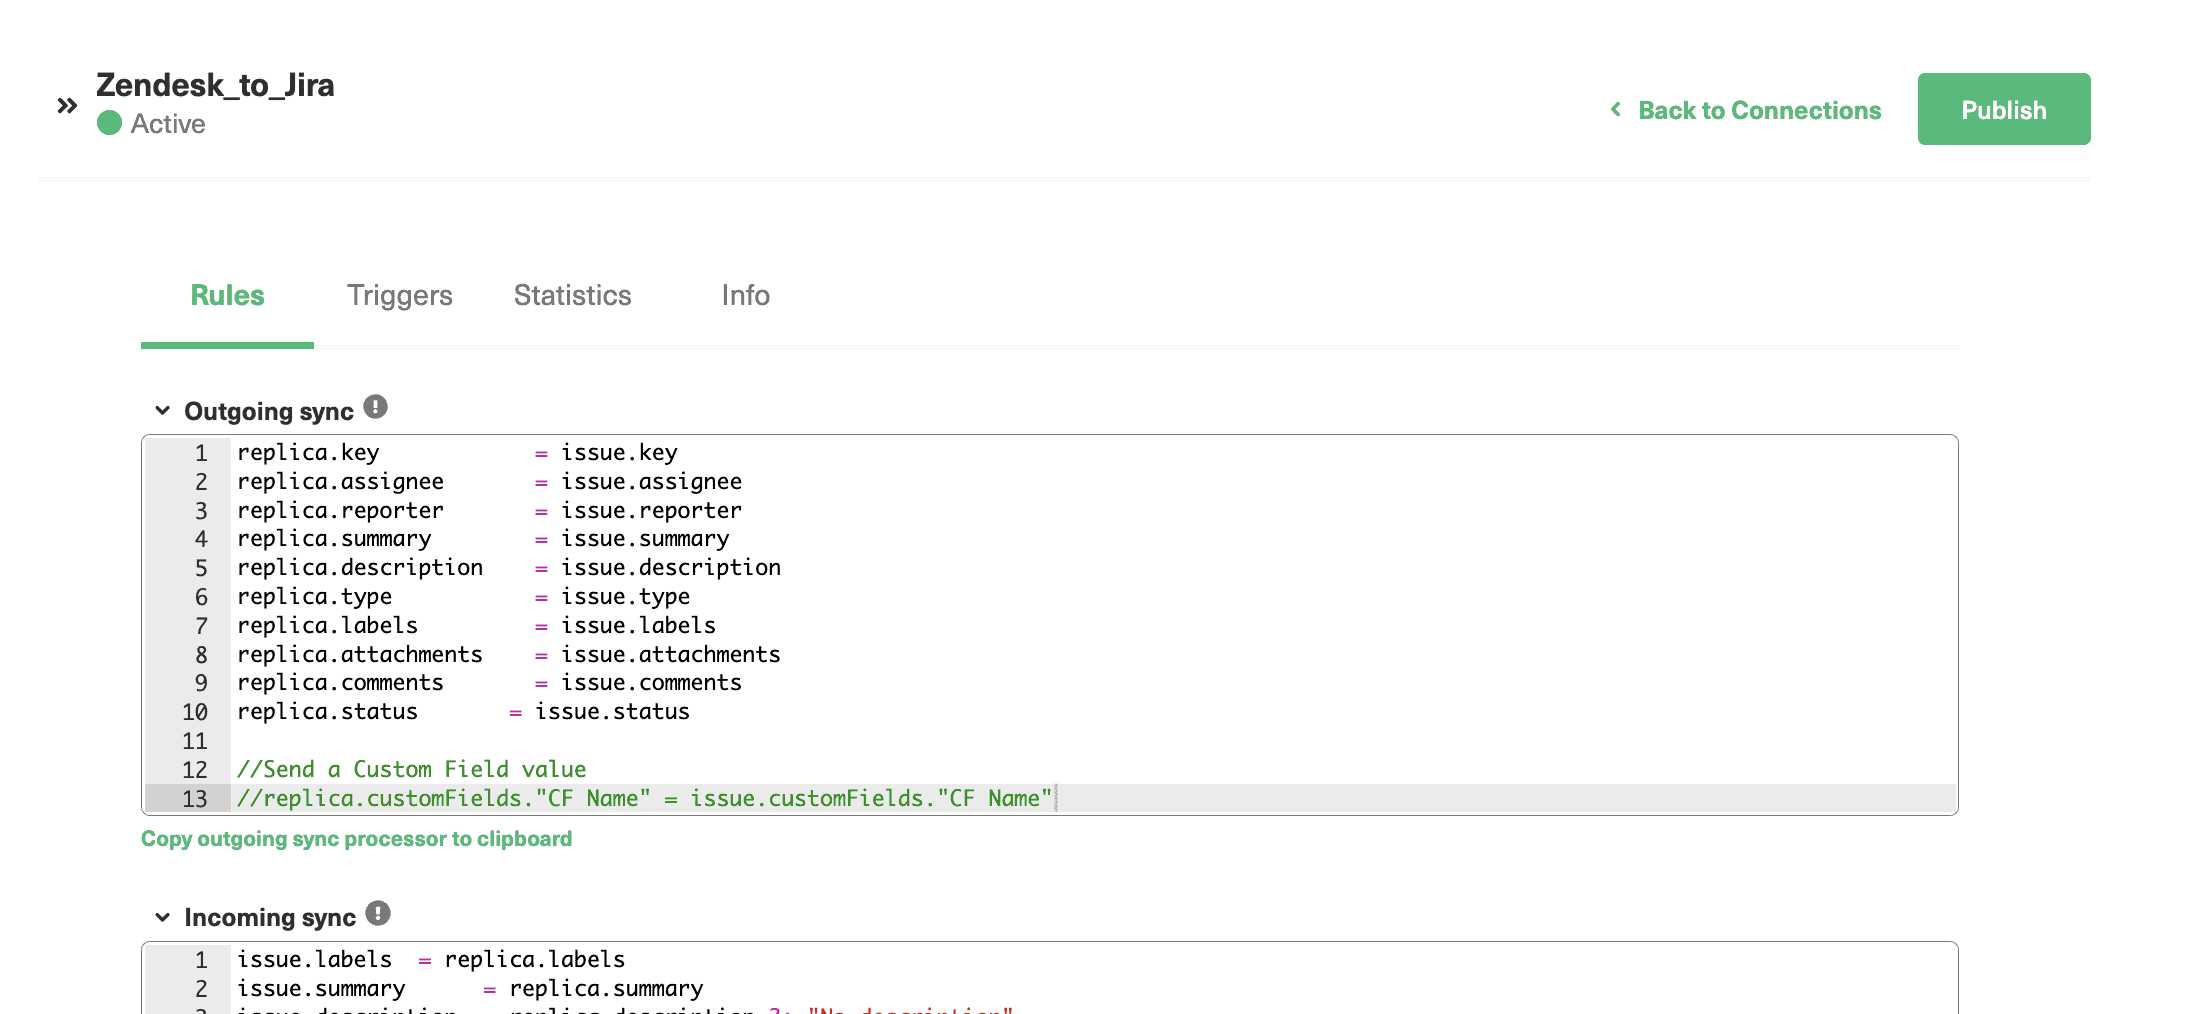
For now, click the “Rules” tab. The “Outgoing sync” section shows how items that go from Zendesk to Jira are mapped. The “Incoming sync” section shows how incoming items from Jira are matched to new Zendesk items.
Fields on each platform’s items are mapped to their equivalents on the other. Exalate does a great job of picking defaults for you.
You might want to alter this behavior, however, or add additional items.
These Outgoing and Incoming sync scripts are present at both ends and need to be configured independently depending on your sync requirements.
In the Outgoing sync, you can see that the “assignee” fields are mapped via the line that says “replica.assignee = issue.assignee”.
There isn’t an equivalent in the incoming sync, so if you want the assignee for issues mapped, you could add the line “issue.assignee = replica.assignee” there.
Replica works like a payload or a message in which you pass the information that needs to be sent over to the destination instance in the Outgoing sync. At the destination, you apply the contents of this replica in any way that makes sense on the Incoming sync side.
Perhaps you want to assign issues from Jira to a particular person or give them a particular value. You could do that by adding lines like these: replica.assignee = ‘Julia’ issue.labels = ‘From Jira’ You can do more complicated things, such as add multiple fields to the description, or add data from one field to a different one.
You may also have custom fields you want to work with. There are also advanced functions that can do even more. For more information about what you can do, read our Script Helpers guide.
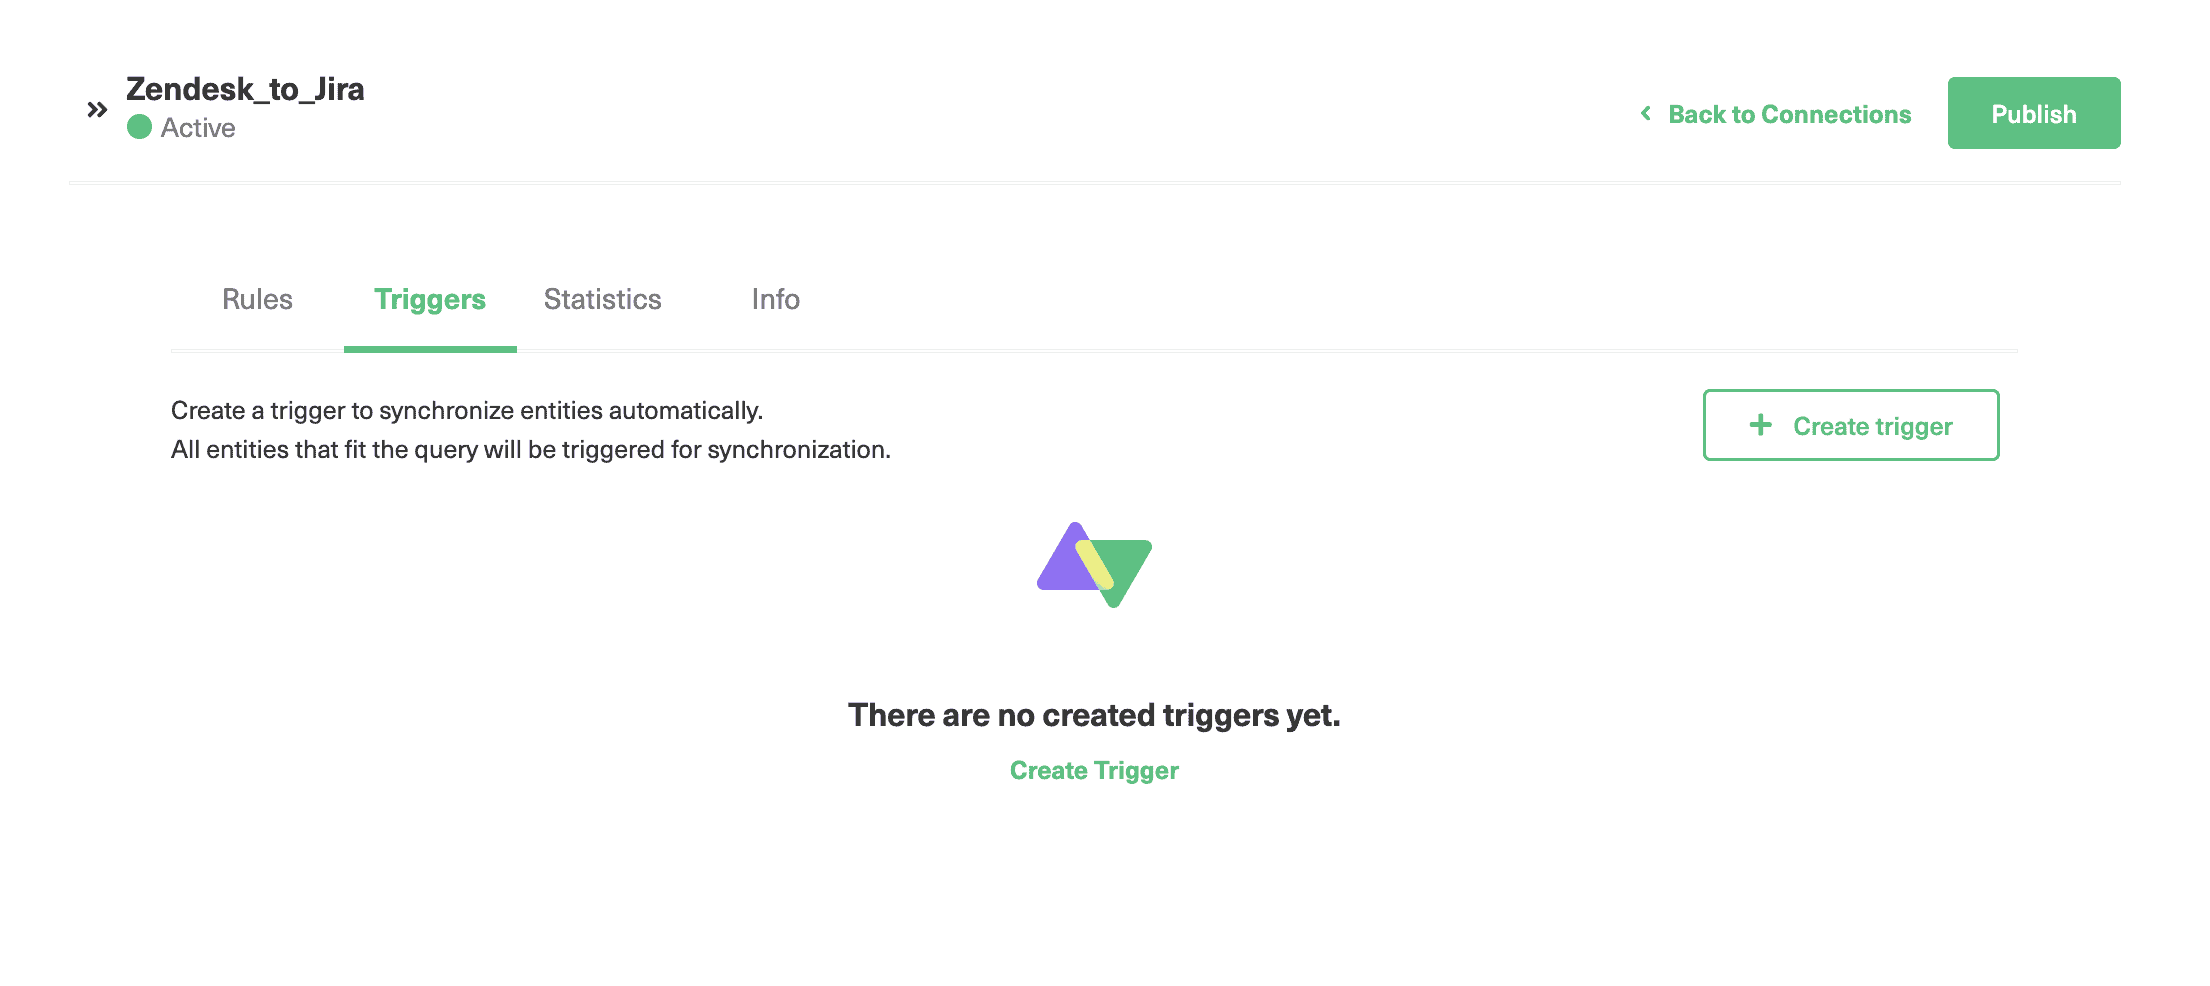
Step 5: Set Up Automated Synchronization Triggers
As well as controlling mappings, you can change the conditions which cause entities to be synced. We do this with synchronization triggers.
As in the previous step, find your connection, hover over it, and click the “Edit” icon.
Then make sure you are on the “Triggers” screen by clicking the matching text. You can also use the Triggers entry in the left-hand menu. If you haven’t done this before, there won’t be any triggers listed. Let’s create one by clicking the “Create trigger” button.
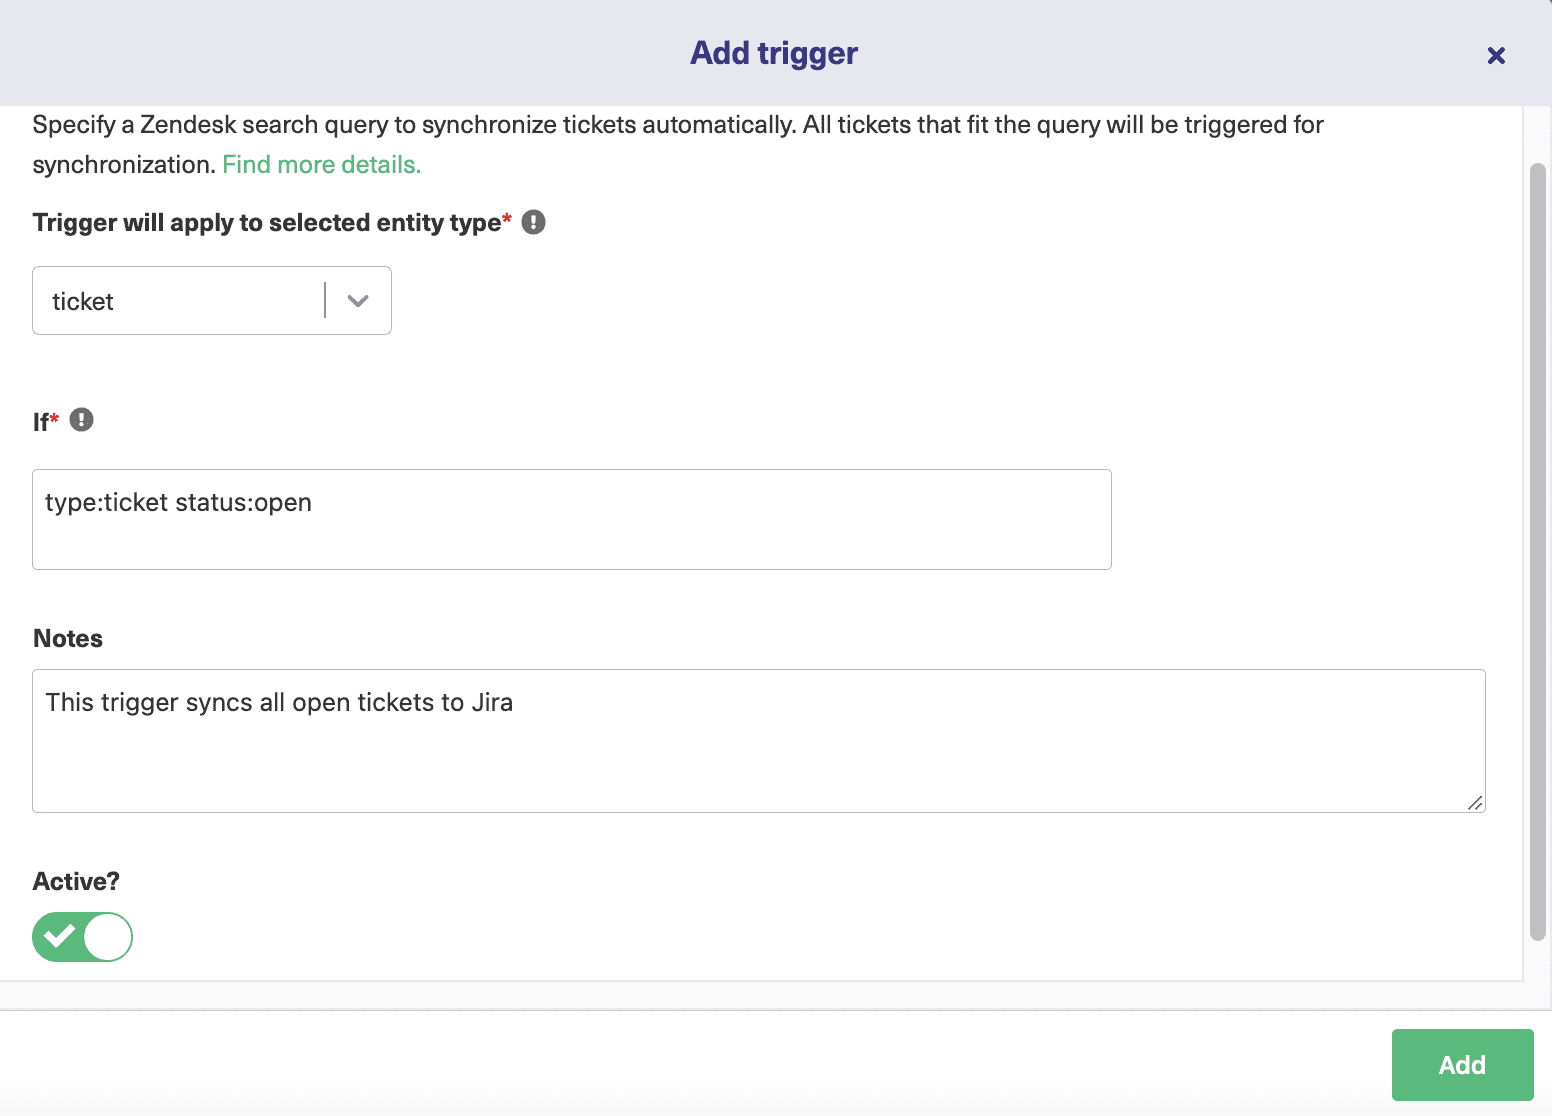
On the “Add trigger” screen there are several fields to adjust. You can pick the type of issue to synchronize, using the drop-down box. This will include available entities.
We’ve selected “Ticket”(in Zendesk) in the screenshot below. You then need to enter a search query that matches the type of entities you want to send(Zendesk in our case). You could sync all entities of a particular type, entities with a particular tag, or items assigned to a particular user. It’s up to you.
You can also set up multiple triggers to sync entities under different conditions. Triggers are defined using platform-specific queries, for instance, JQL is used for Jira.
So if you want to sync all Tasks from Jira to Zendesk, you can write issueType=Task in the ‘If’ section of the ‘Add Trigger’ dialog box.
For more information on how to build them, read this doc.
Some example queries are:
If item.type = bug
If item.assignee = ‘Kevin’
If item.status = ‘open’
Each of those queries will automatically sync queries that match the condition.
You can build more complex queries using logical operators, such as AND, OR, and IN. You can use comparison operators such as < and >, as well as symbols like ~ and !=. If you know how to use those in other programming languages, they work the same way here.
There’s also a description field for you to enter information about the trigger. As with connections, it is best to add as much information as possible here, to help you recall what the trigger is for, as well as help out anyone else who needs to work with it later.
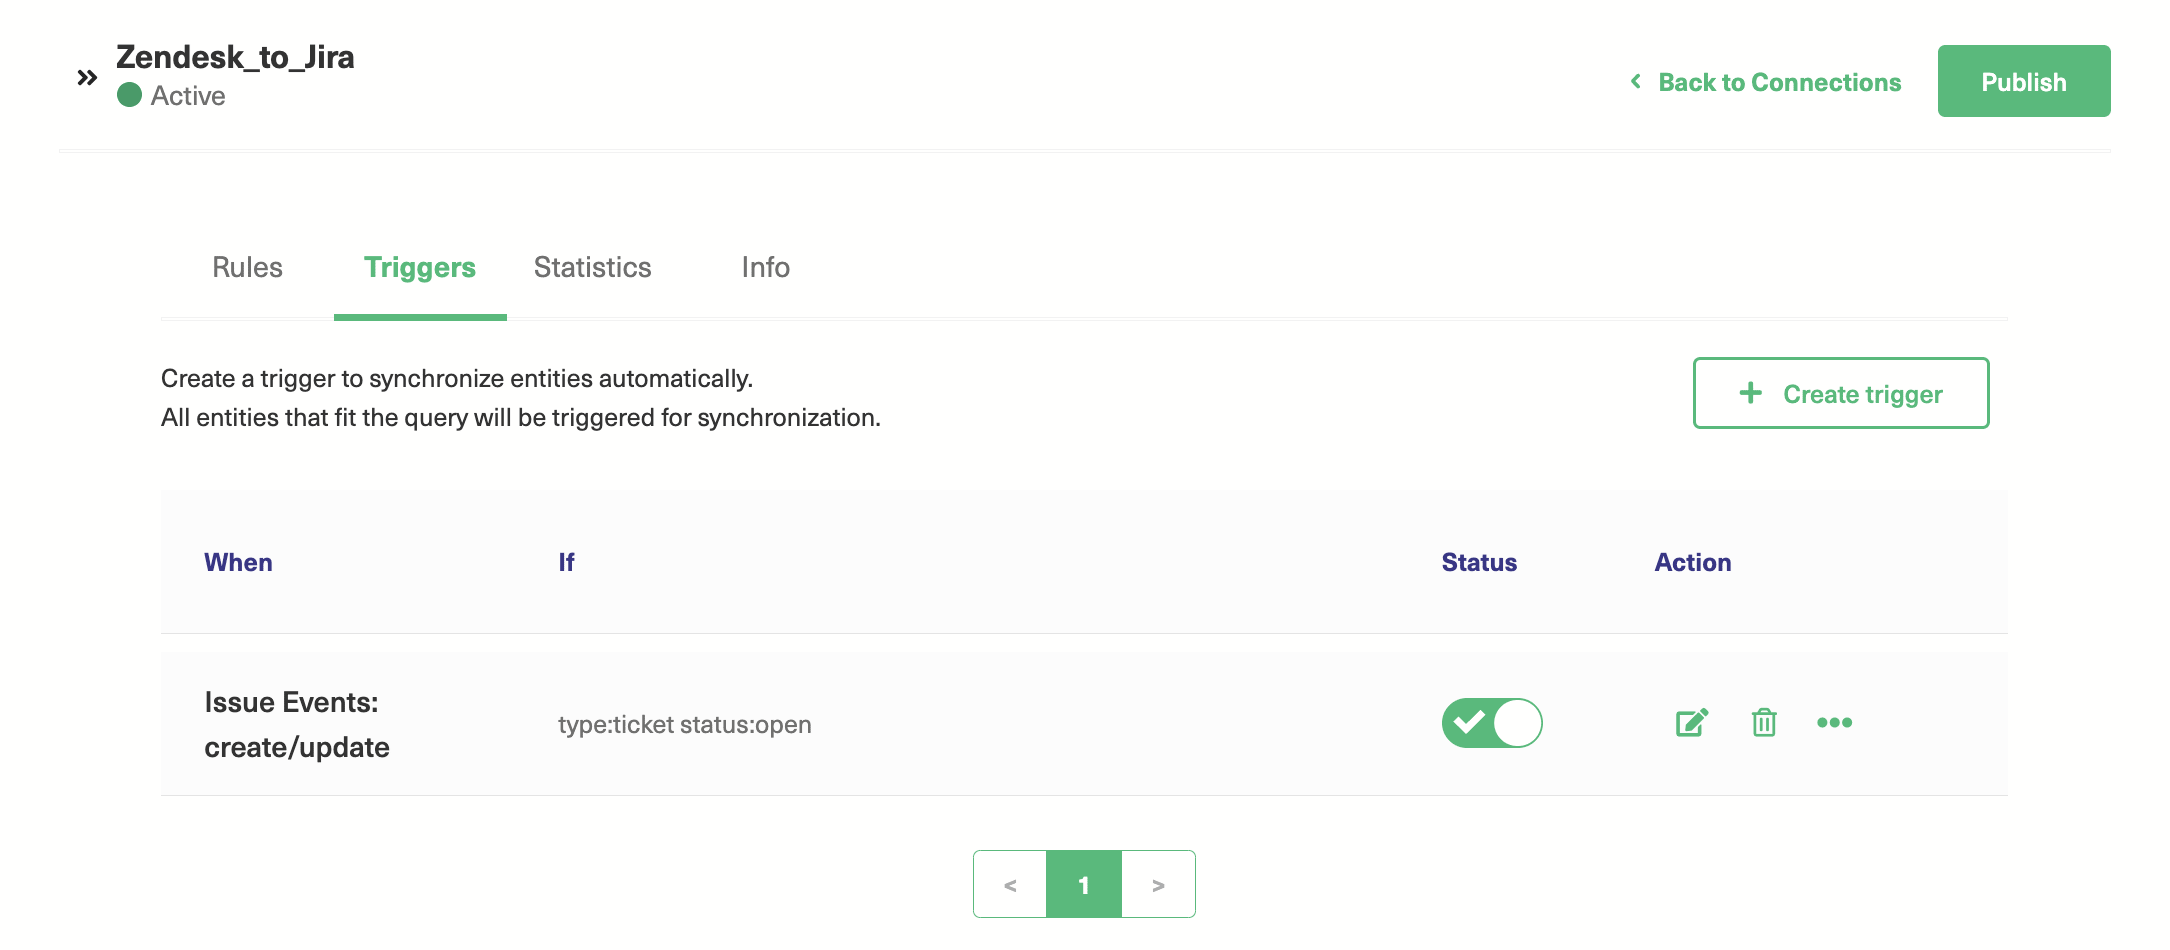
Below the description field, there’s a switch to activate the trigger, which you’ll need to flip if you want it to work. When you’ve got everything set how you want it, click the “Add” button to create the trigger. You should now see the trigger listed.
Click the green “Publish” button to publish your changes.
As well as the standard fields listed you can synchronize custom fields by adding them to the sync rules. There is a customFields property in Jira that stores custom fields in an array.
You can add a line of code like this in the Outgoing sync of Jira:
replica.customFields. ”Custom field name” = issue.customFields. “Custom field name”.
With this line of code you add the custom field properties value to the replica in replica.customFields.”Custom field name”. This must be mapped in any field of your choice in the Incoming sync of Zendesk.
Here you replace the “Custom field name” with whatever your field is called. This kind of flexibility gives you fine control over how Exalate maps your data from one platform to the other.
Step 7: Start Synchronizing Tickets
Now we’ve got everything set up, we can start creating tickets. If we create a ticket in Zendesk that matches our conditions it will appear in Jira. It takes a few minutes for the syncing to take place, so leave it a while if you don’t see it straight away. Our platforms are now synchronizing tickets automatically without any manual intervention from us.
Common Pitfalls to Avoid After Setting Up the Jira Zendesk Integration
Zendesk has a pretty simple workflow, so it’s quite simple to align workflows when working in tangent with Jira and Zendesk. However, there’s a caveat.
Beware of the way Zendesk handles “closed” tickets! When you mark an issue as ‘closed’ in Jira, you can still edit the information as much as needed.
However, the same is not true for Zendesk. Once an issue has a “closed” status on Zendesk’s side, it becomes read-only. This means you can no longer change any of the data on the ticket. Take this into account before marking an issue as “closed”.
If you believe you still need to edit data on the Zendesk side, consider not closing the issue. If, for some reason, you absolutely must mark the issue as “closed” in Jira, consider disconnecting the issues so that the ticket remains open in Zendesk until you perform the necessary edits.
Alternatively, you could give it a similar-sounding status, such as “Resolved” or “Done”.
Conclusion
That’s it! Now you’re ready to fully combine the power of Jira and Zendesk with this Jira Zendesk integration in place. Here’s a quick recap of what we’ve covered:
Why set up an integration between Jira and Zendesk in the first place
How to choose the right integration solution to set up a live synchronization between Jira and Zendesk
How to set up a Jira Zendesk integration using Exalate
How to automate Jira issue creation with triggers
How to best align your workflows to make the most of Jira and Zendesk
What common pitfalls to avoid in a Jira Zendesk workflow