
Jira Work Management helps business teams to collaborate and to track work. This makes processes transparent and ensures that progress can be measured, building accountability into the system and ensuring that teams are aligned. What’s more, it embeds these workflows within the Atlassian ecosystem, opening up enormous opportunities for extension, customization, and integration.
What is covered in this blog post:
- What is Jira Work Management and what is it used for?
- Jira Work Management basics
- Getting started with Jira Work Management
- Best practices and tips for agility and collaboration with Jira Work Management
- Best Jira Work Management use cases
- Apps and integrations

This guide will explain how to get started with Jira Work Management, explore the platform’s core principles, and offer some tips and tricks on how to make the most of it. Let’s get to work!
What is Jira Work Management, and what is it used for?
Jira Work Management (JWM) is a task-tracking collaboration tool that is intended for business teams. Work might mean completing a specific job or a project, or it might mean managing a periodic task or overseeing an ongoing process. JWM sets out to make it clear what work is underway, what’s been completed, and what’s coming up next.
Whereas Jira Software’s core customers are software developers, JWM is intended for everyone else – from HR and finance to marketing, sales, legal, and operations. At the same time, JWM seamlessly integrates with Jira Software, as well as Atlassian’s other products, such as Confluence and Jira Align.
JWM is intended to be fast to set up (with more than 20 business project templates to kickstart projects) and easy to understand – so JWM refers to tasks and assets rather than bugs and stories.
And JWM makes it simple to create and track tasks, follow work across time, and get a view of the bigger picture. You can also automate routine chores in the platform, such as allocating and progressing tasks. Furthermore, JWM makes it easy to set permissions and privacy settings in order to keep information safe.
In addition to that, the platform comes with over 500 integrations and more than 3,000 app extensions, meaning that there’s enormous scope for customization and slotting JWM within your existing technology stack.
Jira Work Management Basics
Items in Jira are called Issues. These could be almost anything in the workplace and can be used to track activities, individuals, files, and assets, whether online or offline. You can also create your own issue types to suit the requirements of your team.
A team hence might use issues for Tasks and Assets – keeping track of jobs that need doing and inventorising the team’s online resources.
Issues sit within Projects, which group issues together. Individual team members can be added to specific projects and projects can be given their own workflows, depending on their precise requirements. Projects might be intended to last for the short term or for the long term, or they might house an ongoing process.
Projects might be used to house long-term, large-scale jobs, to separate a firm’s work for different clients, or to build out an organization’s different departments, such as accounting, HR, and marketing. In any of these cases, the project provides a clear view of the relevant workload, which is shared with managers and the team.
This makes it simple to see how work is moving forwards, identify bottlenecks, and effectively allocate resources. At the same time, it’s easy to add and remove tasks from the pool as and when needed.
As work on issues progresses, they move along Workflows. Workflows lay out the individual steps that issues can take from being created to ultimately being completed. They consist of statuses (the issue’s current location) and transitions (where the issue is moved). Workflows can be customized to add and remove steps and to precisely map your real-life working processes within JWM.
For example, a task might go from being created to being assigned to being underway, before moving on to a review stage and completion. All of this provides visibility and transparency on the status of the issue and on who is responsible for moving the task to the next stage and ultimately to its resolution.
And the individuals in charge of all these are Admins. Jira Admins can manage user access and licenses, create new projects and edit shared configurations – they’re a general admin and are likely to belong to the IT team. Project Admins, on the other hand, might be project leads, department managers, or client account managers. They can manage project-level settings, control access to projects and implement custom workflows.
JWM comes with a number of views that have been specially built for the use cases faced by business teams, allowing you and your team to view your workload from a range of perspectives. These include:
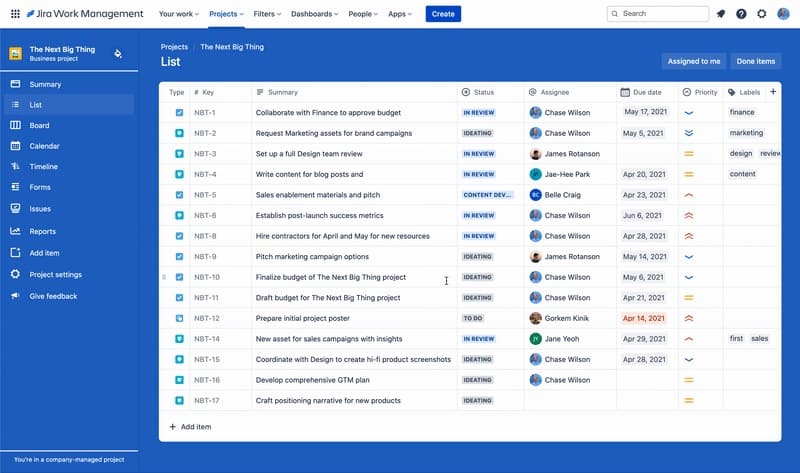
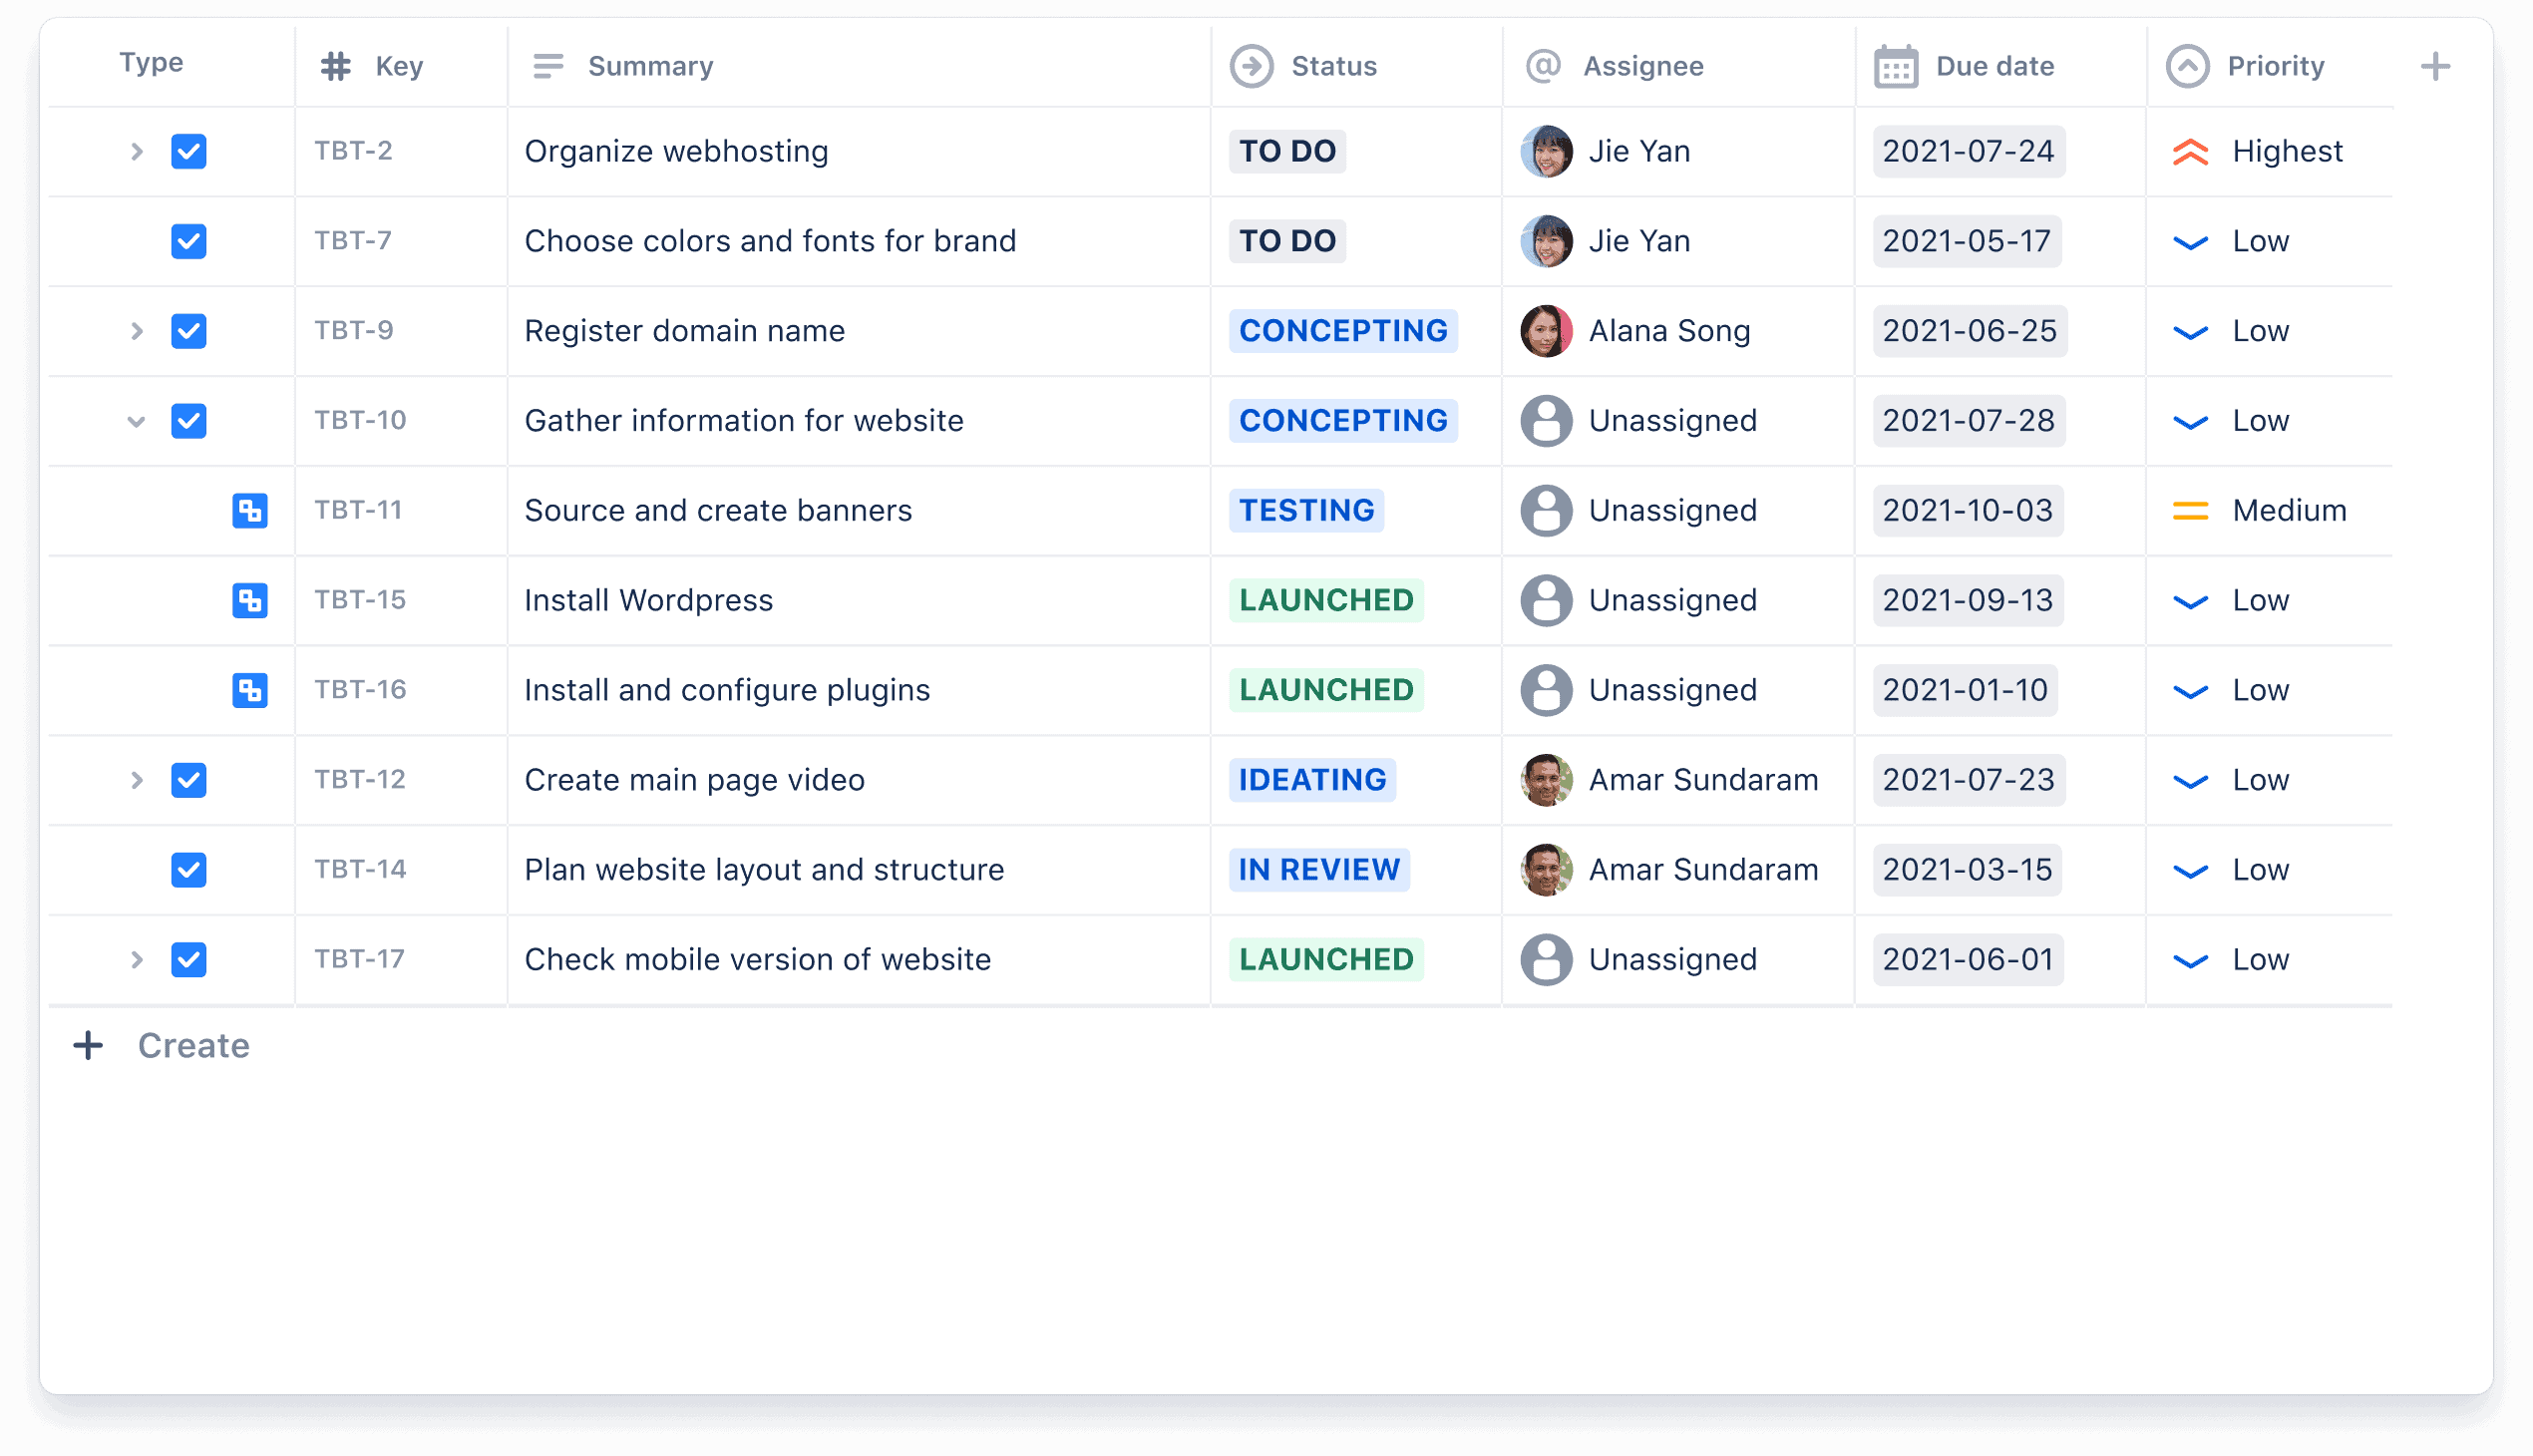
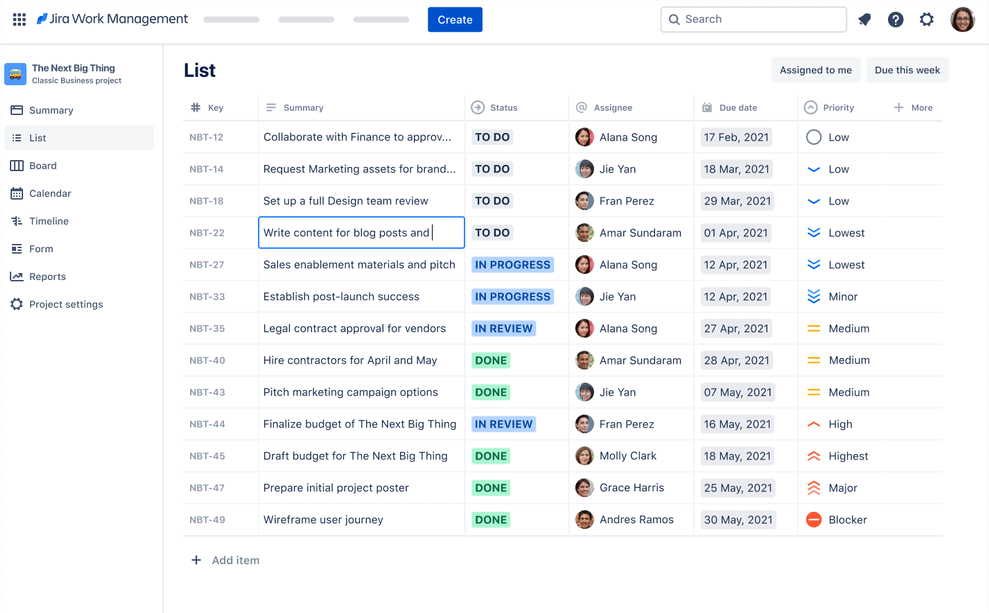
List view – this view lays out tasks in a list, allowing you to quickly and easily view, manipulate and edit issues as if you were working in a spreadsheet.
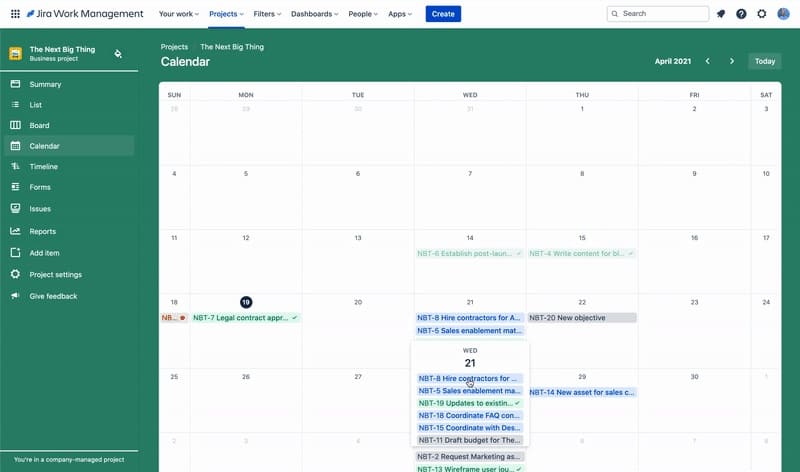
Calendar view – this view places tasks against a calendar, making it easy to map out deadlines and to plan ahead.
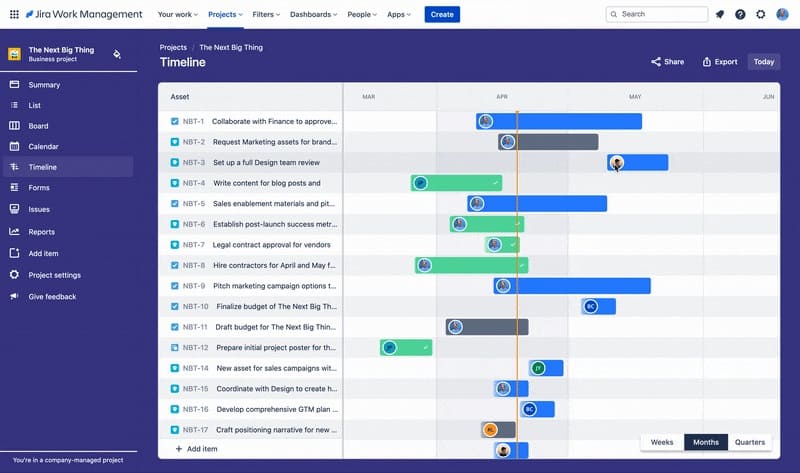
Timeline view – this view is a tweaked version of the Gantt chart, which sets out to emphasize connections and dependencies between different workstreams, while also adding additional data points, so items can be understood at a glance.
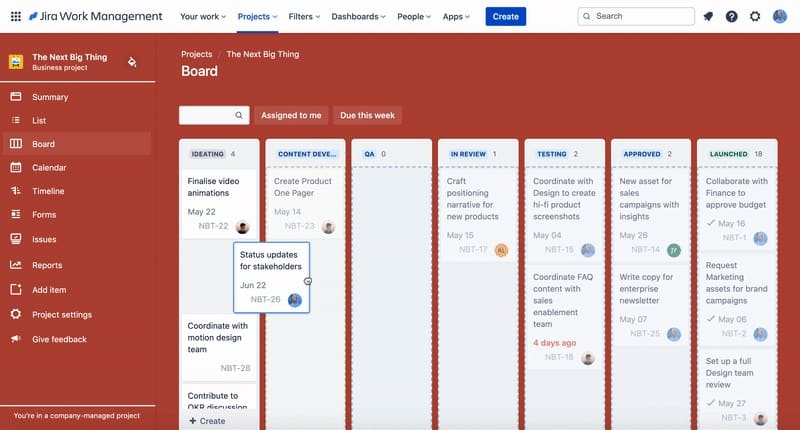
Board view – this view lays out the stages of the workflow as parallel streams, also called Kanban, so tasks move across columns from left to right as they head toward completion. This makes it easy to view work in progress and to manage and understand the overall workflow.
Getting Started with Jira Work Management
As an admin, the first thing you’ll want to do is to get your JWM site. To do this, you’ll want to head to the Jira Work Management Cloud sign-up page, where you can start a free trial.
Once you’ve signed up as the site administrator, you can begin customizing your instance, for example by changing the site logo, setting your desired color scheme, and altering the date/time format. To find this, go to Settings (the cog symbol). Then from “User interface”, go to “System” and “Look and feel”. Now it’s time to get to work!
Creating projects
Before you can start tracking tasks and adding issues, you need to create a project. This is a job that has to be done by a Jira admin. Projects serve as containers, which group issues together, allowing you to allocate resources and track progress.
There are several default project types available in JWM, each coming with workflows and issue-type hierarchies tailored to specific use cases. To create a project:
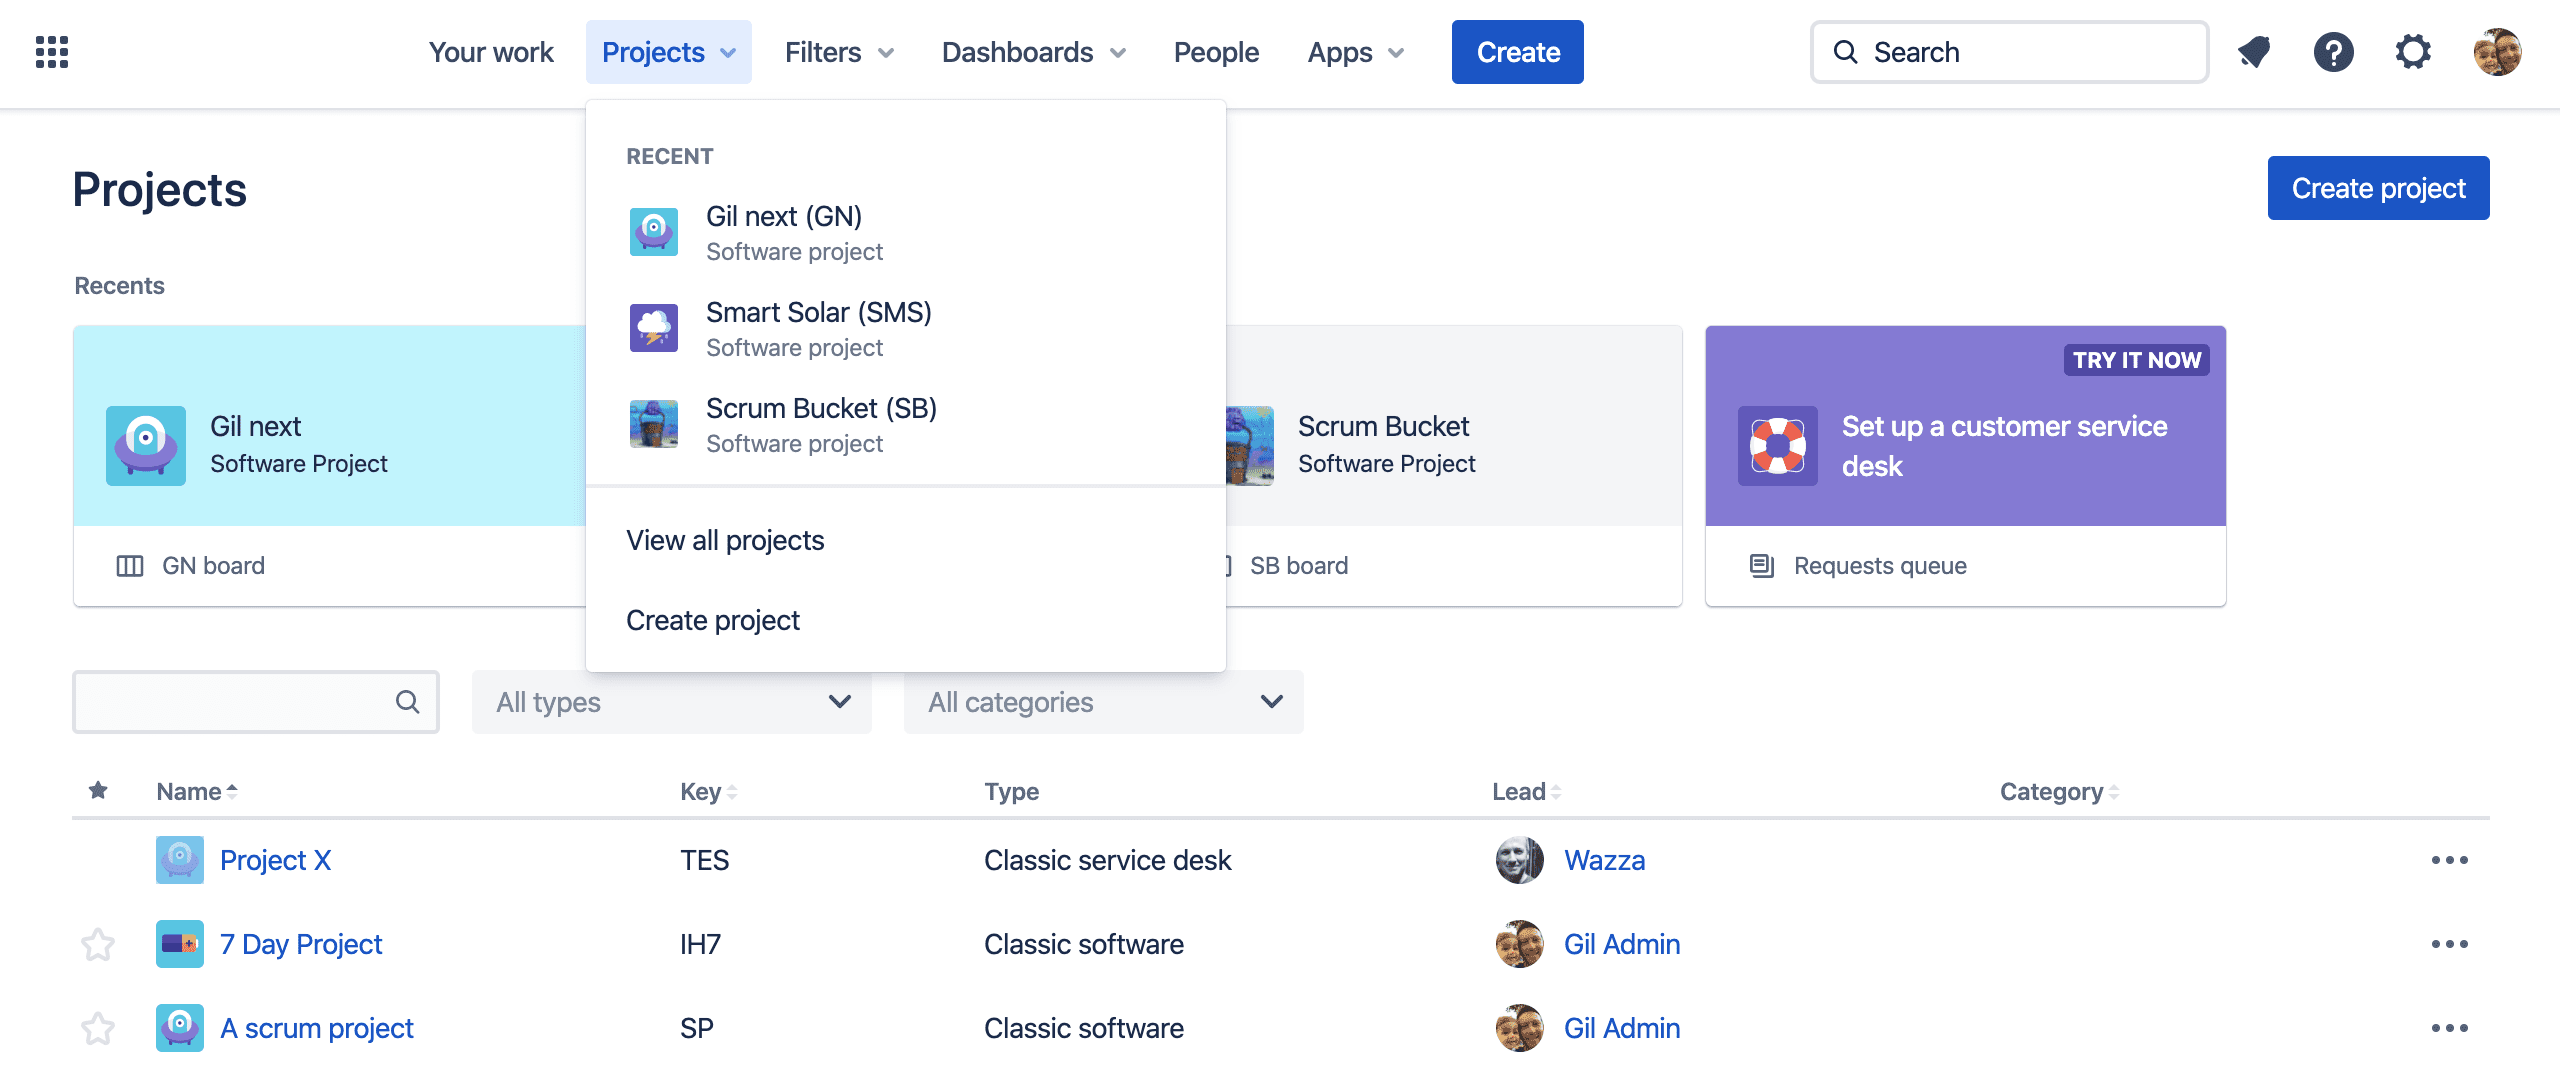
- Go to “Projects” and then “View all projects” (or on a specific project, if one is in place)
- Then click “Create project” and give it a name
- At this point, the project also gets a unique key – a shortened code, used to associate issues with the project that they belong to
- The project will also need a project lead; this will probably be the manager overseeing the project, but it can potentially be any user that you want to select
- You can also choose the project type – in this case, we’ll use the Project Management project type
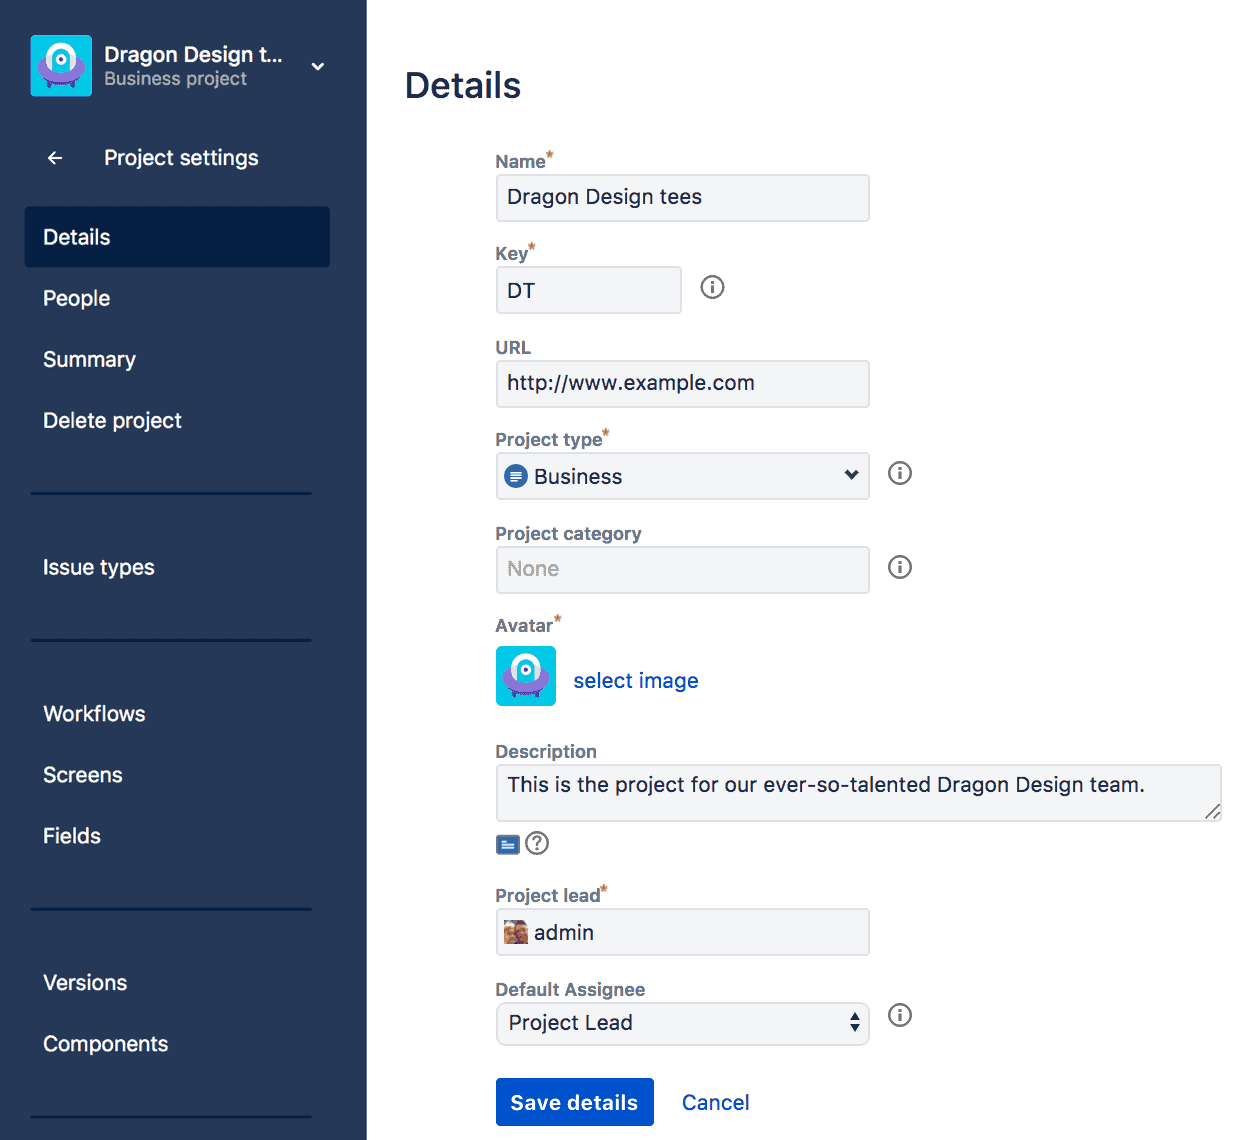
There are also various customization options available for the information that will appear on the Summary page for the project. To edit these:
- – On the project sidebar, click “Project settings”
- – You can enter a “Description”, to provide a brief summary of the project’s remit or purpose
- – You can also set a link for the project, perhaps pointing to a Confluence page or a Wiki, providing supporting information
- – Additionally, you can update the project’s assigned icon – go to the project’s Avatar field, choose “select image” and you can upload an image or select a new icon to represent the project
- – Then click “Save details”
With this done, you now have a first project set up in your Jira instance. Next, you need to add some users and begin assigning tasks.
Get your team onboard
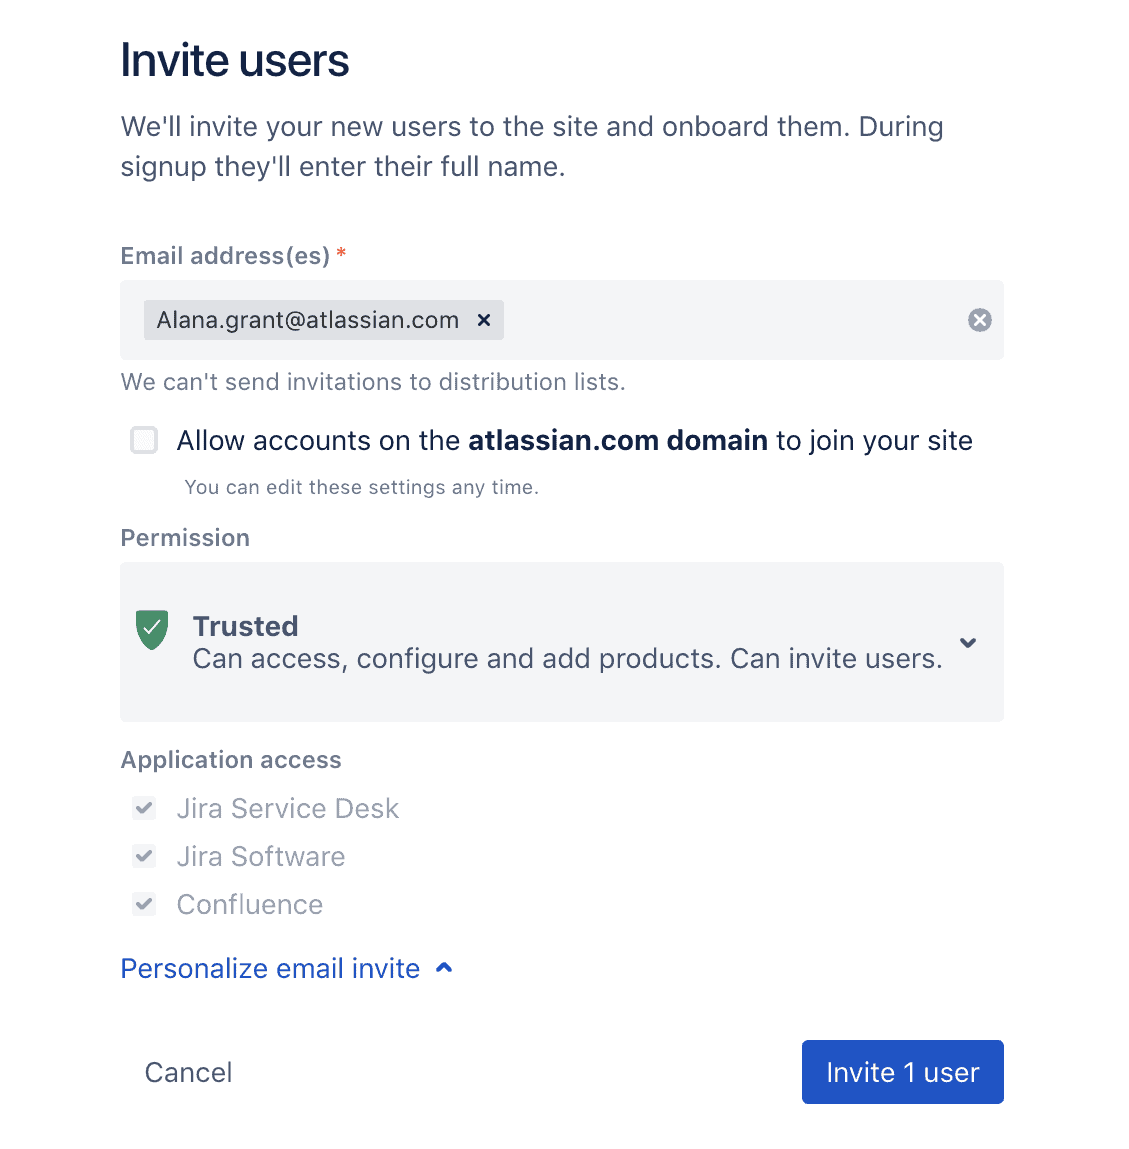
To start adding users to your instance go to “Site administration” and add email addresses for the relevant individuals (separating the addresses with commas). You can then choose the applications that they’ll have access to – with Jira Core being the bare minimum. Then select “Invite users” and they’ll get an email invite to sign up for the site.
There are also some additional options for how you add users, depending on your requirements. The following options can significantly speed up the process if you’re working at scale:
– You can select the option “Existing users can send invitations to anyone” by going to “Site access” on admin.atlassian.com and then “User invites”.
– You can create an “Invite link”. Go to “Site access” on admin.atlassian.com and then “Invite links”, and select the product that you want to create a link for. These links will only be valid for 30 days and can be canceled if needed, but you should only share them with trusted parties, of course.
– You can also approve all users with an email address from a specific domain, giving them default product access. This can help to quickly onboard employees, for example from your company or from a client. To do this, go to “Site access” on admin.atlassian.com and then “Approved domains”. You can then select “Approve the following domains” (or alternatively “Approve any domain” or “Don’t approve any domain”, if wanted). Then click “Save changes”.
If users have already been added to the system and you would like to add them to a project:
- – Go to “Project settings” in the project sidebar and then “People” then “Add people”
- – You can then search for users and can add one or more individuals or groups
- – Then select the relevant role and click “Add”
- Now that you’ve added some pals to the party, you can start creating issues!
Create issues
To create an issue, click “Create” on the button in the navigation bar. You’ll then need to fill in the relevant fields in the “Create issue” form.
Summary – This is a very brief description of the task
Description – This should provide all the information that the assignee needs to understand the job, what is intended, and any problems that may be faced
From this screen, you also have the option to:
- – Manually assign the issue to a specific team member
- – Add attachments, create subtasks and link the task to other issues
- – Add labels, allowing you to tag relevant points
- – Add comments to the issue
The issue will automatically be assigned to the project that has been created. All issues will be defined as tasks unless you’ve customized your instance (for example to use Jira Software issue types such as epics, stories, or bugs). The one exception is that you can add subtasks to tasks, defining a smaller piece of work that is required to complete the job.
Then, once you’ve finished adding all the required information to the issue template, click “Create”.
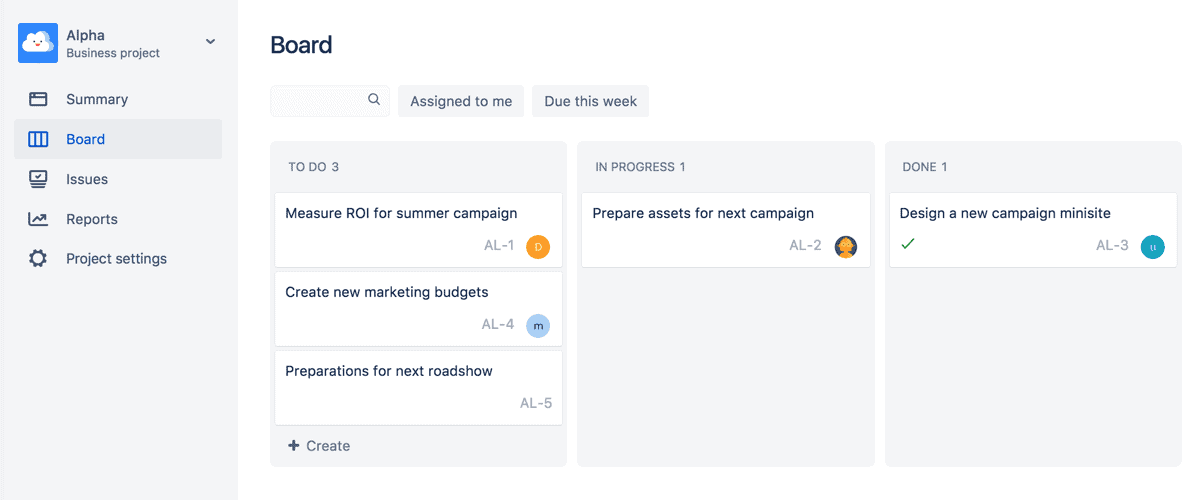
Another way to create issues is to do so from the board. This allows you to quickly create multiple issues. While in the board view, click “+ Create” in the left column. All you have to do from this view is to fill in the summary before saving. To add more detail, you can then click on the issues to populate them further (though if there are mandatory fields on the issue form then clicking “+ Create” will take you to the “Create issue” screen).
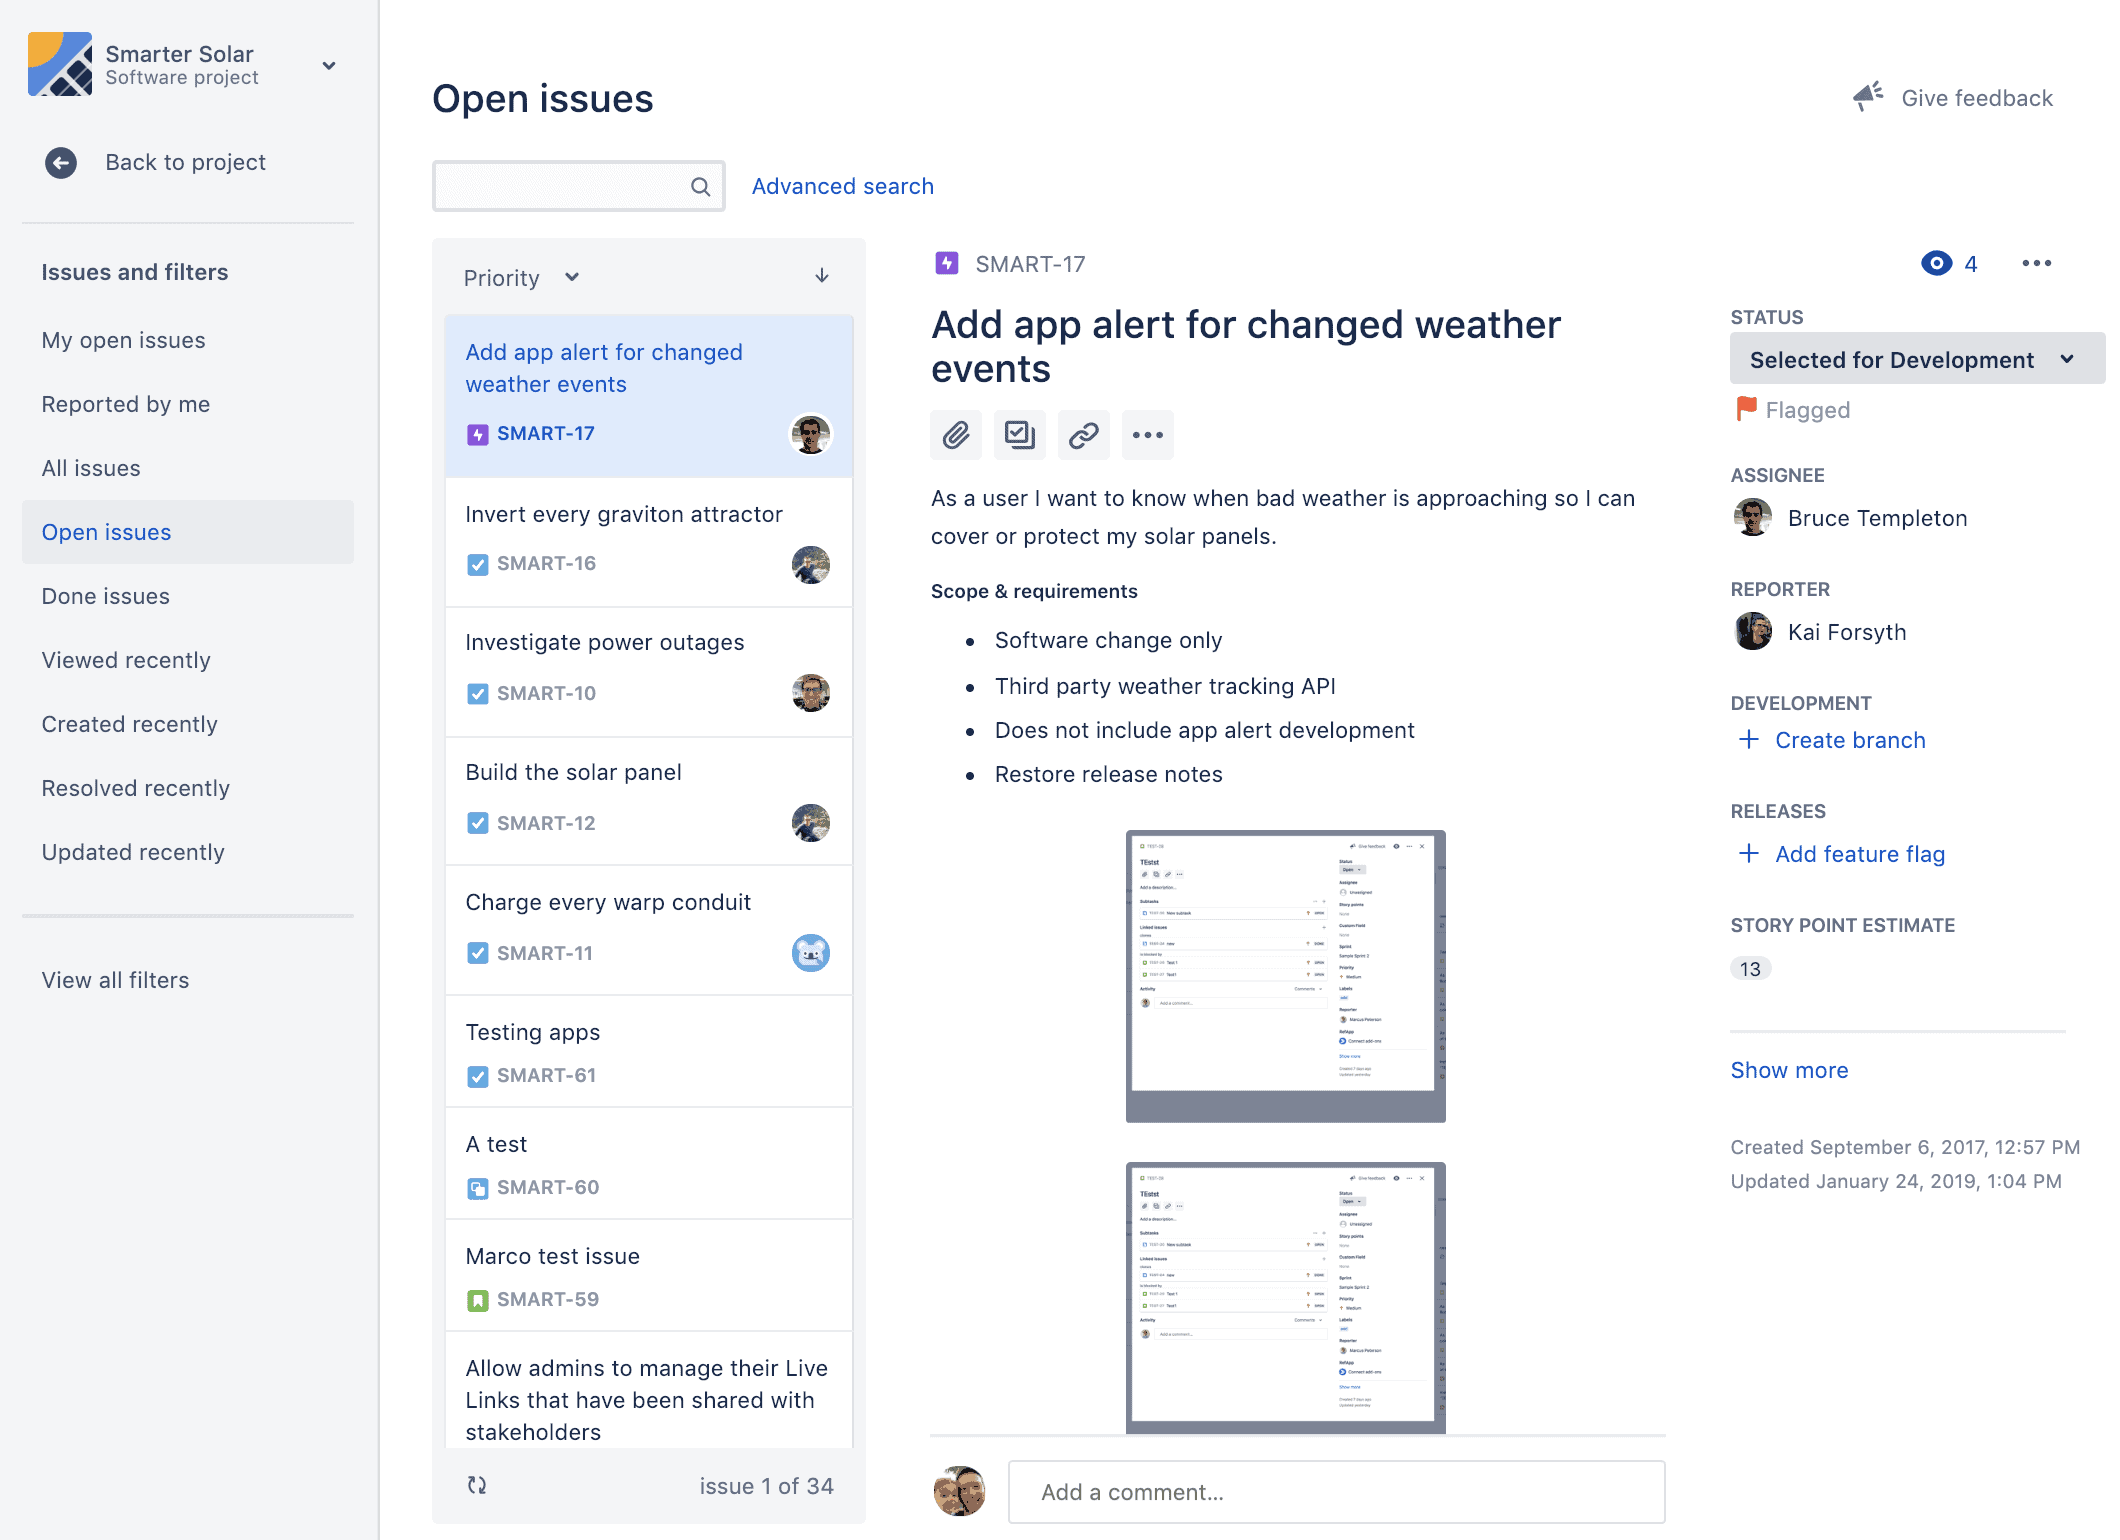
Search for and filter issues
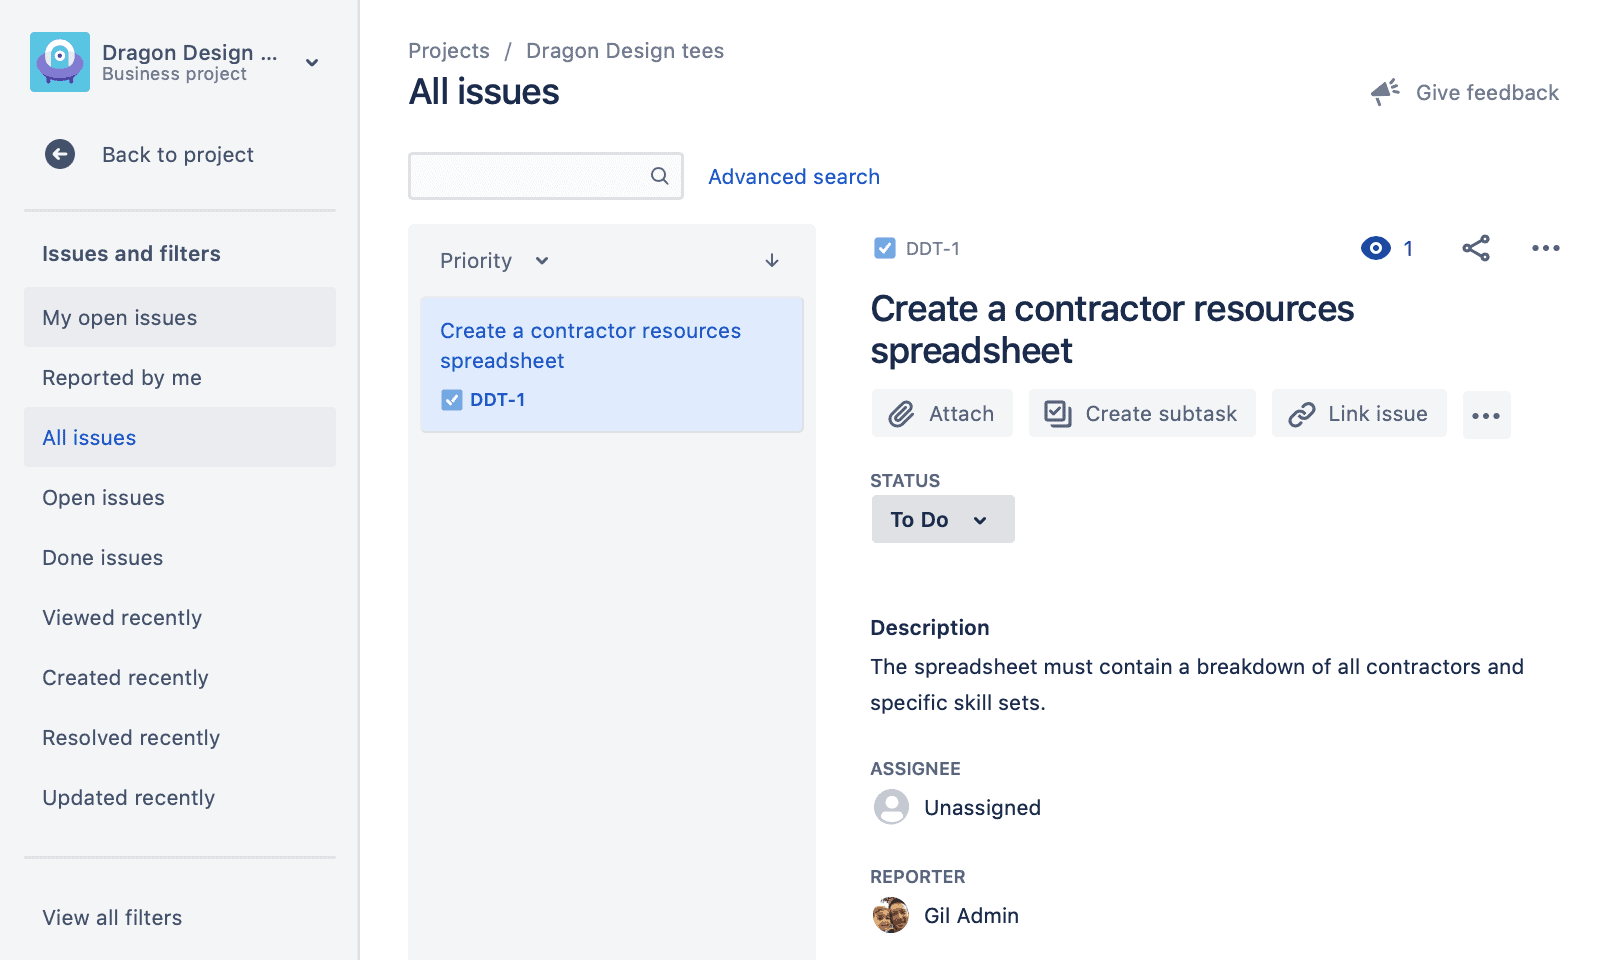
Once users are logged in, they can easily call up all the different projects that they have access to from the “Projects” tab on the top bar and the “View all projects” option.
Then, using the Issues button in the left project sidebar, users can view and filter all the issues in the projects to which they have access. The sidebar also comes with filtering options, such as “My open issues”, “Reported by me”, “Open issues”, “Done issues” and “Viewed recently” – allowing you to quickly find what you need.
You can also use the search field in the top right of the screen, using filters to narrow down your search. In addition, you can run a search within a board from the board screen.
By placing multiple filters on a search, you can further refine the results – for example looking for open issues assigned to you. By clicking the “save as” button, you can then save the search as a filter, so you can call it up again when you need it. Alternatively, you can use it to export a specific set of information for reporting. Sharing filters additionally lets you plug other users into the information that you’ve called up.
Managing and editing issues
Once you have issues in place, you can assign, transition, and update them.
With the “Status” field in the top right, you can progress the task from creation through to completion, as and when appropriate.
The “Assignee” field allows you to manually edit who the issue is assigned to if need be.
From here you can choose to “Watch” the issue, so you’ll be updated when changes are made to it, and you can share it, to direct other individuals to the task.
You can also clone the issue from this view, which can be very useful when creating new similar issues.
Lastly, you can add comments below the issue description, if a dialogue is needed to clarify or confirm the details of a task.
Customizing issue layouts
There are a number of options available for customizing the field layout for issues. If you want to edit the field layout for an issue (noting that changes will affect all issues of that type within the project, as well as those that use the same view issue screen):
- Access an issue of the type that you want to edit and click the “Configure” button in the bottom right
- You can then add and remove and rearrange the fields with a drag-and-drop interface
- When finished, click “Save”
If you want to add, remove or edit field tabs then follow the link for the relevant screen configuration at the top of the page and make the changes that you need. For existing tabs, you can also click on them and then “Edit fields & tabs” to make changes.
Managing permissions in Jira Work Management
JWM comes with settings that allow you to precisely control how users access the system and what they can do and see. There are two sets of controls: global permissions (affecting all projects on the instance) and project permissions (relating to more granular points on specific projects – such as who can create and progress issues).
If you only want a permission scheme to relate to a specific project, it’s best to create a new one along with a custom role to go along with it. To create a new role:
- Go to “Settings” (the cog symbol) and click on “System” and then “Project roles”
- Then add a new project role and click “Add project role”
- You can then click “Manage Default Members” to assign specific individuals to the new role
To edit a permission scheme or to create a new one:
- Go to “Settings” (the cog symbol) and click on “Issues” and then “Permission schemes”
- If you’re creating a new permission scheme it’s best to “Copy the Default Permission Scheme” and give it a new name (saving with the “Update” button)
- You can then update the permissions for your new scheme to determine which project roles are able to create issues or to browse the project
To then connect the permission scheme to a project:
- Go to “Projects” and choose a project or create a new project
- Once it’s set up, go to “Permissions” then “Actions” and “Use a different scheme”
- Then choose the desired permission scheme and click “Associate”
Best practices and tips for agility and collaboration with Jira Work Management
By design, JWM is simpler and more streamlined than Jira Software – but that doesn’t mean there isn’t an art to making the most of the platform:
– Don’t be tempted to recycle issues – if you manage recurring minor tasks, you may be tempted to reuse the same issue and return it to the “To do” status next time it needs to be completed. However, doing this will make it much harder to track what work is being done and it will make your reporting confusing and unclear. Instead, it’s better to clone the issue, give it a new name and close it when the task has been completed.
– Don’t over-customize your instance – part of Jira’s power is that the platform can be endlessly customized. However, the more that you tailor your issues and workflows to the needs of your team, the less well they’ll plug into other teams’ projects. A simple solution is to look at how pre-existing templates can match your use case or, if they’re not doing the job, to look at whether customization options are suitable for your whole organization.
– Download the Jira Cloud mobile app – this mobile app allows you to create issues, check on tasks and assign work, all while on the go. This makes it a powerful way for business teams to enhance their use of JWM and for team members on the go to check in on their team’s progress.
Best Jira Work Management Use Cases
JWM has been designed for business teams ranging from HR and legal to sales and marketing – so there’s a very good chance that you can make it work for you. Here are some example use cases for JWM:
Marketing teams

The Jira “content management” project template is great for marketing teams (providing more specialization and detail than the general “task management” project template). It allows you to track and progress work from the commissioning stage to completion. The board view will make it easy to see all work in progress at a glance, while the calendar view lays out your team’s deadlines. You might also use milestones to mark checkpoints toward the completion of major goals.
HR teams
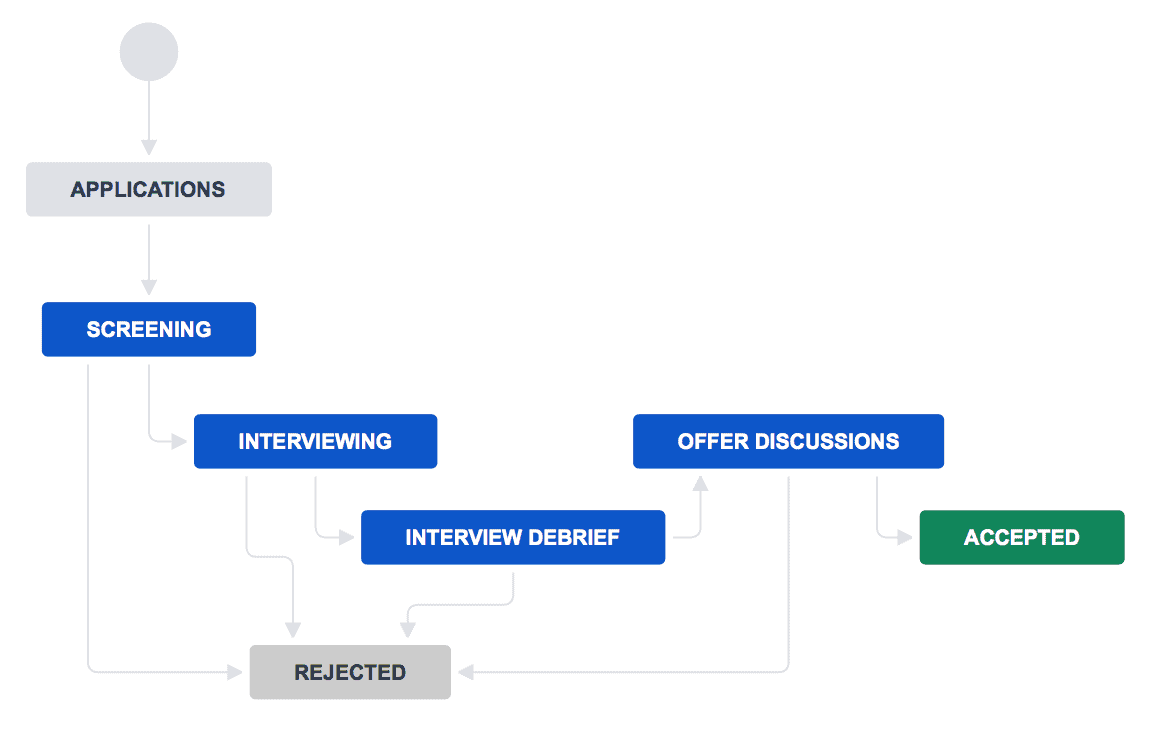
HR teams follow a number of processes, but the “Recruitment” project template can be a great fit when hiring. By creating an issue for each candidate under consideration, the team can view all suitable prospects from the board screen. Documents can then be attached to the candidate’s issues as needed.
Sales
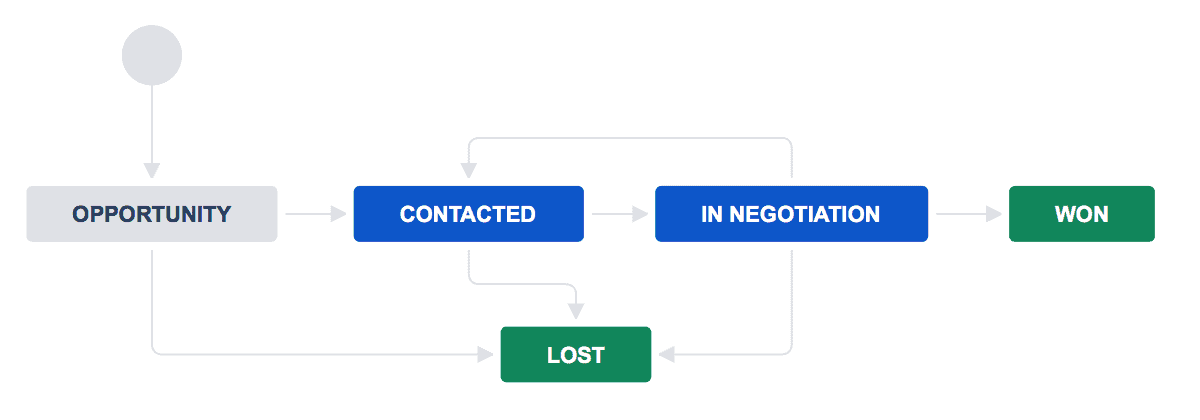
The “lead tracking” project template guides lead from being identified as an opportunity through to either being won or lost. The board allows you to easily check on the status of open leads, and you can also set prioritization and due dates.
For other use cases, the “process management” project template may be suitable, which directs tasks towards completion, but with approval stages and the option for cancellation as an alternative endpoint. Something similar might be suitable for finance requests, where queries will ultimately be approved or rejected, and purchases can be checked and reviewed in the interim.
Apps and Integrations
One of the key benefits of the Atlassian ecosystem is how much its products can be customized and extended. As well as the vast library of apps available on the Atlassian Marketplace, these integrations are a great place to get started:
Slack
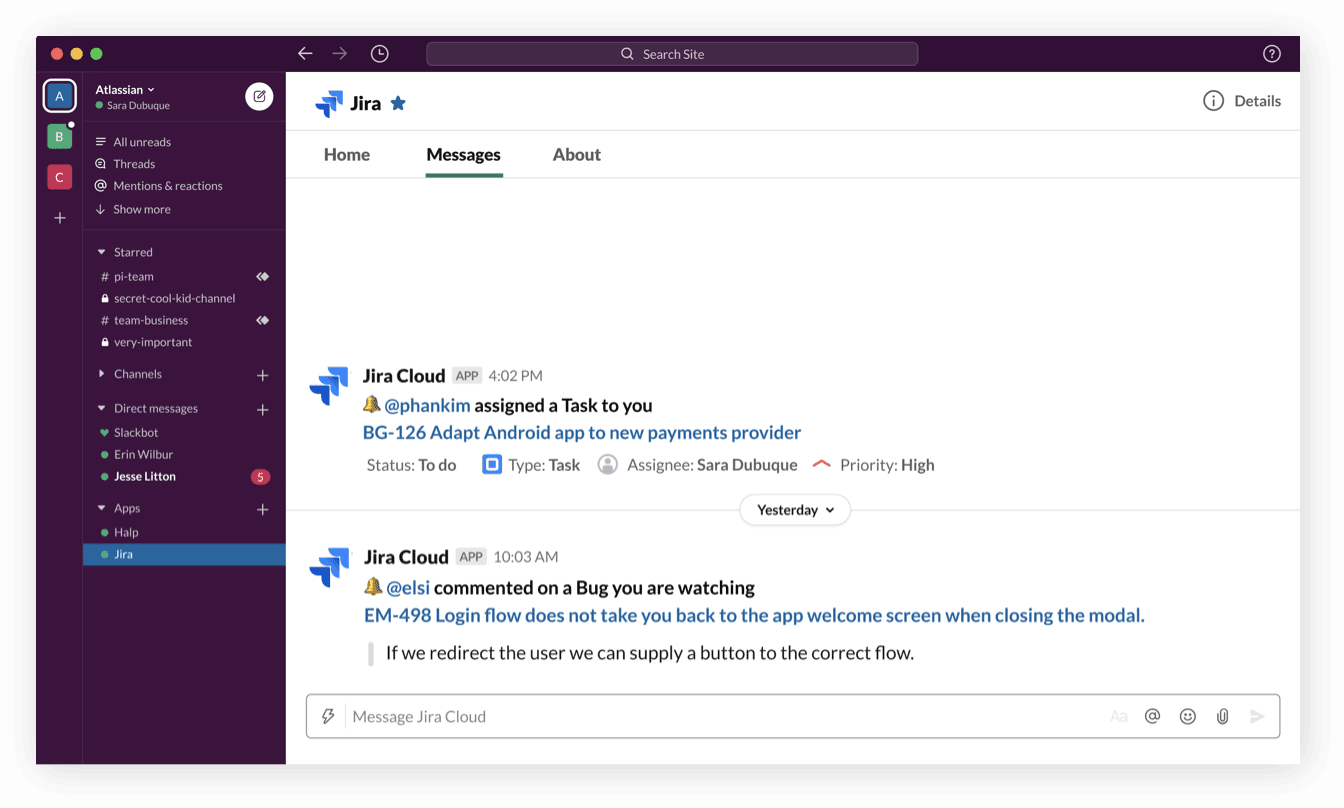
This integration lets you get personal Jira notifications in Slack, rather than by email, and allows you to access issue previews and to create and edit issues from Slack (as well as including the ability to assign and transition issues and to comment on them). Additionally, you can set up a Slack channel to provide reports on a specific Jira project, to keep you up to date. All of this can potentially save you a lot of time, as well as allow you to avoid the distraction of context-shifting between programs.
Sheets
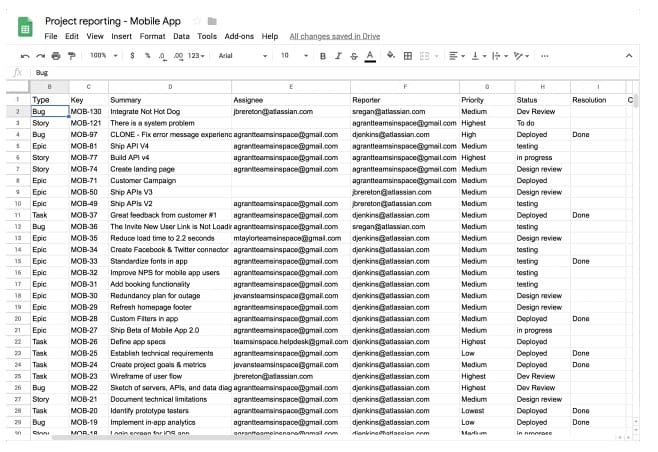
Jira Cloud for Sheets allows you to painlessly export data to Google Sheets from your Jira Cloud sites, based on Jira Query Language (JQL) or using starred or pre-defined filters. This makes it fast and simple to get ahold of data so you can build reports and quickly get a view of the big picture.
Confluence
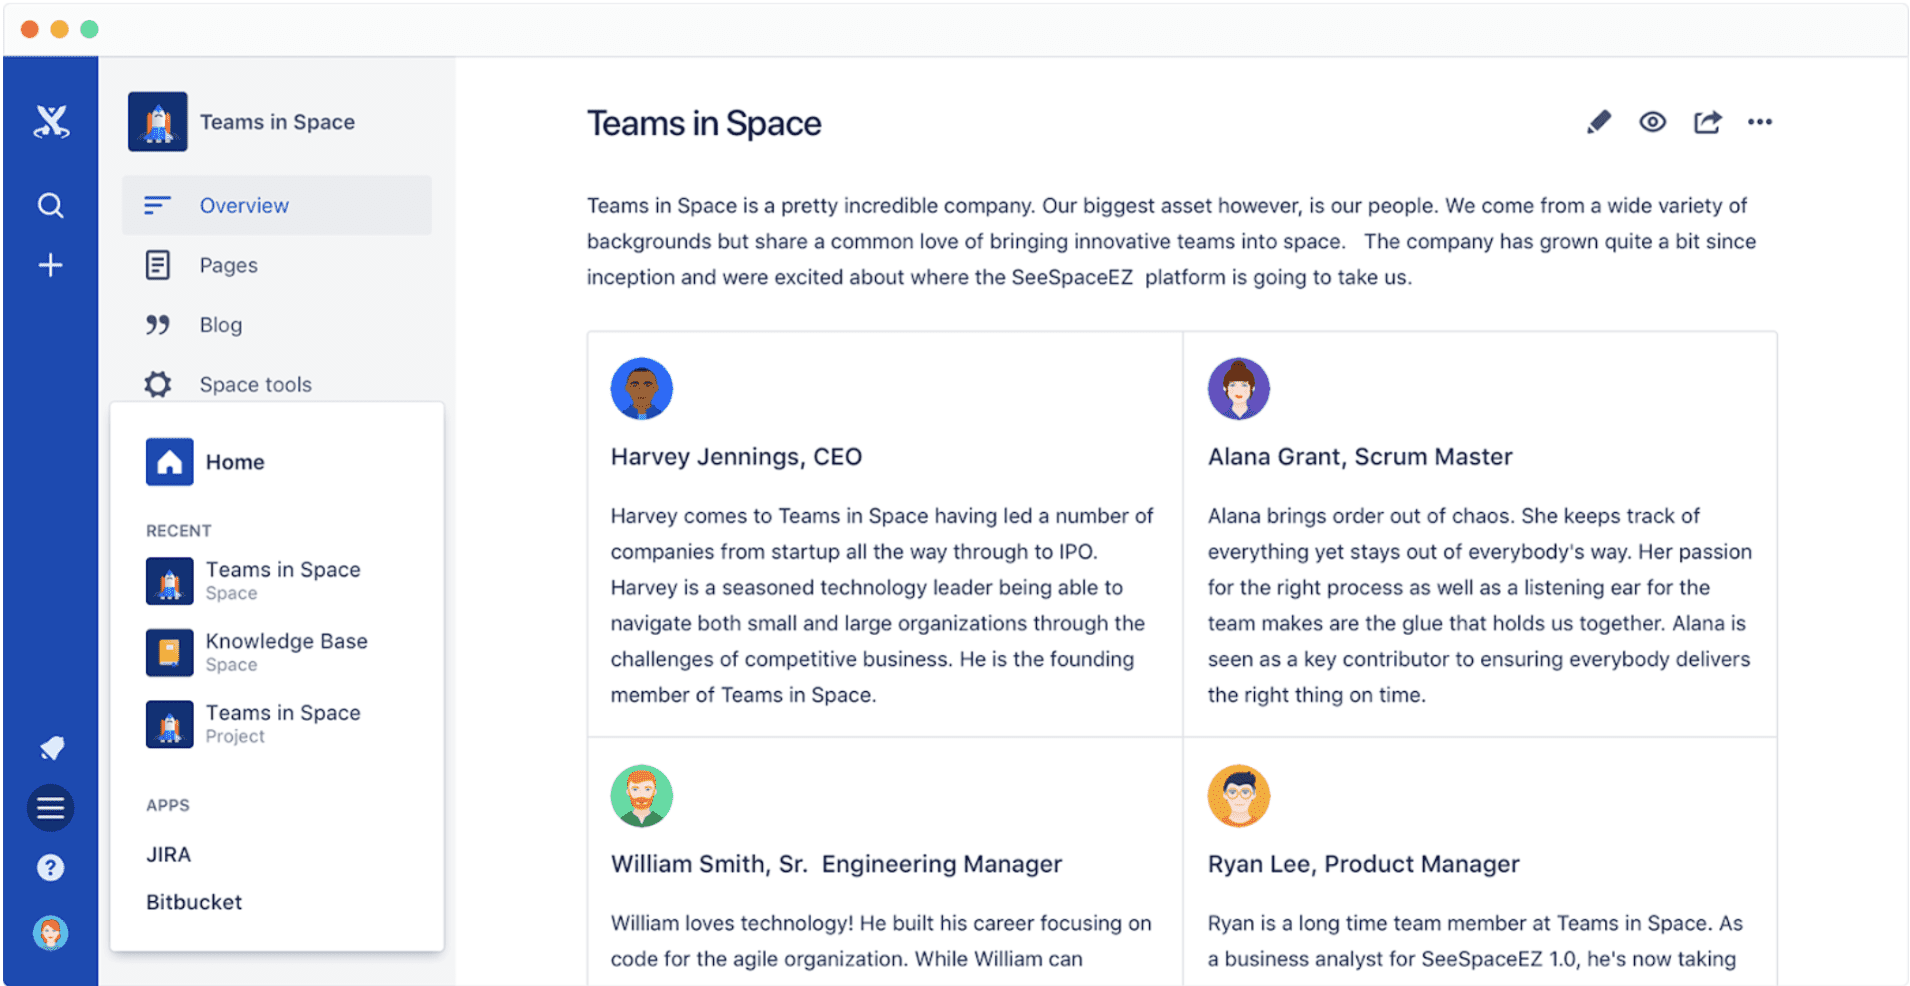
As another cornerstone of Atlassian’s product range, it’s only natural that Confluence integrates seamlessly with JWM. Confluence is great for housing project documentation – from project plans and meeting notes to employee manuals and user guides. Connecting JWM and Confluence means that you can insert issues into Confluence pages and you can create issues directly from Confluence. What’s more, you can auto-convert pasted issue links and automatically link to issues when they’re mentioned.
GitProtect
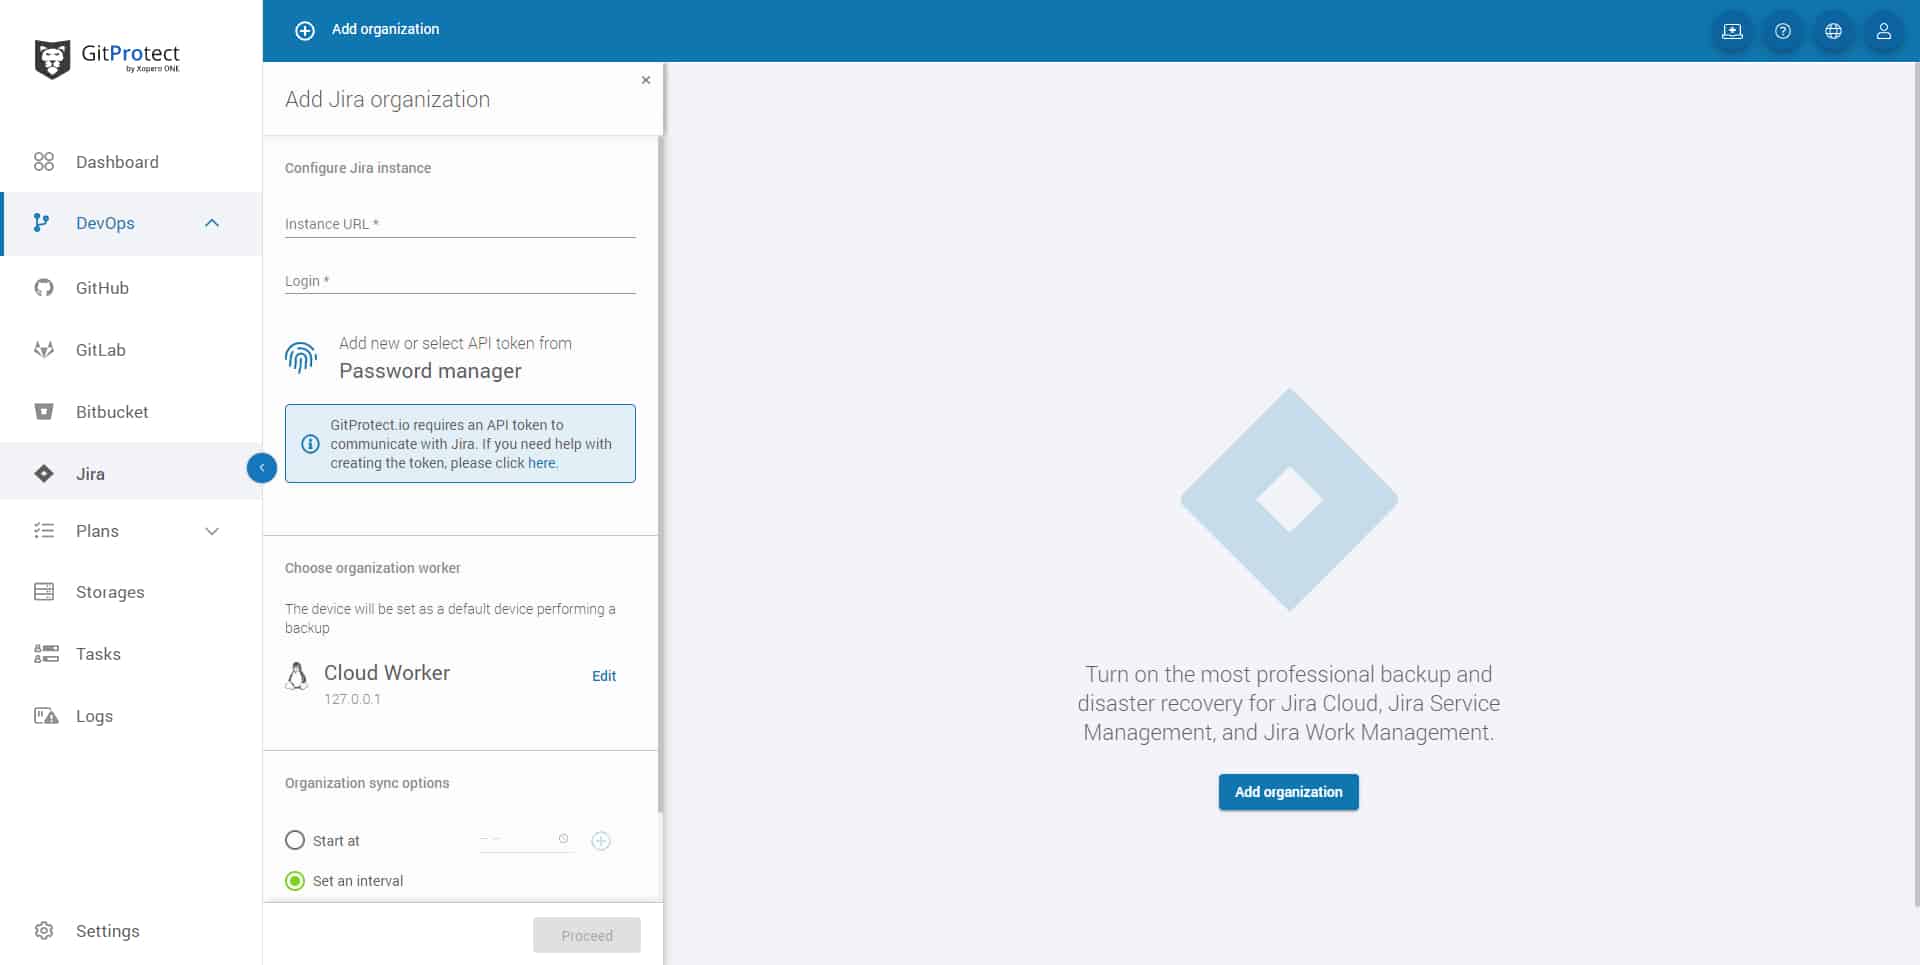
GitProtect Jira Backup lets you automate data protection and recovery for critical Jira Software, Jira Service Management, and Jira Work Management data, including projects, boards, users, issues, and more. It not only saves your time from manual exports and scripts, but with Disaster Recovery technologies, also eliminates data loss and downtime, mitigates service outages, errors, and attacks, and enables simple migration to the cloud. In the end, you can stay compliant with the Shared Responsibility Model and security standards (SOC 2 or ISO 27001).
Conclusion
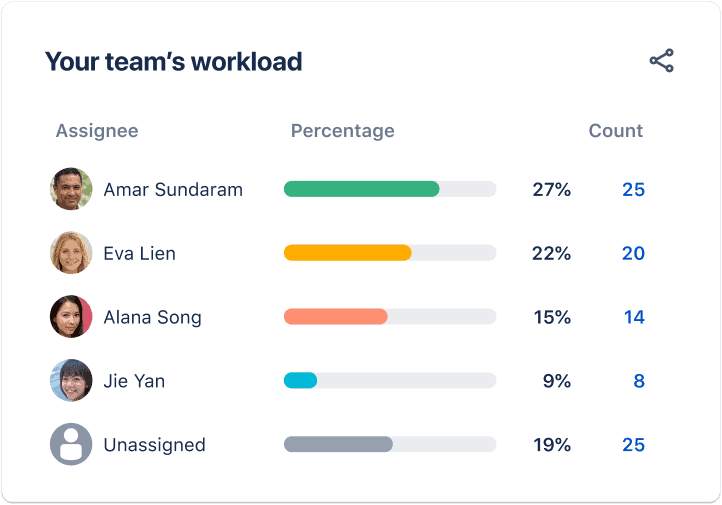
Jira Work Management provides a powerful platform for business teams to work together and track progress, driving efficiency and transparency. Having a clearer view of resources and team workloads also allows managers to make better use of resources and to plan ahead more effectively. All of this helps organizations to fundamentally get work done, engaging employees with the tasks at hand and aligning teams towards the organization’s overall objectives.
What’s more, onboarding team members to JWM integrates them into the Atlassian ecosystem and the host of tools, products, and services that it provides – amidst an endlessly extendable and customizable workspace. This can build a bridge between business teams and engineers, but it can also help to better connect every department across the organization, breaking down silos and enhancing organizational agility. All in all, JWM can be a key to unlocking an enormous amount of organizational potential.
Recommended Reads: