

How can we integrate multiple Jira instances and projects?
Jira is hands down one of the best project management and communication tools out there for development teams. But when you work with outside teams, whether they be service suppliers, clients, or outsourced teams, your collaborative Jira process can get a little sticky.
This is when a Jira to Jira integration (or Jira to Jira sync) can help streamline these collaborations and help share data with other Jira users. This can increase the visibility of common information and allow teams, that reside in different Jira instances, to communicate better.
This article will cover why a Jira to Jira sync is needed in the first place. It then discusses a few common use cases for such a sync. Then we walk you through solutions available to implement synchronization between multiple Jira instances and the step-by-step process to achieve that.
Note: We will be using an integration solution called Exalate for this. It enables teams to efficiently coordinate their work when tracked in multiple projects or multiple Jiras. This two-way sync automatically updates issues on both ends when a change is made.
What is covered in this blog post:
- Why do You Need to Integrate Multiple Jira Instances
- Use Cases for Jira Issue Sync
- How to Choose the Right Technology for a Jira to Jira Sync
- How to Synchronize Multiple Jira Instances

Why do you Need to Integrate Multiple Jira Instances
Jira is a popular tool that supports a variety of teams, right from engineering to customer support. It has a suite of applications like Jira Software, Jira Service Management, Jira Work Management that cater to these teams.
Every such team has its own workflows and pipelines within Jira. If you’ve ever tried onboarding an outside team onto your Jira project – or vice versa – you know how difficult it can get to manage separate workflows.
However, having two completely separate Jira instances or projects is just as much of a hassle. Information gets lost. Issues get confused for other issues. And manually syncing issues from project to project is not a scalable solution. What if you’re working with a large number of teams within Jira? Hence, a need to integrate multiple Jira instances and projects where information flows automatically in real-time and teams can work together in a more structured manner arises.
But before we get down to the practical aspects of implementing this integration let’s have a look at a few use cases.
Common Use Cases For Jira Issue Sync
Okay, so Jira to Jira sync sounds convenient, but how exactly can it help your project? Here I’ll dive into a few of the several use cases in which Jira issue sync can come in handy.
Quality Assurance and Development Teams Working on Multiple Jira Instances
Many software and game developers outsource quality assurance to third-party teams. These outsourced quality assurance teams have their own workflows within Jira. Especially since they often have to juggle separate clients with multiple workflow styles. A QA team needs to constantly share issues and bug reports with the development team. But the QA team doesn’t require access to all of the development team’s task-related issues and other development notes.
The traditional solution would be to have the dev team access both Jira instances or projects at the same time: their own project, plus the QA team’s project. The latter only contains bug reports. However, constantly needing to keep up with two Jira projects (or instances) for the same development project is a waste of time.
An integration solution enables both teams to stay within their own Jira projects and only sync Jira instances that are relevant to the other team. The workflow could be established as follows:
- QA tester finds a bug
- QA tester creates an issue in the QA Jira project
- The tester’s team lead vets the issue and syncs it to the dev team’s Jira project
- An instance of the bug is now created in the dev team’s Jira project
- The Dev team updates the QA team on the status of the bug via their twin issue – all information is synchronized on the QA team’s end
With this workflow, only relevant issues get communicated between both teams for a more streamlined approach to quality assurance.
Sync Jira Issues with an Outside Team without Sharing Confidential Information
What if you want to sync Jira issues with an outside team without leaking confidential information?
With the traditional method, two separate issues would be created in two separate Jira instances (or projects). The issue available to the outside team would only contain non-confidential information. However, this method requires dual work every time the issue is updated. On the other hand, Exalate enables project administrators to sync only specific fields between two Jira projects.

For example, let’s say a dev team didn’t want to share certain screenshots with the quality assurance team. But what if they wanted to add these screenshots to the issue to better keep track of the bug on their end?
In this case, the administrator could set it up so that all attachments on the development side do NOT get synchronized to the QA side. This wouldn’t prevent the QA team from uploading attachments for the dev team, enabling them to share relevant information for bug reproduction.
Jira Service Desk Sync to Multiple Development Projects
Let’s say you have an IT support team reporting issues through a Jira service desk when angry users come to them with problems. In this use case, you have two Jira projects (or separate Jira instances):
- the front-end support project
- the back-end development project
The usual method to report bugs would be for IT support agents to forward these Jira issues via email.
Now, even if we set aside the fact that this gets developers’ emails flooded when they’re already busy, email is just not an effective way to share Jira issues. It’s a waste of time and information will inevitably get lost both ways. Instead, we can set up a Jira to Jira integration. That way, IT support agents can create issues and sync them so that the development team gets instant access to the issues. This is without having to comb through their email first.
This also means that the IT support agent has visibility on the status of the issue when the developers update it, making communication with angry users much simpler.
Note: We’ve covered more use cases on Jira issue synchronization in the following article on Making The Case For Synchronization Of Issue Trackers
Before we get to implementing a Jira to Jira Integration, let’s briefly see how to choose the right technology for such an integration.
How to Choose the Right Technology for a Jira to Jira Sync
Jira has a lot of applications on its marketplace that cater to a variety of integration needs. In this section, we discuss the points to consider when choosing an integration solution. This is not an exhaustive list but can serve as a guideline that you can use.
Decentralized Integration & Security
Perhaps, the most obvious point is to have a secure integration. You wouldn’t want confidential information to be passed over to an outside team. So having encrypted information exchange, secure transfer protocols (HTTPS), and role-based access control mechanisms is a must.
All the solutions out there are secure in this regard but what takes the security of an integration a notch above is having a distributed architecture.
In simple words, it means having independent control over the information being sent and received between multiple Jira instances. After initial meetings to set up the synchronization, there is no need to consult the other team if you need to change any sync requirement at your end. Your Jira instance will have the autonomy to decide what you send over and how you receive information coming in from multiple Jira instances.
A consequence of this is increased security.
Flexibility
Jira is no longer limited to technical teams and so an integration between multiple Jira instances shouldn’t be limited to technical users only. Even business users must be able to set up the integration just as easily.
Another aspect to consider is respecting the fact that integration requirements are volatile. What you might want to sync today might no longer be needed, or you might want to sync something completely new. Having the integration solution adapt to these requirements with minimal tweaking is a must. Otherwise, you might end up wasting a lot of valuable time configuring new sync requirements.
Reliability
Systems failures and downtimes are as real as global warming. Having the integration solution pick the synchronization automatically from the point of interruption is highly important.
Number of Platforms Supported
It is not always the case where you want to sync multiple Jira instances. You might need to integrate Azure DevOps with Jira or Jira with Salesforce. Having the integration solution support a variety of platforms is important.
We have chosen Exalate for the purpose of this article. Because it is the only solution in the market that supports decentralized integration in the form of incoming and outgoing sync processors. You can learn more about its architecture in this whitepaper.
It has 3 different configuration modes: Basic, Visual, and Script for different users and different integration requirements. It has an integrated retry mechanism to automatically detect downtimes and resume sync from the point of interruption. And finally, it supports integrations for a variety of different platforms like Jira Cloud, Jira On-premise, Salesforce, Azure DevOps, Zendesk, ServiceNow, GitHub, and more.
How to Synchronize Multiple Jira Instances
Now that we’ve gone over how to choose the right technology, I’ll show you how easy it is to set up a Jira to Jira integration.
I’ll guide you through this process step-by-step. (And if you happen to get stuck, or have any questions, use the live chat widget on this page.)
You might prefer watching a video tutorial, so here you go:
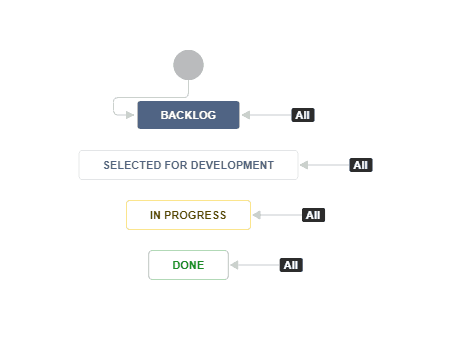
Step 1: Establish Workflow With Both Teams
The very first step you’ll need to take – before even installing Exalate into your Jira projects – is to establish the workflow you want between both teams. It’s possible for 2 teams to sync Jira projects without having the same workflow.
For example, you could have one project with a workflow like this: 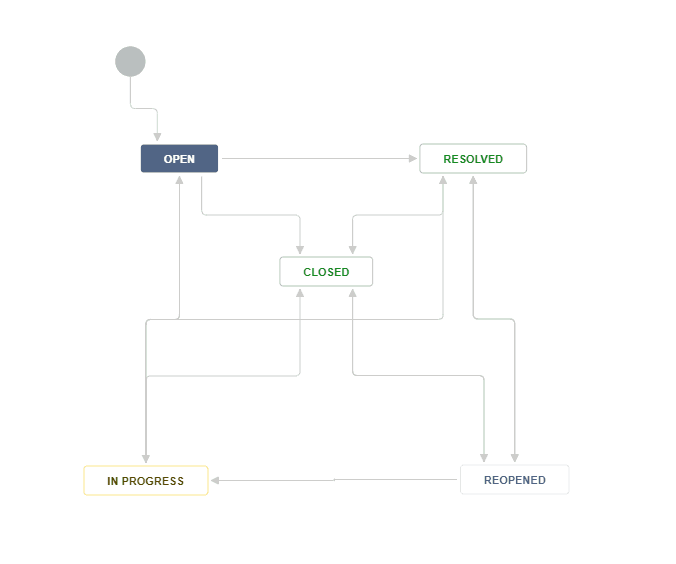
Step 2: Define your Integration Requirements
Another important step before you actually start your sync is to decide which issue information gets synchronized, and which does not, as well as what this translates into on the other side.
Sync templates establish which issue information gets synchronized, and which does not, as well as what this translates to on the other side.
For instance, you can sync the summary, description, comment, and attachment between 2 Jira issues – right out of the box. So before you set up a connection, make a list of all the relevant information you want to sync from Jira to Jira. We’ll go into more depth on how to change this later.
Step 3: Install Exalate on the Jira Instances
It’s time to install Exalate on both instances. To install Exalate, go to the Atlassian Marketplace and type in “Exalate”.
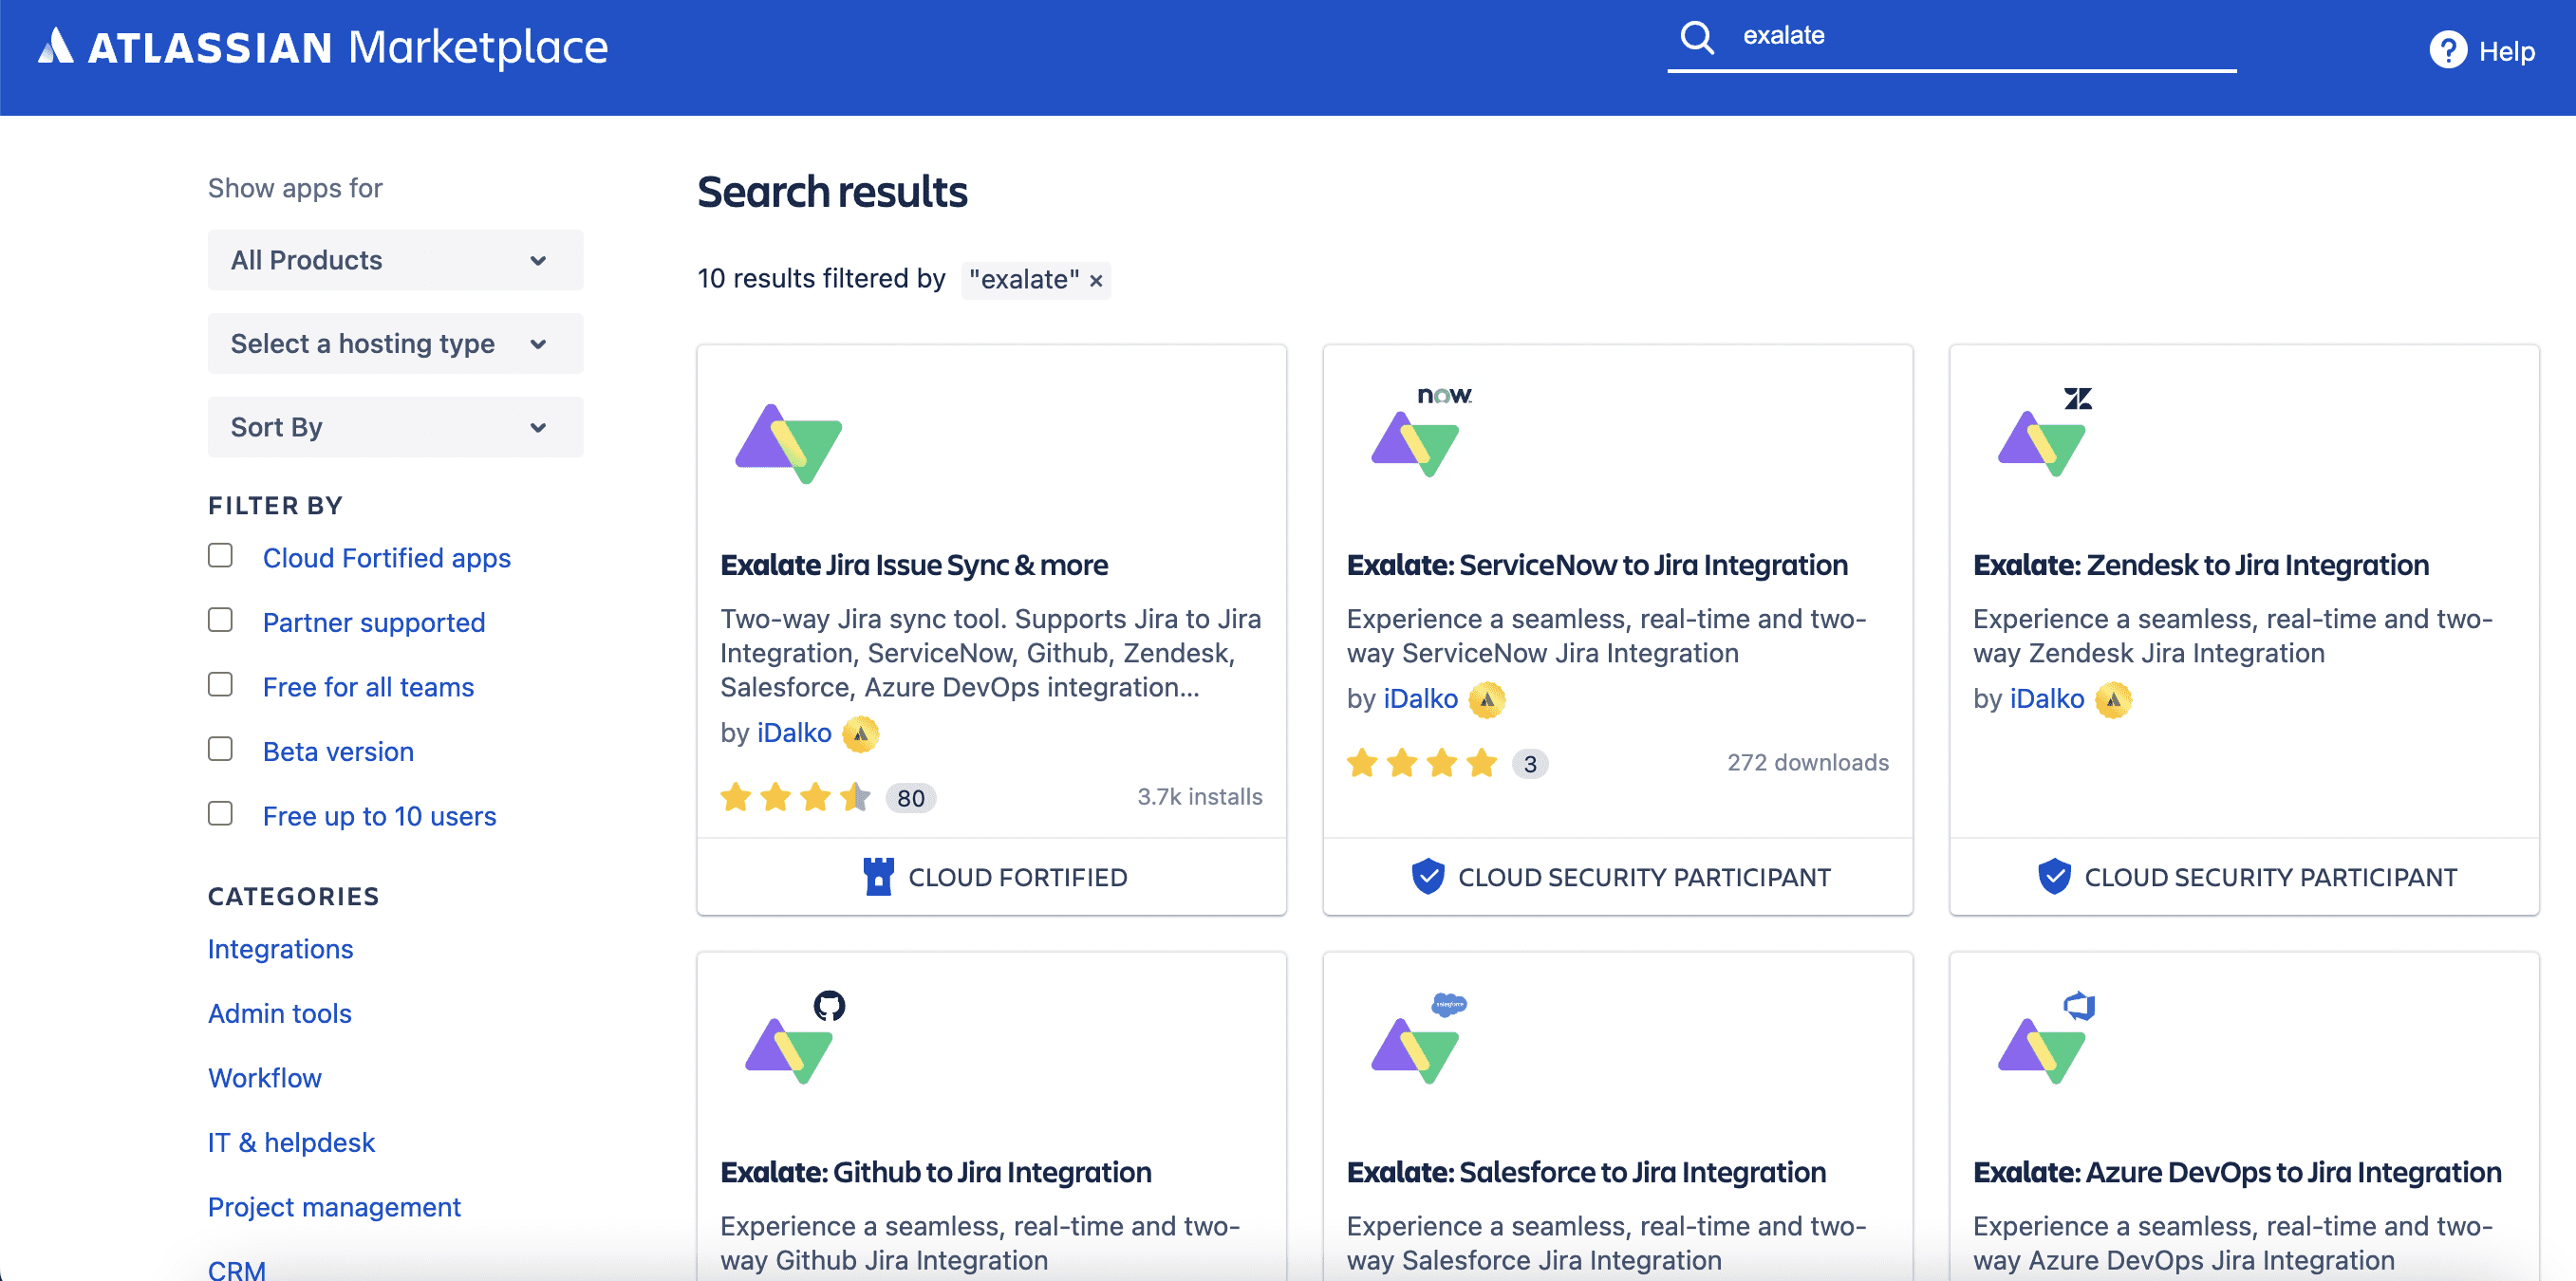
Click on download and install the app to start a free trial. The process is pretty straightforward.
Check out the detailed documentation to install Exalate on Jira Cloud if you prefer.
Note: Exalate can also be installed for Jira on Docker.
Note: Atlassian announced that there’s going to be no more selling server licenses for Jira or new feature development from February 2, 2021, onwards. But the existing server customers will have access to maintenance and support for an additional three years, ending February 2, 2024. For the purpose of this document, the following steps are for Jira Cloud. If you are using Jira on-premise, check out this documentation.
Step4: Create a New Connection between your Jira Instances or Projects
Once Exalate is installed, you’re ready to create a new connection.
Note: If you prefer you can have a look at the Getting Started step-by-step tutorial on the Exalate documentation site.
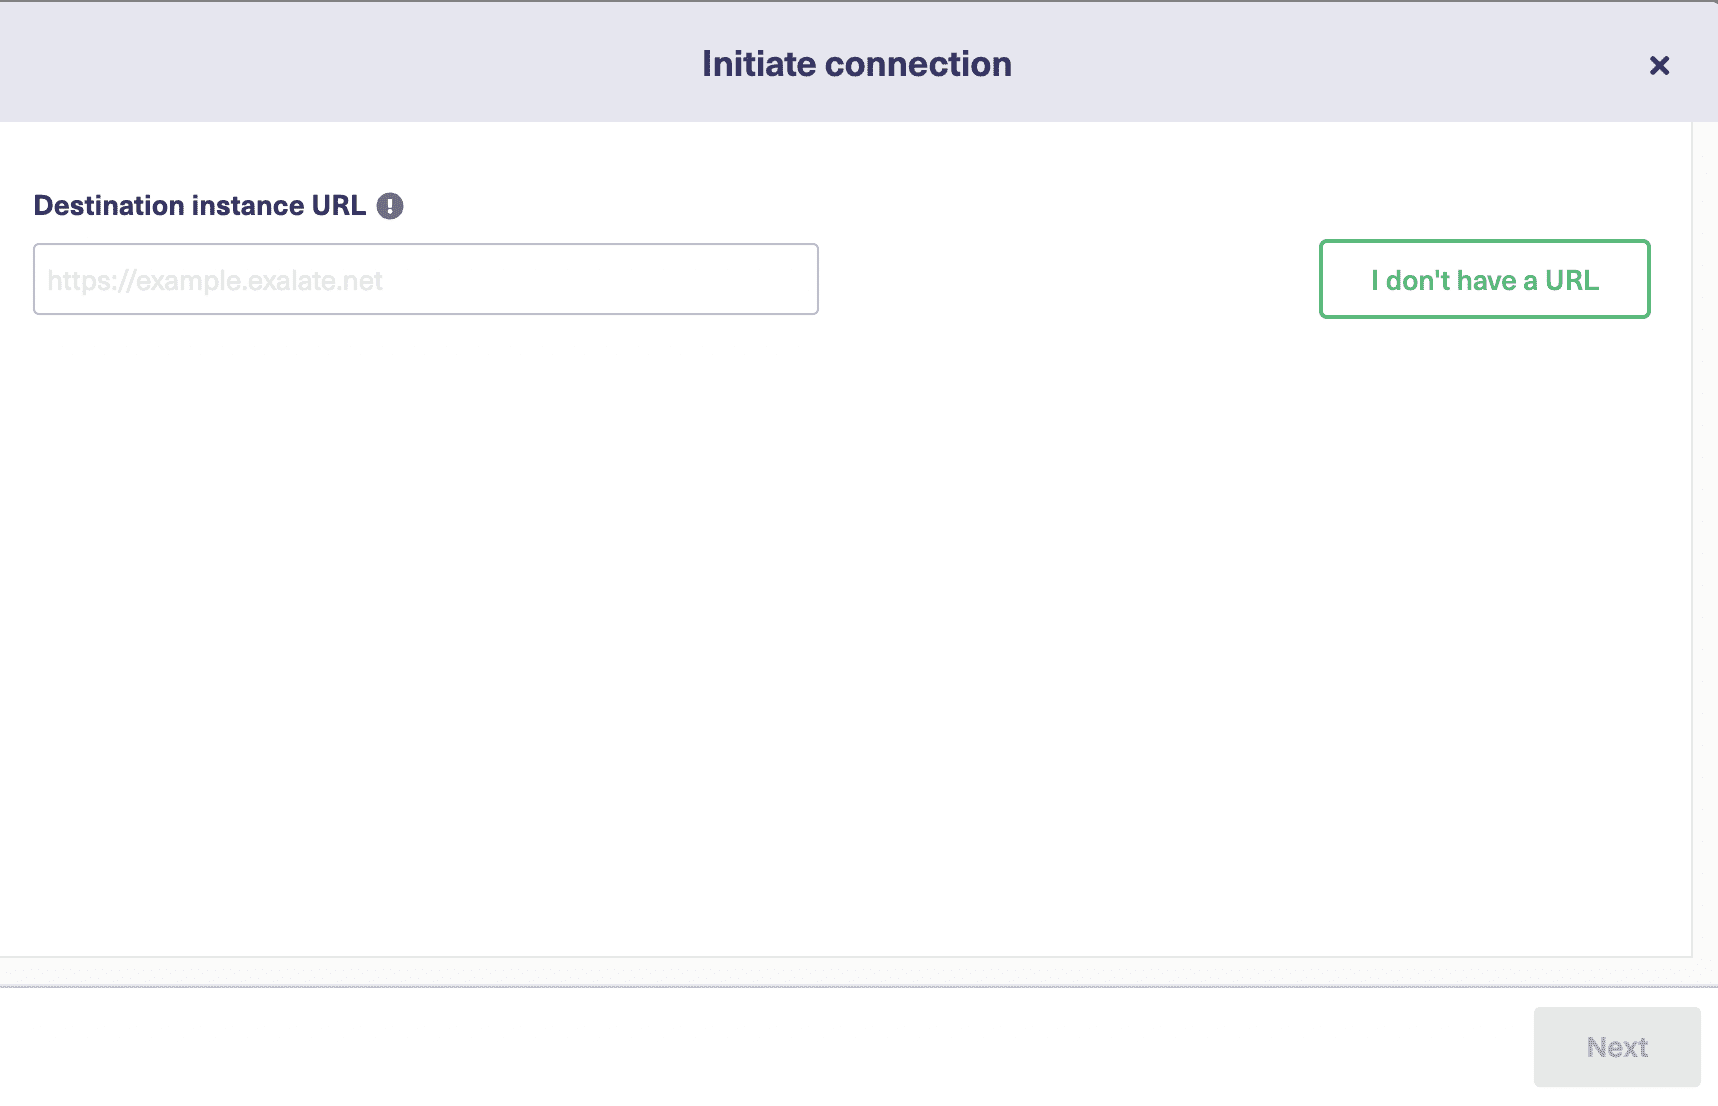
One team will initiate the connection while the other accepts the invitation. In this example, we’ll have a Blue Jira instance initiating the connection with the Green Jira instance.
For the Blue Jira, click “Apps” in the top menu.
The “Apps” menu will give you several options. If Exalate is installed properly, you can see it in this menu. Click on “Connections” in the Exalate panel on the left sidebar. You’ll see any existing connections in this menu if you happen to have any. But if this is your first connection, this area will be empty. 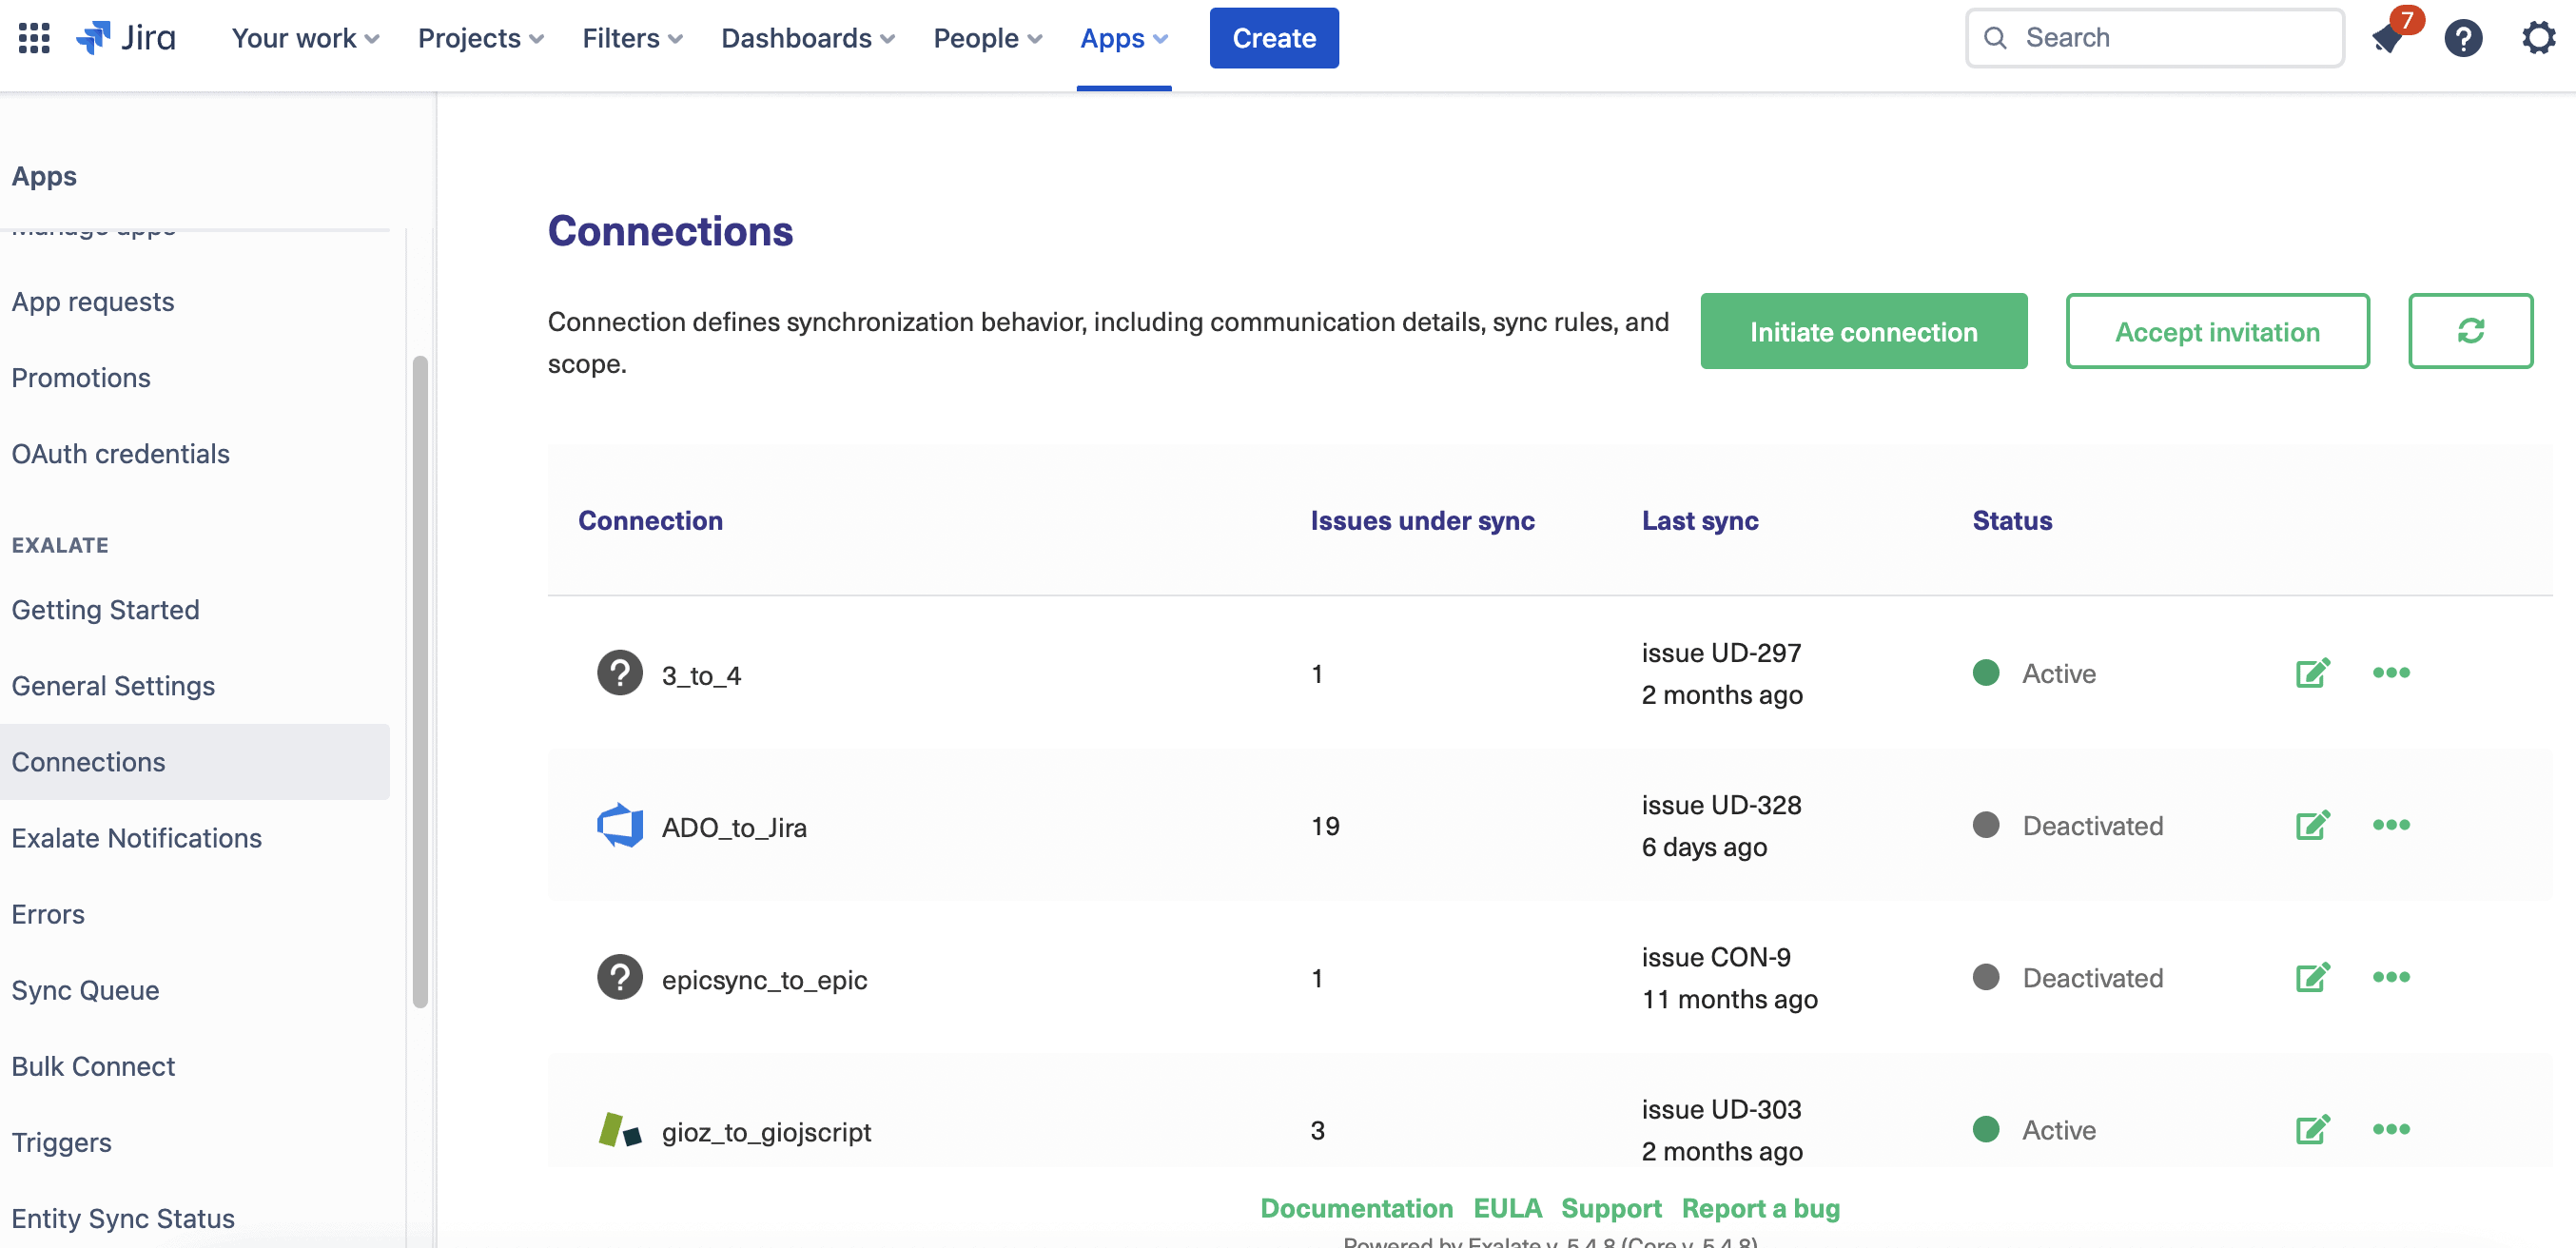
Exalate allows you to configure your connection using 3 modes: the Basic Mode, the Visual Mode, and the Script Mode.
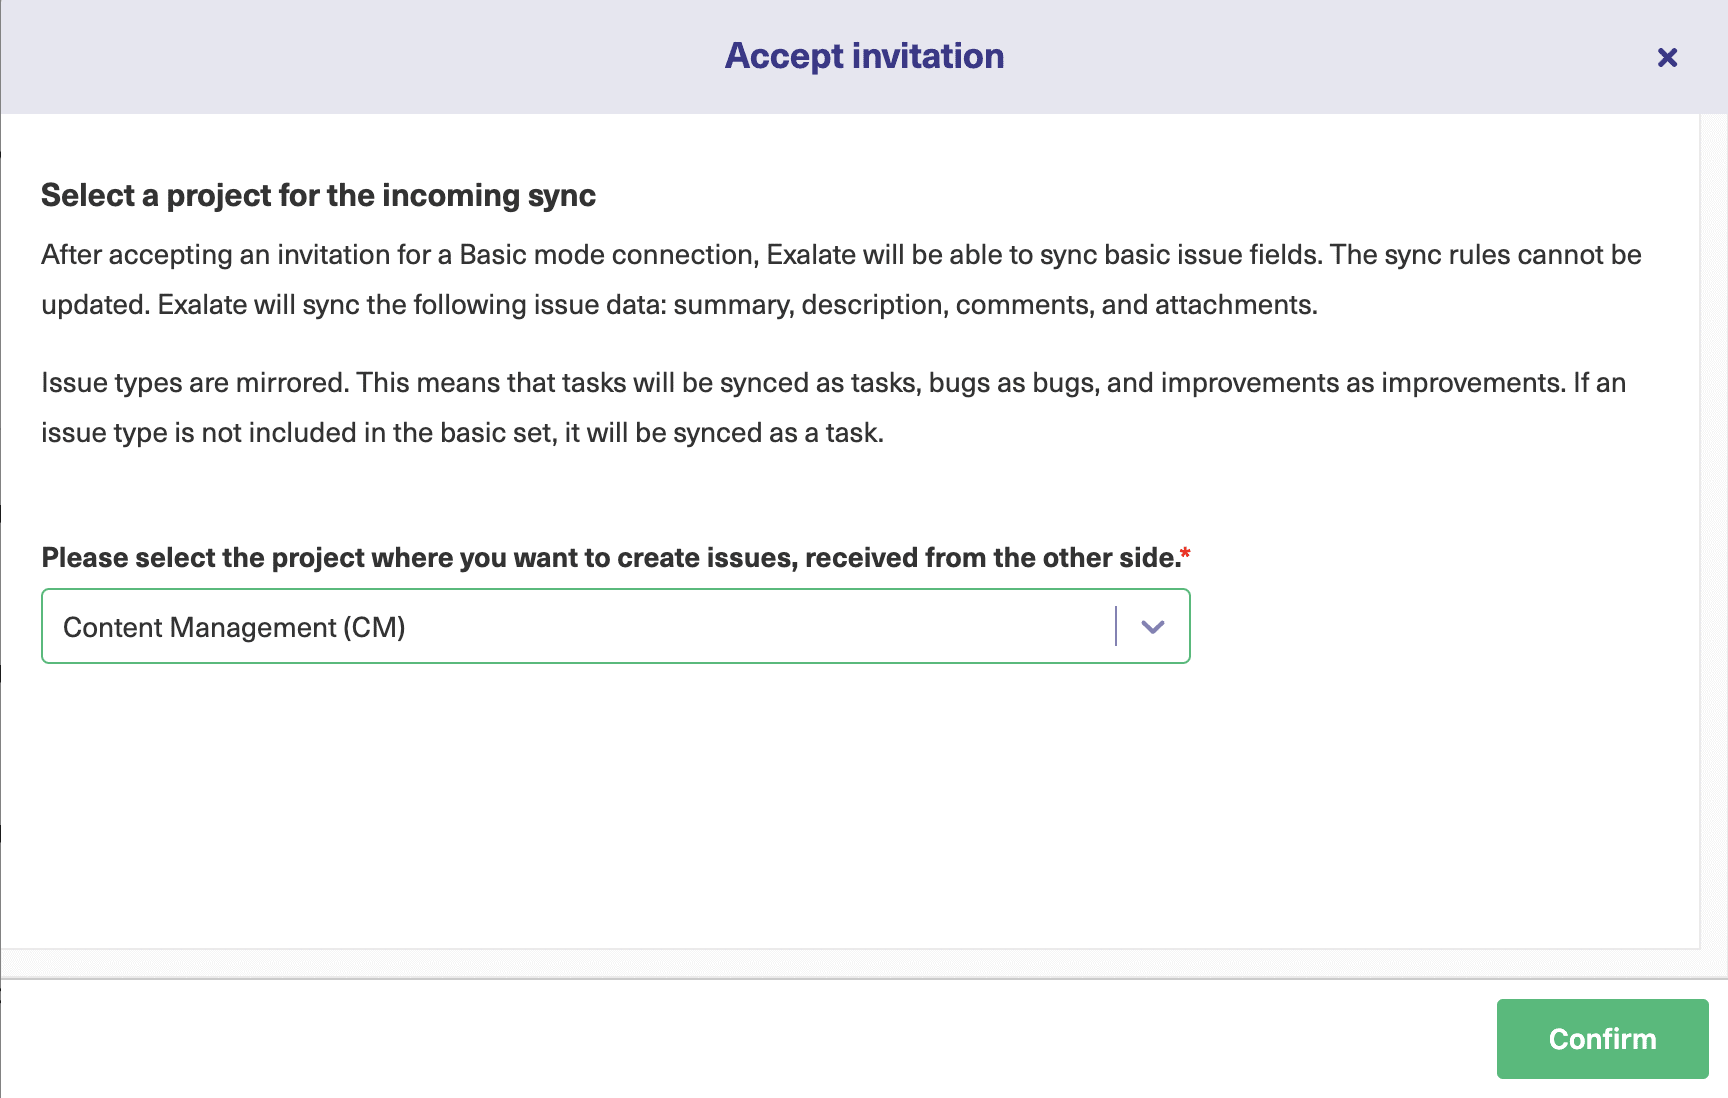
Exalate’s Basic Mode enables you to set up a connection for a limited set of issue fields like summary, description, comments, attachments, and issue types. The sync rules are generated automatically by Exalate and cannot be modified. These connections are recommended for use cases with basic synchronization needs.
Note: Exalate also has an option where not only Global administrators but also Project administrators can set up Basic connections from the Project settings. This helps establish the connection on a project level. Visit this page to learn how to do it.
Exalate’s Visual Mode gives you an easy way to set your connection up to share what you want, at the time of your choosing. It does so with the help of a low-code drag-and-drop interface. Another advantage of visual mode is that it is a one-side, one-admin control that lets you configure everything together. So it is ideal if you want to set up an integration between different teams or departments or projects within a single company.
And if you prefer, you can use the Script mode. Script mode uses an intuitive scripting engine that lets you use more advanced programming logic.
Scripting, by contrast, is disparate, with someone on each side of the connection doing it separately. So it is ideal for cross-company (across different companies) integrations. 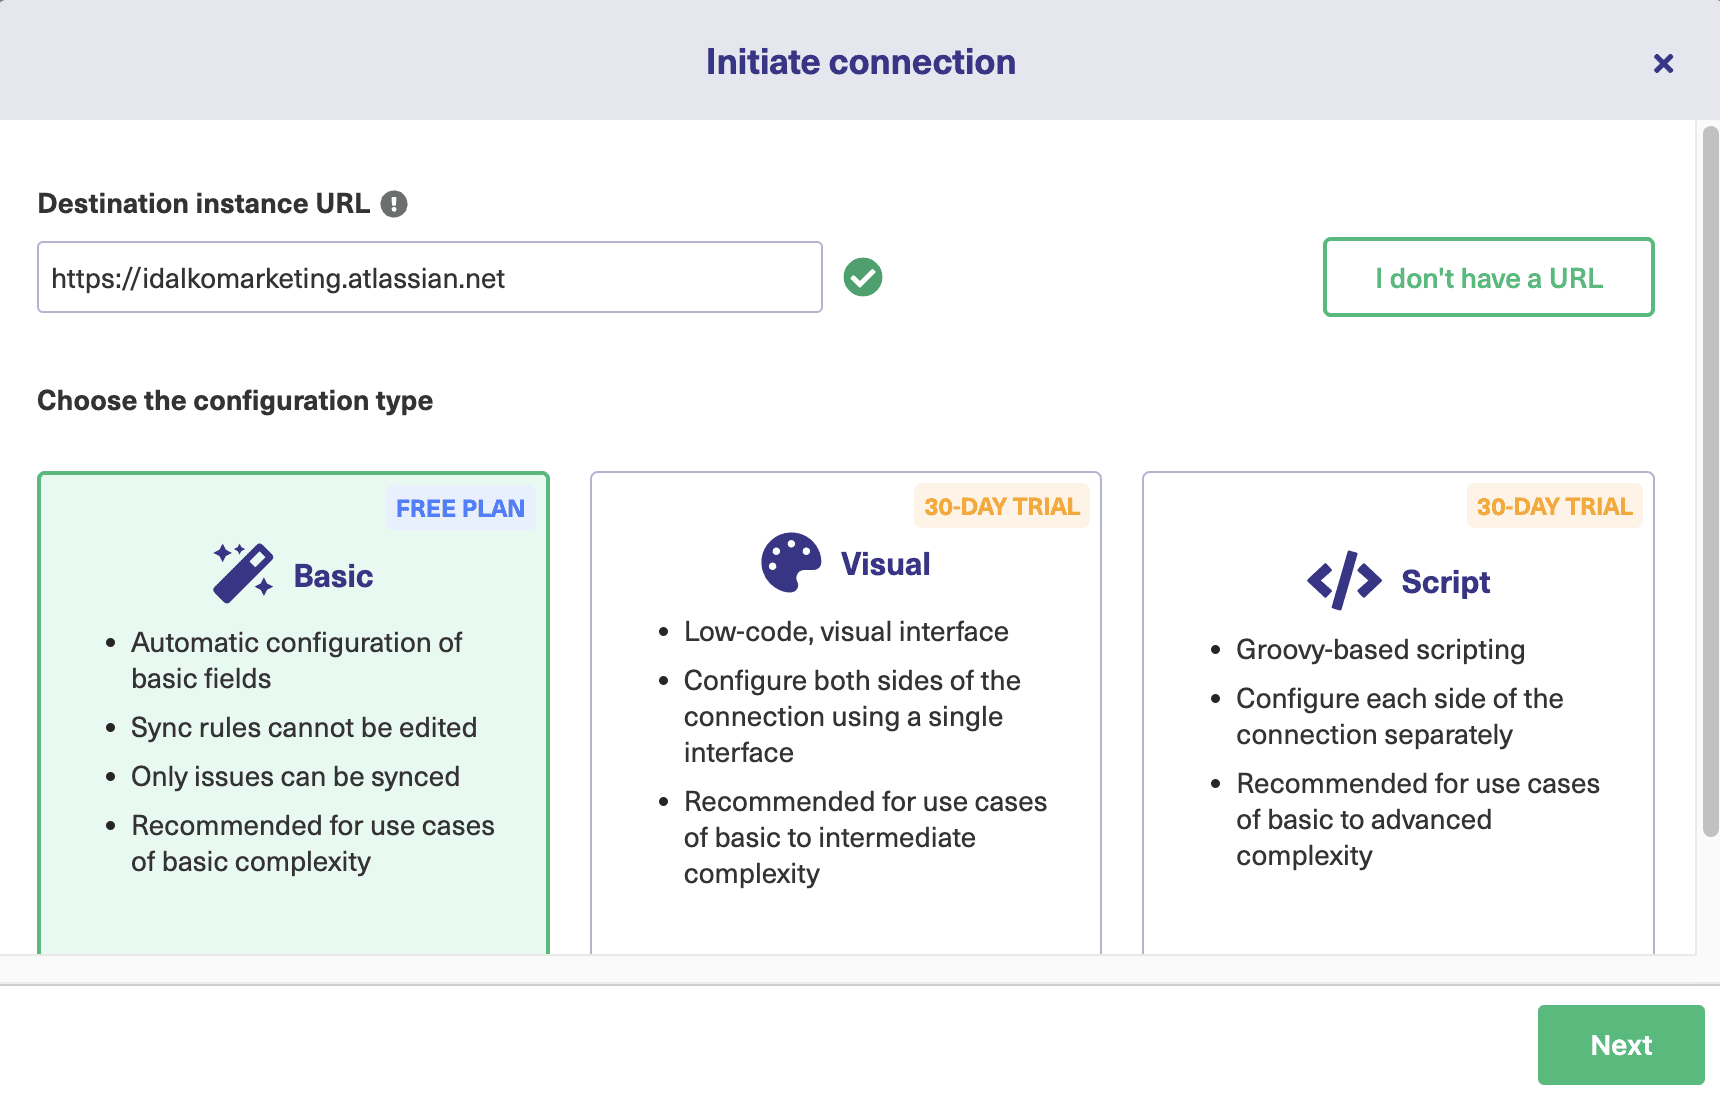
Continue with the Basic Mode
For getting started with the Basic Mode, click “Next” after selecting it. This will take you to a screen where you must select the project on the Blue Jira instance side, initiate the connection, and hit “Next”. 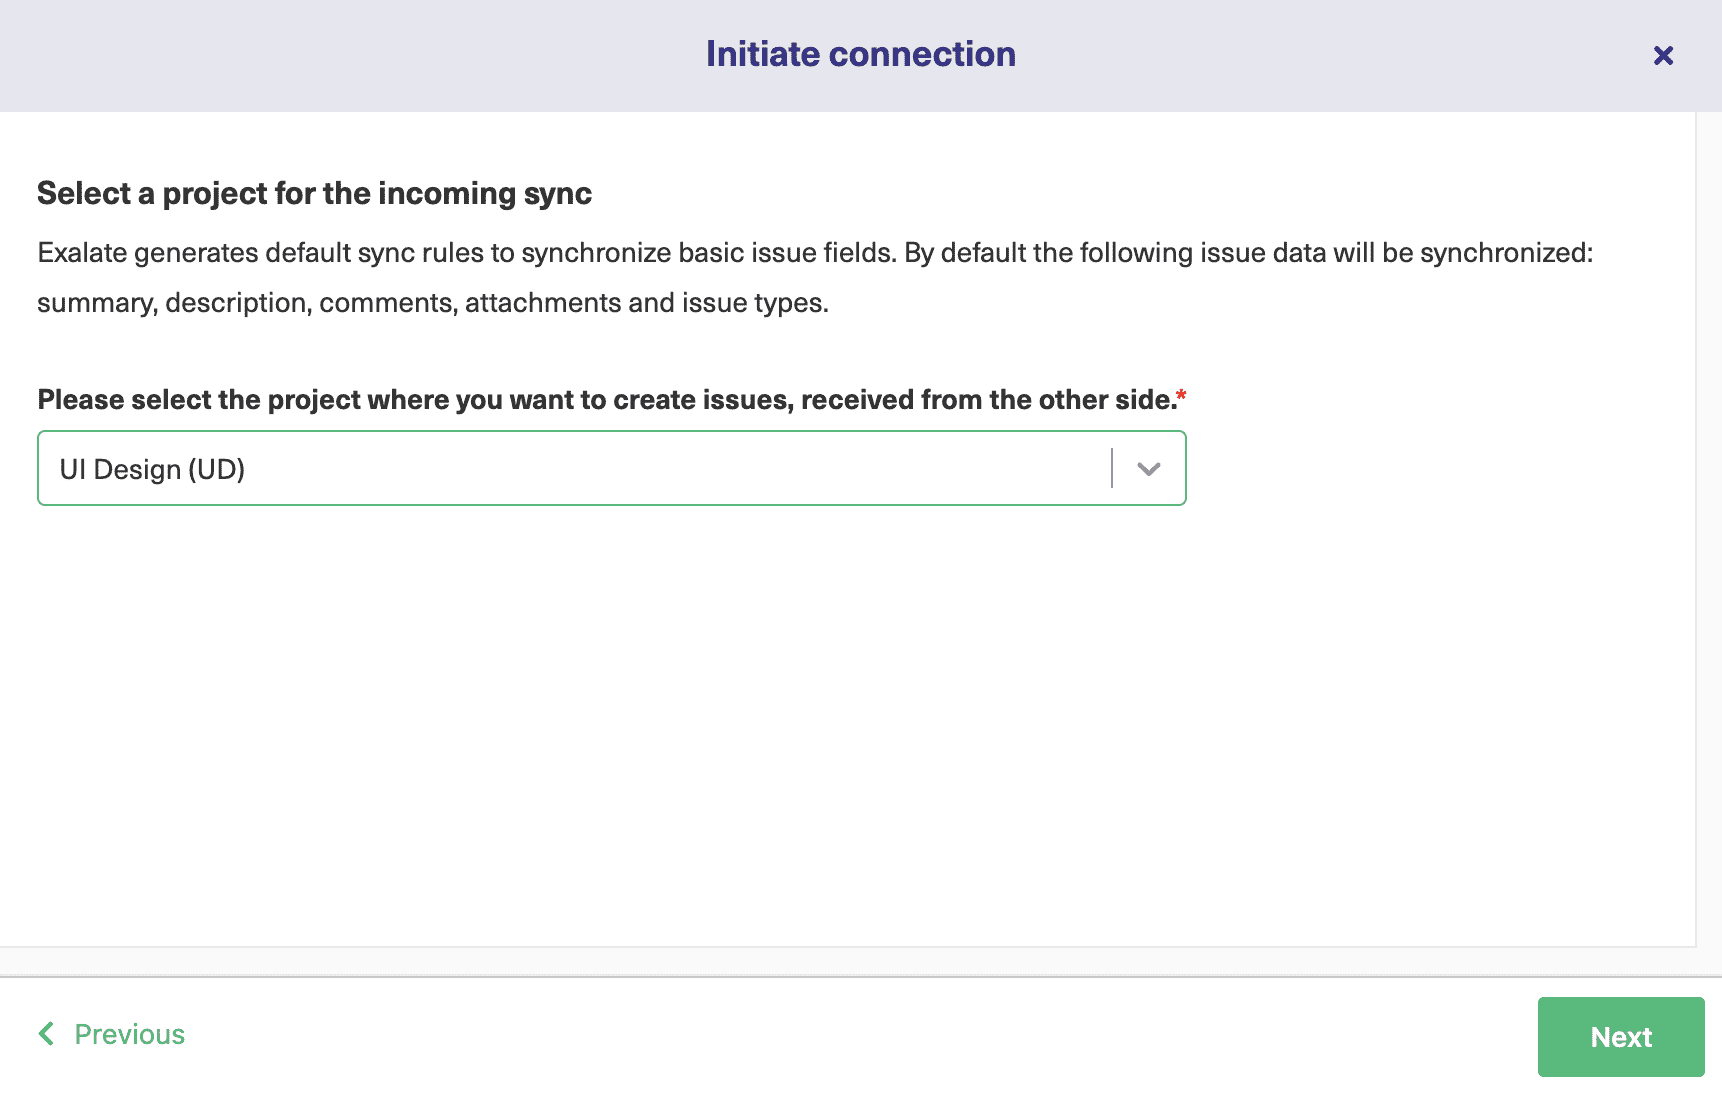
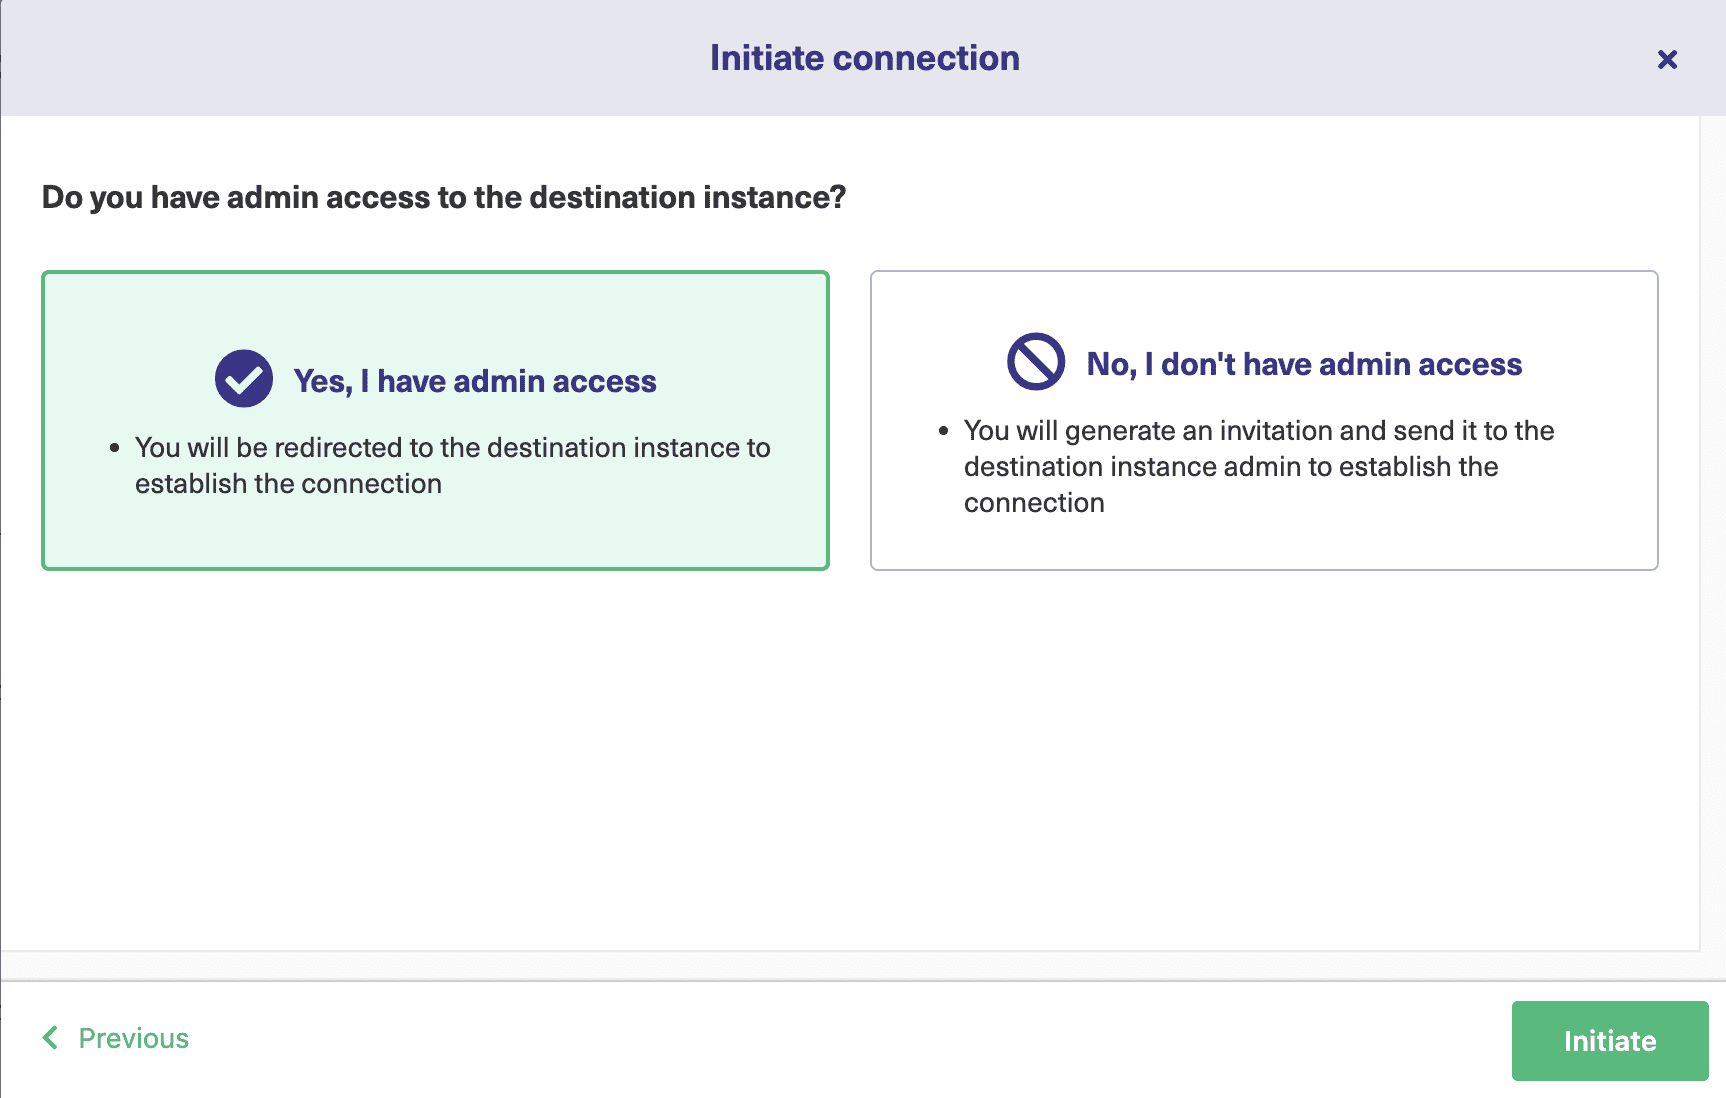
This successfully establishes a connection between the 2 Jira instances.
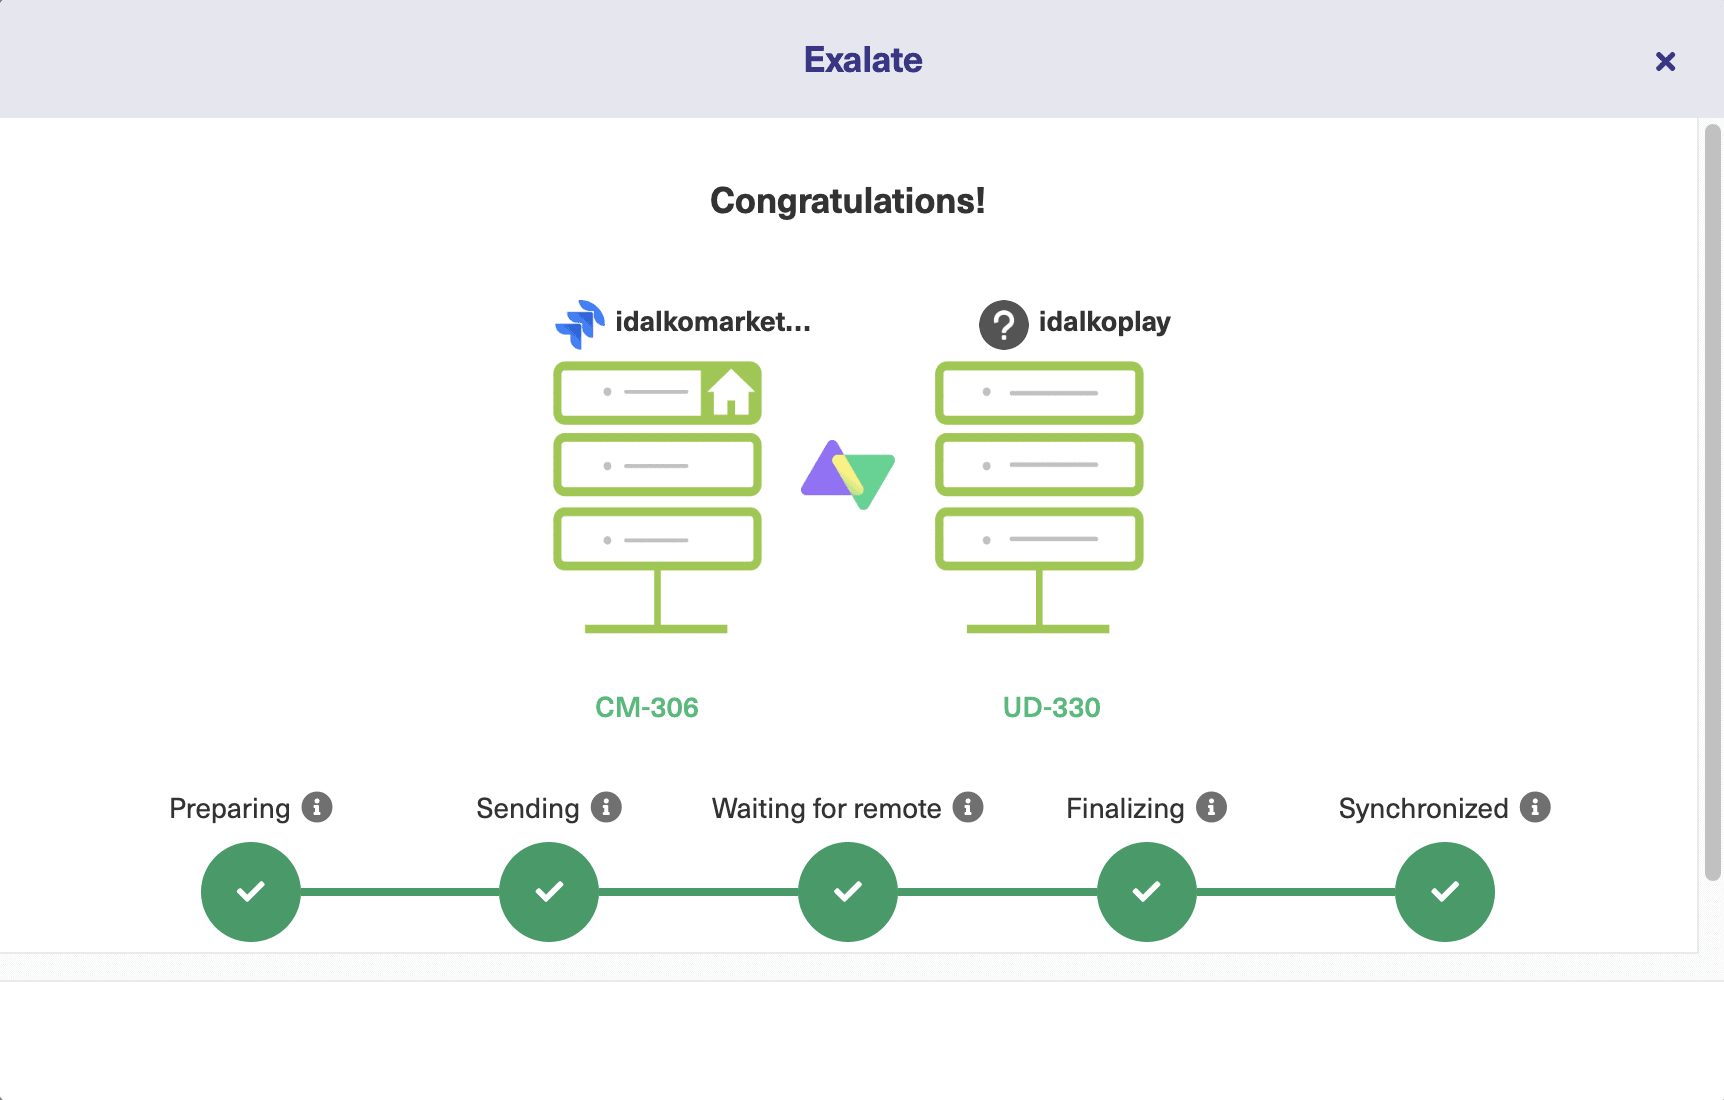
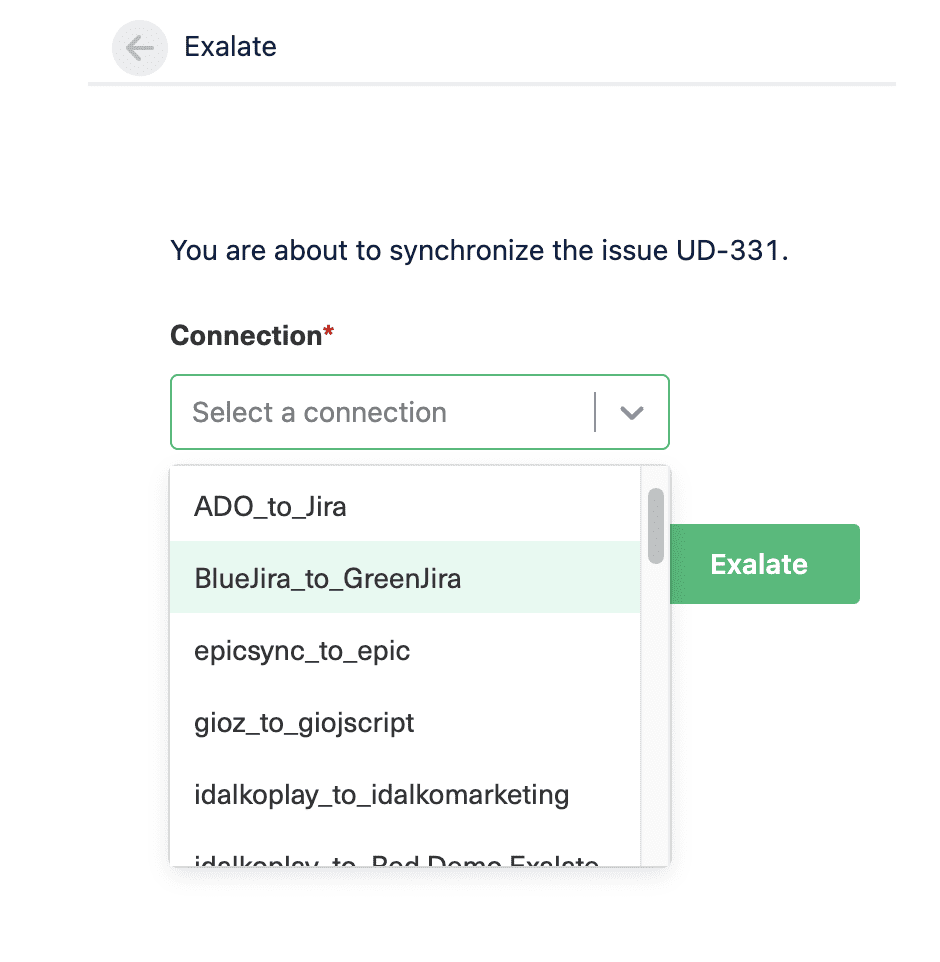
Now you can sync your first issue by directly entering the issue key as shown below, or by creating a trigger. You can even synchronize your issues in bulk.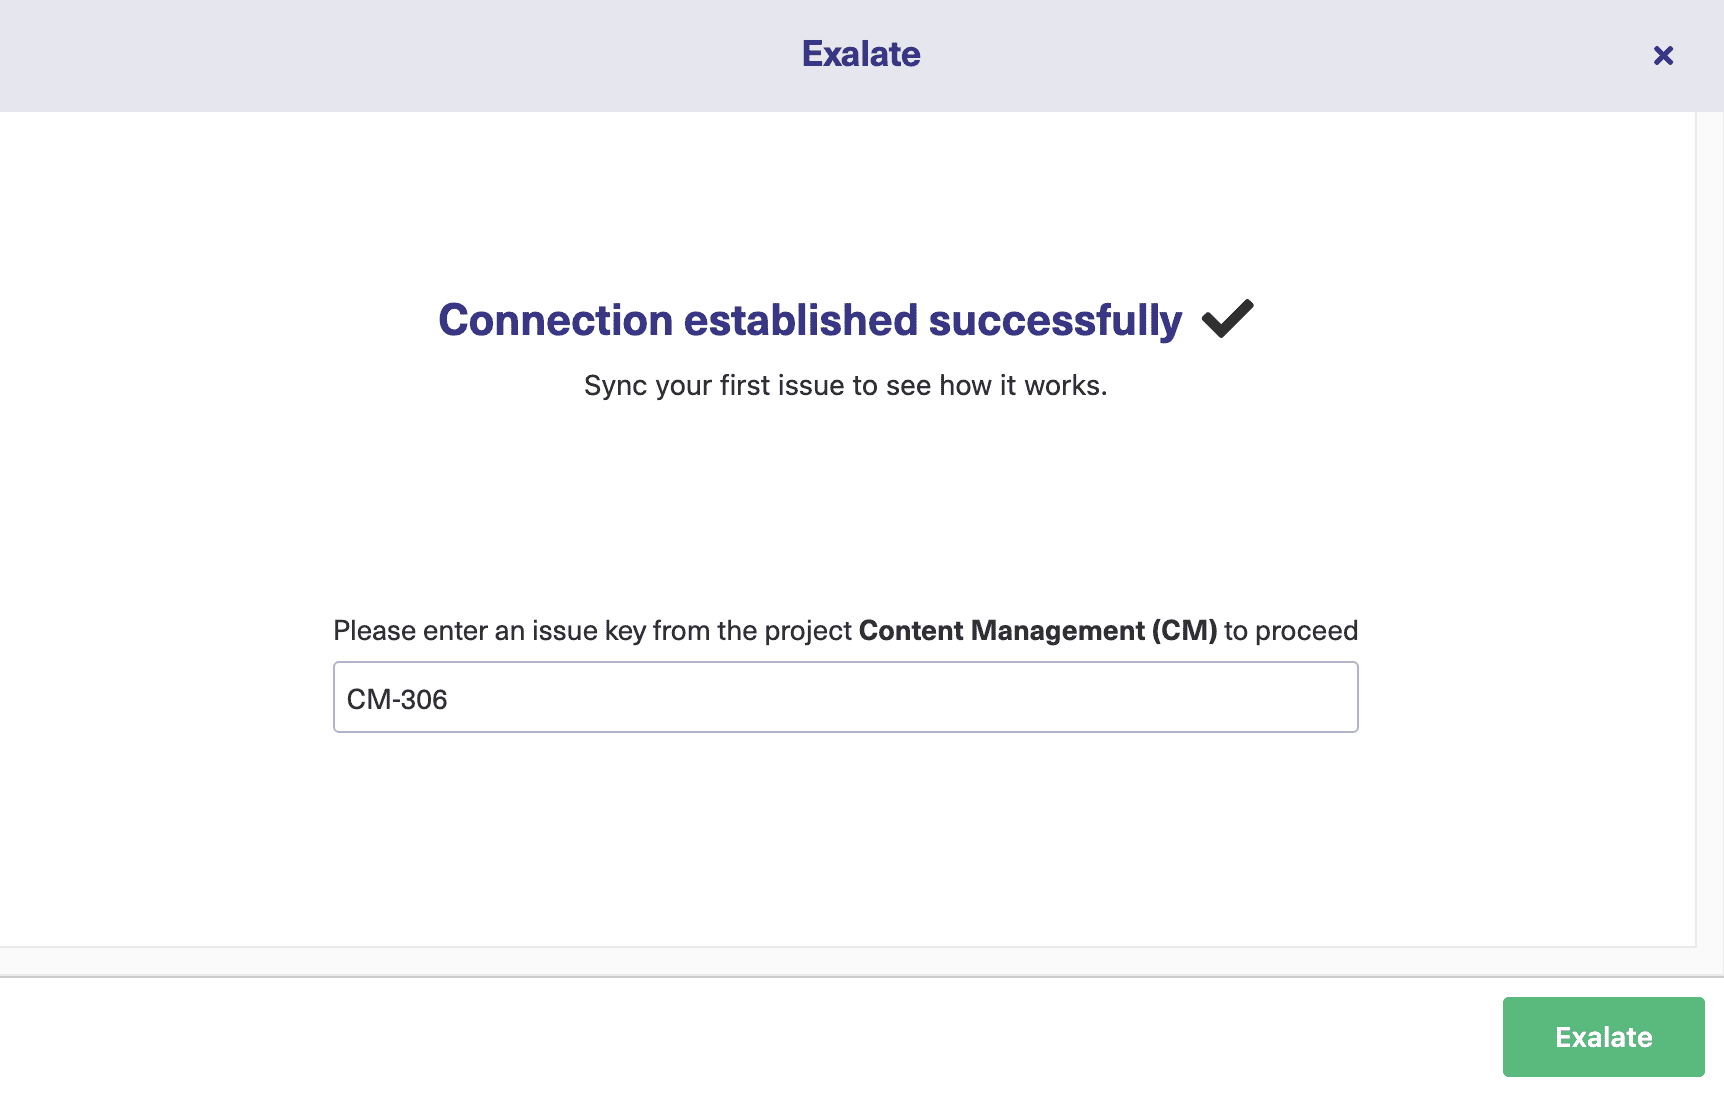
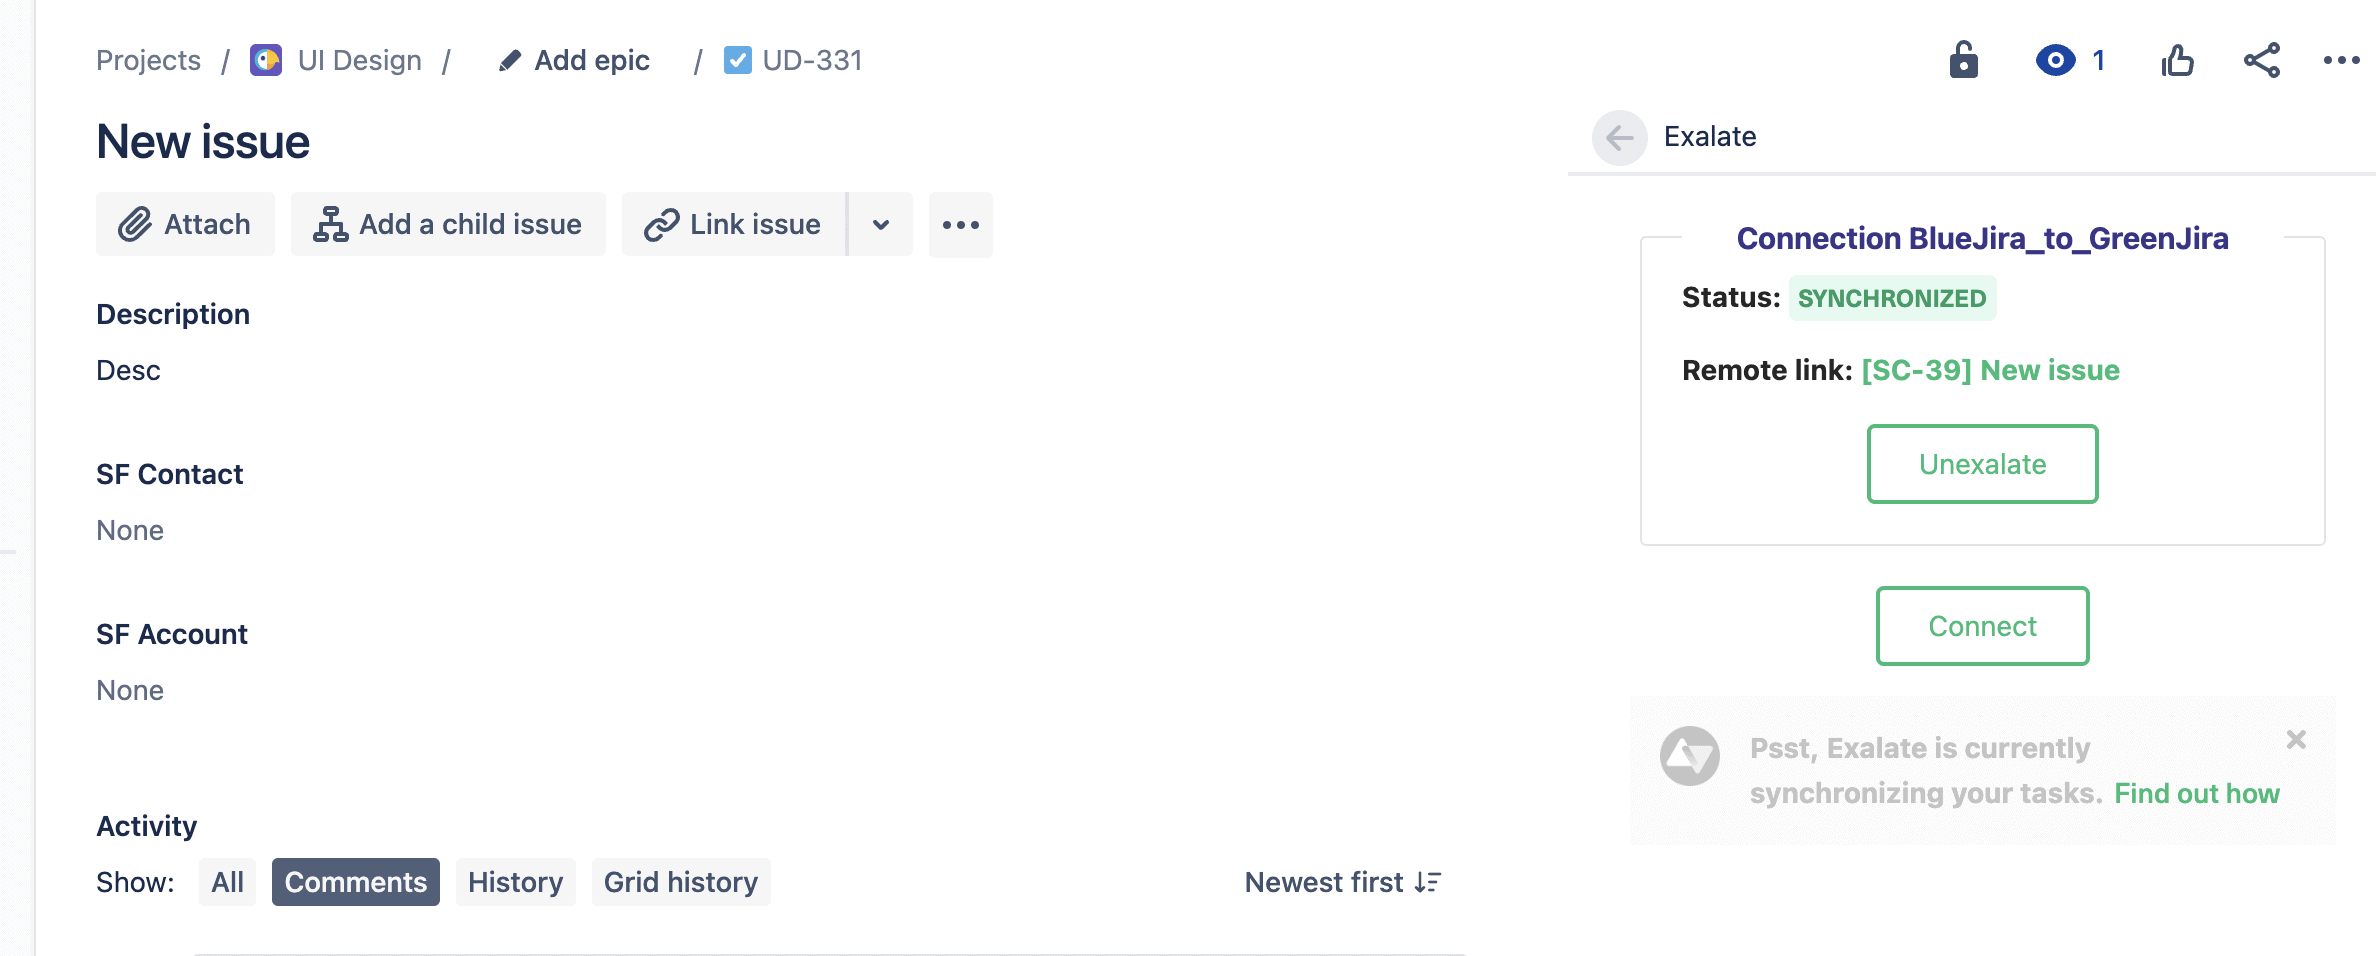
Once the connection has been established, you can directly see the status of synchronization.
Continue with the Visual Mode
If you want to use the Visual mode, click it to make sure it is selected in the appropriate screen shown in the screenshots of selecting a configuration mode, then click “Next”. After this, you will be redirected to a screen that will allow you to enter the details of the connection you wish to establish. 
When it is ready, click the “Configure Sync” button. 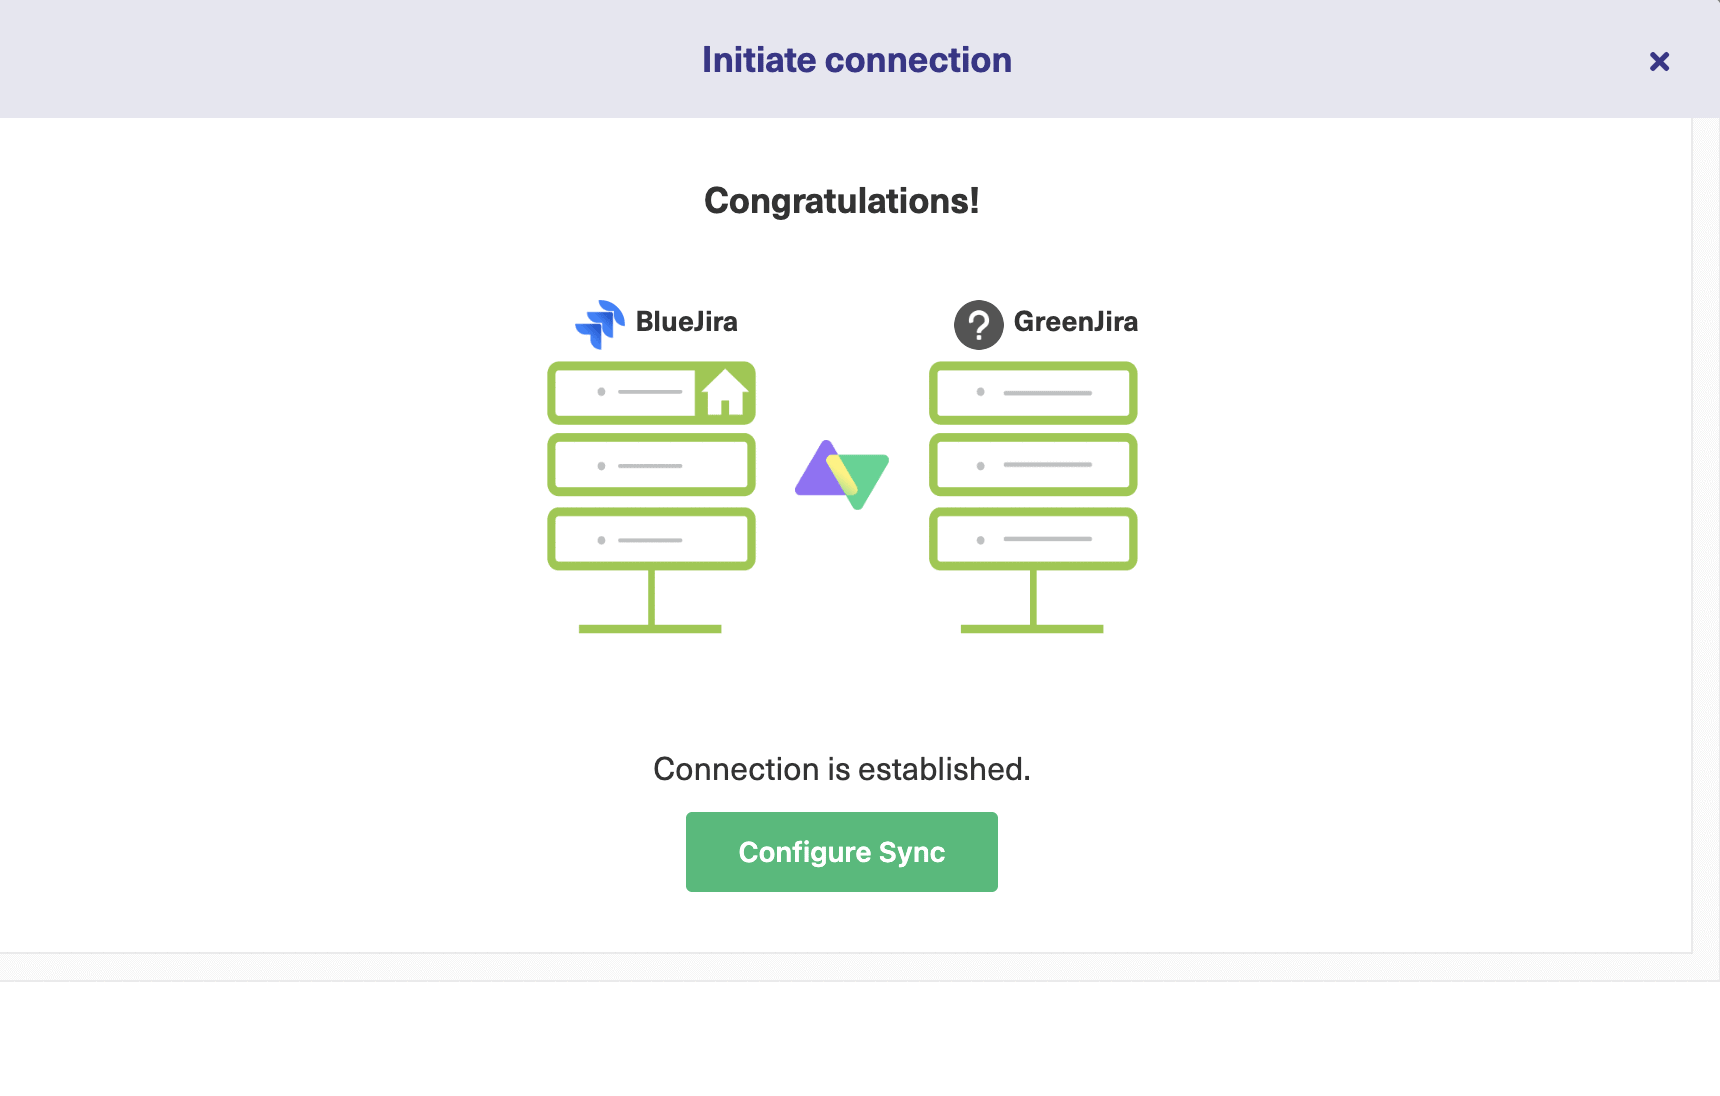
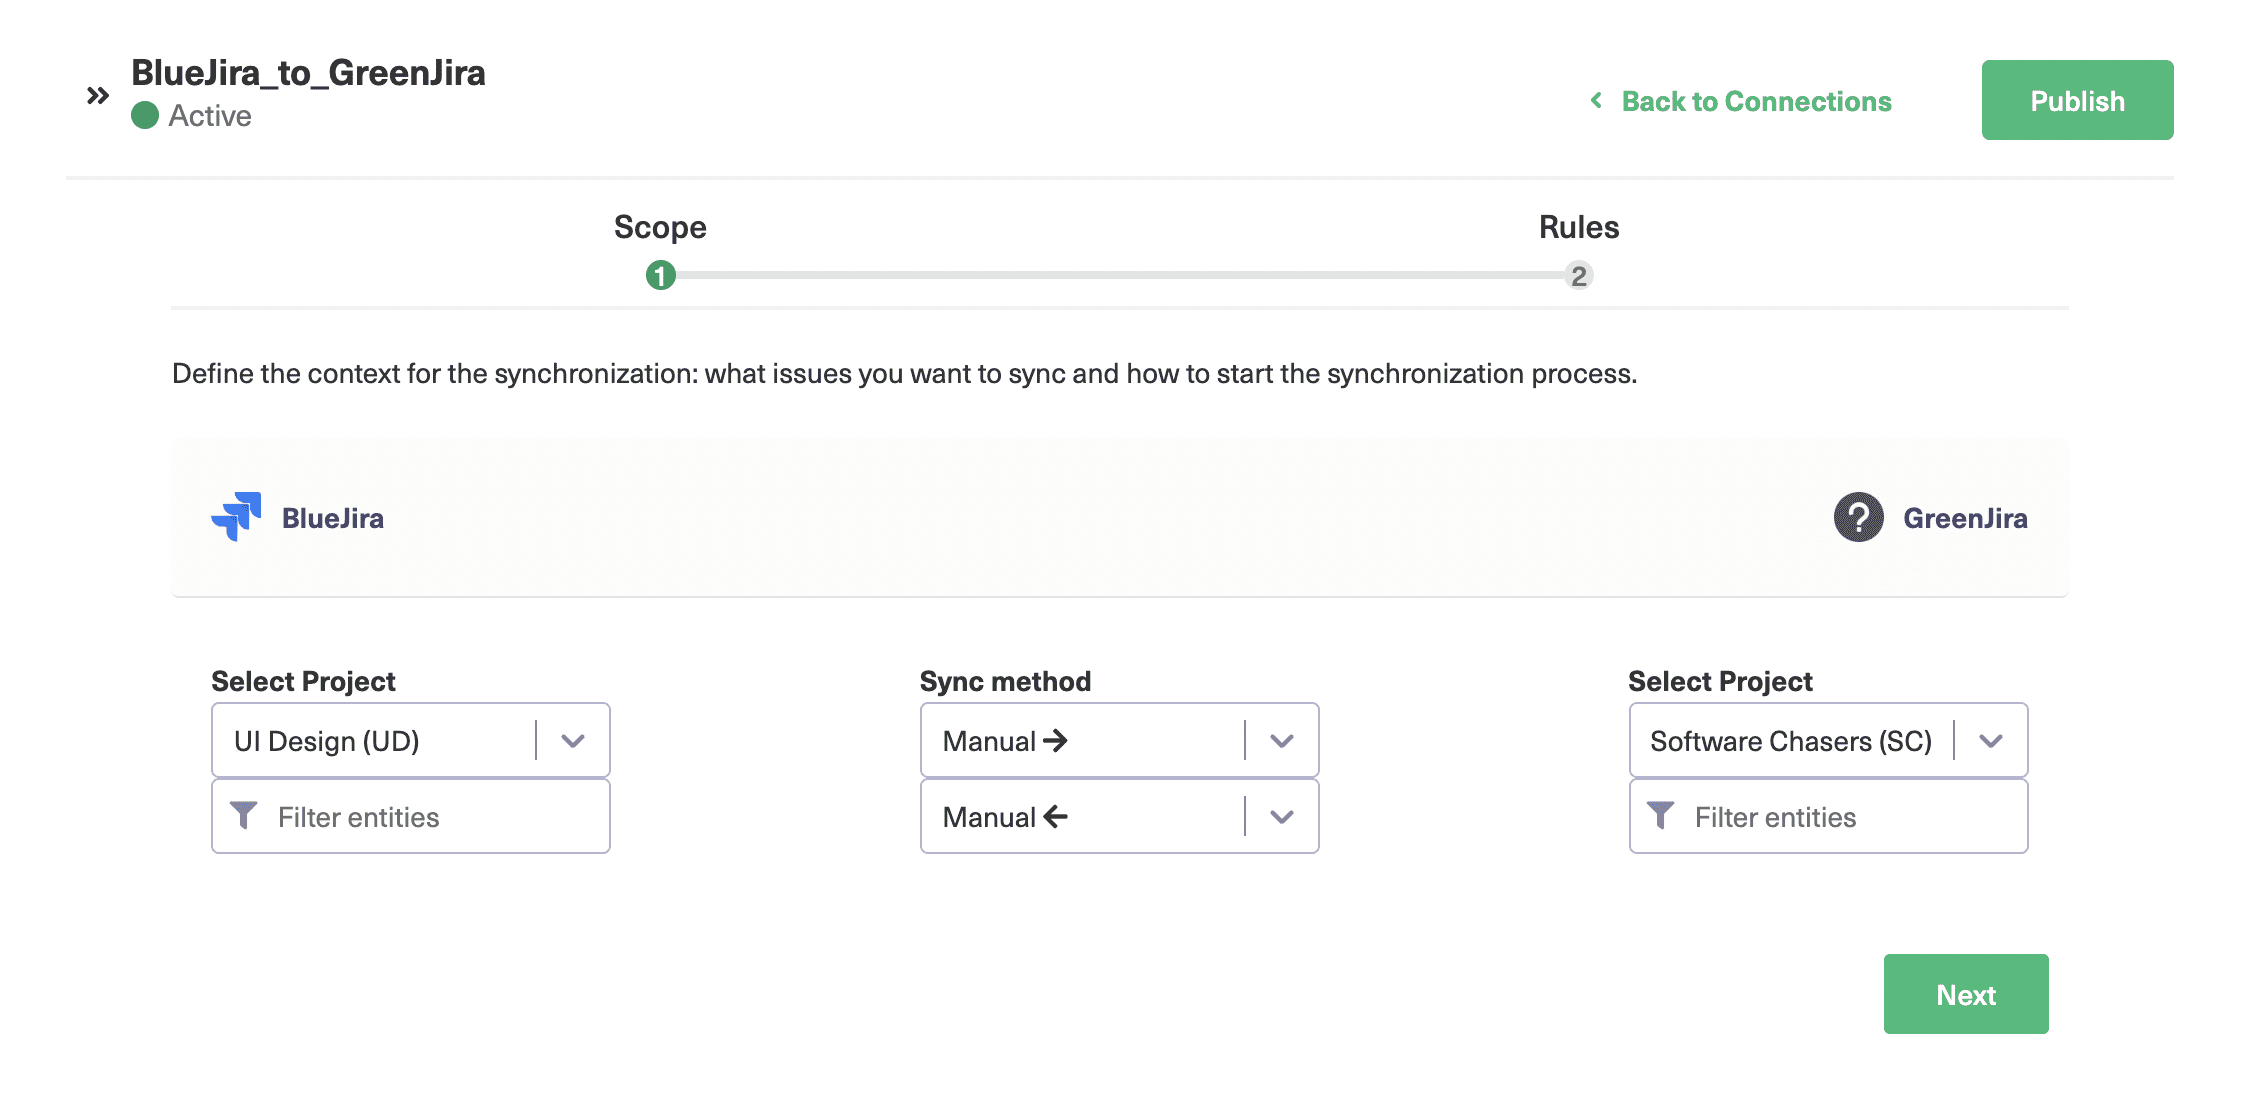
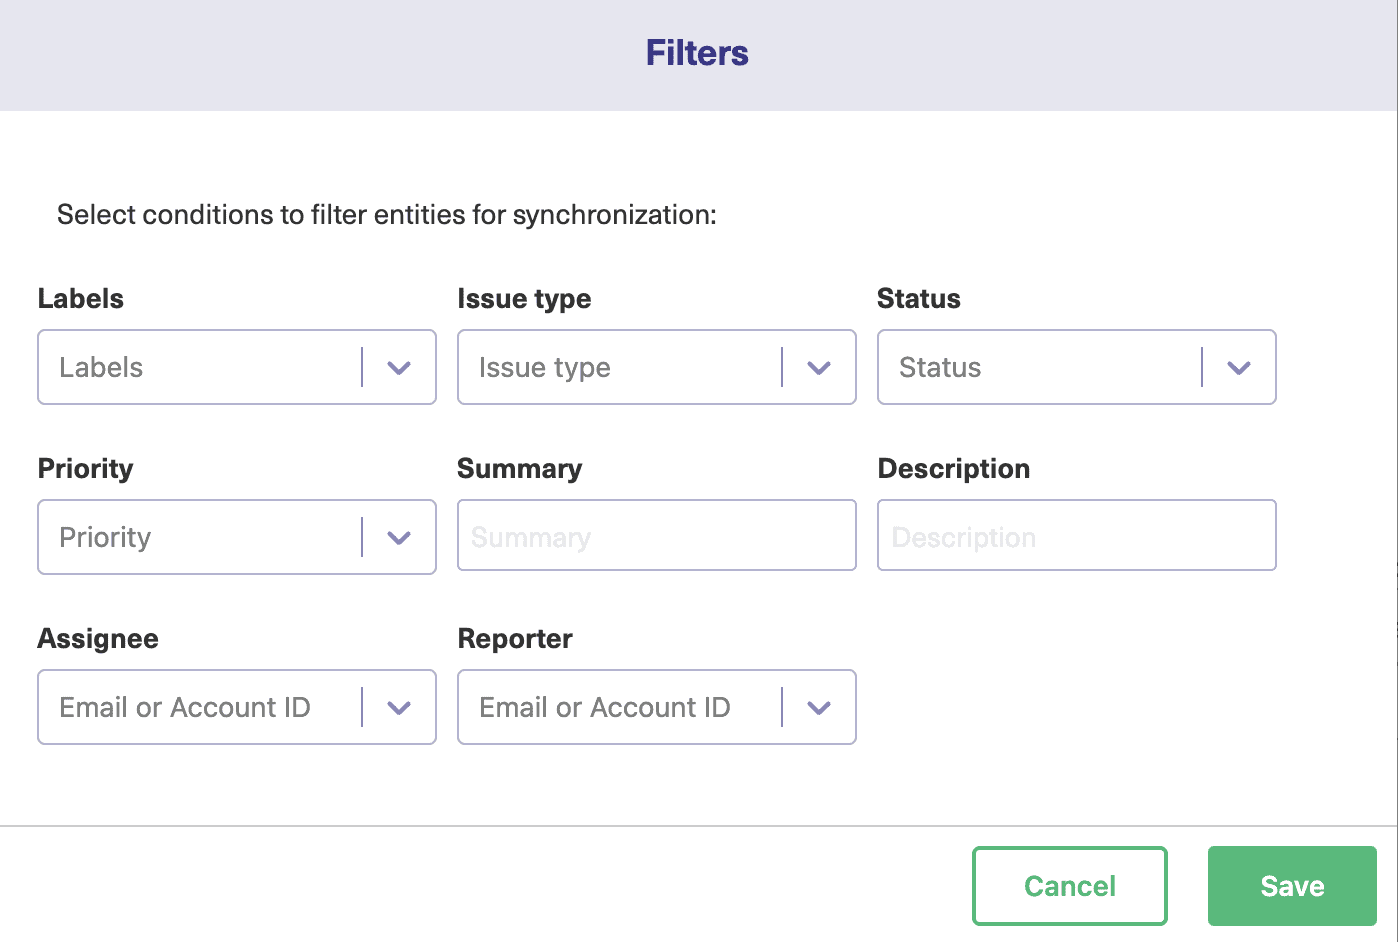
You can click the “More” button to expand it and show more controls. The controls show various attributes of your entities. Making selections in these controls, will filter the entities and determine what gets synchronized.
If you want to synchronize all items assigned to a particular person, add them to the “Assignee” dropdown. To choose entities of a specific priority, select the priority you want from that dropdown. It’s a similar process for all of them. You can combine filters too if you choose.
When you are finished, click “Save” and your filters will be applied. Remember that different filters are used for each side of the connection, so you’ll need to check the other one, too.
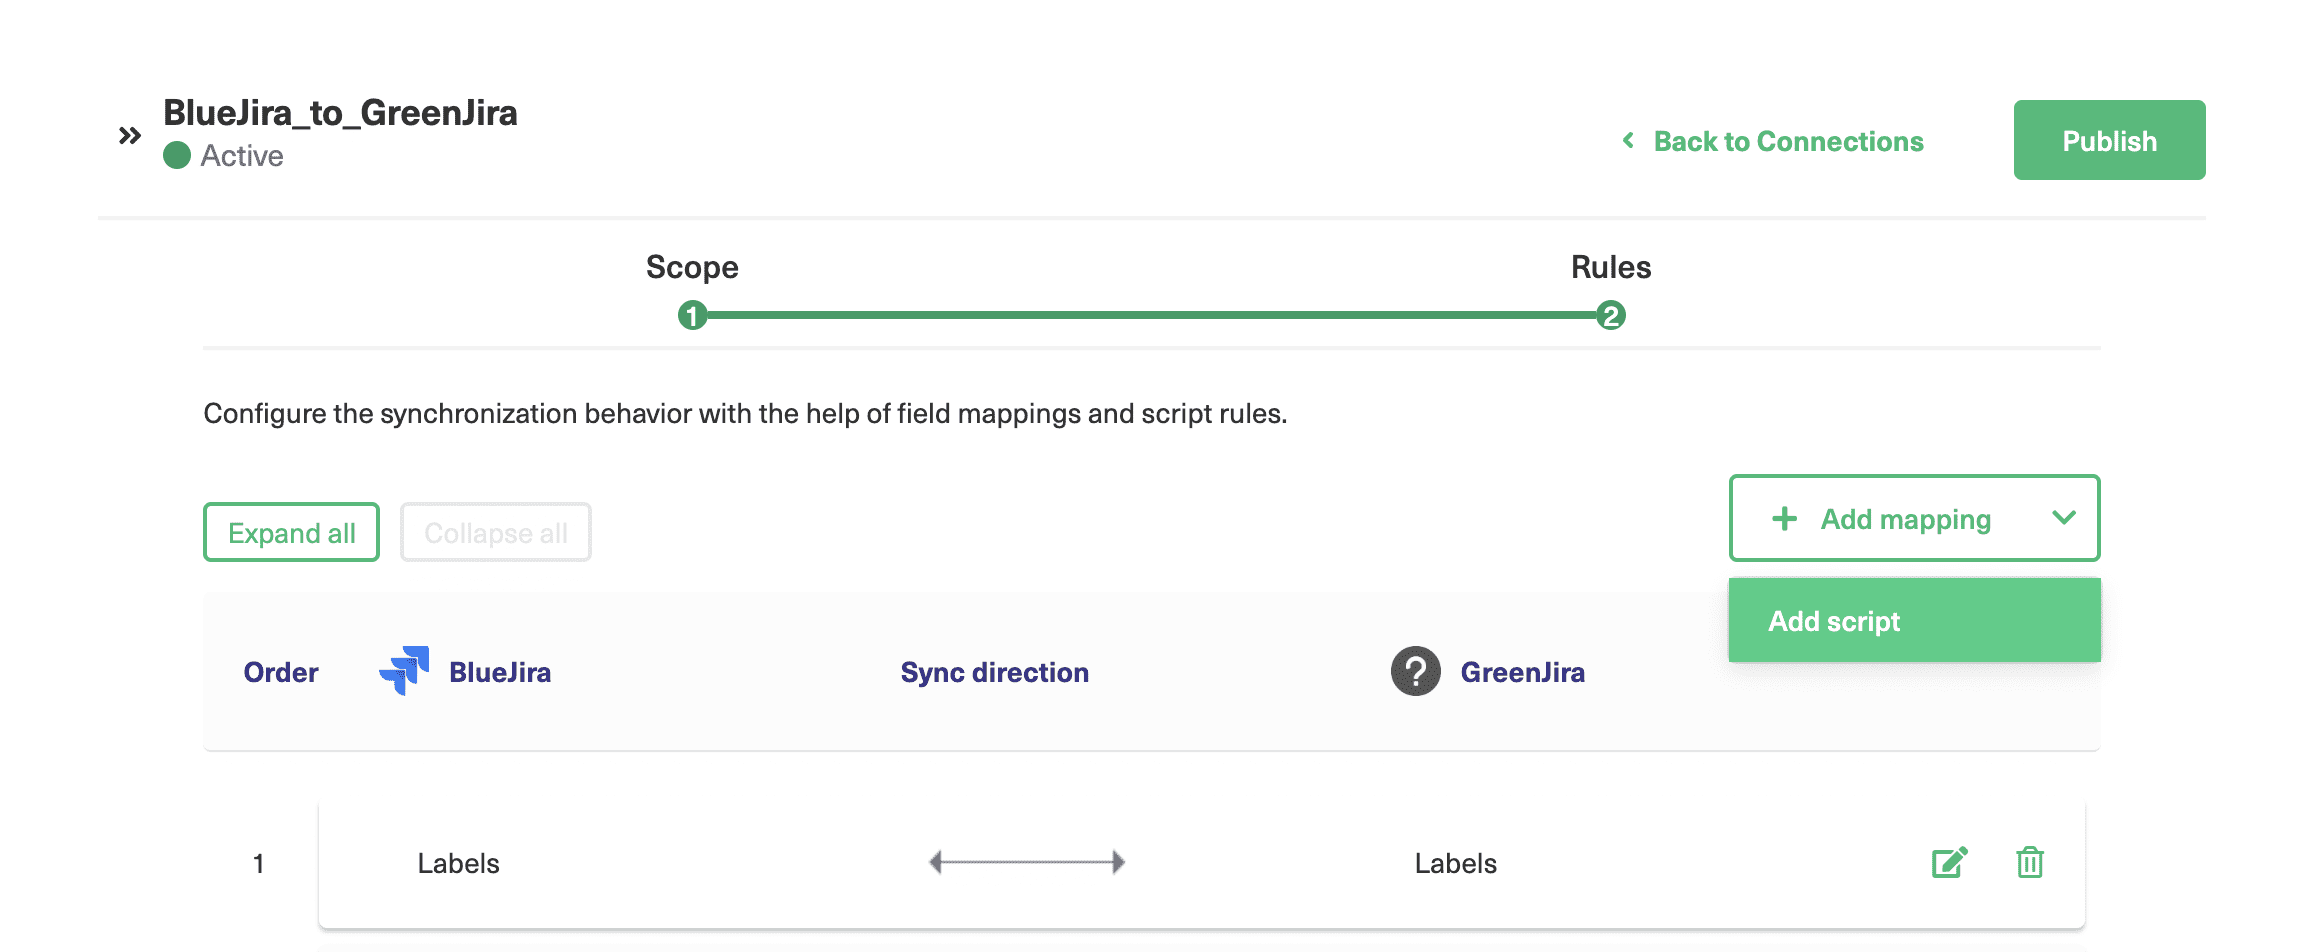
On the Scope screen, click “Next” and you will move to the “Rules” screen. This screen lets you decide the mappings between the Jira instances.
For every connection, you can see a list of mappings that shows which fields match each other.
Since this is a Jira to Jira connection, the fields match identically named fields on the other side, but this may not be the case for you.
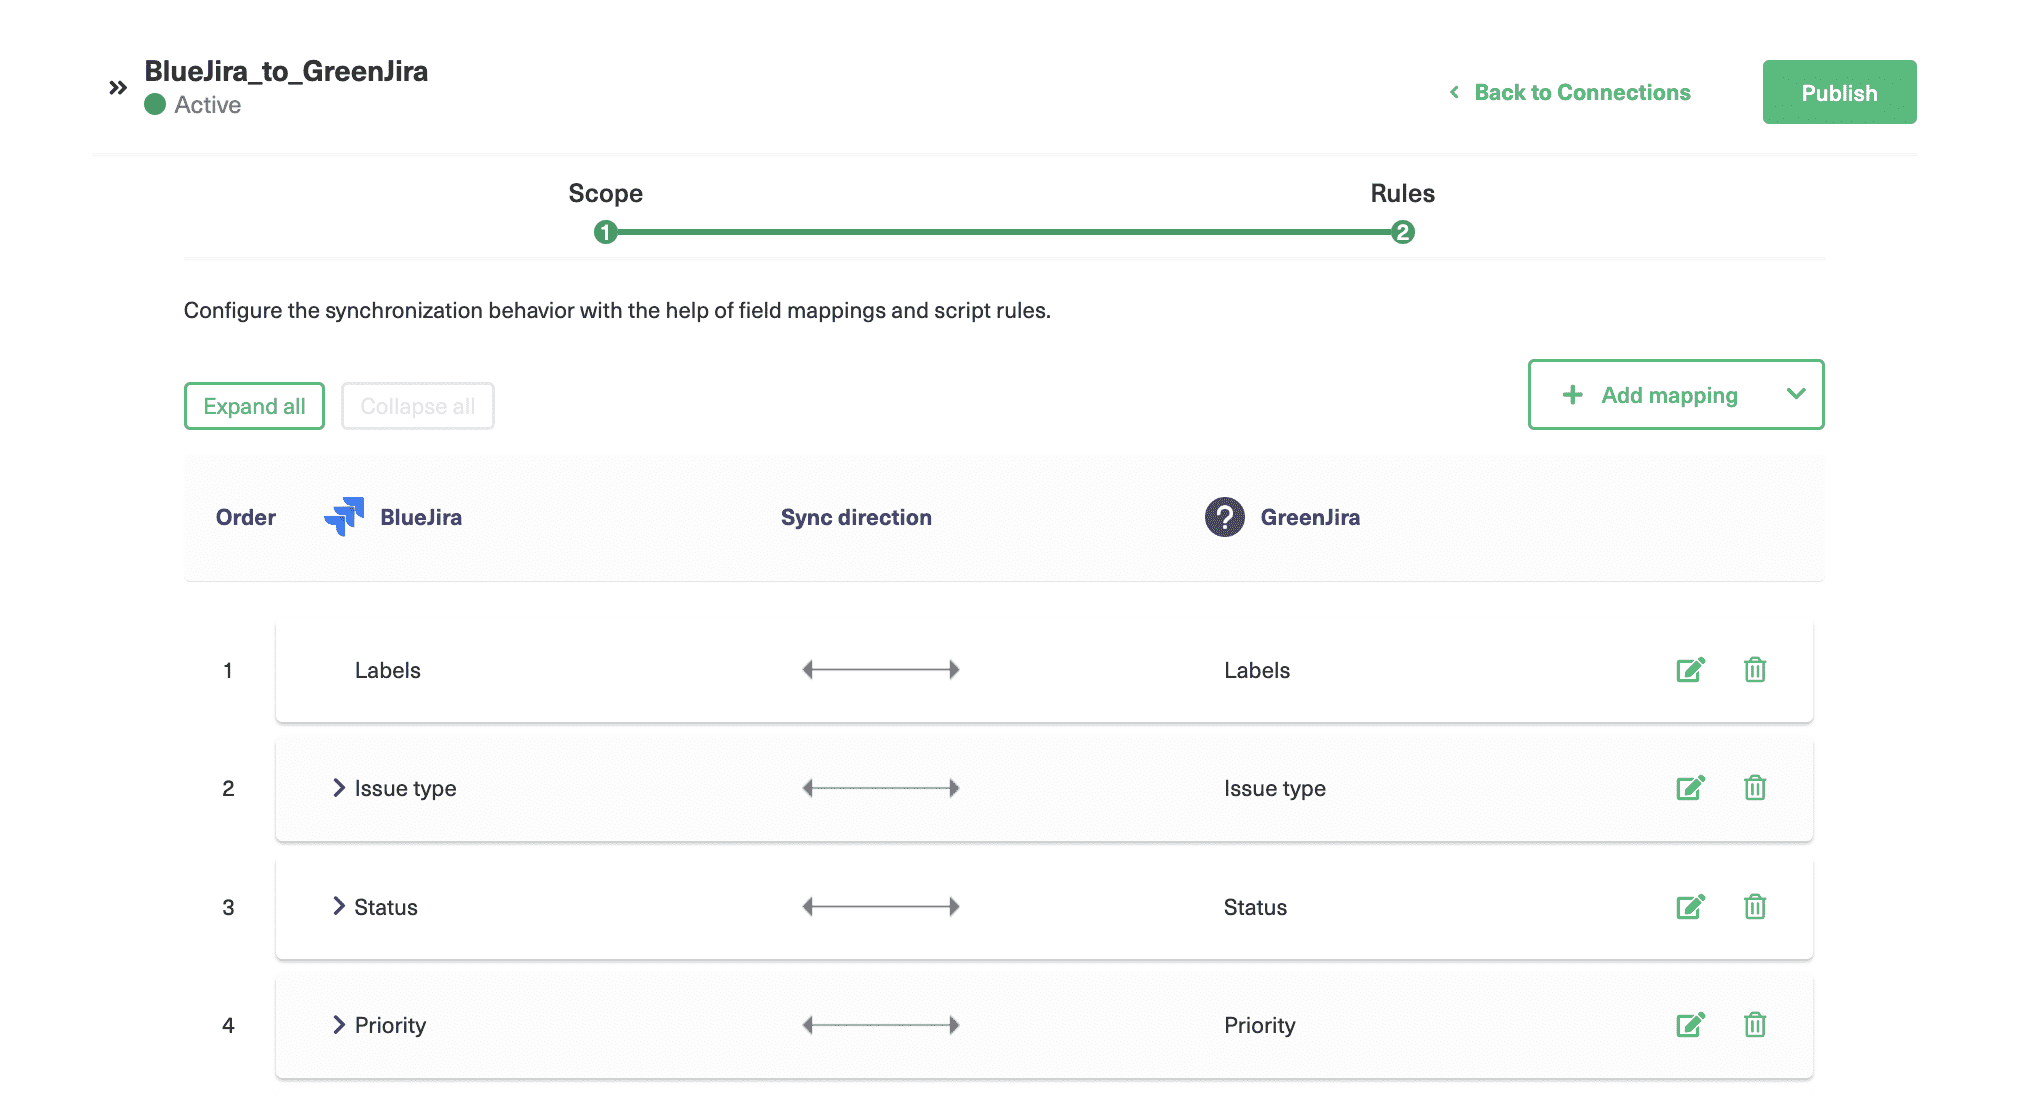
Some entries also have a button that lets you expand them individually. Not all entries can be expanded, just those that let you choose from a predefined set of values.
You can reorder entries by dragging them up and down. Each entry has its own edit button and a delete button, too.
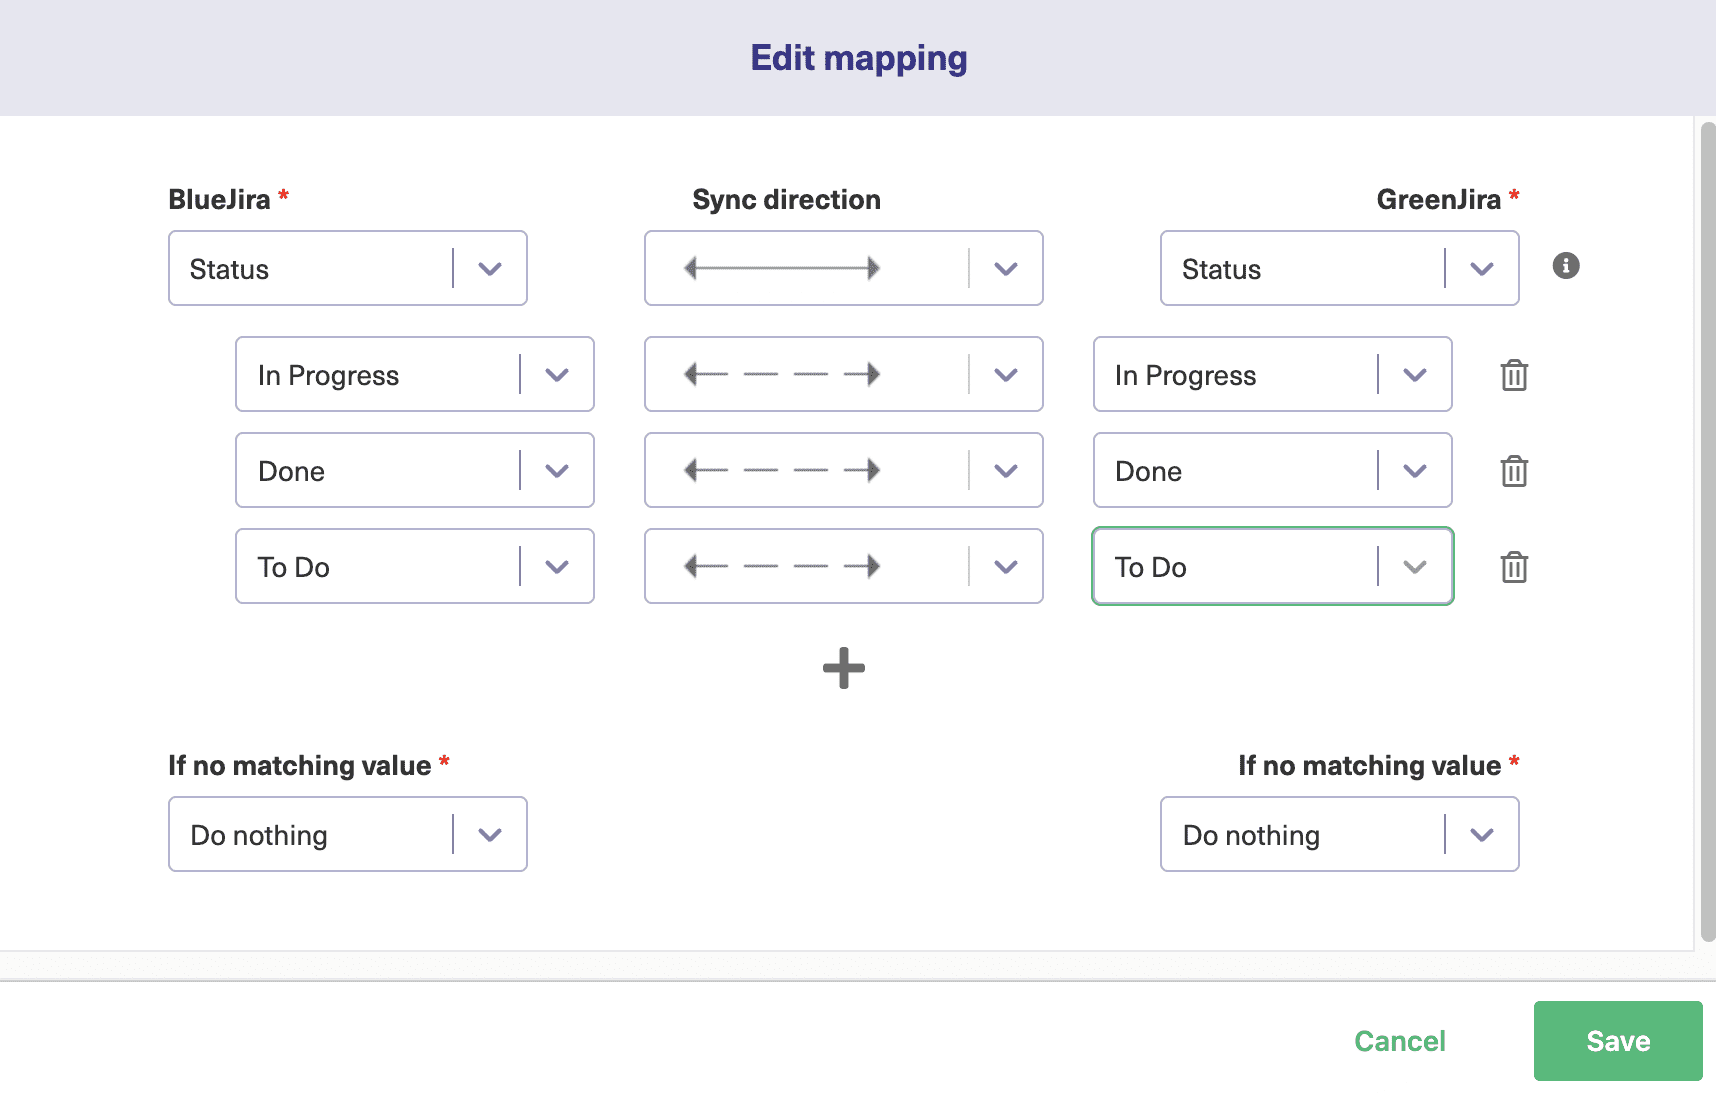
Click an entry’s edit button to bring up its edit mapping screen. There are various controls available. There’s a sync direction button in the middle. This works like the ones on other screens, but here you can apply it on a field-by-field basis, so you can have specific fields mapped in one direction only if you want.
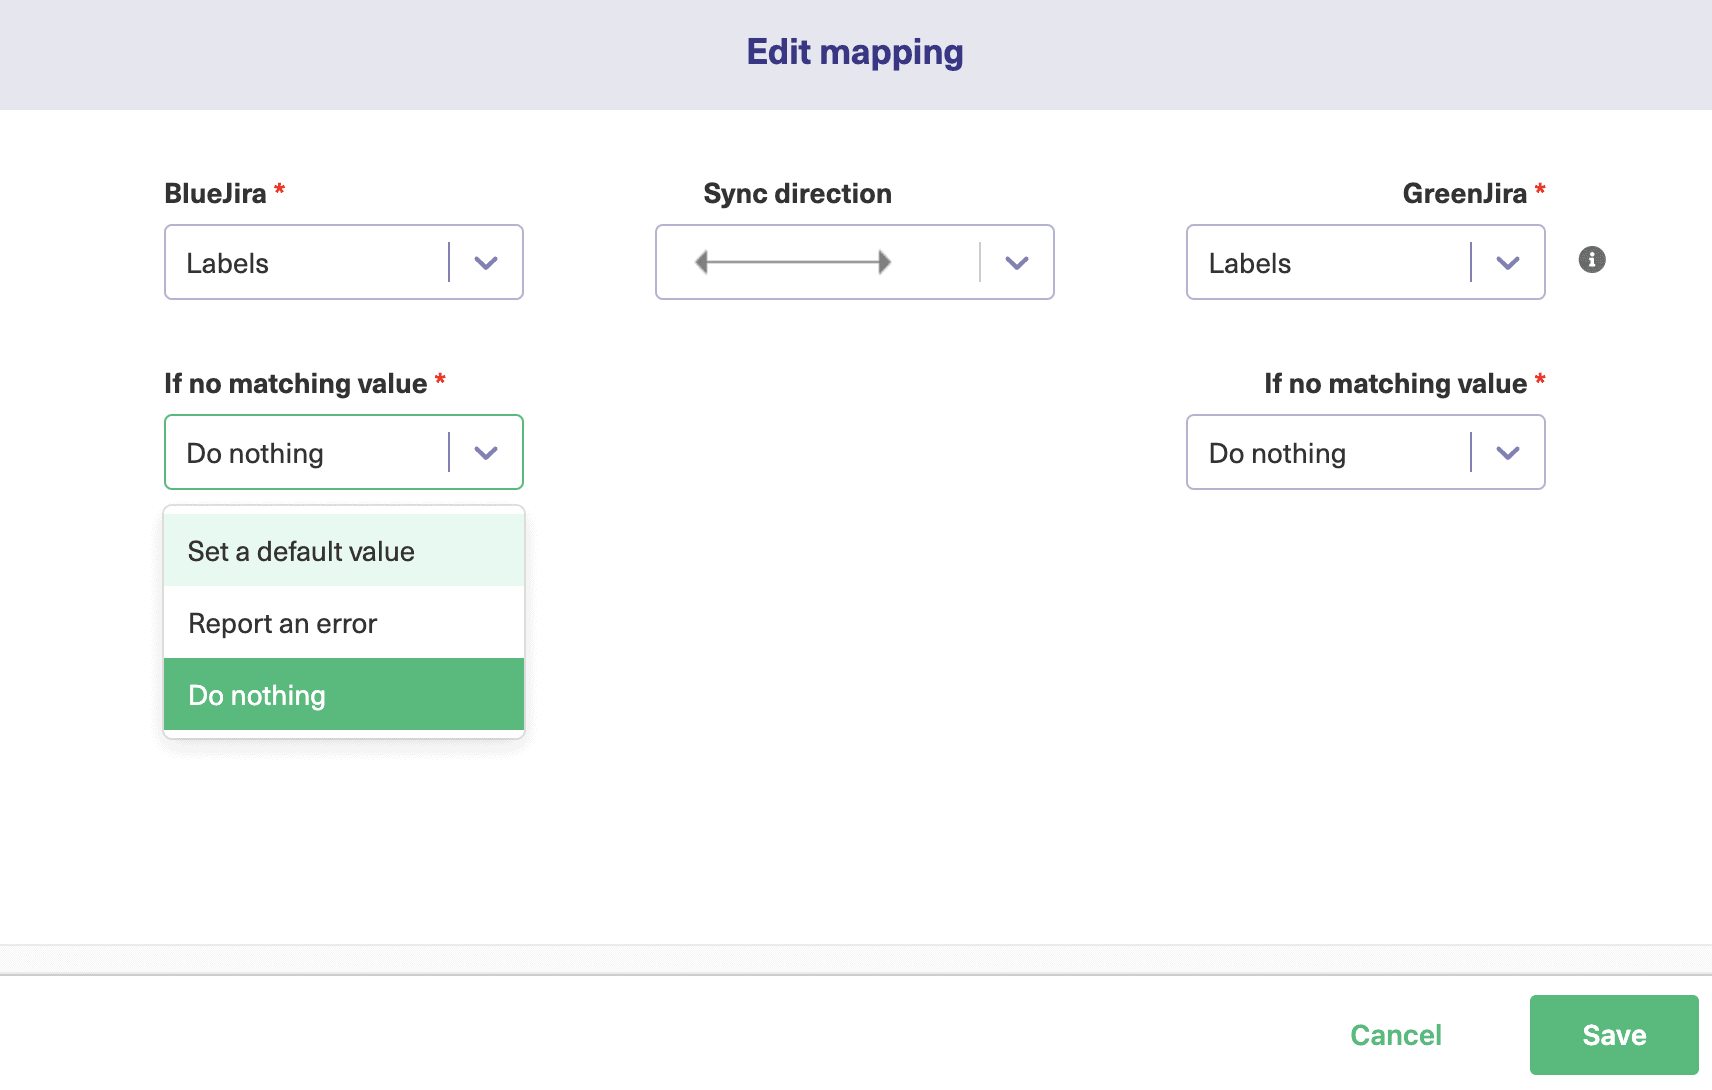
You can adjust the mapped field on each side of the screen. Perhaps you want the priority to be passed to the description, so the other team can prioritize it themselves while still seeing how the other team categorizes it. You can also decide what happens if there isn’t a value that matches. You can do nothing, report an error, or set a default value. That’s useful if you want a way of spotting problems or absent data. 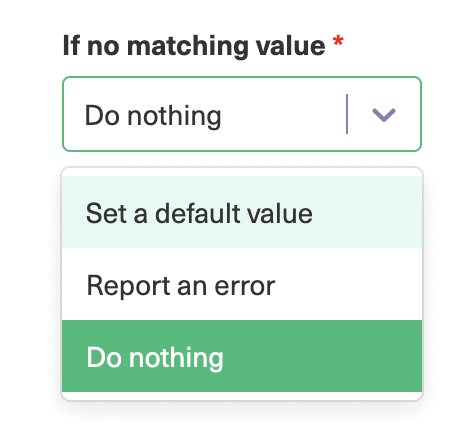
There’s also a plus button, so you can add a new option mapping if you want. Again here, you can choose the sync direction for each specific option, as well as map it to a different option, or delete it altogether.
Back on the rules screen, if you want to add a new mapping, click the “Add mapping” button at the top right. This works much like the edit mapping screen, but you have to choose the values to map from the drop-down boxes on the left and right.
Once you’ve chosen them, you’ll see similar options to the other screens and can save your choices by clicking “Save”.
If you click the small arrow to the right of the button, you’ll also see an option to “Add script”. If you click this, a screen will pop up allowing you to add rules using scripting.
These can be simple or advanced, though if you learn how it works, you can do things that aren’t possible otherwise.
When the add script pop-up first appears you’ll see some sample text, as in the screenshot below. This will disappear when you click it to make your own entries.
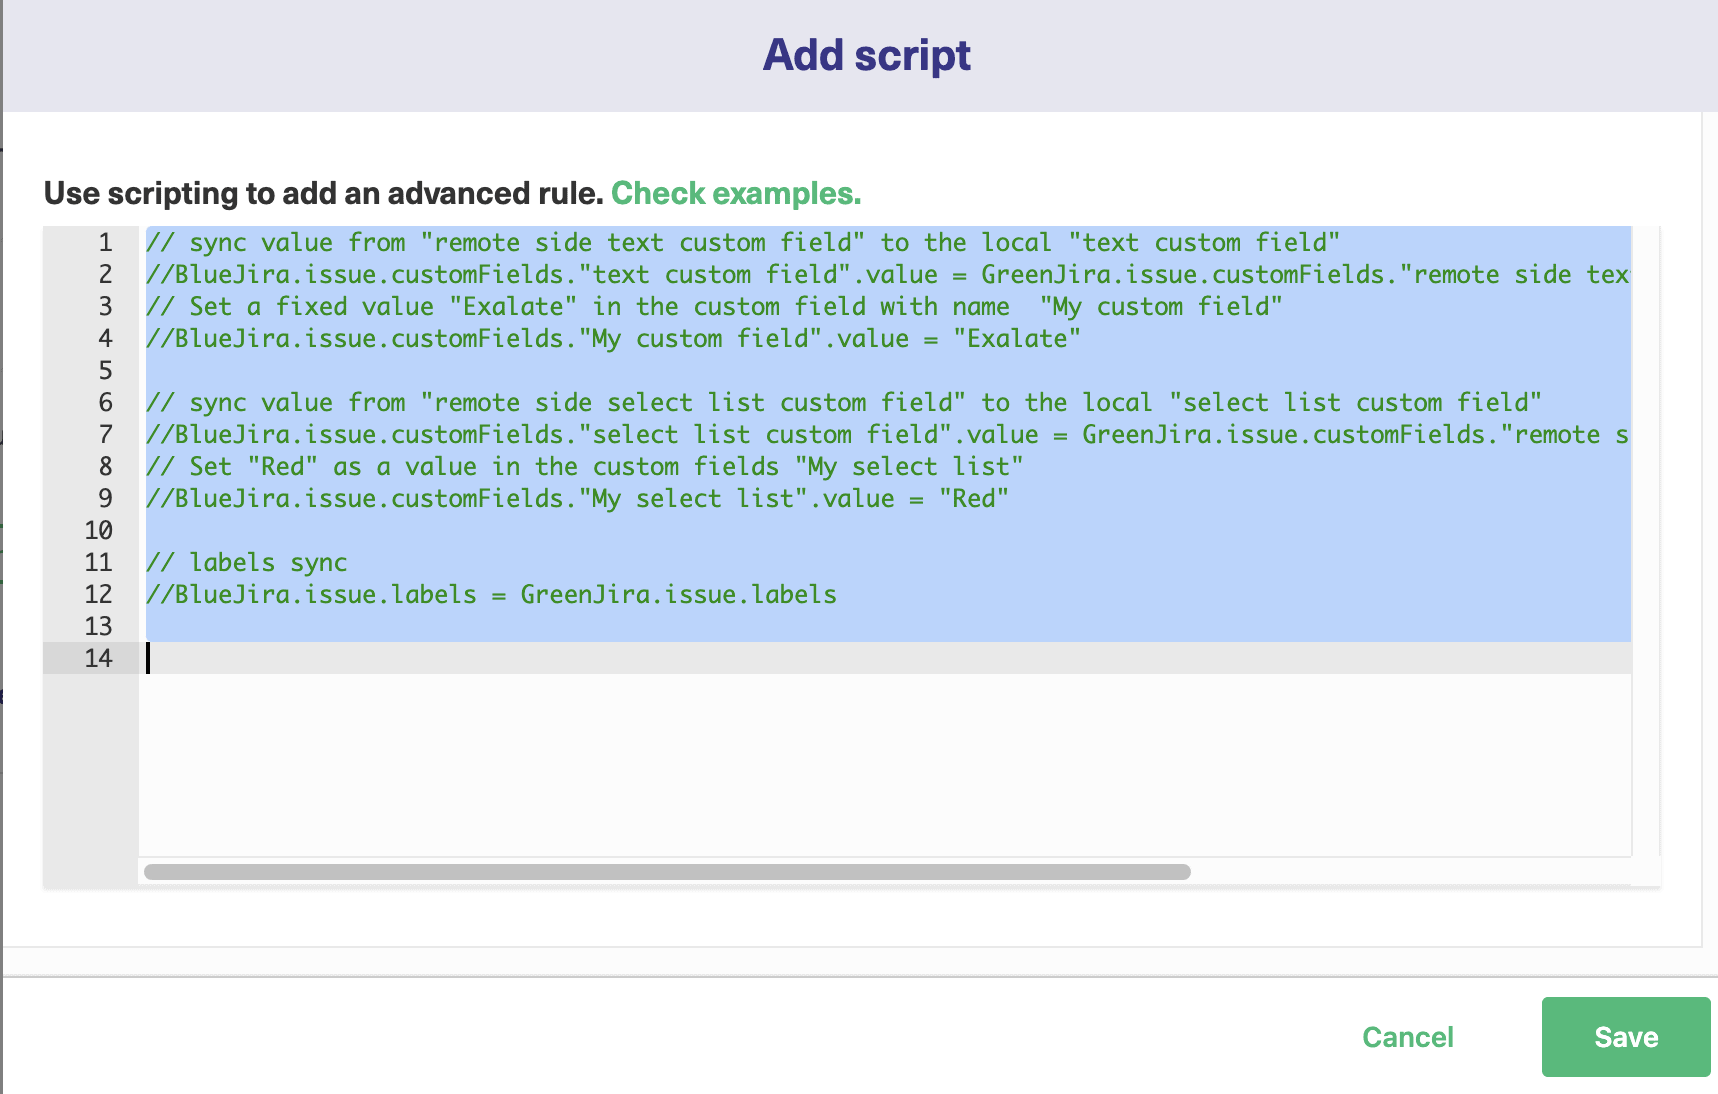
Adding lines here lets you map fields onto each other. In the example above, you can see the text BlueJira.issue.labels = GreenJira.issue.labels. BlueJira and GreenJira are the names of the Jira instances being used. This line maps the issue labels field from GreenJira directly onto BlueJira. It’s a straightforward copy.
If you want to change to something different, you could type BlueJira.issue.labels = GreenJira.issue.comments, or, if you want to use a specific value instead, BlueJira.issue.labels = ‘from Jira synchronization’.
You can use comments to quickly enable or disable lines by adding “//” to the start of any line you want. Commented code is ignored until you uncomment it by removing the slashes.
You can of course also use comments to make comments letting you know what the script does. Click “Save” when you are happy with your changes. Finally, the “Publish” button will save all your changes and apply them to your connection. When synchronization next takes place, Exalate will use your new rules.
Continue with the Advanced Script Mode
If you decide to go with the Script mode rather than the Visual mode, here’s what to do.
First, you need to select it and click “Next”. You will then be asked to enter the connection details as shown below.

Then, click on “Copy Invitation Code” and click on “Go to remote”.
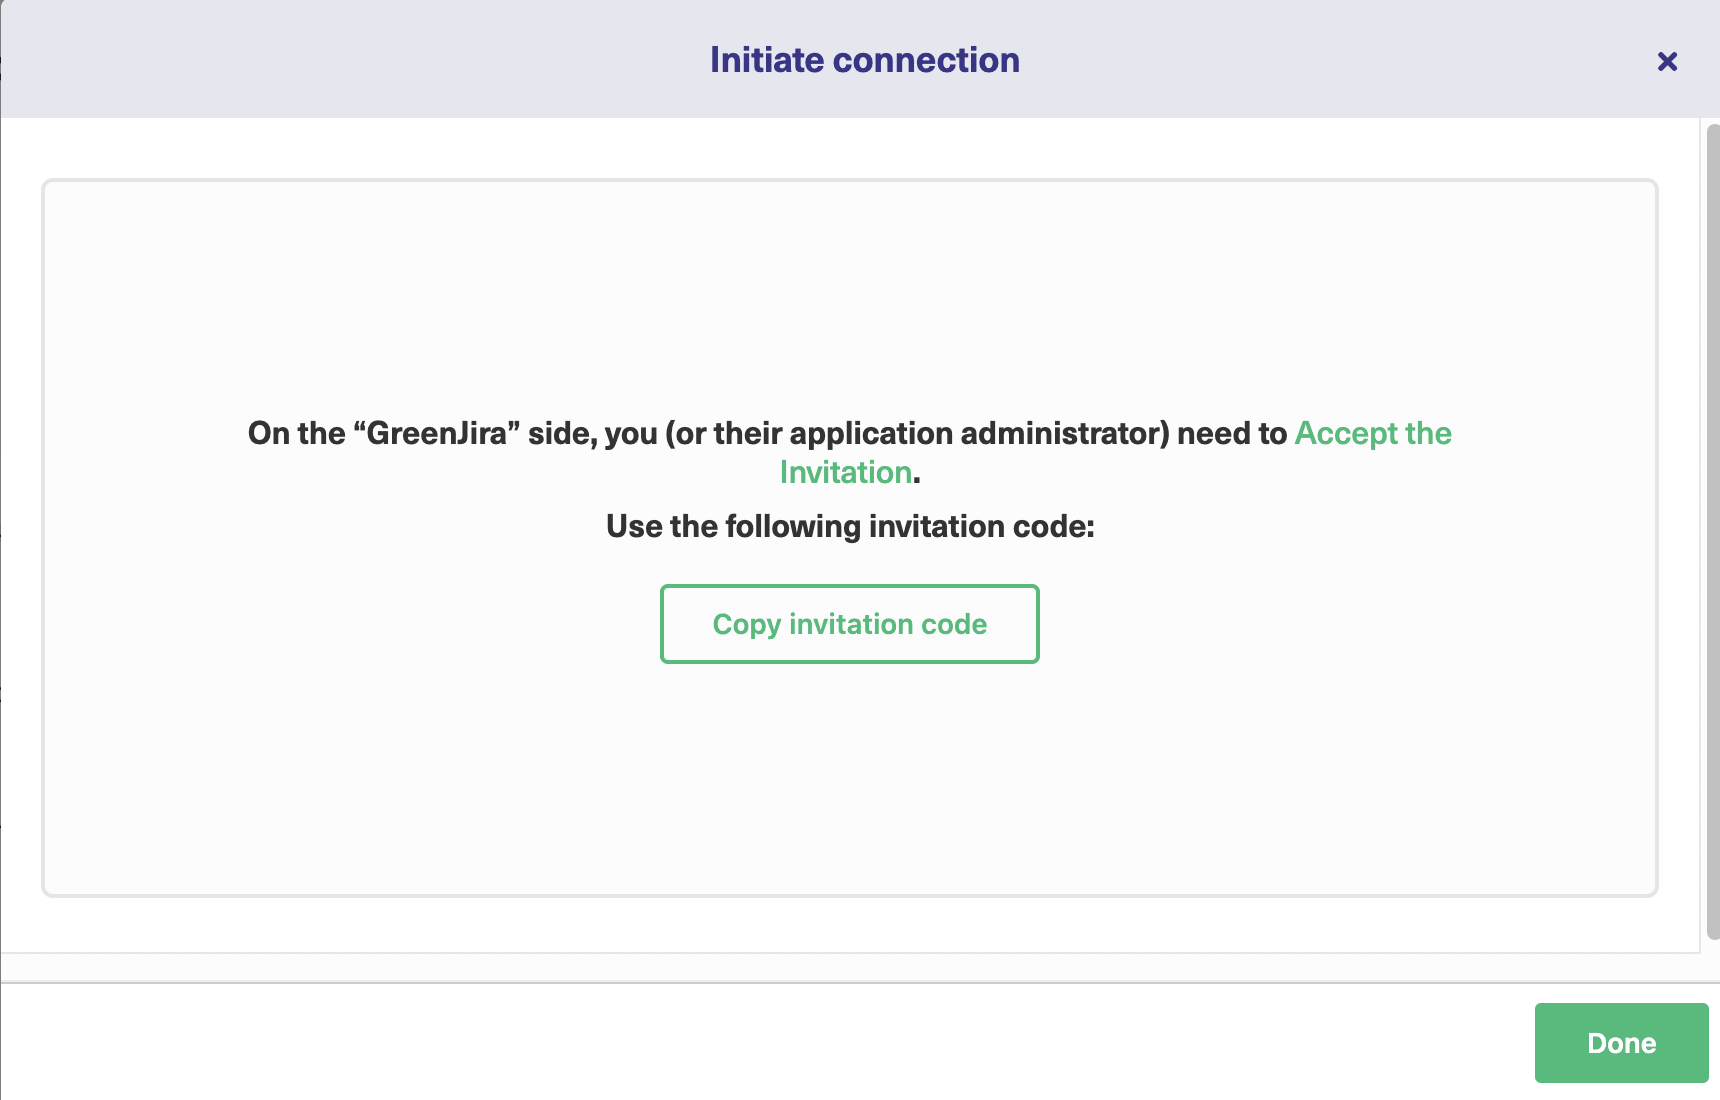
Note: You can also choose to activate or deactivate the connection. When the connection is deactivated, this will pause synchronization. But changes still get queued for later updates. This means that pausing the connection will not make you lose any data.
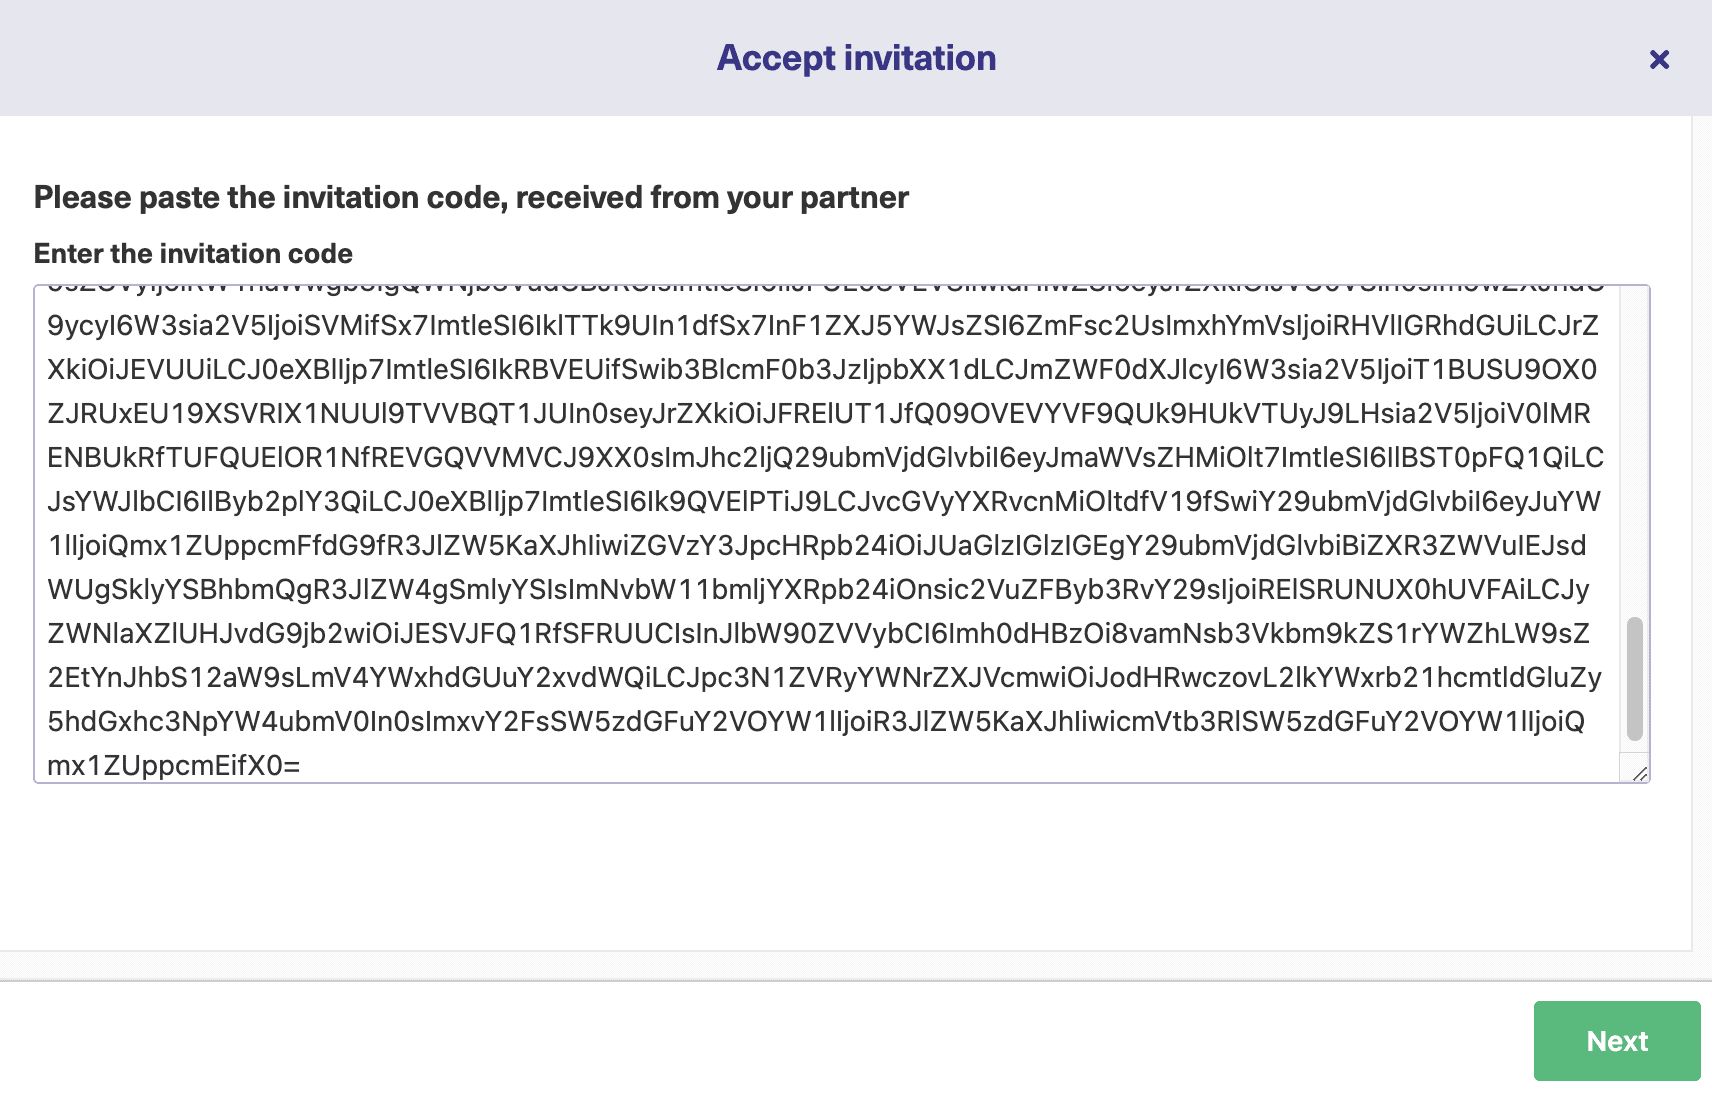
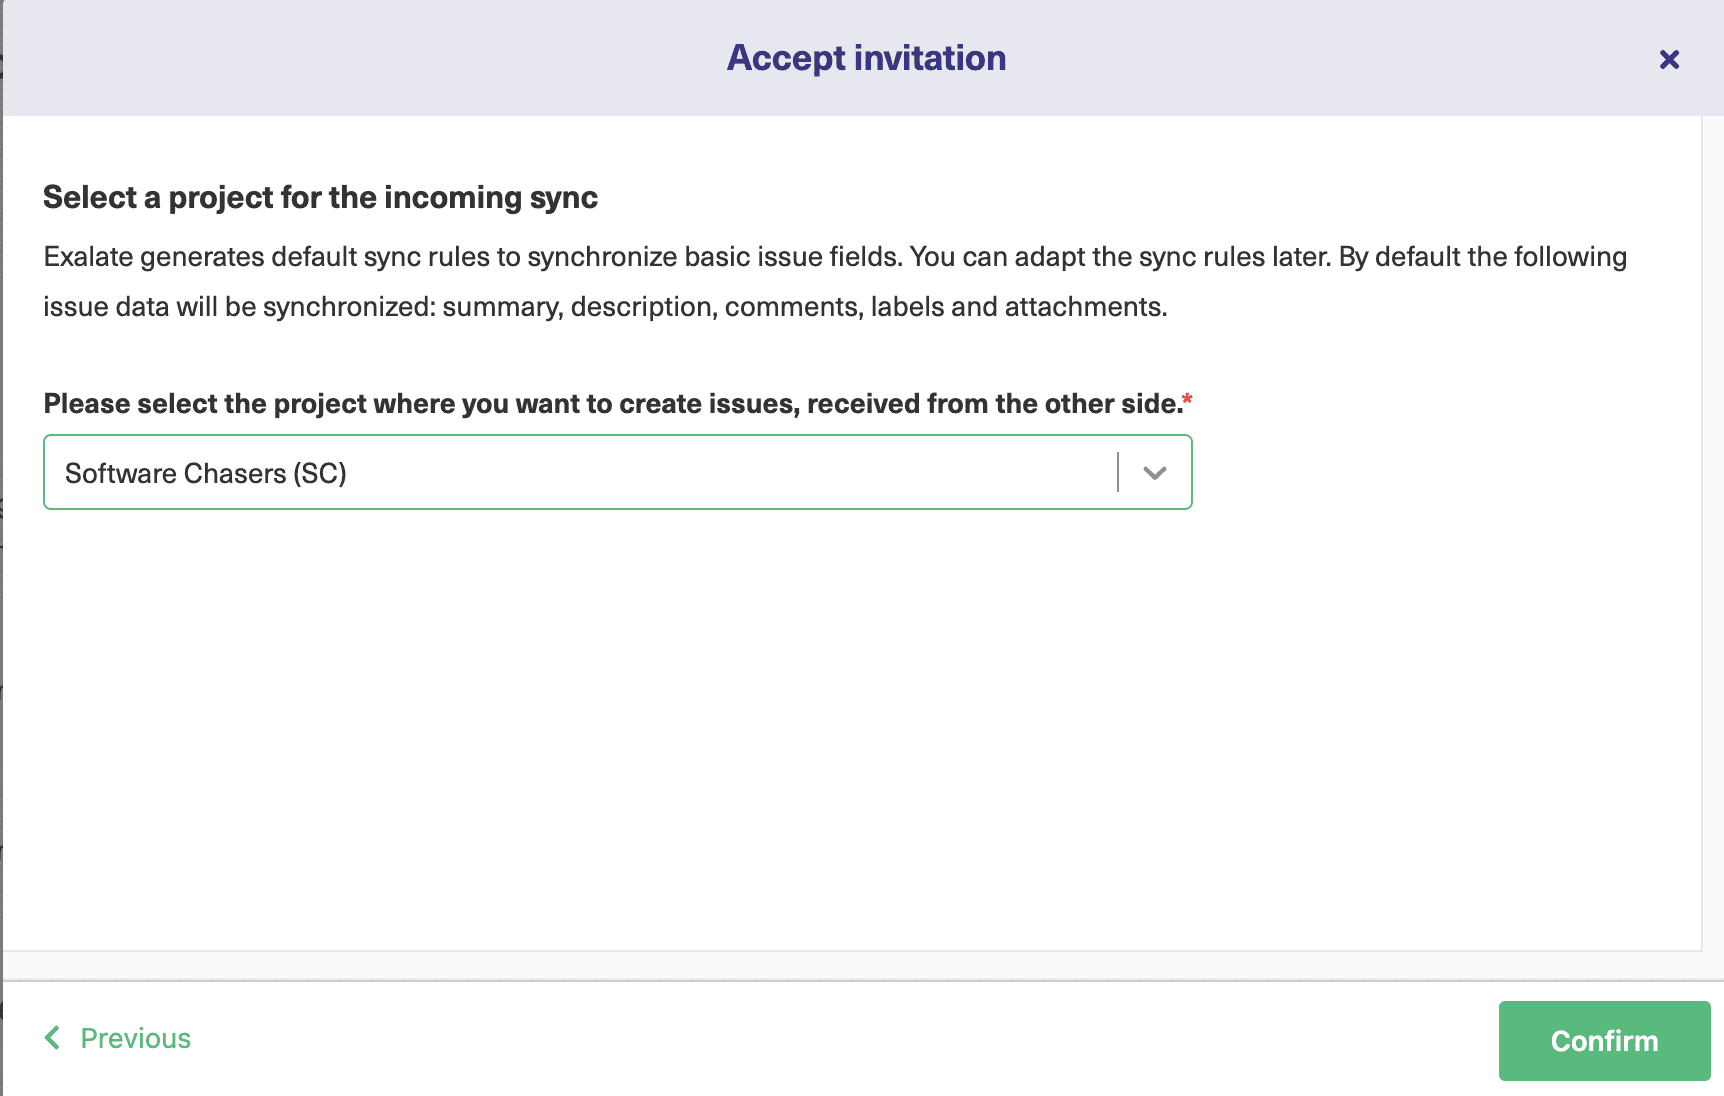
Step 5: Invite the Other Team to Connect their Jira Project
On the second team’s side (Green Jira instance), you’ll need to go through the same menu. But, this time, click on “Accept Invitation” in the Connections menu. 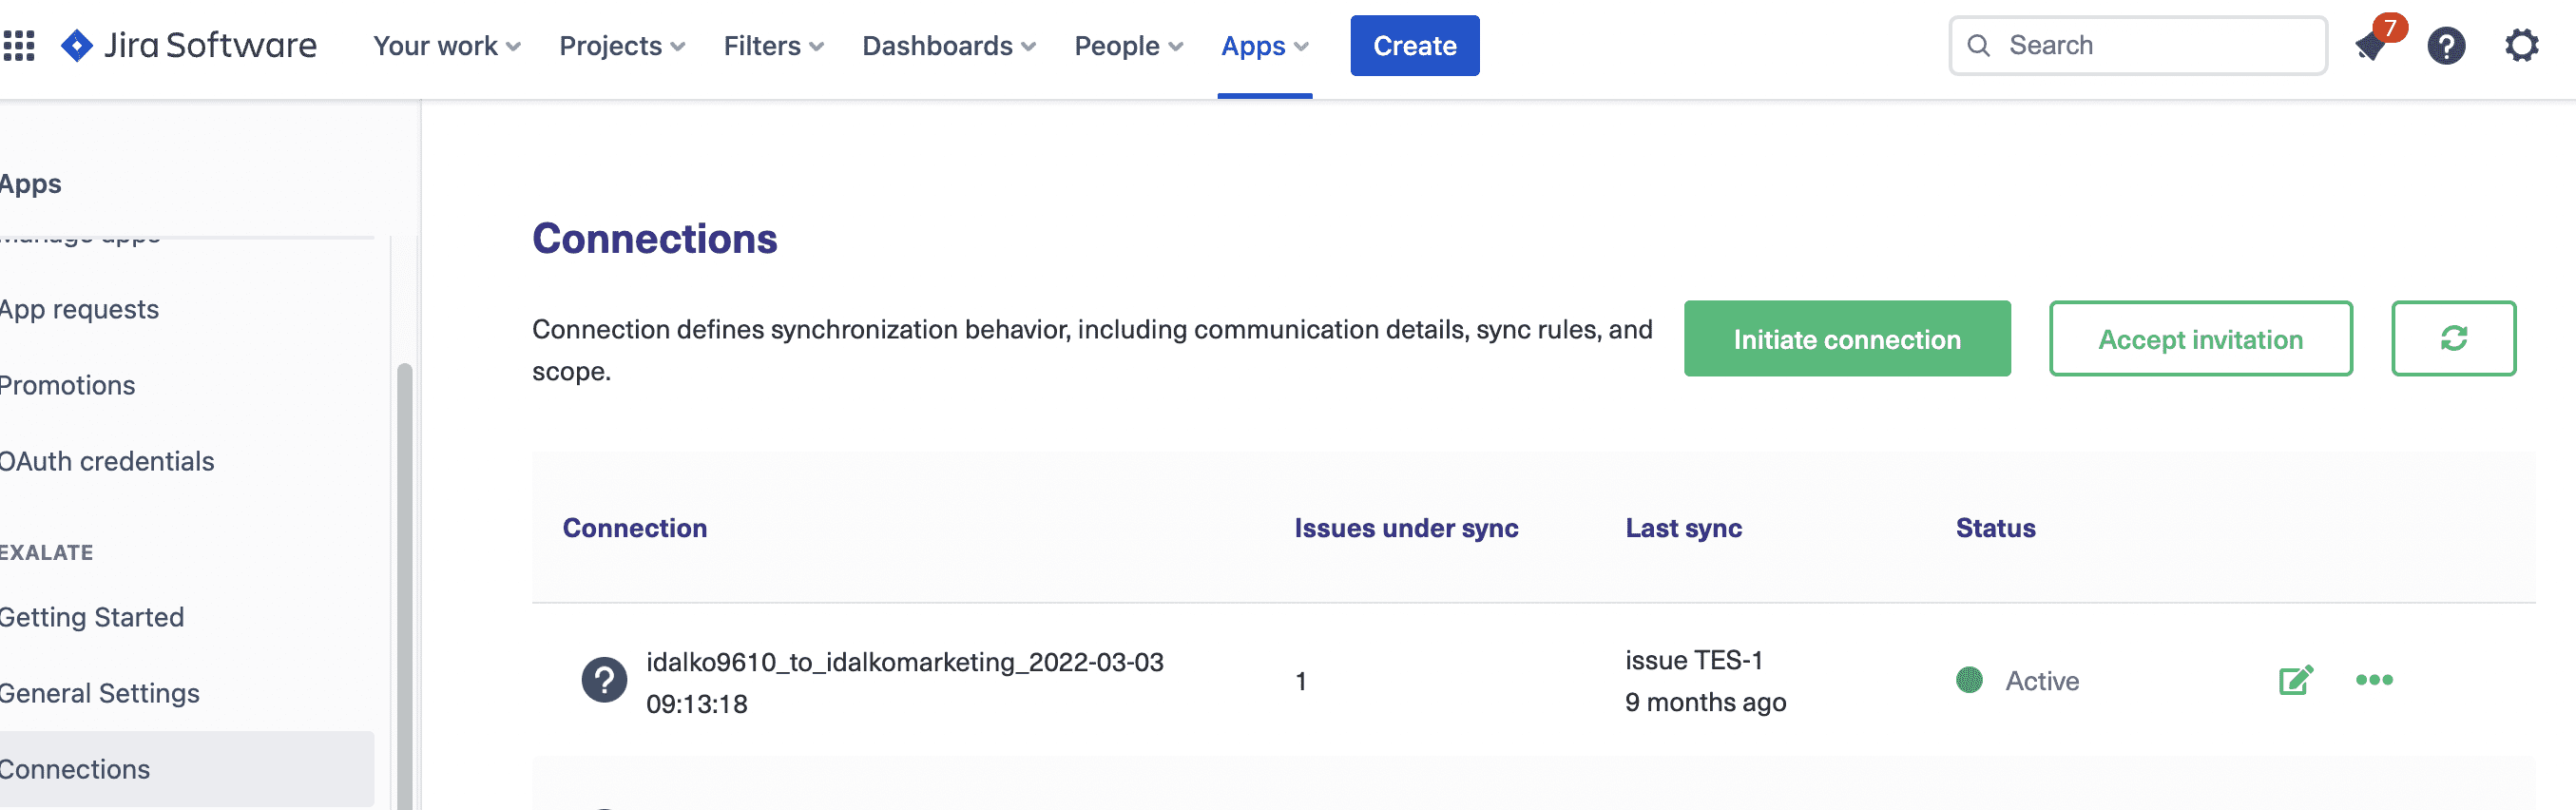
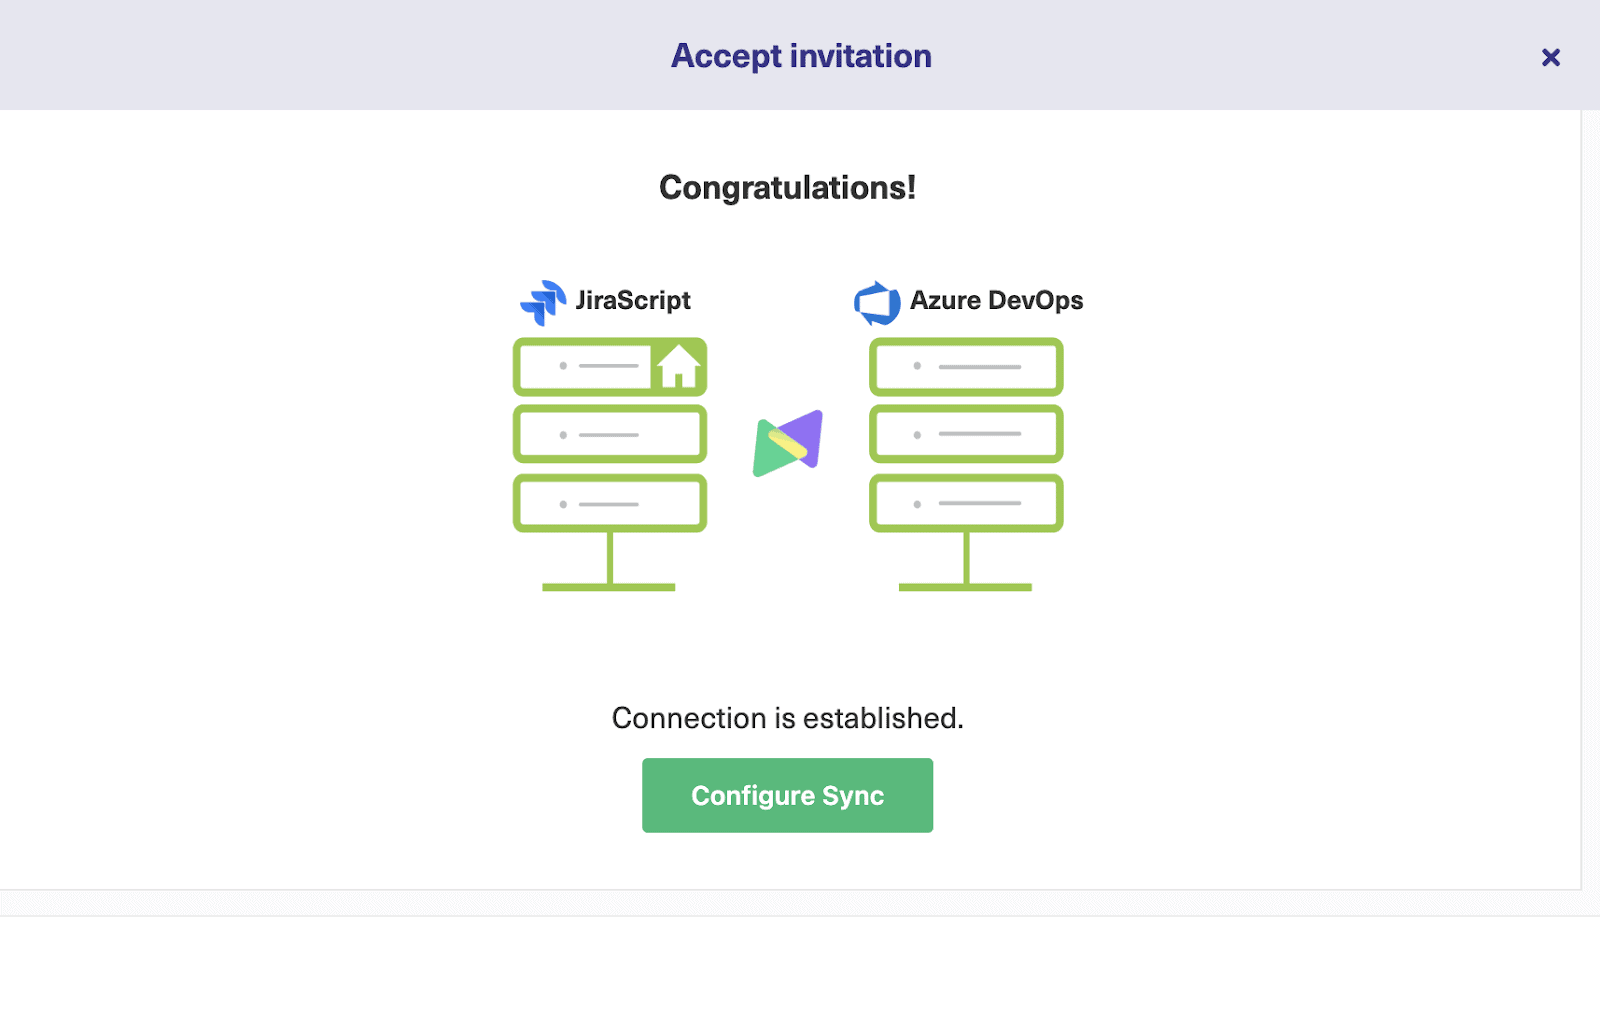
That’s it – have a chocolate 🍫.
Step 6: Test your Connection by Syncing a Jira Issue
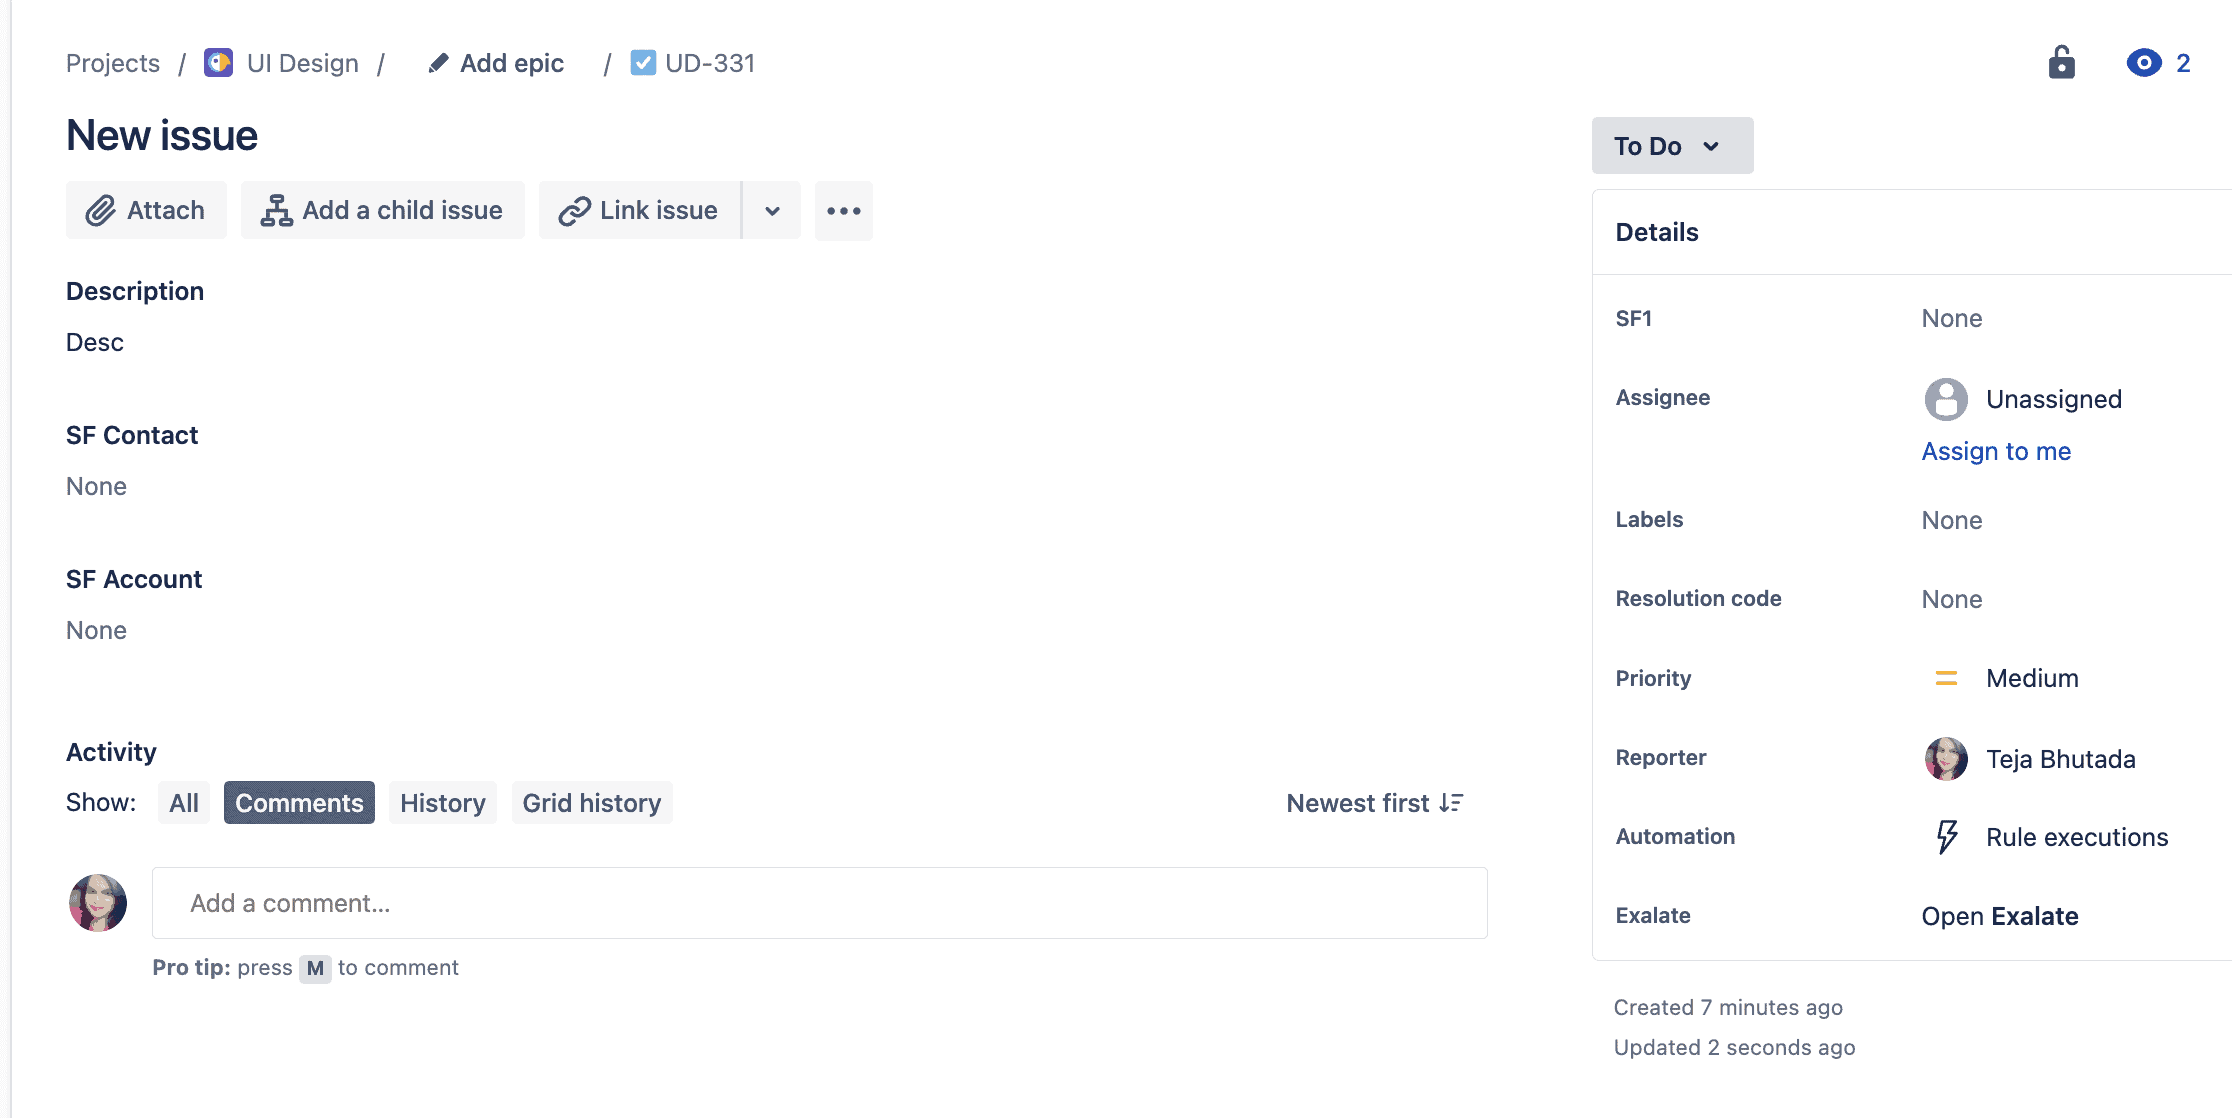
All right, now let’s sync a Jira issue to see if the Connection we have set up works. Now that you have installed Exalate, you get to see it under every issue action. You can find the Exalate button on the right sidebar on the issue view. 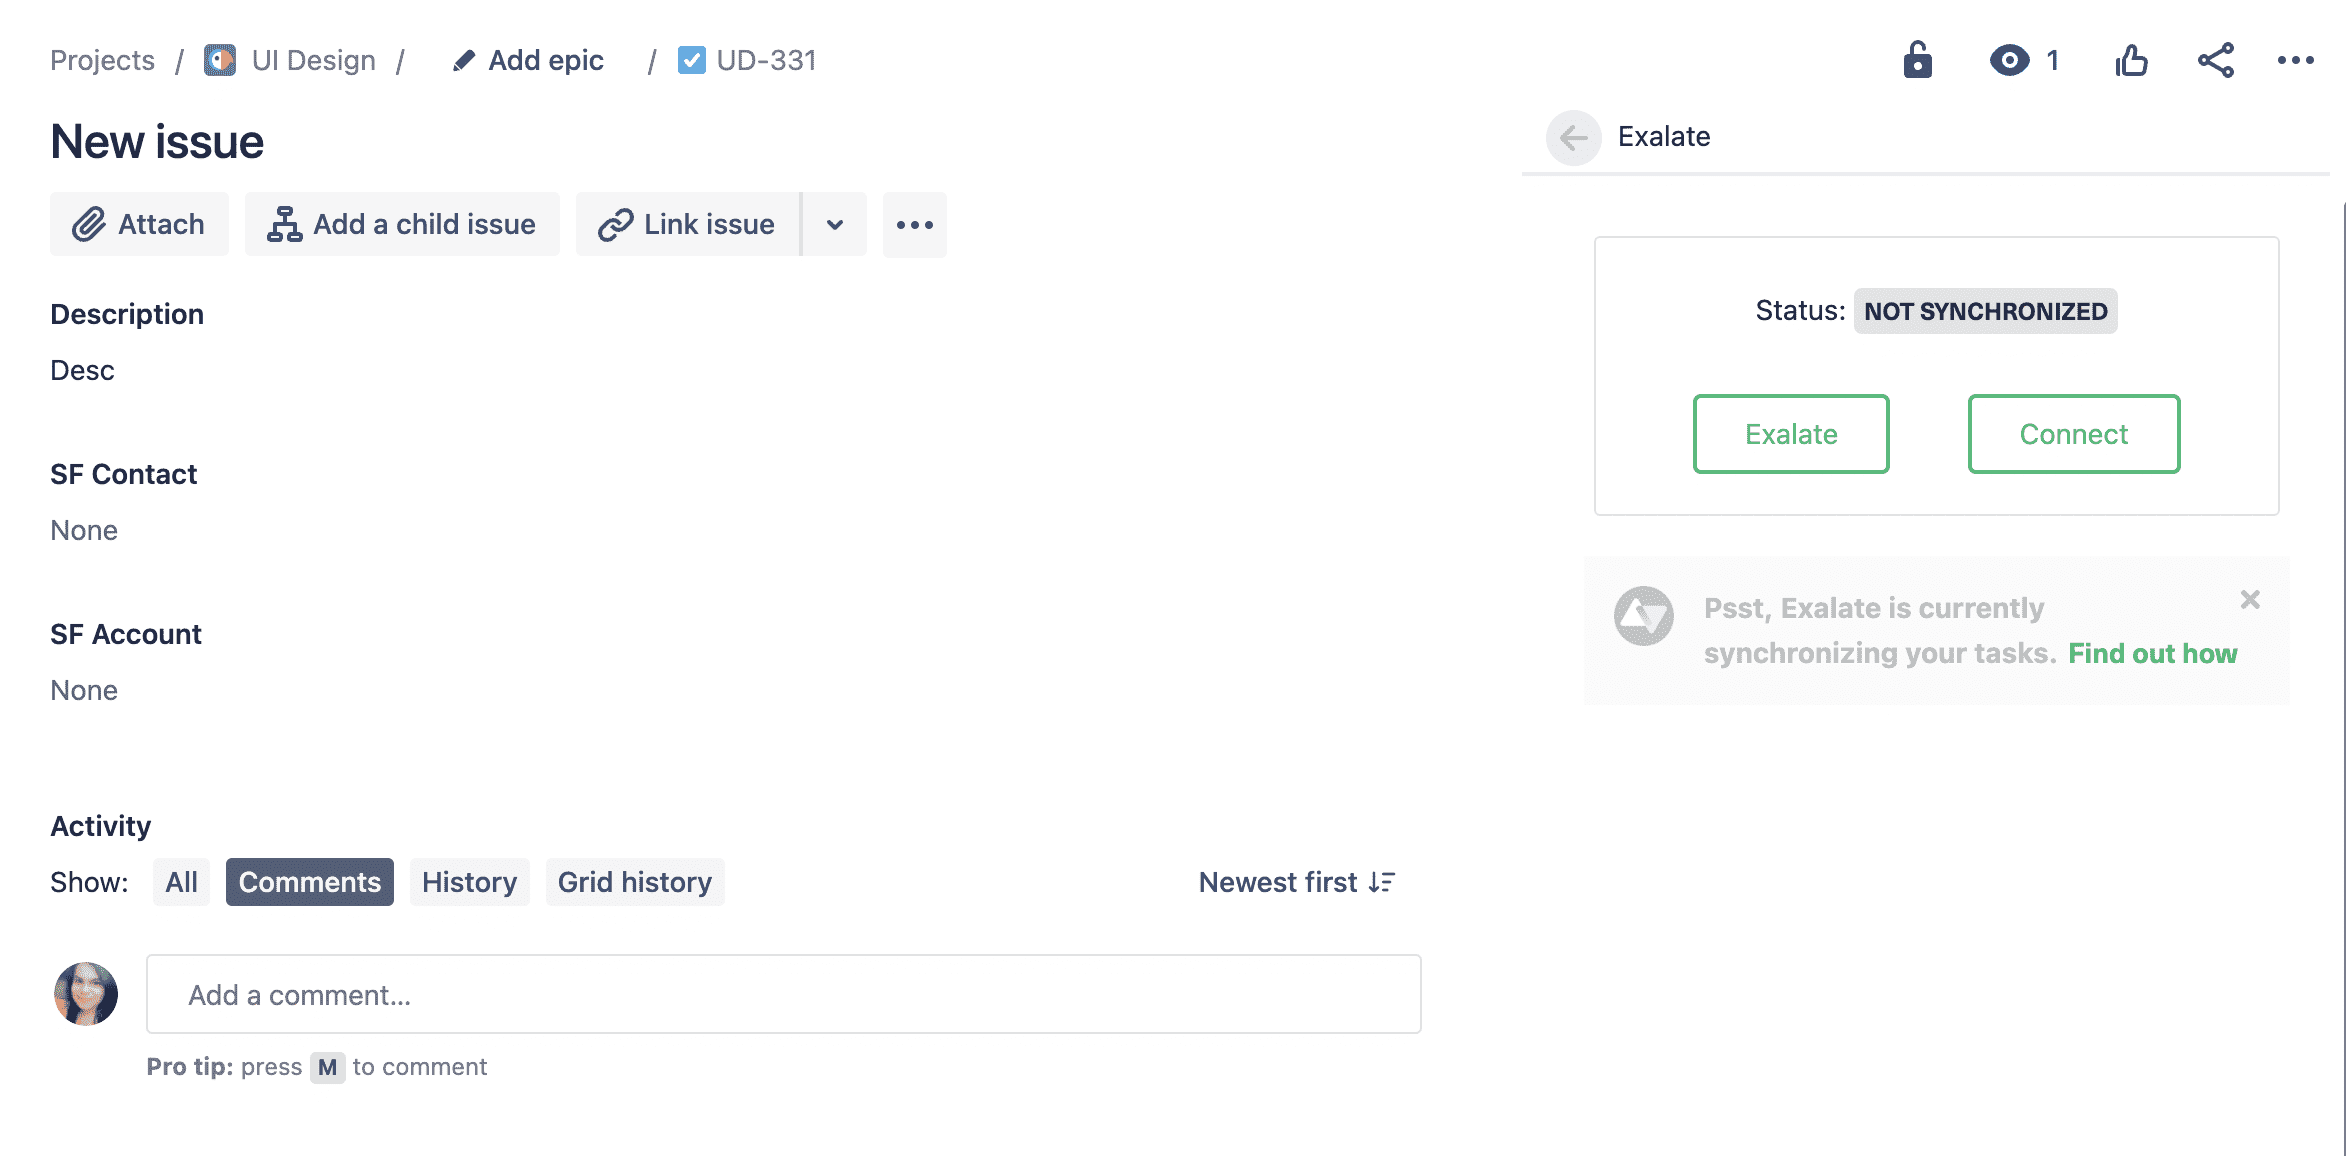
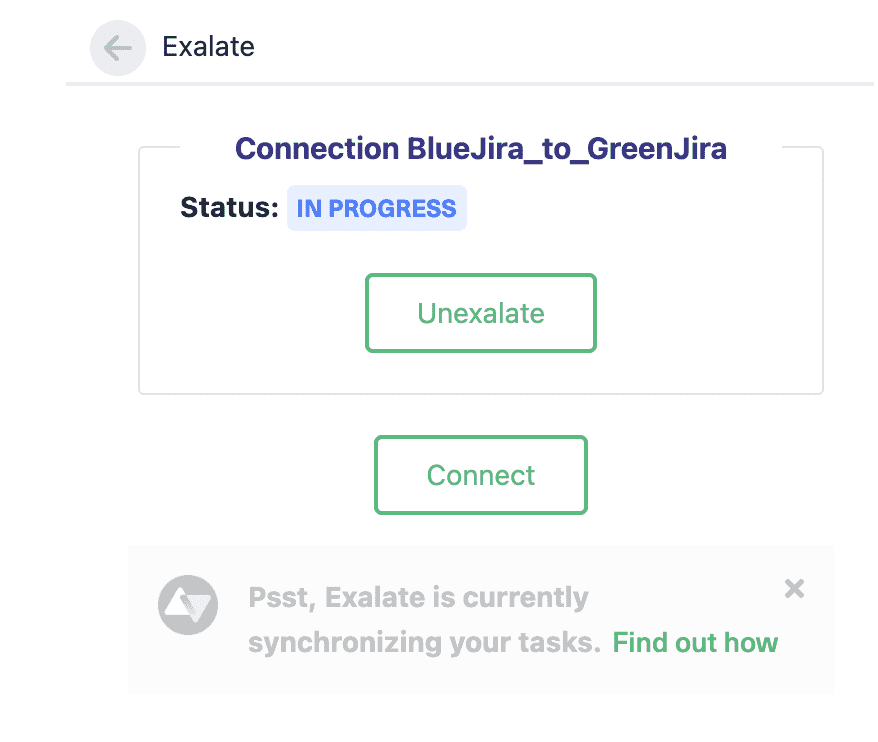
This means your Jira issue is currently being synchronized. It should only take a few seconds for the synchronization to succeed:
Step 7: Customize Synchronization Rules Through Scripting
In this section, we are going to discuss customizing synchronization rules through scripting.
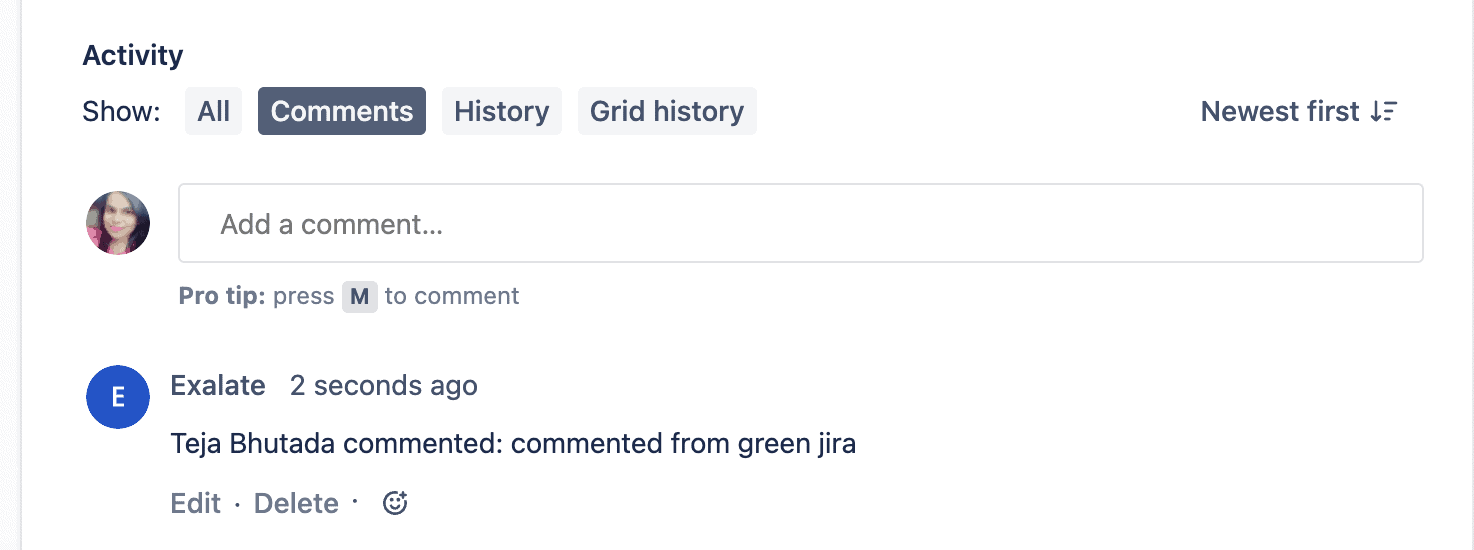
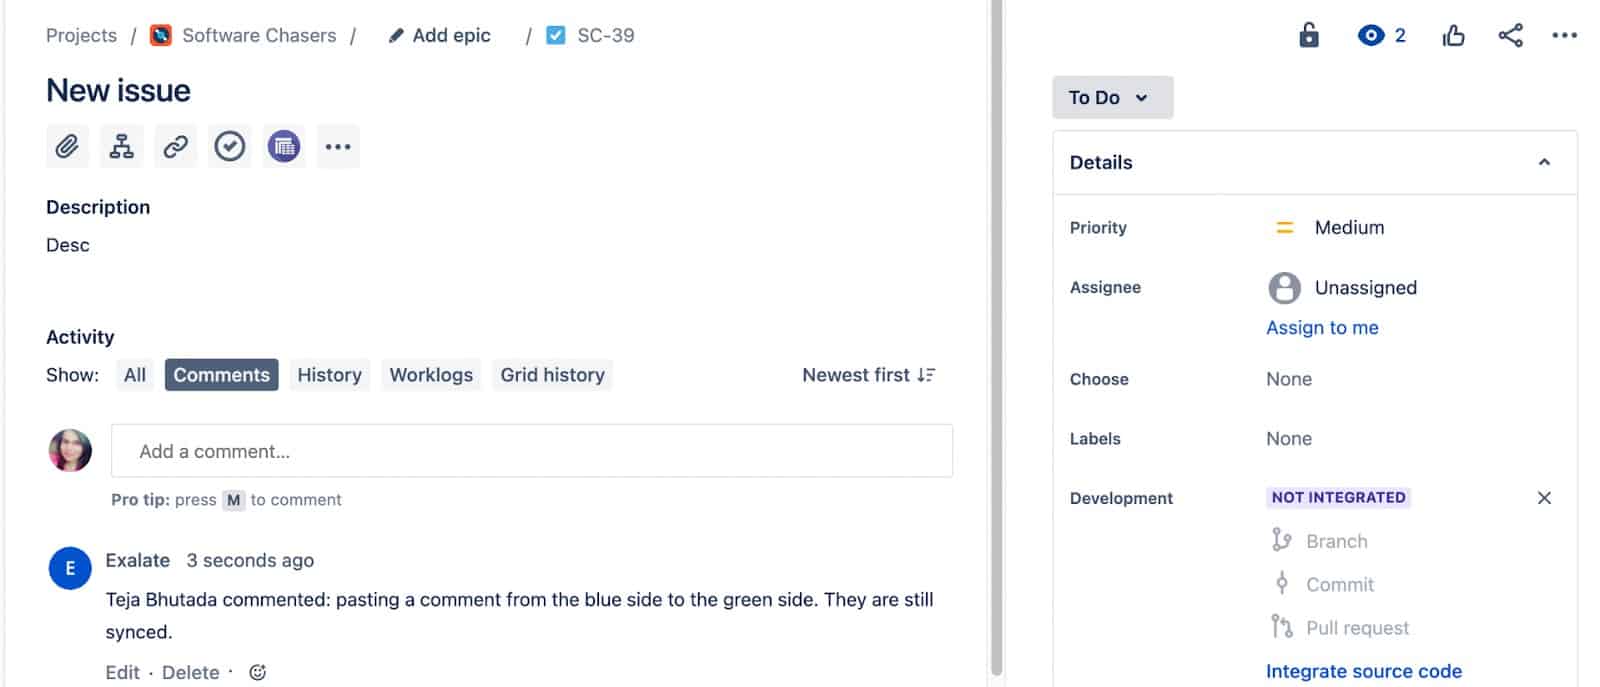
For this, we consider the case where first the comments from the Green side are synced and reflected on the Blue side. We then remove the comment sync on the Green side from its outgoing sync rules and see that the comments on the Blue side are no longer synchronized. The screenshots below show that the comments have been synced. From the Green side to the Blue side.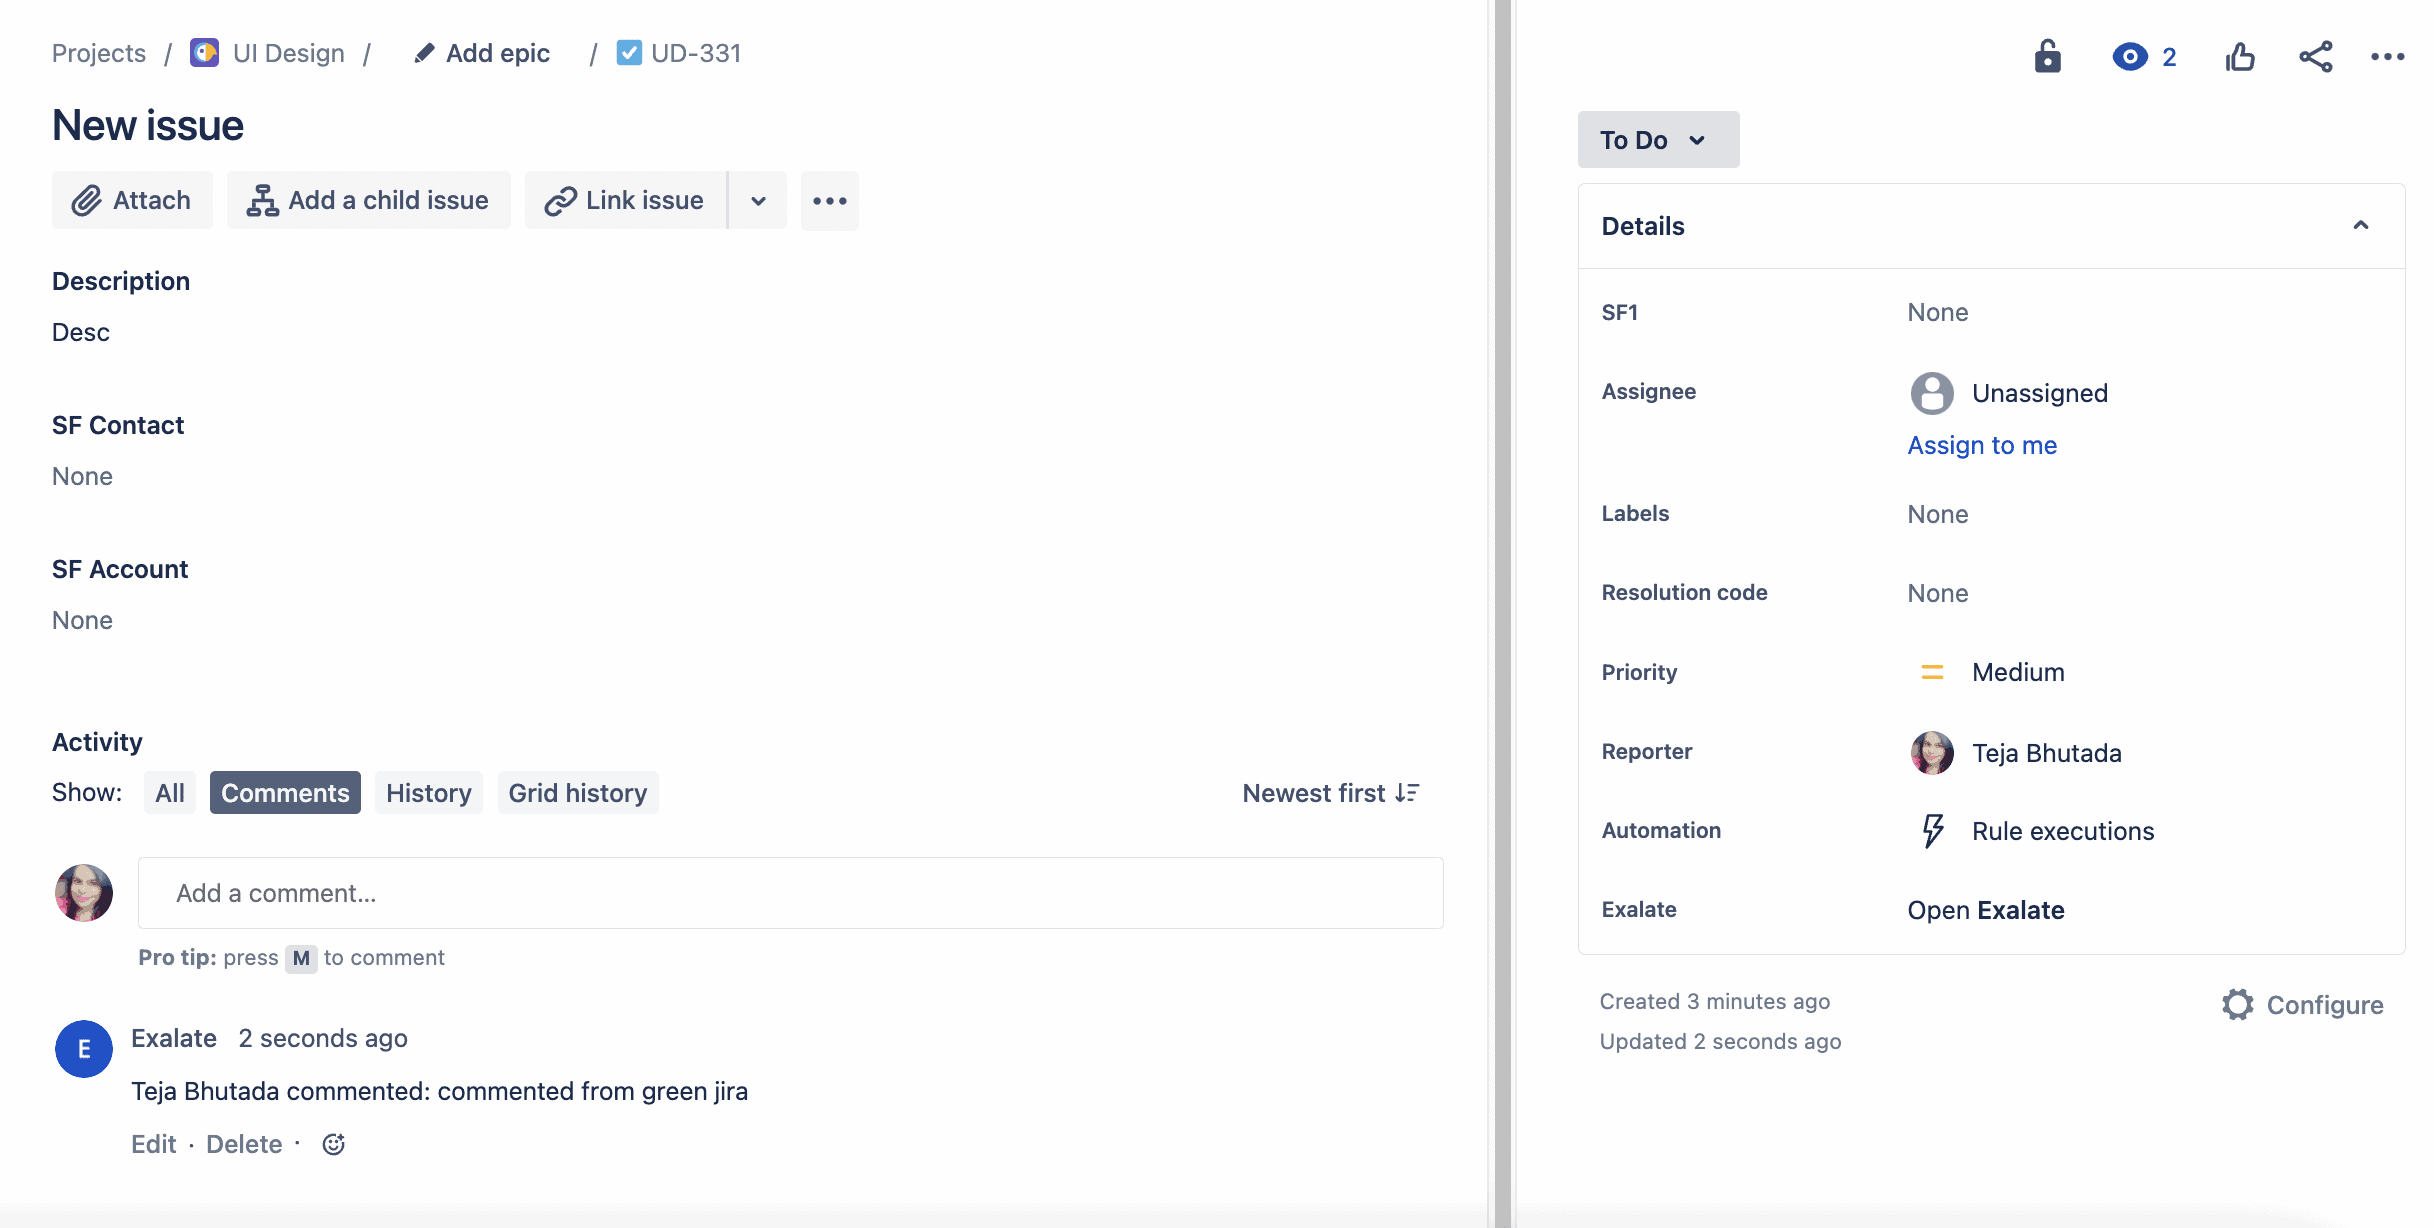
Now, for changing the sync rules, go to your Connections menu inside the Green instance and select the connection you want to edit.
Inside, pick the “Rules” tab. This is where you have access to the way issue fields are being synchronized. (Check out the Exalate Documentation for a full overview of these fields.)
In the Outgoing Sync filter, remove the issue comments line.
Alternatively, you can keep the code snippet intact and add “//” in front of the line to make it into a comment, like so: 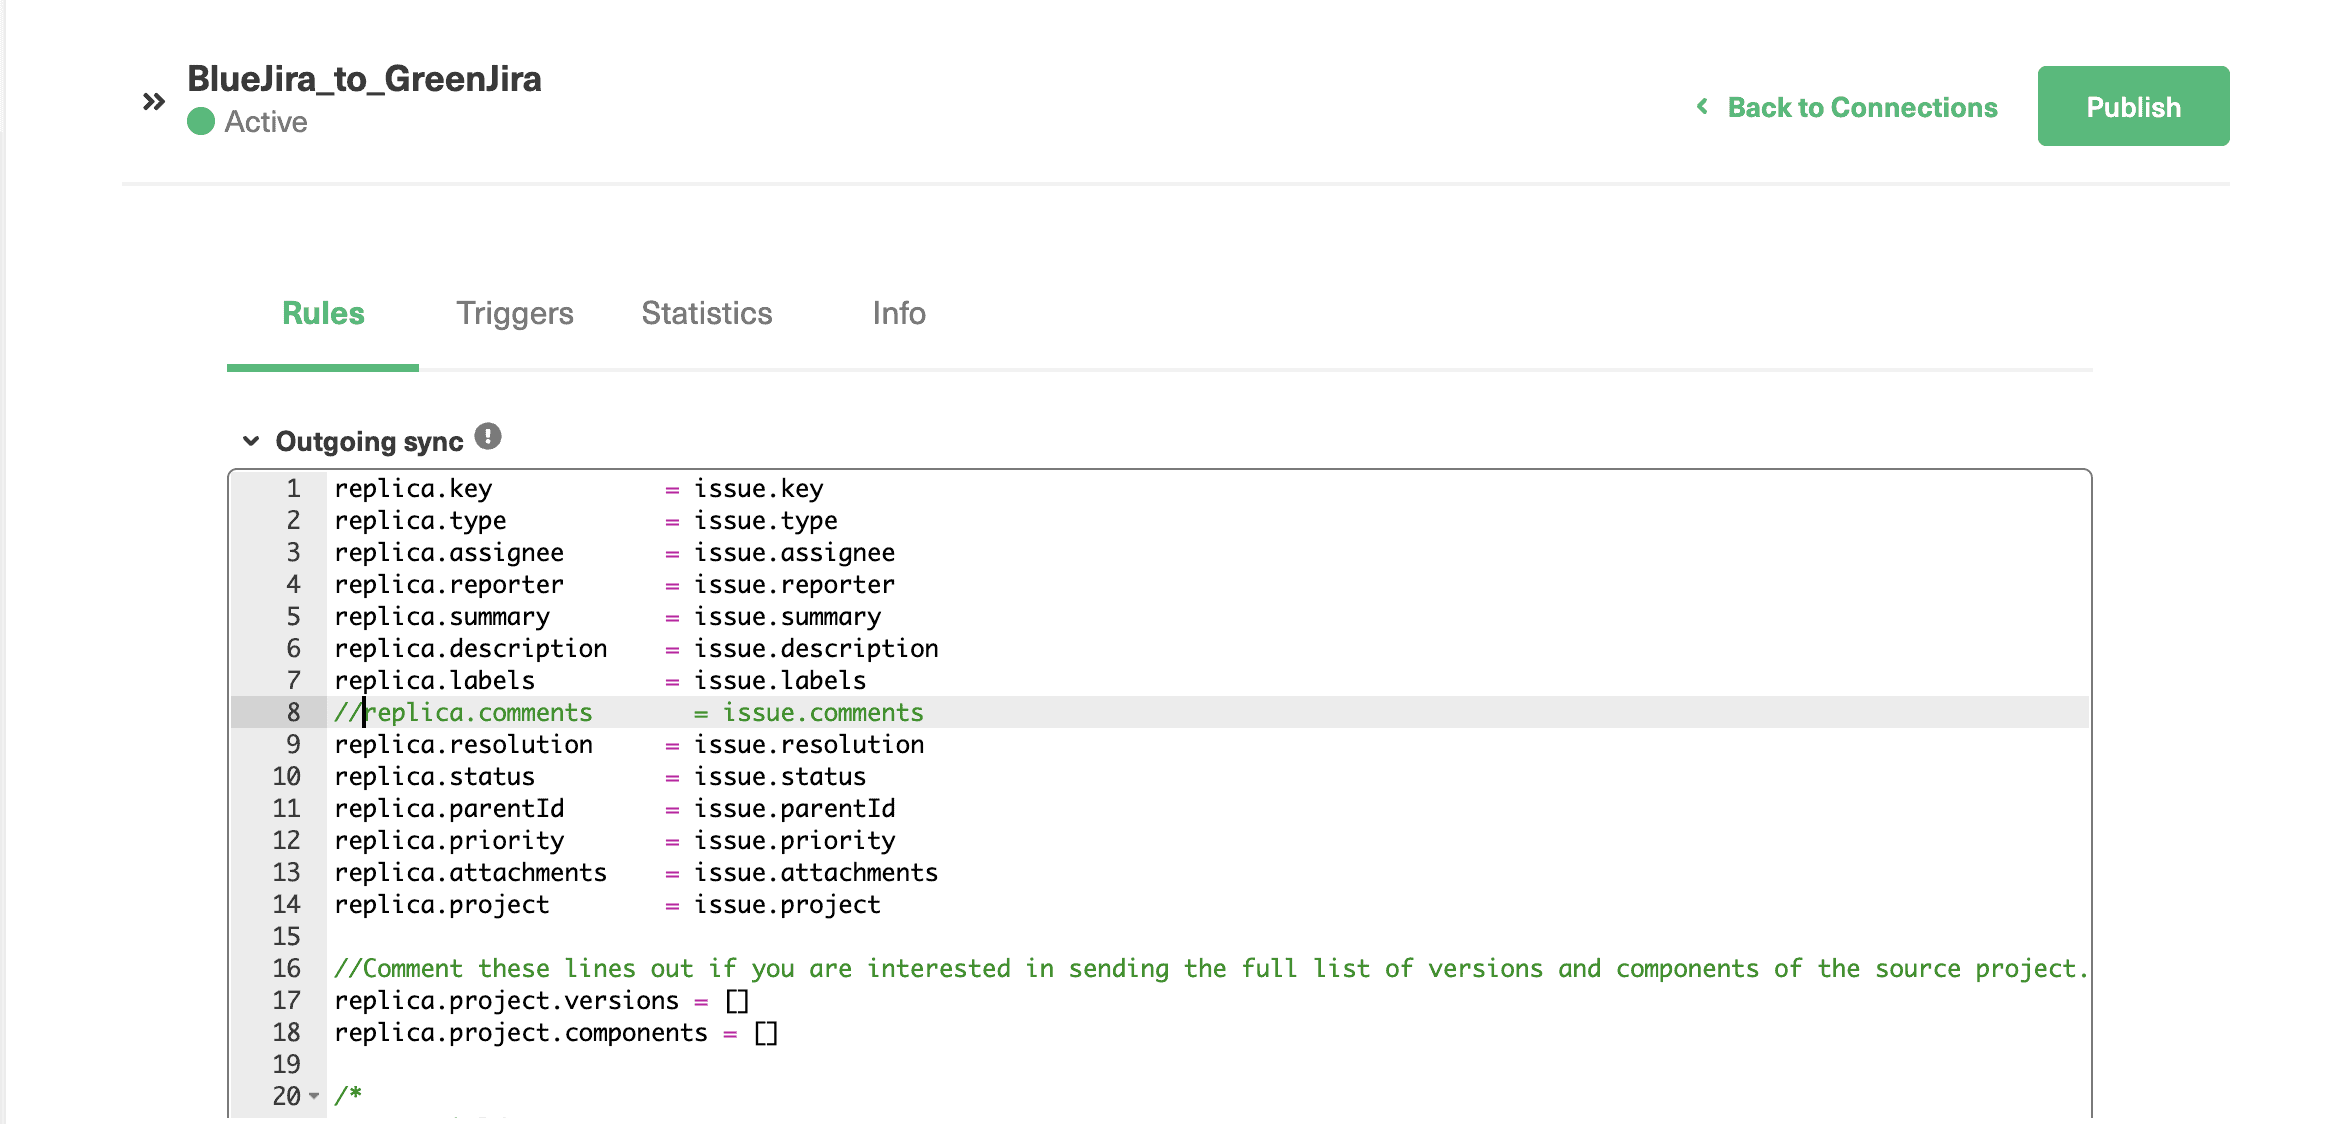
Let’s go back to some of our use cases. What if we want to sync attachments to the Green side without giving access to this information to the Blue side?
We can set this up using simple scripting. What’s great is that we only need to do this on a single side. So, if we want to block attachments from synchronizing to the Blue side, we can set this up on the ‘Outgoing Sync’ rules of the Green team.
So for this step, determine which information you want to send out through your outgoing syncs – and which incoming information you want from the other team. In our case, we’ll set it up so that we can get incoming attachments from the Blue team. But the Blue team can’t access the Green attachments.
Step 8: Create automatic synchronization triggers
Triggers are used to synchronize issues automatically over the connection. You need to set certain conditions for the trigger and if those conditions are satisfied, then the issues are synchronized based on the sync rules you have specified for that connection.
Click the “Triggers” tab in the edit connection screen, so you can create new triggers. Triggers can also be accessed through the left-hand Exalate menu. This is a general tab that lists all the triggers you have created. You can create triggers here as well, but with this approach, you will need to choose the connection you want to implement the trigger for.
We will follow the first approach. You will then find a screen that looks like this.
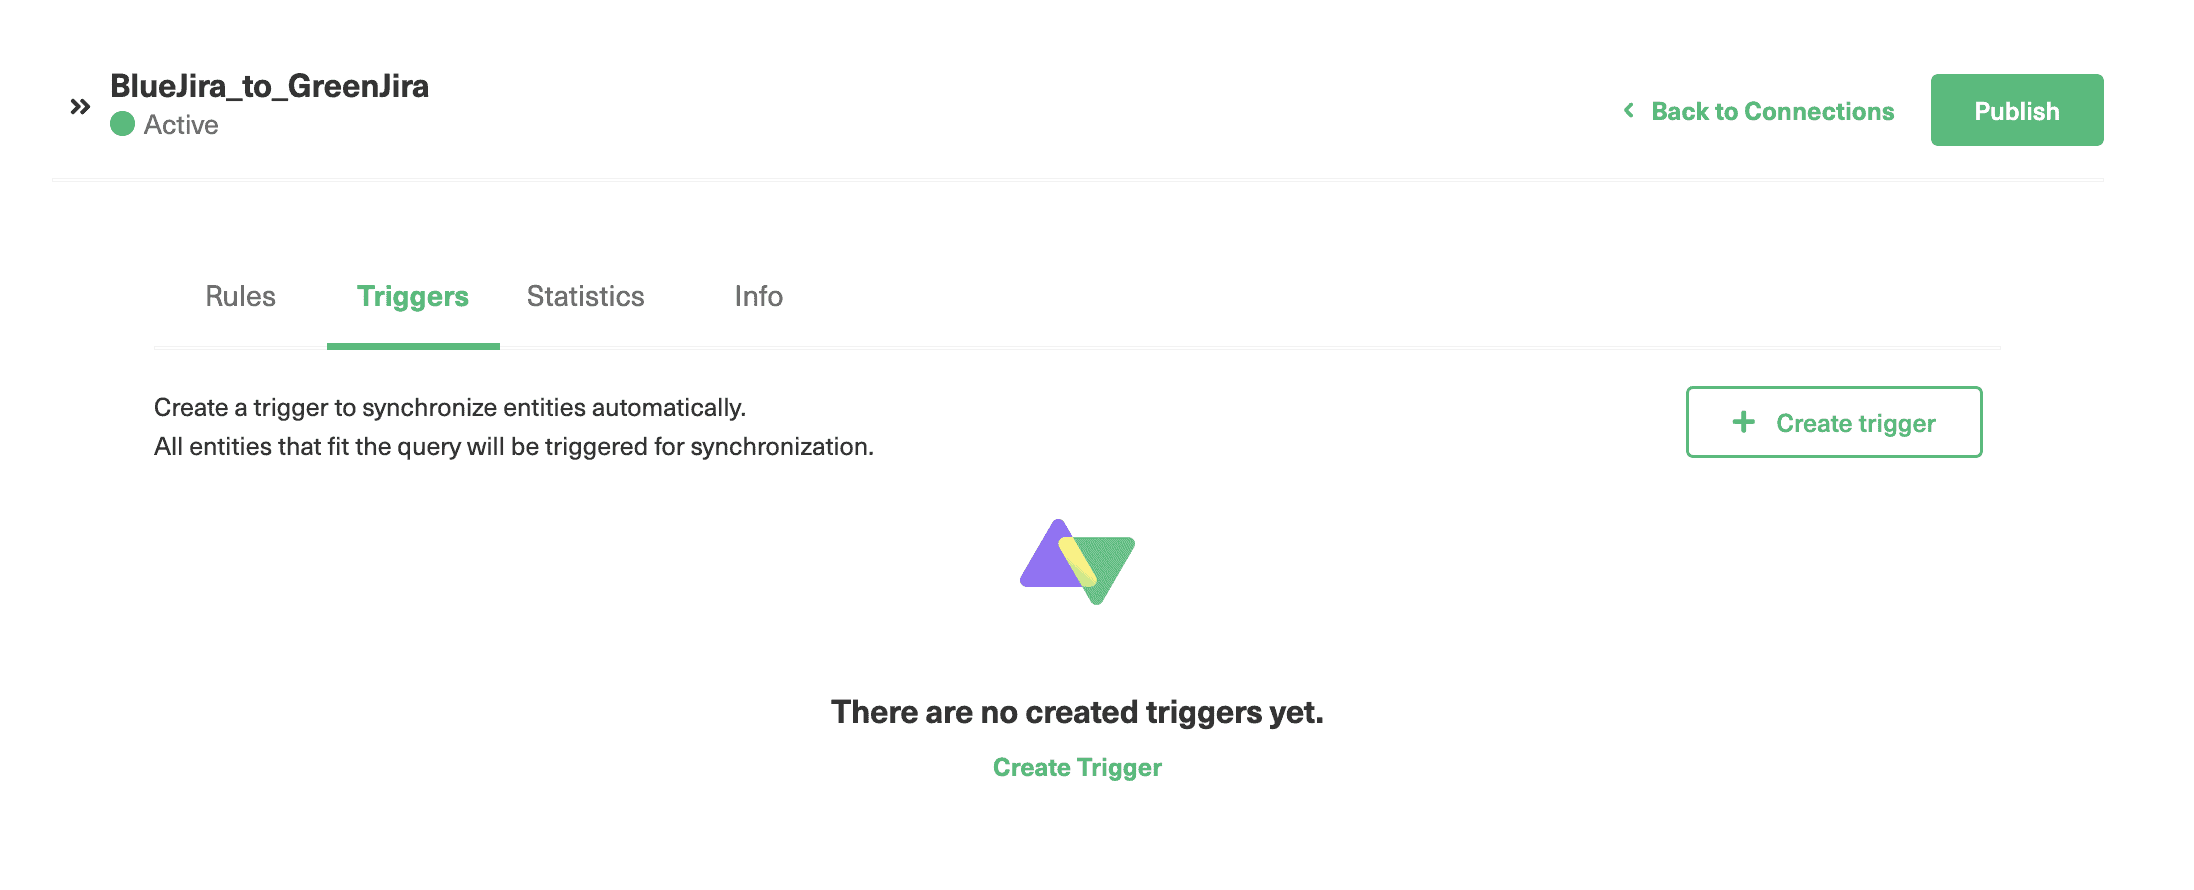
If it’s your first time, you won’t see any triggers, or else you will find the list of the triggers here.
Click the “Create trigger” button on the top right to create a new trigger.
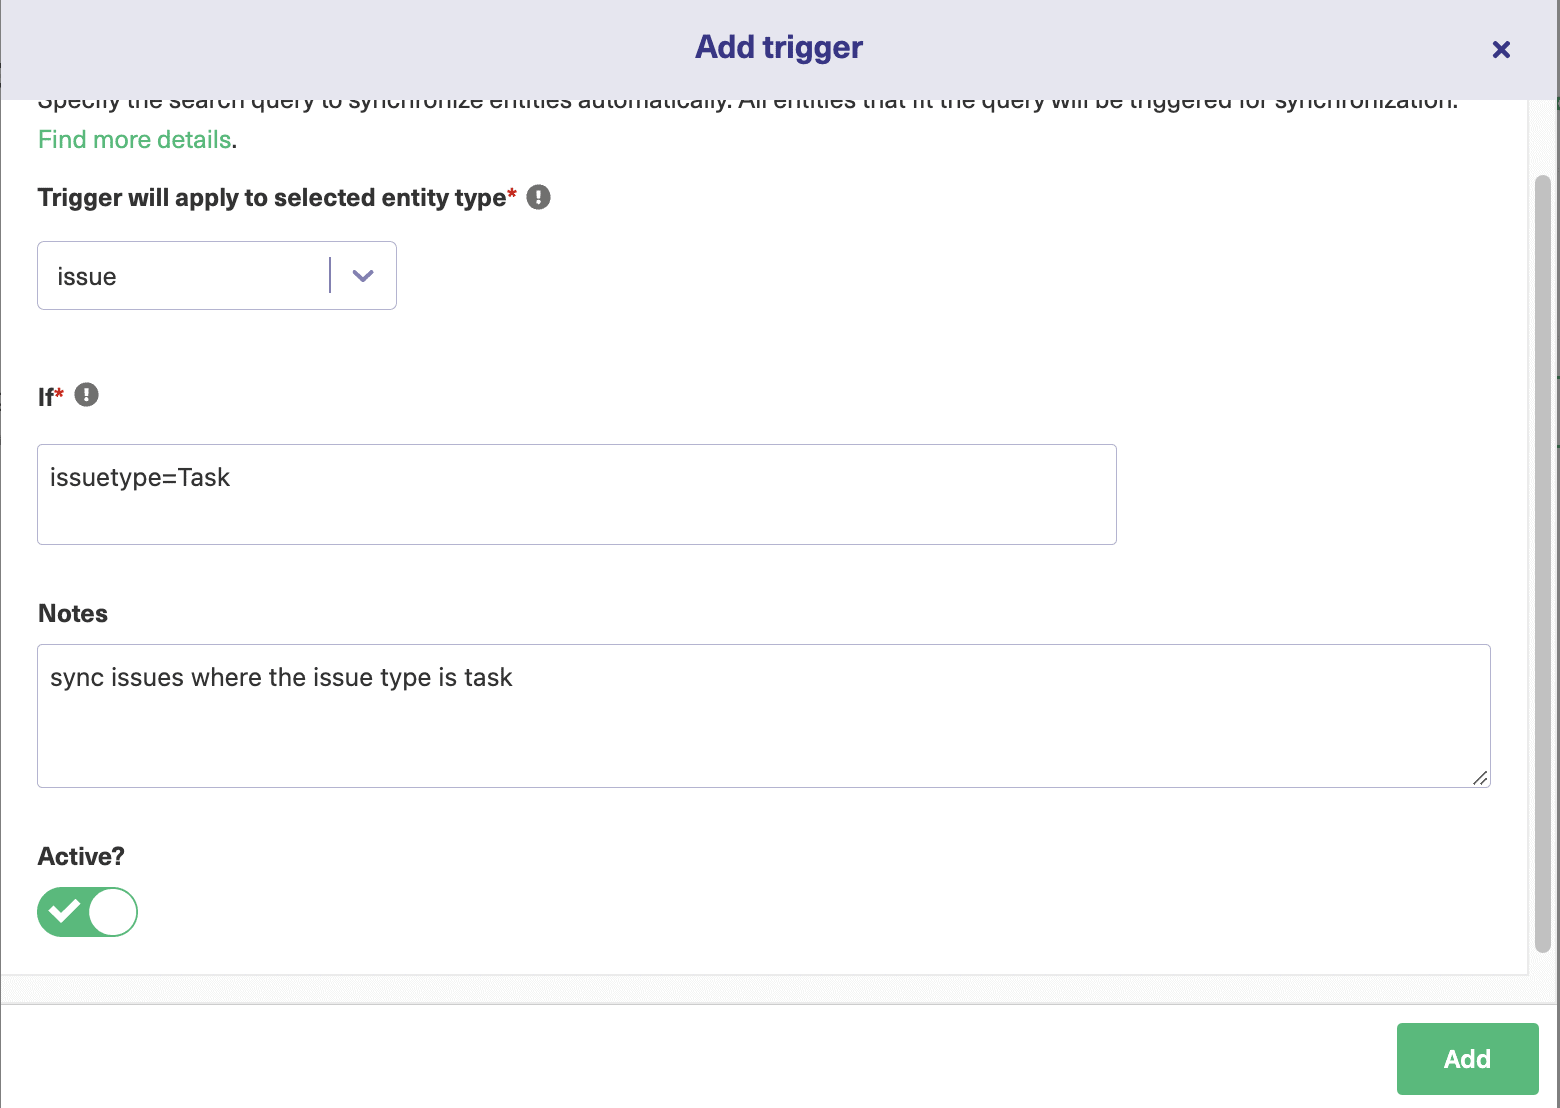
As shown in the figure, we have created a trigger for issue types = “Task”. So all your tasks in Jira will be synchronized over the connection. Leave “Notes” to understand the purpose of your trigger. There is an “Active” toggle switch to activate or deactivate the trigger. To make the trigger work set it to active. Then click “Add”. You can see the newly created trigger in your triggers list now.
You can edit or delete the trigger under the “Action” heading. If you click the 3 dots next to the name of the trigger, you can sync existing issues meeting the trigger condition by clicking the “Bulk Exalate” option.
Step 9: Handle Sync Errors
So what happens if an error occurs during a Jira issue synchronization? Because Exalate works with a transaction-based system, any connection errors won’t break the synchronization and cause conflicts between the issue and its clone. This basically means you don’t need to do any housekeeping in Exalate to fix conflicts if connection errors arise. Because there won’t be conflicts at all. If an error occurs, you can seek assistance from the Exalate team. Once the issue is resolved, your synchronization will resume in the order the changes were made.
Wrapping it Up
There you have it. 9 steps to achieving a simple Jira to Jira sync. Here’s a quick recap of the basics:
- Establish a connection on one end
- Accept the invitation from the other end
- “Exalate” your new or existing issues to establish issue synchronization
- Tweak any sync rules if needed
- Add automatic sync triggers if needed
By synchronizing Jira issues in this way using Exalate, you’ll avoid losing time and information. And you’ll make your workflow much simpler. Additionally, if you need separate connections with varying sync rules, you can create multiple connections between two projects with multiple sync rules. If you have an interest in setting up sync using Exalate, you can try it completely free. And if you need some help setting it up, we can schedule a demo on how to use it for your particular use case.
Recommended Reads: