Jira is a phenomenally powerful platform, and part of that potential is the sheer amount of information that can be packed into issues. Indeed, your Jira instance can become host to an immense amount of data about your projects and about your organization. A highly effective way to access and manage that data is via tables in Jira.
You’re not limited to just adding spreadsheets and tables to tickets as attachments, though. Instead, Jira issues support simple tables, and apps can enable you to do much, much more with the platform
Why use Jira Tables?
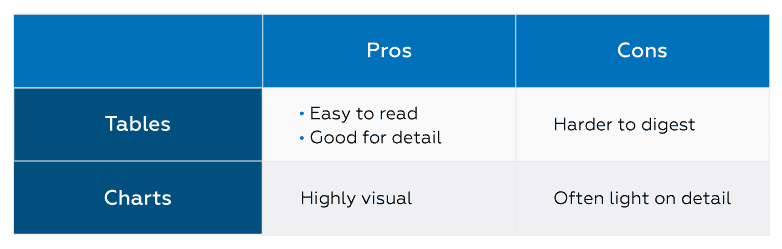
Tables allow you to lay out information in a grid format, like a spreadsheet. This can enable you to create everything from a pros vs. cons list to a dataset that maps the relationship between dozens, or hundreds, of data points.
Jira issues natively support tables, so it’s easy to set up simple grids when you need them. These can fulfill basic requirements, such as tabulating simple datasets or version comparisons. However, Jira’s native functionality doesn’t stretch much further than this and you’ll likely begin to hit walls if you attempt to build further.
Note: If you do want to do something more complex, you might consider using an app like Table Grid, which can significantly boost what you can achieve with the platform.
How to Create Basic Tables in Jira in 1 Simple Step
Adding a table to a Jira issue is actually surprisingly simple.
You just need to use the pipe character (“ | ”) to define the cells of your table and a double pipe (“ || ”) for the headings, and to then insert this into the relevant Jira field that you want to work in.
Hence, to create a 3×3 grid with headers, just copy the following into a Jira issue field:
||heading 1||heading 2||heading 3||
|col 1 row 1|col 2 row 1|col 3 row 1|
|col 1 row 2|col 2 row 2|col 3 row 2|
|col 1 row 3|col 2 row 3|col 3 row 3|
And you’re done! You now have a simple grid in Jira.
This highly manual implementation has its limits, though. For one thing, you need to manually layout the rows and columns, as illustrated above. And secondly, you can’t create dependencies within the table or fully connect the grid to issues and projects across your instance. Furthermore, as things get more complicated, it can quickly turn into a mess.
You can do a little more using Visual Basic, but your best option for more advanced cases is likely going to be an app like Table Grid.
How to Create Tables in Jira for Advanced Use Cases
Introducing Table Grid
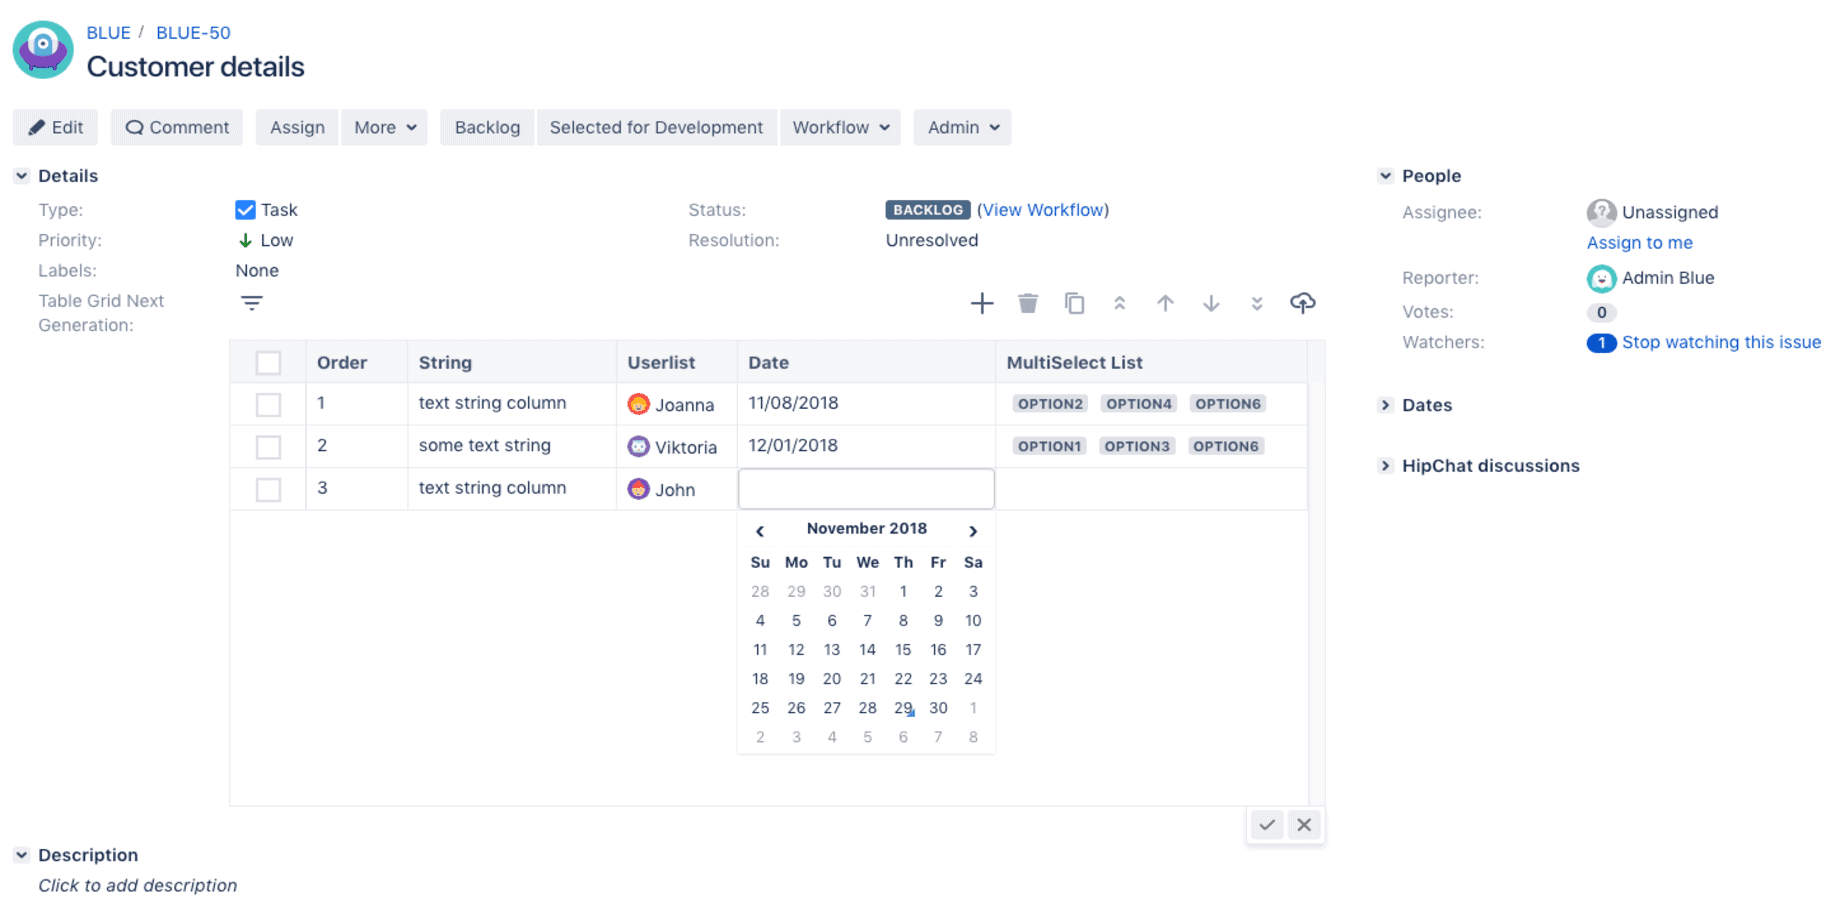
The Table Grid Next Generation app adds a huge amount of additional functionality directly to Jira and allows you to embed far more information into your issues. The spreadsheet-like user interface enables you to create tables and to configure columns and add formulas.
One of the key benefits of Table Grid, compared to Jira’s native tools, is that it provides structure. By applying rules and restrictions on how data can be entered you can ensure that your dataset is consistent and coherent. What’s more, the grid can replace a whole bunch of Jira issue fields with a single field: the Table Grid. You can simply add all the information from the relevant issue to one row in your table without losing any capability.
You can import Excel and CSV files straight into the grid and search all of the information in your table via JQL, so it’s completely integrated with your Jira dataset. Meanwhile, integration with the Jira Service Desk Customer Portal means that you can direct queries straight to your Table Grid for easy management and monitoring.
Table Grid is a tried and tested app and recently relaunched with a new edition with new and enhanced features developed based on feedback from the community. The app is described as being easy to use and comes with an intuitive design.
Here are some of its best features:
The ease with which you can import and export data from your Jira tables
One of the things that makes Table Grid so powerful versus basic tables is the fact that it supports full REST and Java API meaning you can connect internal and external data sources, adding a great deal of flexibility to tables in Jira.
You can also use the API to automate processes when specified triggers are hit.
For example, you can automatically populate the rows of a table as new issues are created or progressed. You can also use it to connect other apps to Table Grid, such as ScriptRunner for Jira, which can be used for advanced process automation. Find more details on the REST API here and the Java API here.
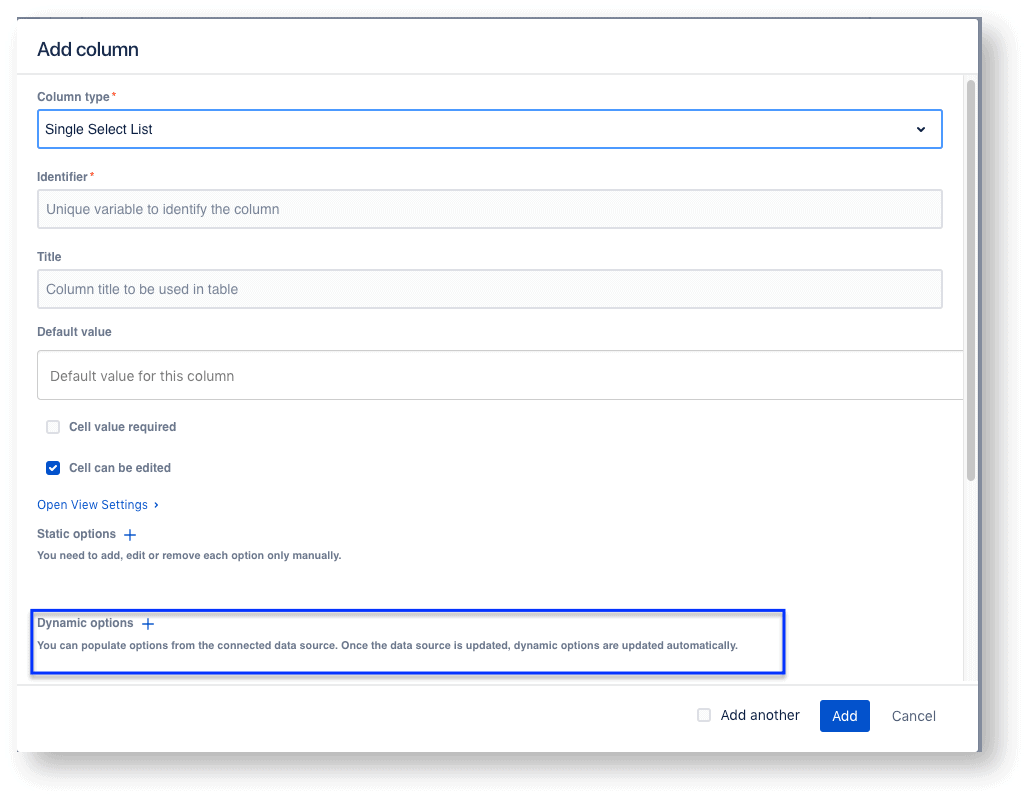
You can also import data directly into the Grid Custom Field from CSV and Excel files. You can add several files to a single grid and you can pick from all of the following column types: integer, list, number, string, textarea, checkbox, date, time, and dateTime.
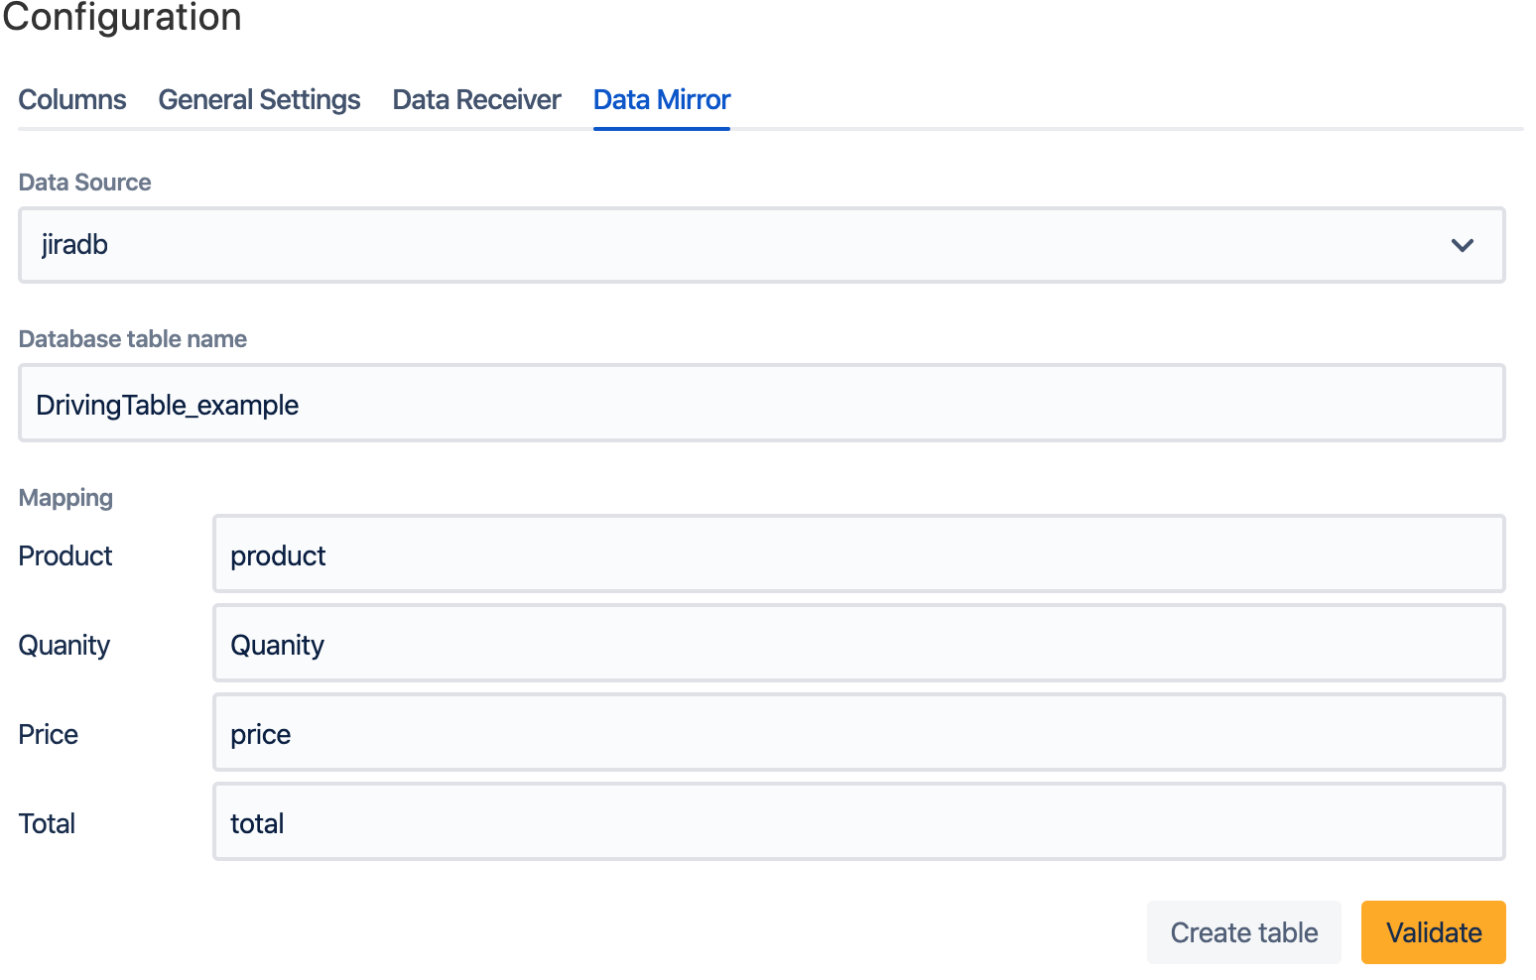
The Data Mirror, meanwhile, enables you to save grid data straight to your Jira database or to an external database. This makes it fast and simple to export data, giving your wider organization instant access to the data, stats, and metrics stored in your Jira instance and to ensure that your data is always backed up.
Jira Value Placeholders
Jira Value Placeholders allow you to automatically populate tables with predetermined values and variables from across your Jira instance. Alternatively, you can enable the column as a whole to pull from specific fields, including both basic fields and custom fields.
What this means is that your table can update as issues are created and edited, thereby giving you complete visibility on how tasks are progressing by assignee, by project, or across your organization. What’s more, it saves on the need for any manual data entry work.
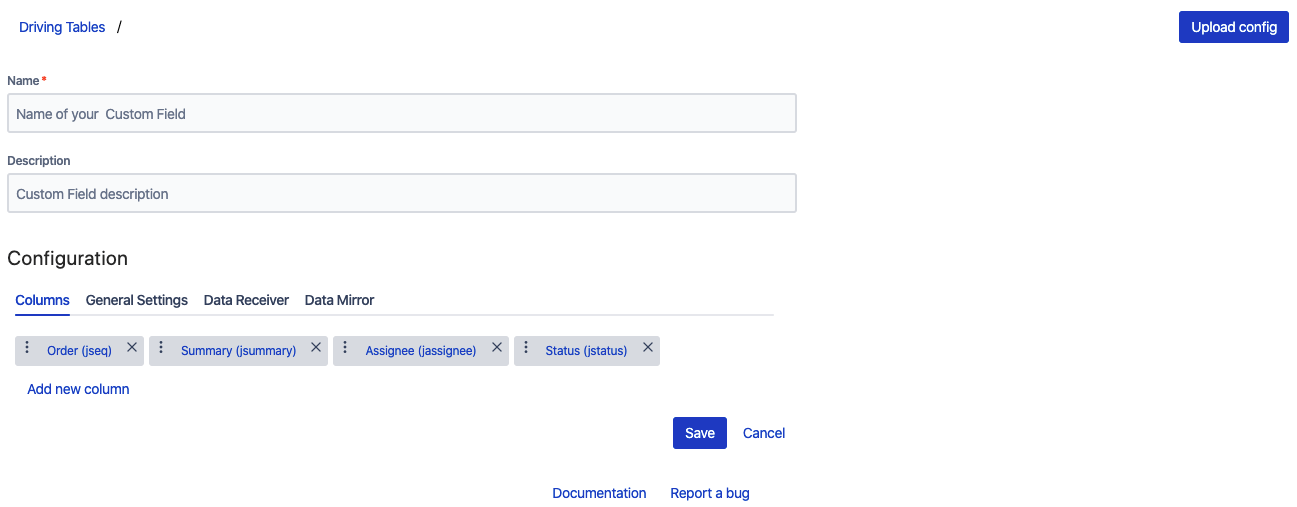
Driving Tables
Driving Tables enable you to create stand-alone tables that aren’t connected to issues. The driving table can then be used as a data source for your grid or you can use it as a hub to export data to an external database, to then be reused elsewhere. This makes it easy to collate information from across your Jira instance and to then quickly and easily export for use in your organization.
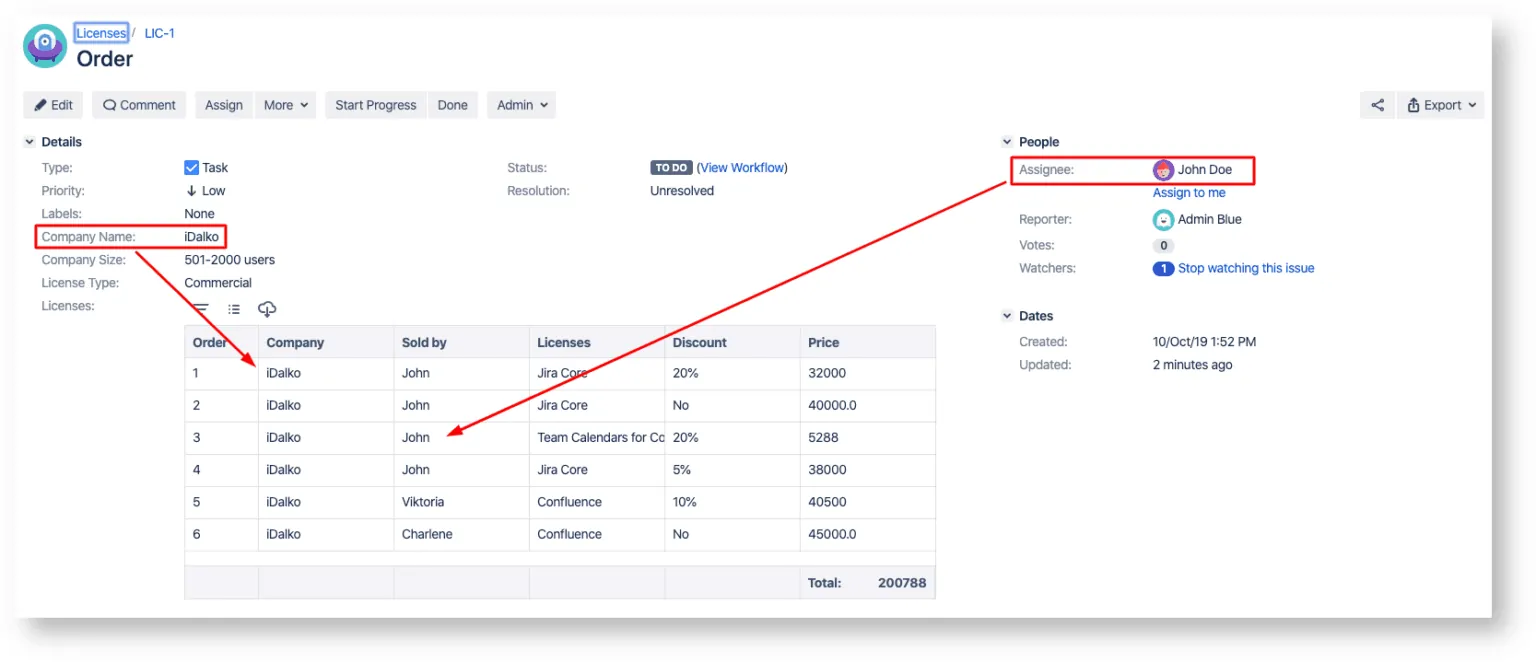
One example use case would be to use Jira as a central repository for your products/services price list, allowing you to link issues and service desk queries straight to the always-up-to-date index while synching the list with external resources and applications.
Dynamic Lists
This popular feature allows you to create dynamic drop-down list columns, populated with data from a data source of your choice. With just a SQL query (or by specifying a JSON path), you can dynamically populate your table with information from an external source, such as a customer database, for example.
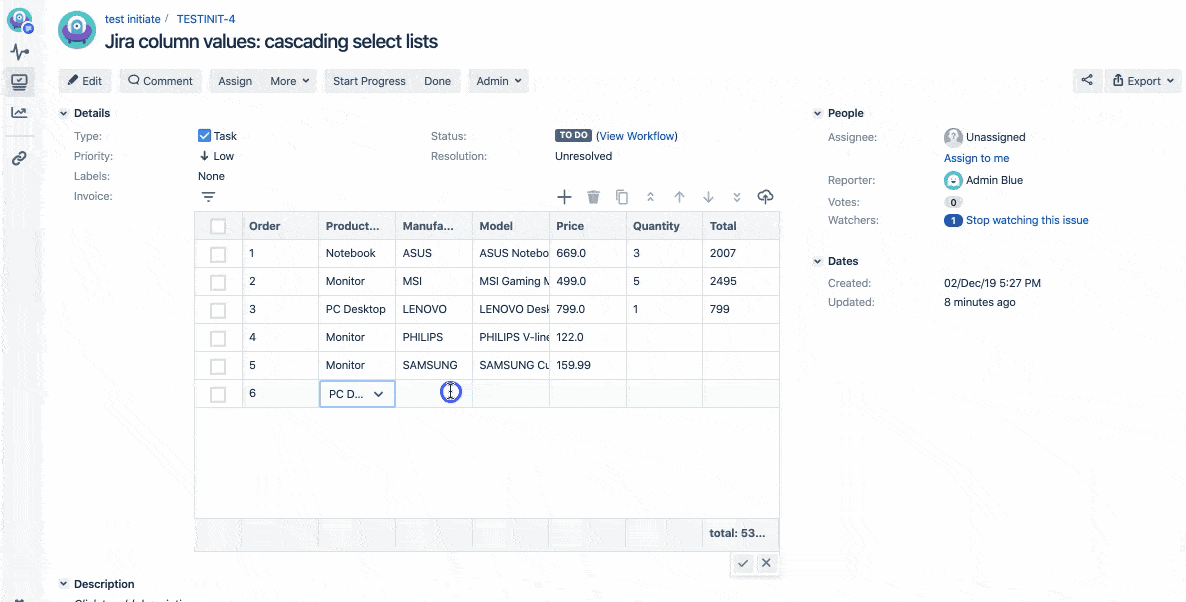
Cascading Select Lists
Cascading Select Lists allow you to create dependencies between columns in a table. This means you can filter data in one column using values from a second column, and cross-link data points within the grid.
Being coupled with Table Grid’s Value Placeholders feature, you have almost unlimited control of how you pull data into your table from across your Jira instance and how you can then manipulate it, much like you would with a spreadsheet. You could use these features to create a dynamic product list in Jira or to review the issues assigned to specific team members.
How to Create Tables in Jira Using the Table Grid app for Jira
With the Table Grid Next Generation app installed and up to date, all you have to do to create a grid on an issue is to add some data in a relevant field. That’s it! You can then filter the data, group the data by columns, and export your table data. From the admin’s perspective, you can add grids to specified screens by running through the following steps:
– From the Jira administration panel, go to add-ons.
– Go to the Table Grid admin menu in the left sidebar and select Grids.
– Then use the Add Grid button in the top right of the screen where you want it.
To deploy the Grid Custom Field, take the following steps:
– In the Jira administration panel, go to Issues > Custom fields > Add custom field
– Select a Field Type from the list as Grid Custom Field
– Add the field name and description and associate the field to the relevant screens
– And that’s it, you’re done!
What are some Common Use Cases for Table Grid?
Table Grid makes it much easier to handle complex datasets within Jira. This means that you can visualize and track information and connect issues to the table, all without having to leave the platform.
What’s more, you’ll be able to move data from your tables across the ecosystem of Atlassian products that you use, and beyond. All in all, the app opens up the potential to use Jira in ways that you had never previously considered.
Some sample use cases for Table Grid include:
– Managing lists and task management
– Maintaining dynamic product lists
– Storing notes, for example, to cover expenses
– Onboarding new team members to Service Desk
– Tracking milestones and product feedback
– Keeping track of test execution
– Track milestones, releases and employee histories
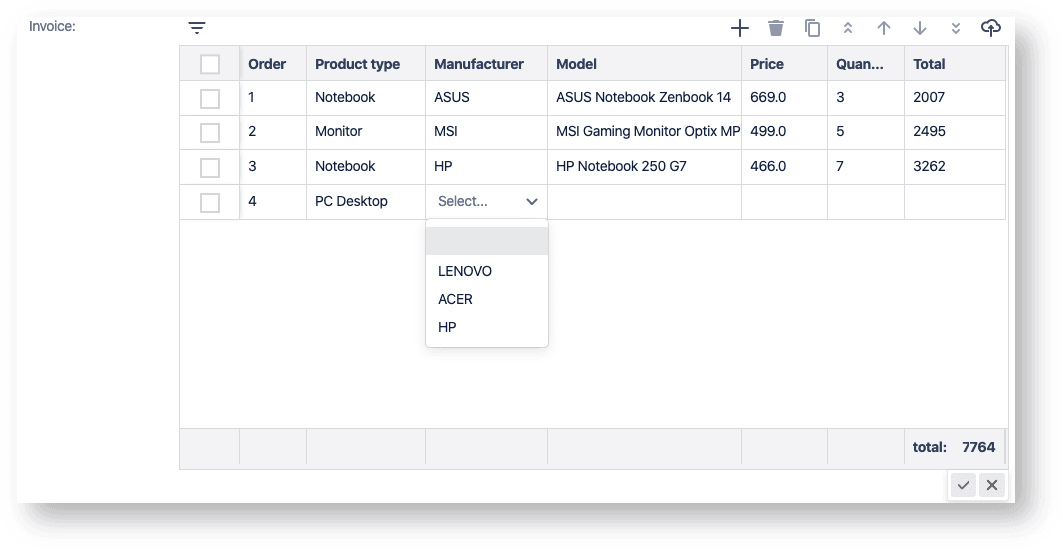
Creating and managing invoices and quotes
A significant use case is the ability to create and manage invoices and quotes using cascading lists. These can be dynamically updated with column value placeholders and can draw on external data sources, to populate specifications such as product category, manufacturer, model, price, and quantity.
This functionality enables Jira to function as a central repository for sales information. This information can be directly connected to tasks and tickets within your Jira instance.
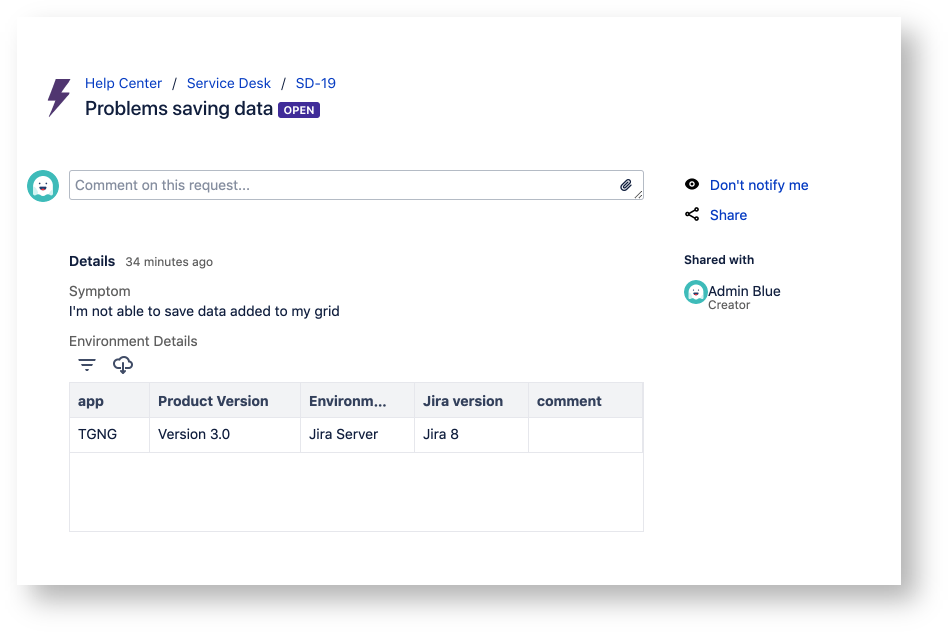
Collecting data from customer portal requests
Table Grid can also help collect information on the customer’s environment in support requests issued by your Jira Service Desk Customer Portal. By making the grid fields mandatory, you can ensure that you have all the information that your team needs to be able to progress the ticket.
For example, you might require the customer to fill fields for the app, product version and environment version and/or to provide a comment when raising a query.
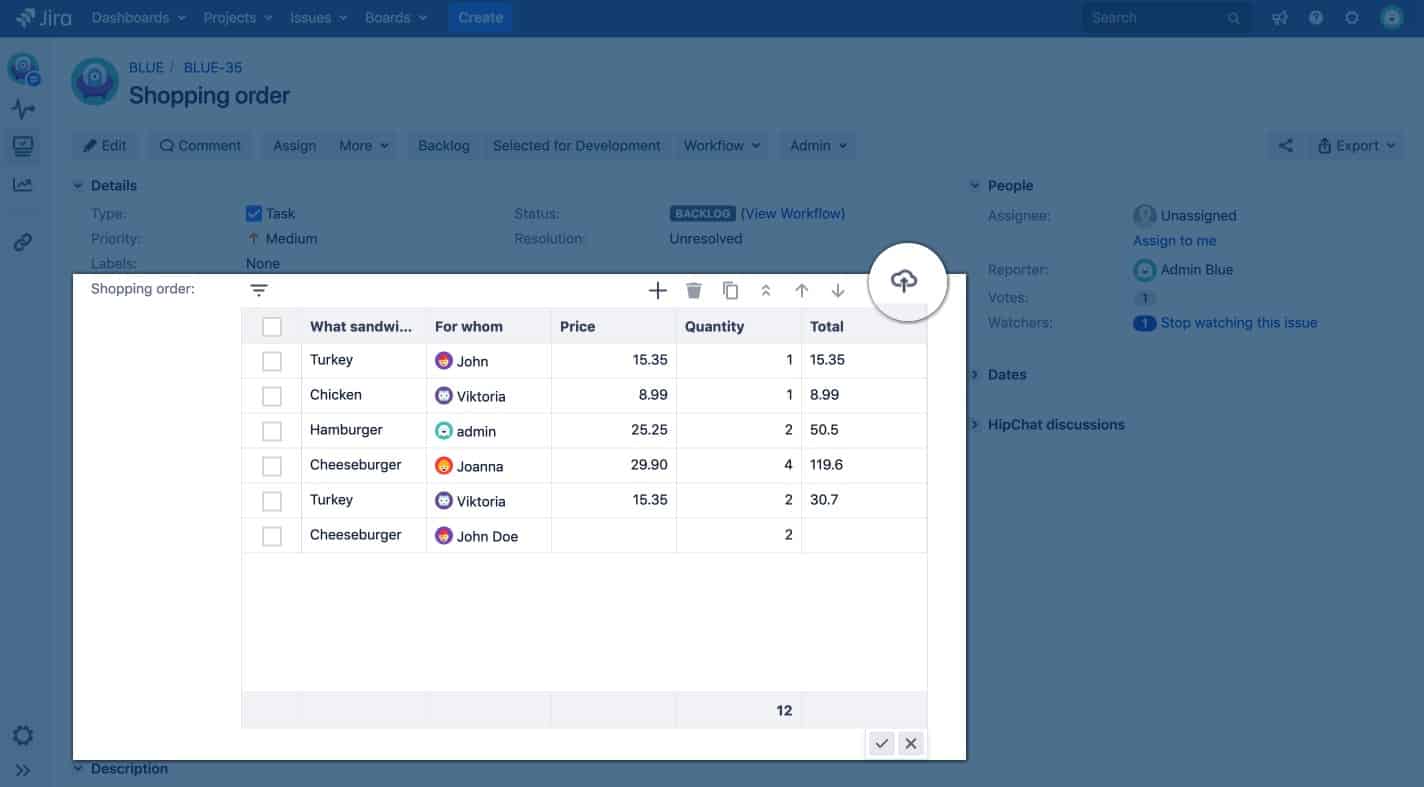
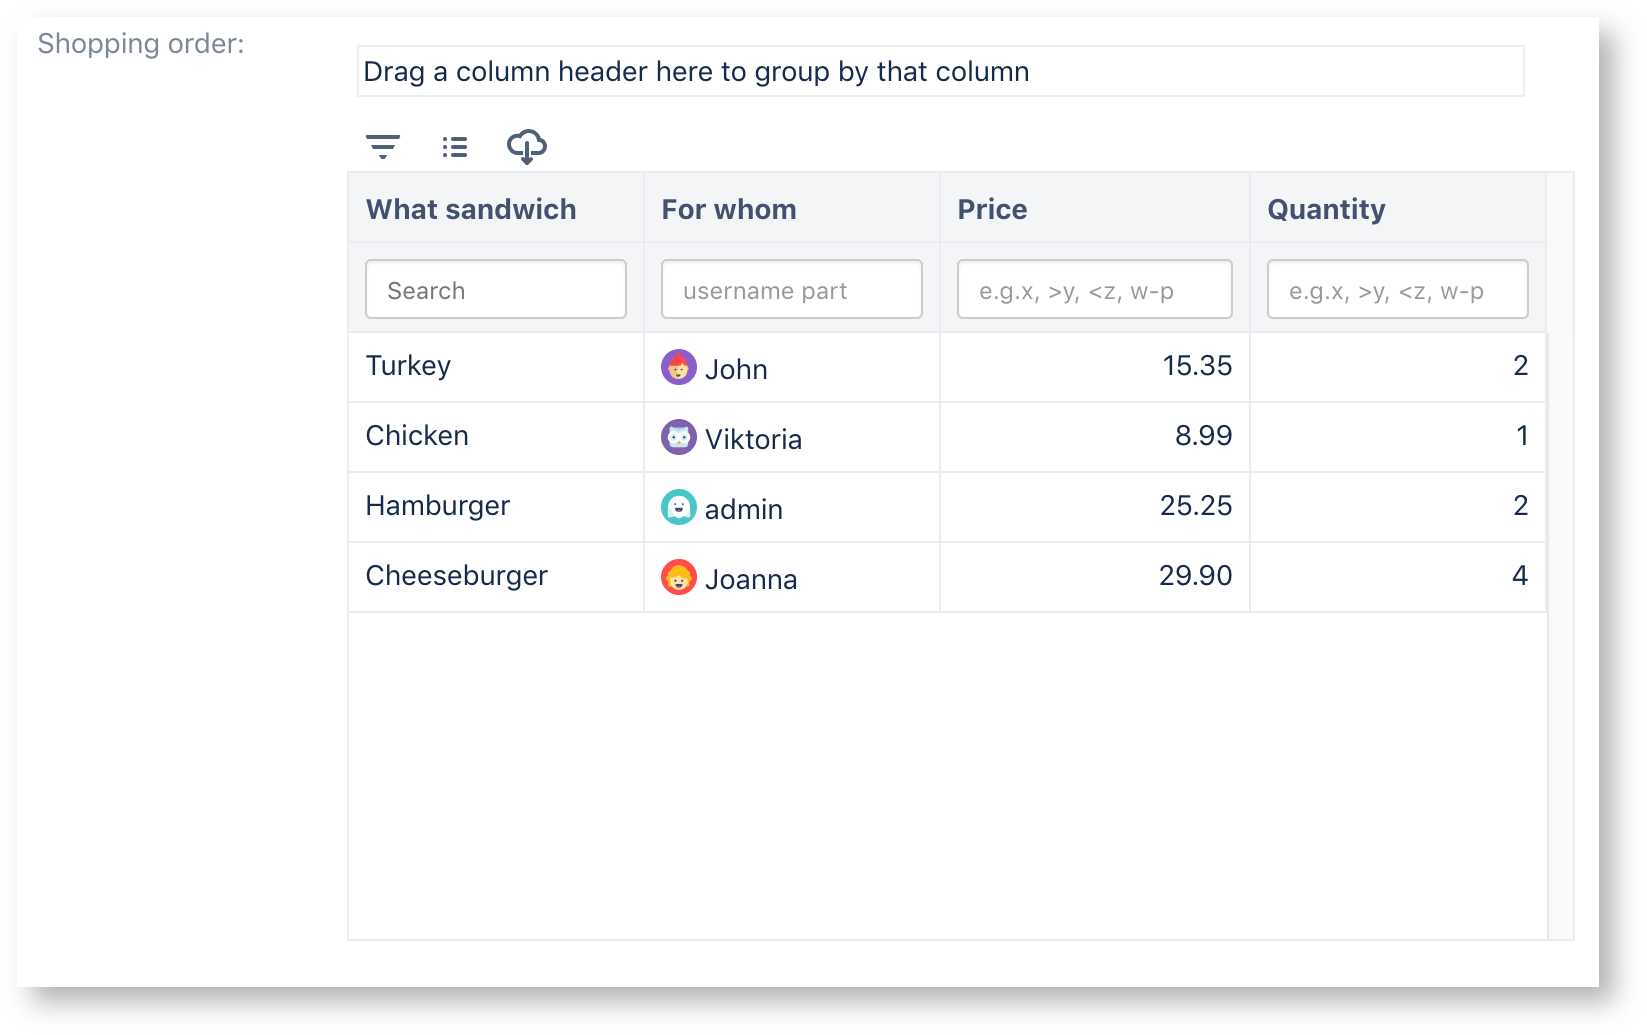
Managing internal purchases
A simple use case illustrating Table Grid’s flexibility is in calculating and managing the cost of internal purchases. The Driving Table feature can be used to create a product list, while a formula column can calculate the total cost of the items selected, allowing you to quickly and easily create a shopping list to match all your requirements.
Conclusion
Jira makes it easy to create basic tables, but more complex approaches really require third-party apps, like Table Grid. When used in concert, you can achieve a good deal, and you can get some great results by combining the strengths of Jira and the structure of tables.
You can find the Table Grid app in the Atlassian Marketplace here, and you can try it for free to help you quickly get a sense of the functionality that it has to offer.