This article was written by Krzysztof Daukszewicz, the Community Manager at Infodesign.
Jira is a universal tool designed to serve a variety of purposes and needs. One of such needs is a precise Service Level Agreement (SLA) measurement, which translates to tracking the time of completing a task or a set of actions in accordance with a set of rules.
Measuring Jira Service Management SLAs warrants that the services are delivered as agreed, and the time needed to resolve a task or answer a customer is not exceeded.
While Jira Software and Jira Core have no SLA module whatsoever, Jira Service Management comes with a simple, built-in SLA measurement tool integrated with the issue queue, which allows us to:
create many different SLA metrics
measure SLAs with the use of different calendars and issue statuses
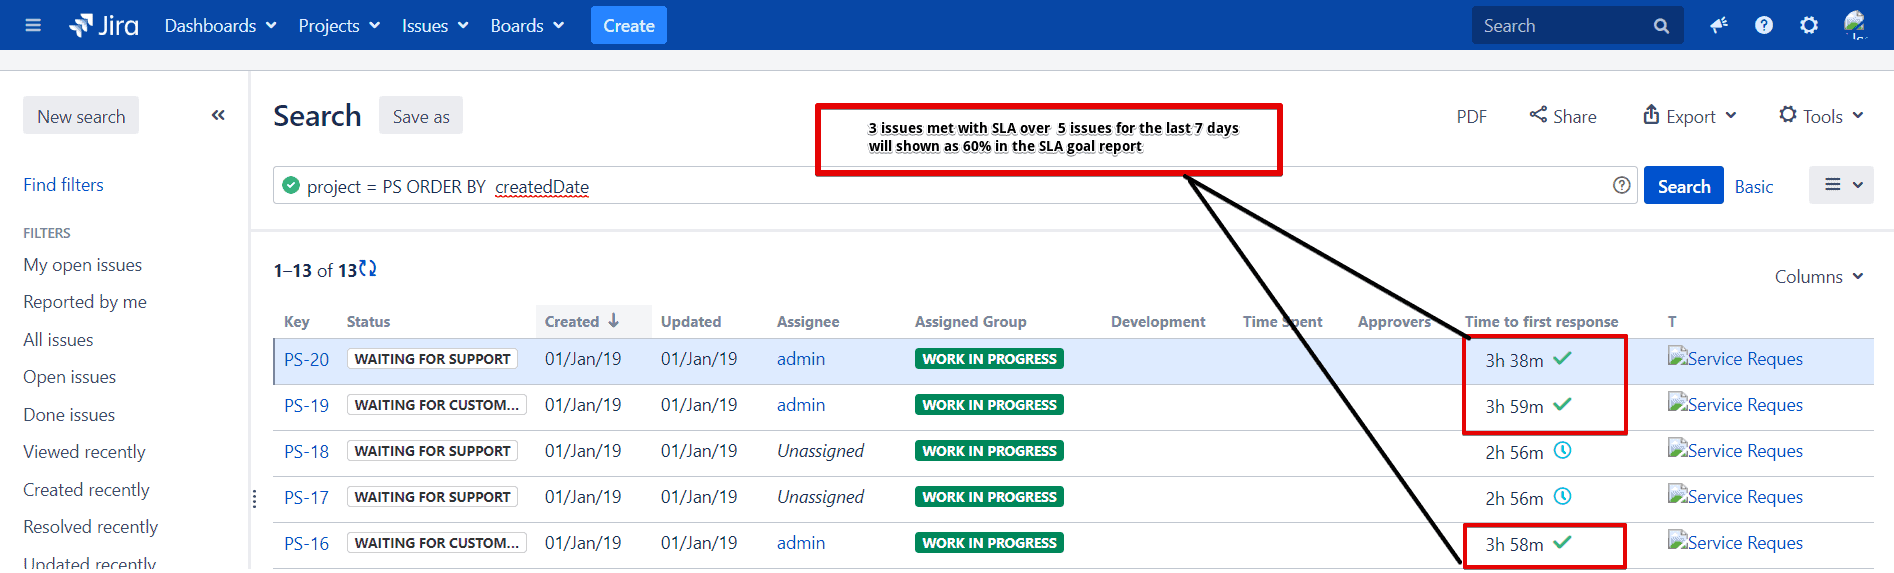
report SLA breaches
notify that the SLA is about to be breached via email (using automation rules).
The built-in SLA solution is often enough, especially for small companies not serving external customers. If Jira Service Management is used for internal IT or a helpdesk that doesn’t need any hybrid solutions – like passing the task to consultants working in Jira Core or sporting field repairs – the standard SLA module will most probably suffice.
The situation gets more complicated if, for example, we want to show the time to SLA breach to the customers themselves or track the SLA metrics between different tools.
Differences between Cloud and Data Center
The built-in SLA module in Jira Service Management is more or less the same in different hostings. Atlassian paid attention to keep the Cloud product up-to-date, and even offer some additional features compared to the Data Center and Server hostings.
Still, these features are rather a convenience than a “killer feature”, including:
Automatically closing resolved service requests
Automatically closing resolved incidents
Automatically closing resolved requests
While it’s a nice-to-have, it’s nothing that cannot be done with some effort on the Jira admin’s side in the Server and Data Center deployments.
How to Create and Manage Jira Service Management SLA (Step-by-Step)
Let’s see how we can create a new SLA in Jira Service Management Cloud. The setup process in the Server and Data Center hostings is quite similar. You can find out more in the official Atlassian documentation regarding the Data Center setup.
Step 1: Creating an SLA
Enter your service project, then go to the “Project settings” tab, then click on “SLAs”.
Click on “Add SLA”.
Enter a name for your new SLA in a field next to the clock icon. Remember that the name cannot be changed once saved. Choose a name that will clearly state what your SLA measures.
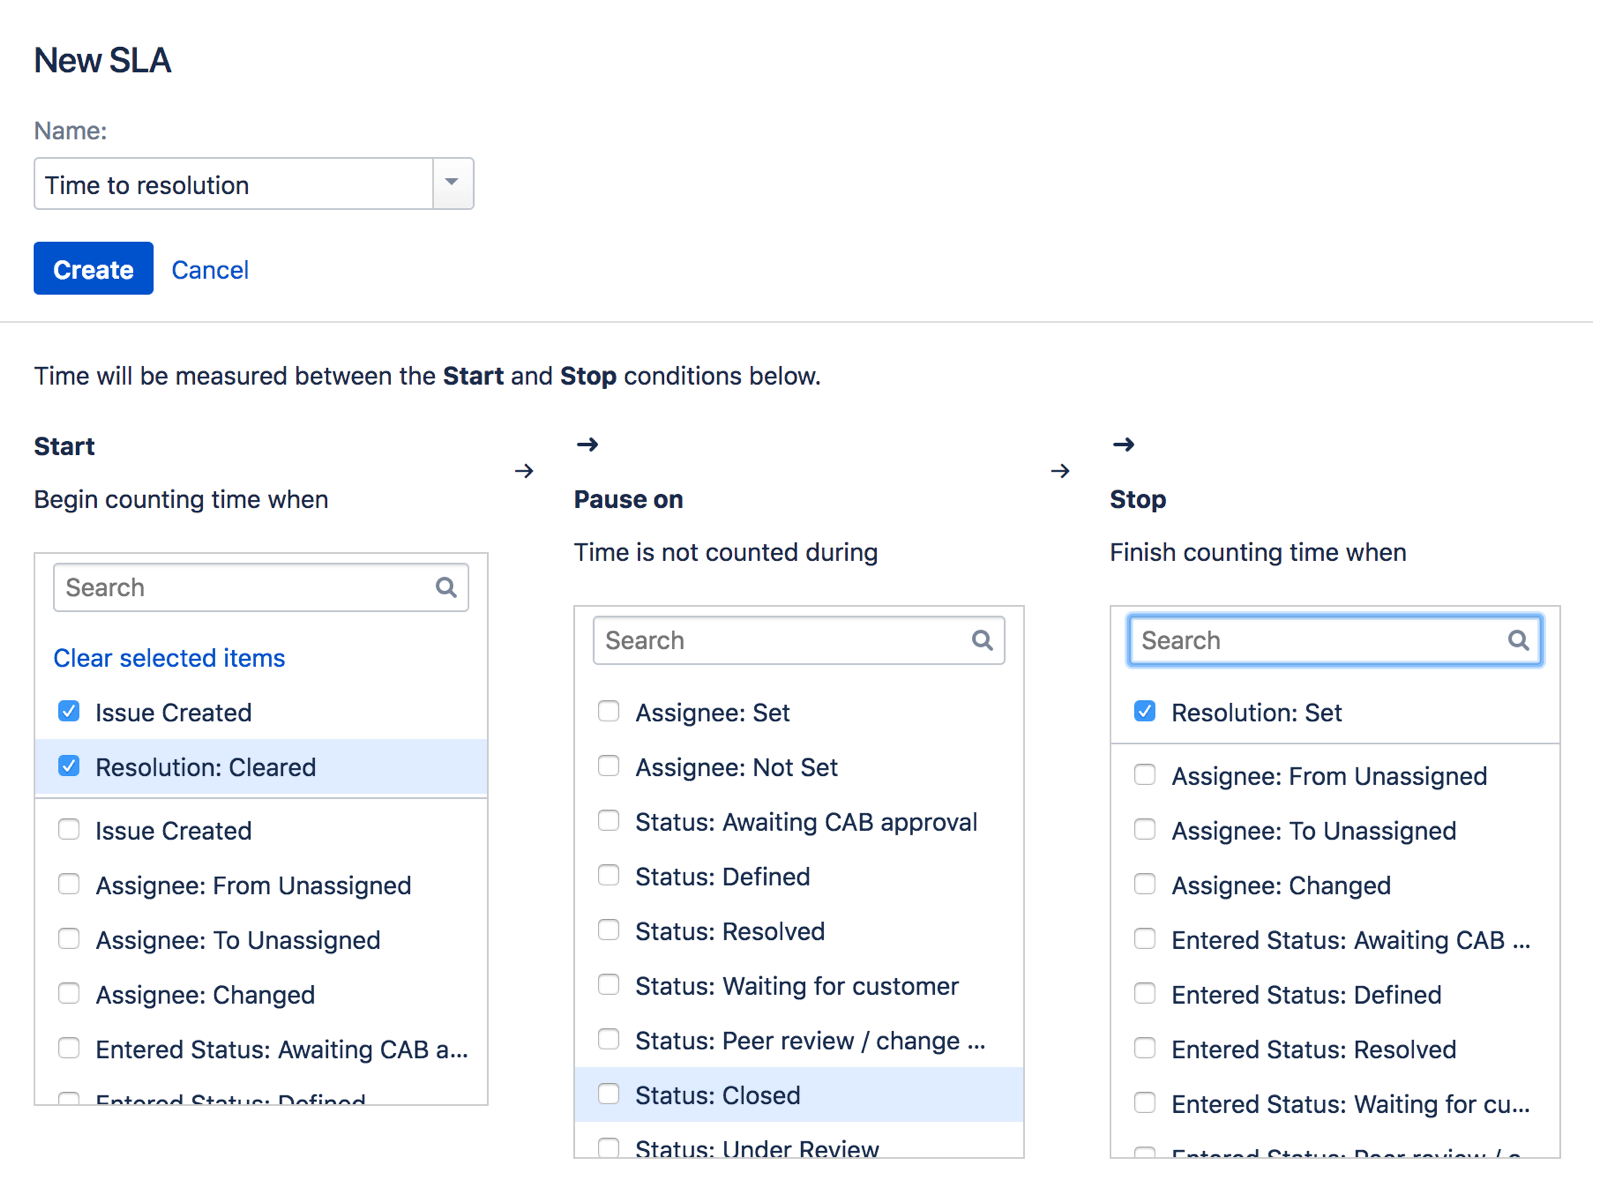
Step 2: Setting goals and conditions
Scroll down to the “Conditions” section of your SLA.
Click on the “Add condition” button under “Start counting time when”. Add a condition under which your SLA will start measurements. You can add multiple conditions – this way the SLA will measure time when an issue meets either of the defined conditions.
Click on the “Add condition” button under “Pause counting time when”. This is an optional setting that can be used e.g. when you’re waiting for a response from your customer.
Click on the “Add condition” button under “Finish counting time when”. When the condition is met, the SLA clock will stop measuring time.
Step 3: Setting up SLA Goals
Scroll down to the “Goals” section and click on the plus icon.
Under the “Time goal” section you can select the desired time for an issue to be resolved.
Under the “Issues to display (in JQL)” you can specify the issues you want to be tracked using a JQL query.
If necessary, add multiple goals to your SLA. Using drag-and-drop, you can order these from most to least important. Your issues will be tracked against the first goal criteria it matches on the list.
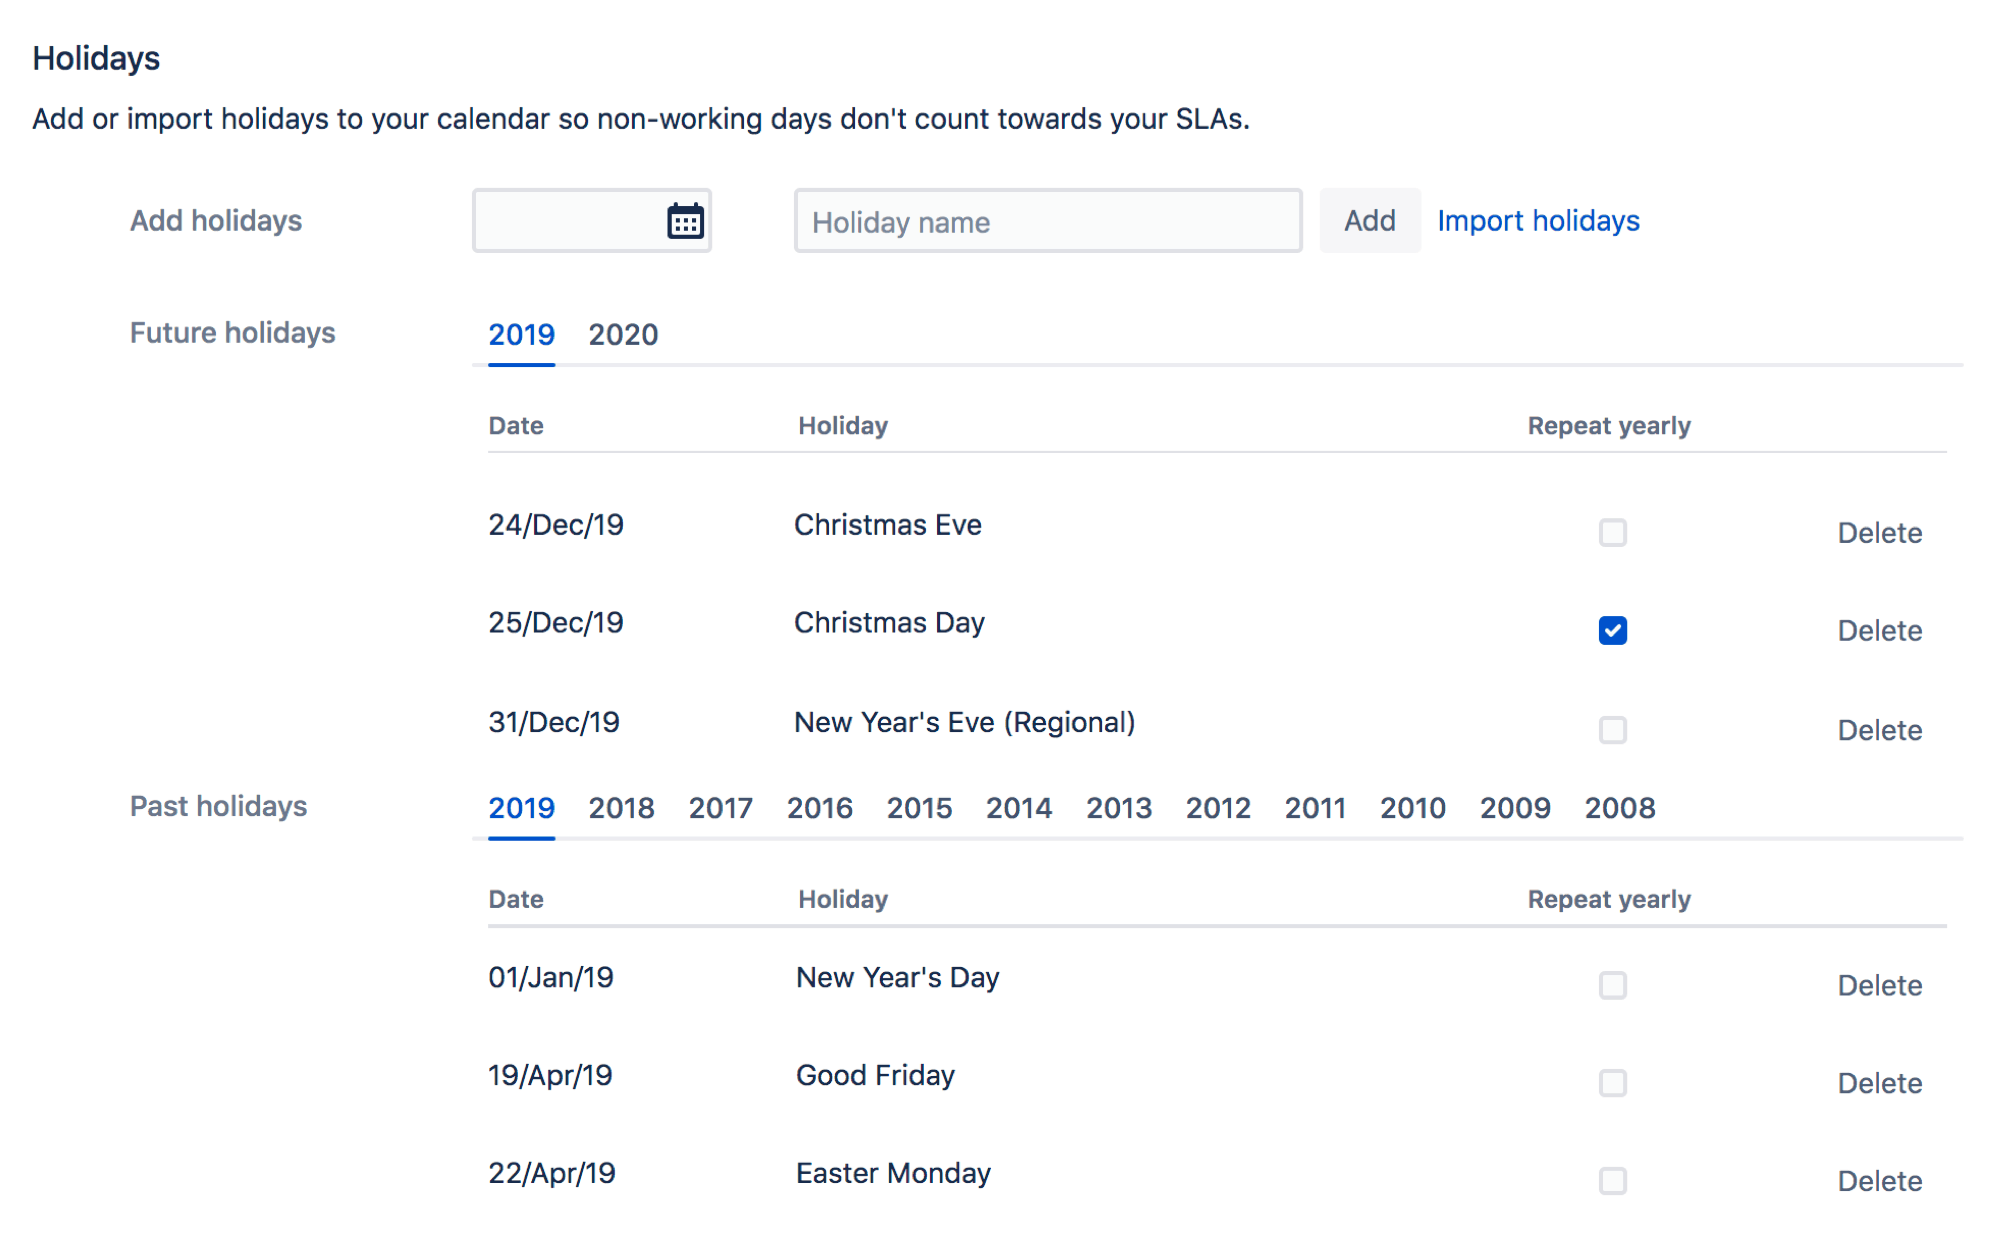
Step 4: Setting up SLA Calendars
Go to the top right corner of the page and click on the calendar icon.
Click on the “Add calendar” button, name your calendar and select the time zone you are working in.
Set up the calendar further by selecting working days and adding the time slots for each day.
If necessary, select the plus icon to add various time periods for a single day (e.g. if you need to include a mandatory lunch break).
If you want to learn more about how to set these up, go to the Atlassian product documentation.
An Alternative: SLA PowerBox for Jira Data Center
In many cases though, the users’ needs greatly exceed the scenarios that can be solved using the standard Jira Service Management mechanism. The most common use cases include:
Displaying a countdown timer to the end customer via the Customer Portal, showing time left to ticket resolution
Sending automatic notifications about the upcoming SLA breaches via SMS, Slack, Teams, and other channels
Sharing the SLA between different teams, e.g. software team using Jira Software and customer support team using Jira Service Management
Integrating SLA with very complex support processes, e.g. demanding creation of sub-tasks
Managing non-standard situations without active Jira access, like field service.
So here you can look for an alternative.
With an app like the SLA PowerBox app, the Data Center customers will be able to handle even the most complex SLA agreements. For lighter cases, Cloud hosting and its functionalities should be more than enough.
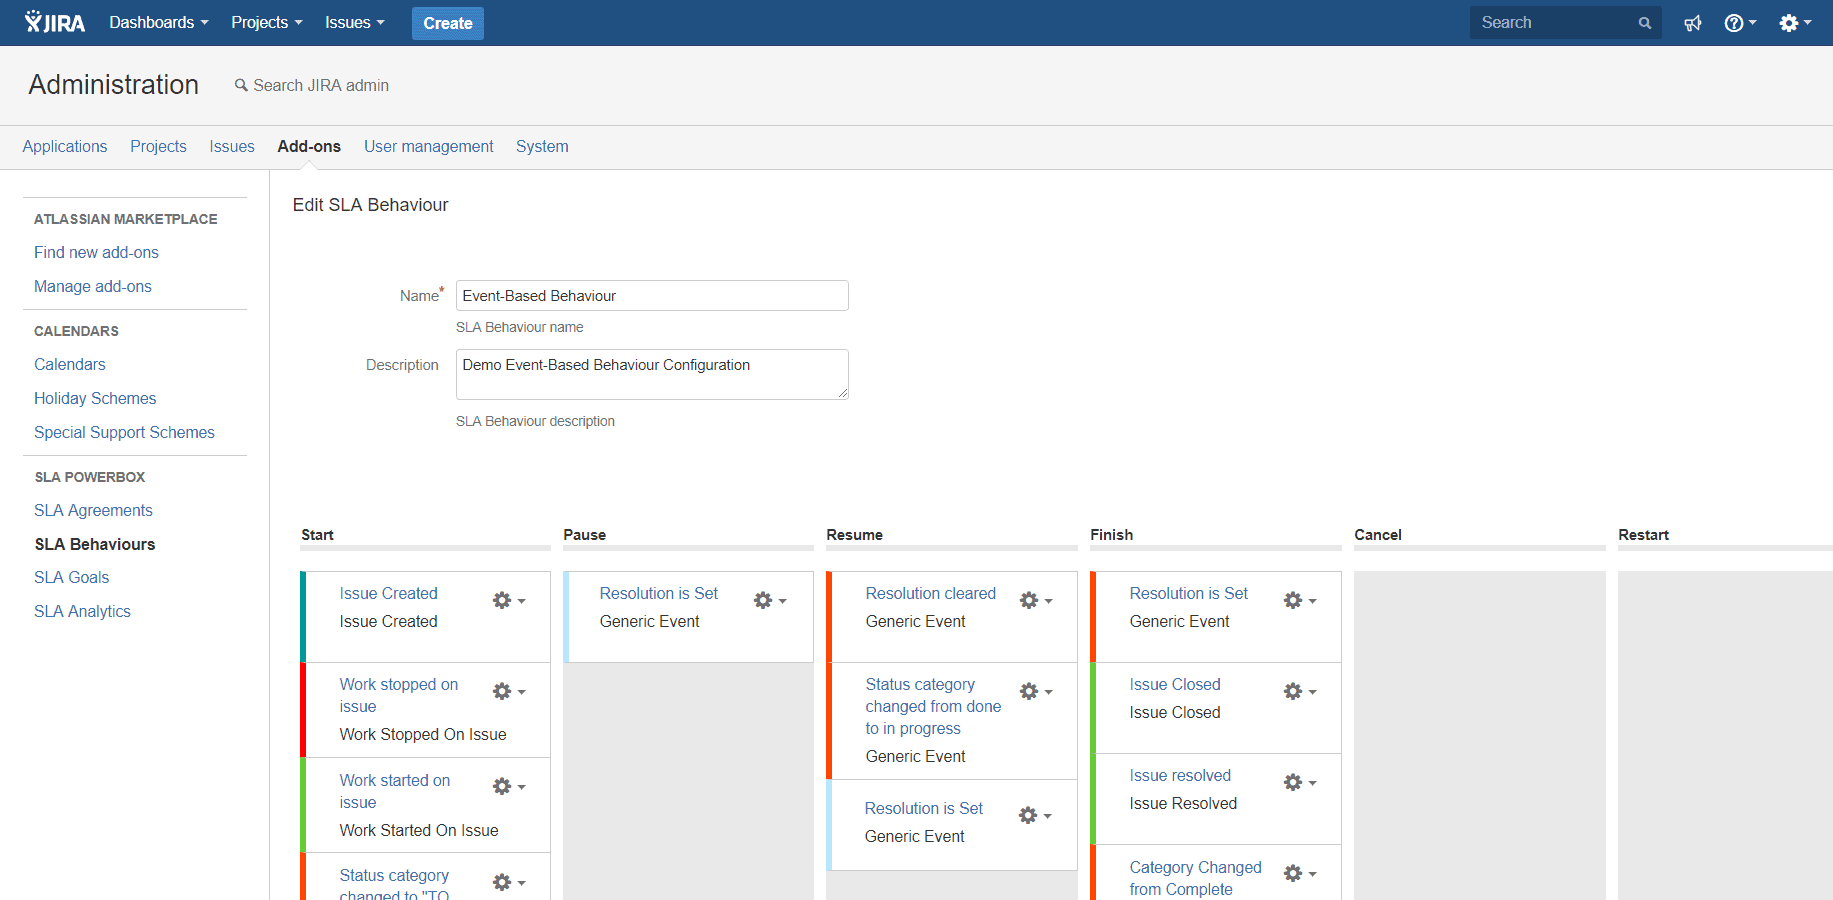
SLA PowerBox – besides displaying the SLA Clocks to the customers and integrating Jira Core, Jira Software, and Jira Service Management, bases its SLA count not on Issue status changes, as the basic SLA module, but on various events taking place in the system (like posting a comment or changing the assignee).
This lets the Jira administrator precisely model the Service Level Agreements in the system, removing one of the most basic constraints that apply to Jira Service Management.
Advanced Jira Service Management SLA Use Cases
Here are the 3 most common advanced SLA Use Cases that need something extra, above the built-in SLA module found in Jira Service Management.
Use Case 1: A Logistics Company and their Field Operations
A logistics company primarily serves logistics centers with expert knowledge regarding specialized equipment. Several dozens of engineers spend their workday servicing advanced machines distributed across warehouses located in different European countries.
Their primary advantage over the competition is the ability to conduct fast, specialized repairs and maintenance work as field operations, often without a stable internet connection. The company needed a solution that would serve as a bridge between the analog and digital world.
Every day the engineers print their issue cards from Jira and then start their journeys across different locations, filling the Jira cards with hours and signatures. By the end of the day, the team inputs the data into Jira.
With SLA PowerBox’s “negotiated days” feature, such work can be precisely reported in accordance to the real-time it took, and every satisfied customer ends up with a solid, monthly report with service listing and time spent on each task.
Use Case 2: On-call Notifications
A company supports critical systems for its customers. They provide 24/7 support for selected services while other services are supported only in an 8/5 system.
As critical failures after working hours occur relatively rarely (10-15 events each year), there is no need to keep a support team working around the clock. They’re using an on-call engineer who is notified only in case of an emergency.
Using Jira and SLA PowerBox, they are able to collect incidents continuously and notify on-call engineers (and their managers in specific cases) via SMS/Text messages and on Slack channels. Notifications are sent in specific cases only (after regular office hours and for critical services).
Use Case 3: – Software Team
A Software company uses Jira to manage its software delivery with Scrum. Next to regular planned development, they provide critical bug fixing for live systems.
As patch delivery is essential to customers, the company decided to manage it based on Service Level Agreements. Software projects in Jira don’t provide built-in SLAs. But with SLA PowerBox, they’re able to track bug-fixing time (including showing SLAs on Agile cards) as agreed with their customers.
Conclusion
Jira Service Management – no matter if we are talking about the Data Center or Cloud hosting – offers pretty decent SLA tracking capabilities. On the very basic level, the functionality remains the same in either hosting type, yet the difference lies in the details.
The Cloud version offers better out-of-the-box automation, and the Data Center version can be extended with powerful solutions such as SLA PowerBox, allowing the admin to properly configure even the most complex Service Level Agreements.
All in all, Jira Service Management remains a trustworthy solution when it comes to tracking Service Level Agreements and can be configured towards it regardless of the hosting type.