
This article was written by Jaime González-Capitel from Resolution as a guest author.
In a remote-first world, employees need to access enterprise web applications like Jira from multiple devices. It’s more important than ever to simplify access to Jira Data Center while removing the risks of bad password habits like sharing credentials, using easy or memorable combinations, and repeating the same password over and over. SAML Single Sign On for Jira can do all that while offering IT teams a jumping opportunity to centralize Identity and Access Management for all their users and applications – without forgetting about their Atlassian stack.
In this guide, you’ll learn everything you need to know to get started with resolution’s SAML SSO for Jira: from the authentication basics to the advanced provisioning features and configuration settings that will make for a successful implementation.
Multiple IdPs? Complex permission policies? High employee turnover? No matter how complex your requirements are, SAML SSO for Jira Data Center will support them. And you will also be able to use what you’re going to learn in this guide to implement any other apps in Resolution’s SAML SSO family for Atlassian Data Center products, including Confluence, Bitbucket, Bamboo, and Fisheye in addition to Jira.
So let’s get started.
Here’s what we’ll cover in this article:
- What is SAML Single Sign On for Jira
- Why is SAML SSO for Jira Necessary for Data Center?
- How to implement SAML Single Sign On for Jira Data Center
- Configuration of Advanced Enterprise Features
What is SAML Single Sign On for Jira?
With SAML SSO for Jira Data Center:
- Users can enjoy a seamless experience of Jira every day without managing a local password
- IT teams can centrally manage their users from their Identity Provider, automating the creation of new users in Jira and minimizing the amount of work required to make changes when employees leave the company, change department or get a promotion.
Basic SAML Terminology
The app name is a standard phrase in the security industry that combines two acronyms:
SSO, which stands for Single Sign On, is the process by which users can use a single password to access all their applications.
SAML, which stands for Security Assertion Markup Language, is one of the most common standards used to implement SSO with web applications – including Jira, of course.
In the context of this guide, Jira is a Service Provider (SP), while the source of user identities for authentication is the Identity Provider (IdP). Some of the most common IdPs include Microsoft’s AD FS, Azure AD, Okta, OneLogin, or Google.
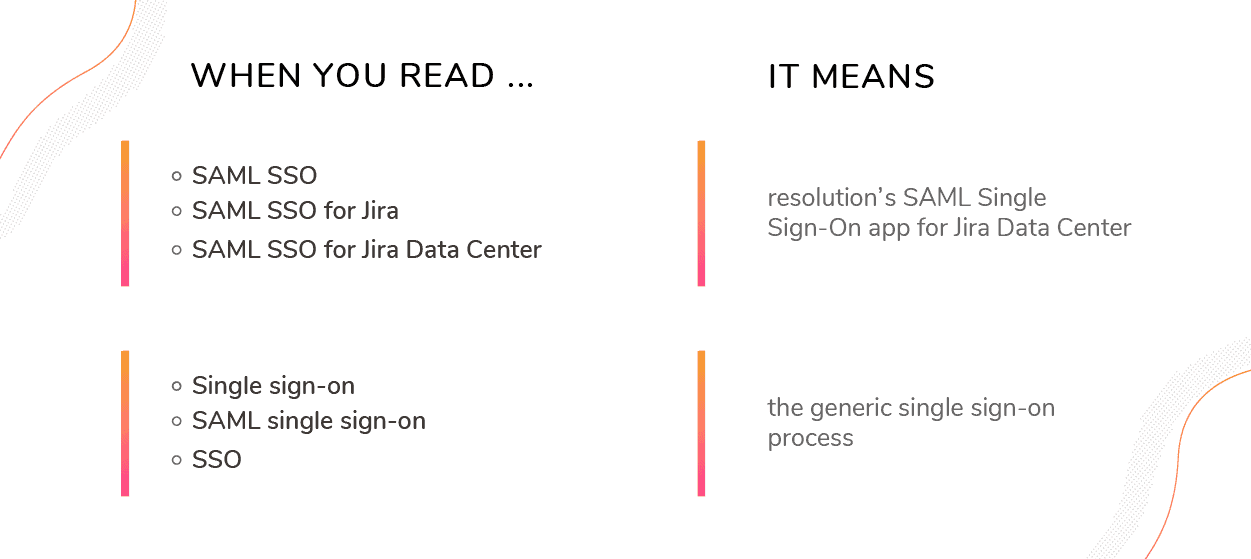
For clarity, in this guide we will make a distinction:
- The acronym SAML SSO, will only refer to Resolution’s app.
- Single sign-on, SAML single sign-on, or even SSO will be used to refer to the technology in general.
The SAML SSO Flow
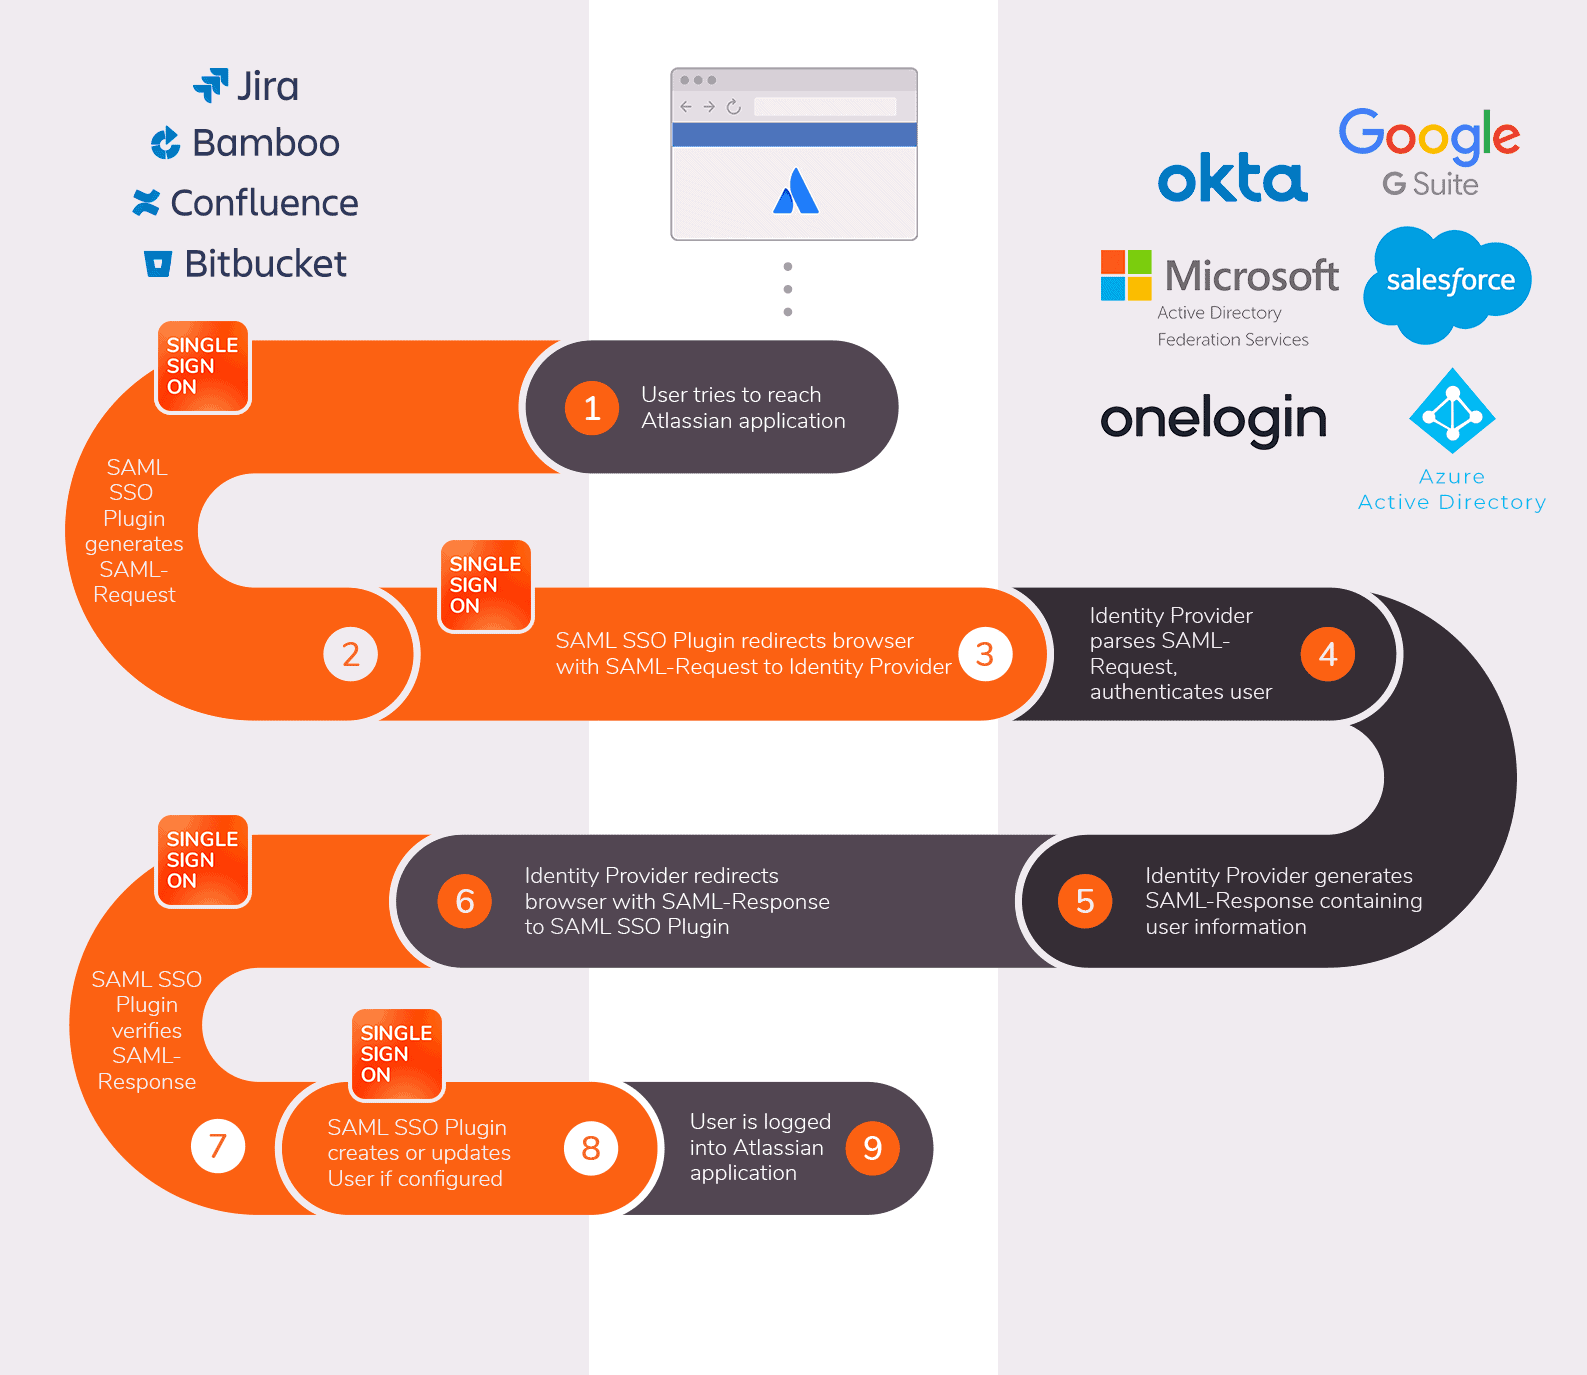
This infographic shows the 9 steps in a SAML authentication flow. The flow happens every time a user logs in to Jira Data Center using SAML SSO. To learn more, see the full description here.
At the highest level, two things can happen when a user enters the Jira login page in an SSO flow:
- If the user is not logged into the Identity Provider yet, they will be redirected to the login page of the IdP to enter their credentials; then they will be authenticated and redirected into Jira.
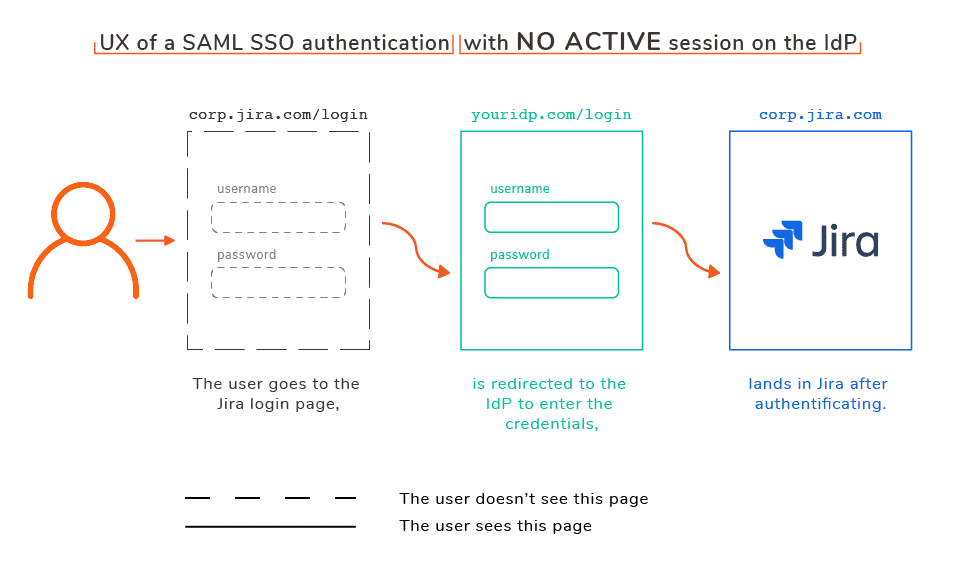
Diagram of the user experience of a SAML SSO authentication with no active session on the IdP
- If the user is already logged into the Identity Provider, they won’t have to do anything else. The IdP and Jira will exchange information and the user will automatically land inside Jira.

Diagram of the user experience of a SAML SSO authentication with an active session on the IdP
Note: During this process, the user’s password is kept secret by the IdP and remains unknown to Jira.
Single Sign-on = Authentication & Provisioning
In this flow, SAML Single Sign On can take care of two actions:
- It can log the user into the application. This action is called user authentication.
- It can also create the user into the application’s directory if it doesn’t exist yet. This is called user provisioning, and it can also be used to update information about existing users.
While authentication is entirely standardized with SAML, there are different options for provisioning users:
- SAML can be used to create them during the login. This is called Just-in-time provisioning.
- There’s also the possibility to synchronize Jira’s directory with the IdP using API calls. This approach is becoming much more frequent as cloud IdPs increase their market share, and very interesting because it makes user creation and updates independent from the login process.
Which method you choose to provision users with will have a great impact on how you manage permissions and group memberships in Jira. We will cover these alternatives in step 5 of the wizard.
But before we look at all the configuration options in SAML SSO for Jira Data Center, let’s answer the question that might still be at the top of your mind.
Why is SAML SSO Necessary for Jira Data Center?
Although SSO has become a standard approach for building secure enterprise software, Jira Data Center is among the many applications that still don’t cover the full scope of SSO.
Why Choose Resolution SAML SSO for Jira Data Center instead of Atlassian’s
Administrators of Jira Data Center have two different options to implement SSO:
- The Data Center SSO by Atlassian
- SAML SSO for Jira Data Center or a similar app from the Atlassian Marketplace
Jira Data Center ships with the pre-installed SAML SSO feature by Atlassian. So why should you choose resolution’s SAML SSO for Jira Data Center?
The short answer: Resolution has a mature enterprise product. Atlassian’s SSO is in its infancy.
If you are evaluating both alternatives, you should know that SAML Single Sign On solutions have been developed for Atlassian since 2012 out of a passion for network security, while Atlassian launched the SSO app for Data Center in early 2019 because it was a must-have for their customer base.
When it comes to something as delicate as user identities and authentication, it’s important to build flexibility into the configuration process.
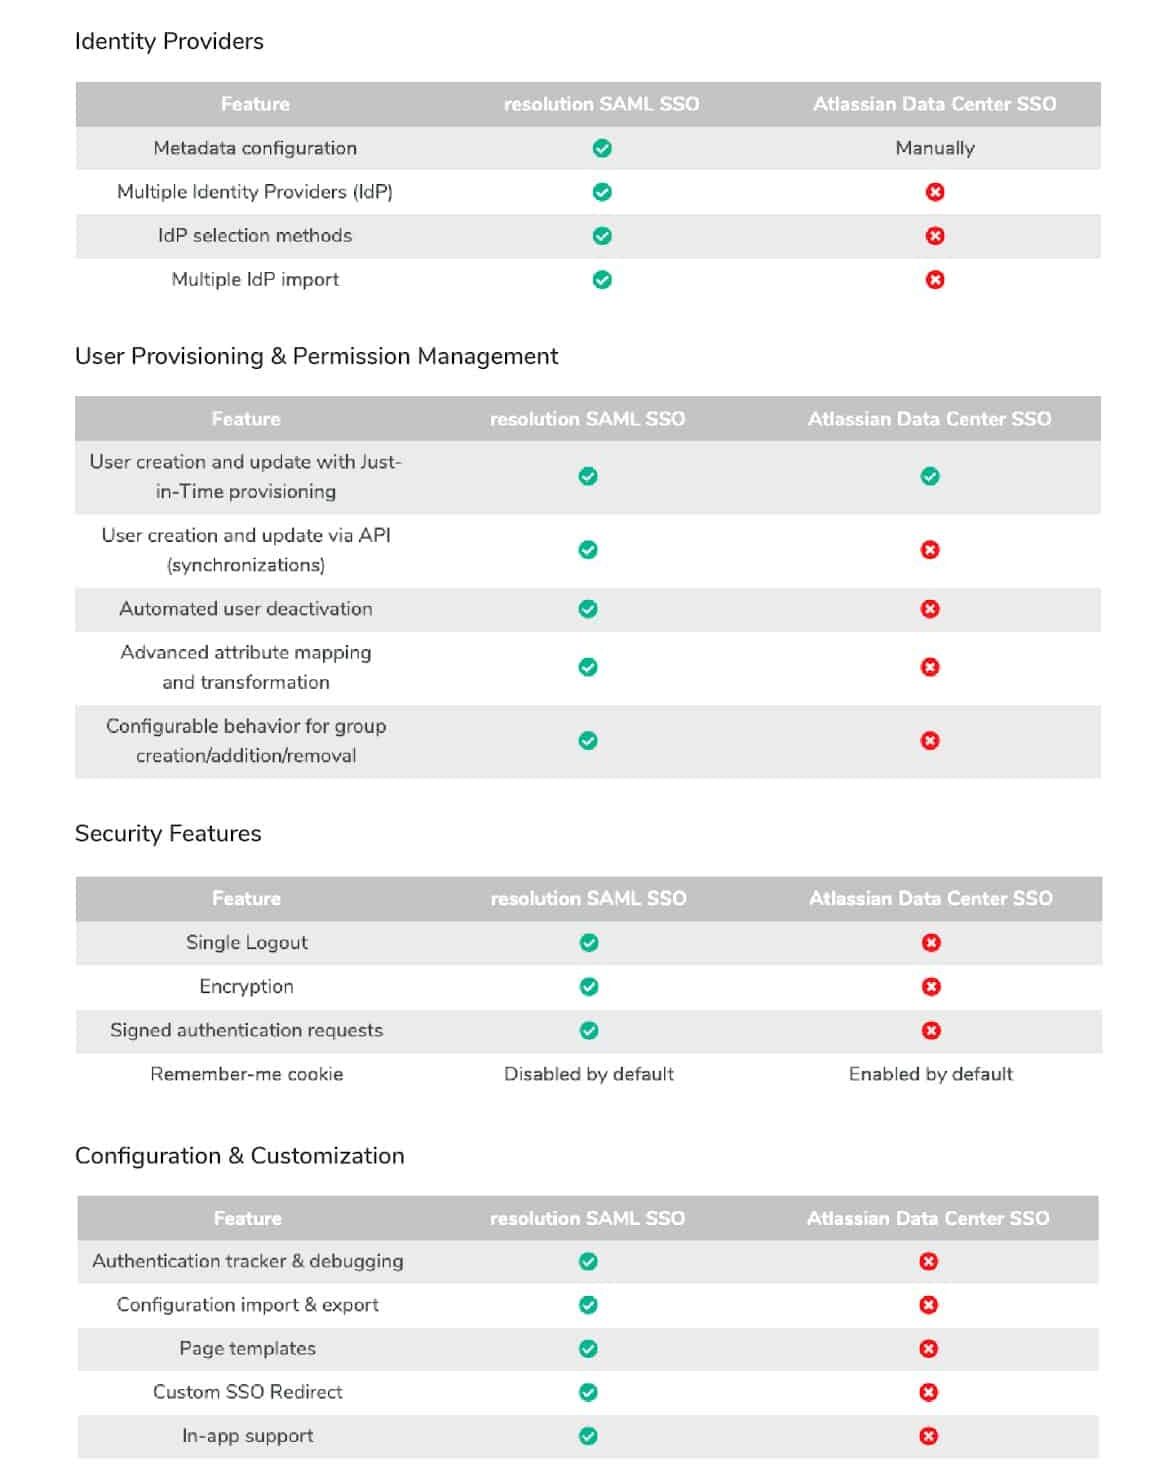
The long answer: Similar capabilities for authentication, huge differences in user management
Note that both products will log in users proficiently. But authentication is only a small fraction of the SAML standard.
Atlassian’s Data Center app is limited when it comes to user provisioning. In fact, Just-in-Time provisioning was launched only in June 2020 and remains the only available option to create or update existing users.
On the other hand, Jira SAML SSO is a more efficient tool for user provisioning, because of the option of synchronizing users.
As a rule of thumb, the following tasks can’t be completed with the Data Center app and you will instead need SAML SSO to perform them with User Sync:
- create users before they try to log in
- keep user attributes and group memberships updated without the need for user logins
- automatically deactivate users in Jira Data Center, for example when an employee leaves the company
Most of the aspects we’ll cover in the configuration section are also not available on Atlassian’s app for Data Center SSO, as you can see in the comparison matrix below.
To dive more deeply into the comparison, check out this in-depth feature comparison.
Support
Jira SAML SSO is easy to implement. It’s even relatively easy for anyone without technical expertise. But sometimes you can stumble upon something unexpected. Or you may have to come to terms with legacy infrastructure.
If you already have an SSO solution in place, you might be planning a migration to Jira Data Center from Jira Server. Or you might be considering that you want to implement SSO in Jira before migrating to Data Center. If you eventually move to Data Center without changing your existing infrastructure, you can simply follow this guide to configure SAML SSO on Jira Server and then export your configuration to the new Data Center license.
However, if you’re making changes in your identity infrastructure, either on the Identity Provider side or in Jira’s local user directory, we recommend following the configuration wizard once again – it doesn’t take longer than an hour.
How to Implement SAML Single Sign On for Jira Data Center
SAML Single Sign On for Jira can be configured once by an administrator and never touched again unless something changes in your Jira or the Identity Provider.
In this part, we’ll walk you through the steps that you need to follow to install Jira SAML SSO and adapt it to your specific requirements.
The Configuration Wizard
After installing SAML SSO for Jira Data Center and clicking on the “Get Started” button, the app will load a configuration wizard that goes through all the necessary steps required to connect your Atlassian application to your Identity Provider. The final step will be testing that the single sign-on process works, and enabling the SSO redirections so that the process kicks in.
Step 1. Starting Fresh or Importing an Existing SAML SSO Configuration?
The wizard will welcome you to the SAML SSO world with two possible paths:
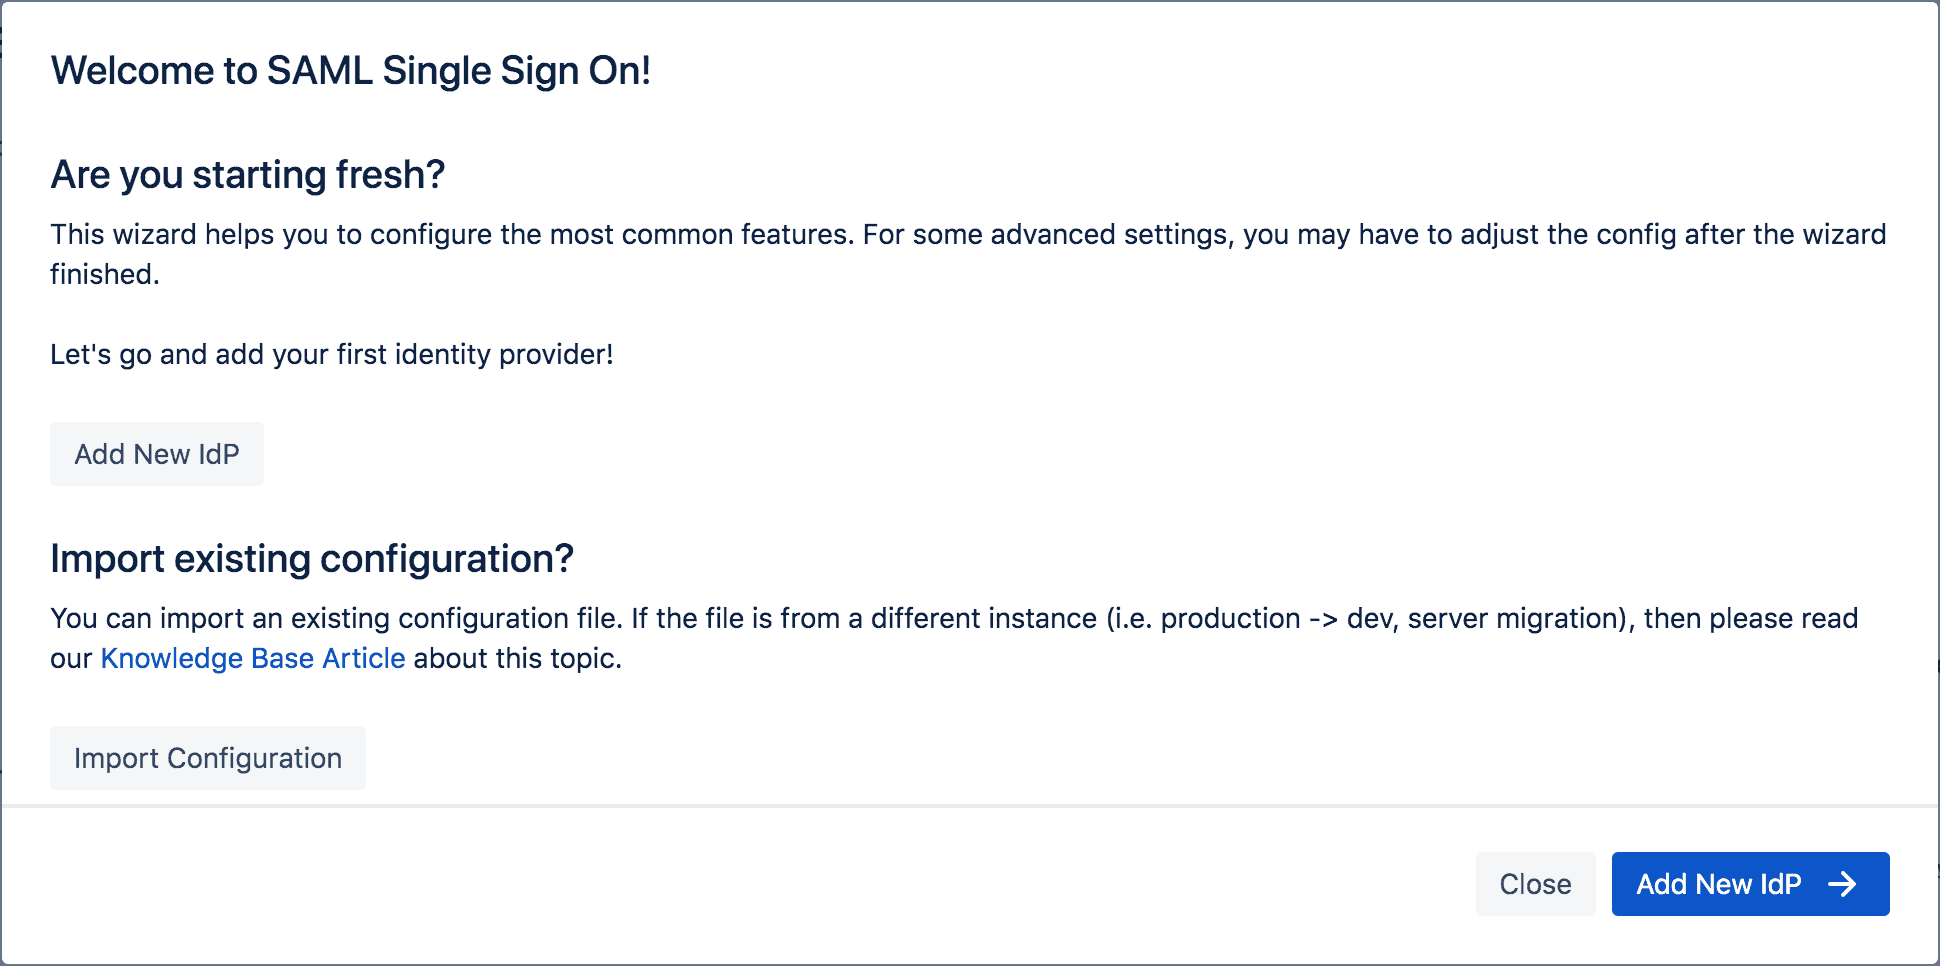
Option 1: Start your Configuration from the Ground up
If this is the first time you’re configuring the app in your Jira instance, the wizard will take you through the most common settings. Any detailed settings beyond these steps will have to be added in the advanced configuration.
Option 2: Import an Existing Configuration
It’s also possible to import an already existing configuration of SAML SSO for Jira. This is particularly helpful:
- If you’re updating to a new version of Jira or moving to a new server
- If you have completed the configuration in a test environment and are ready to migrate it to production
- If you’re completing migration from a Jira Server instance to a new Jira Data Center instance
In this guide, we’ll assume that this is the first time you’re setting up Jira SAML SSO. But if that’s not the case, you can read this guide on how to migrate SAML SSO to a different instance.
Additional Actions in the Welcome Page
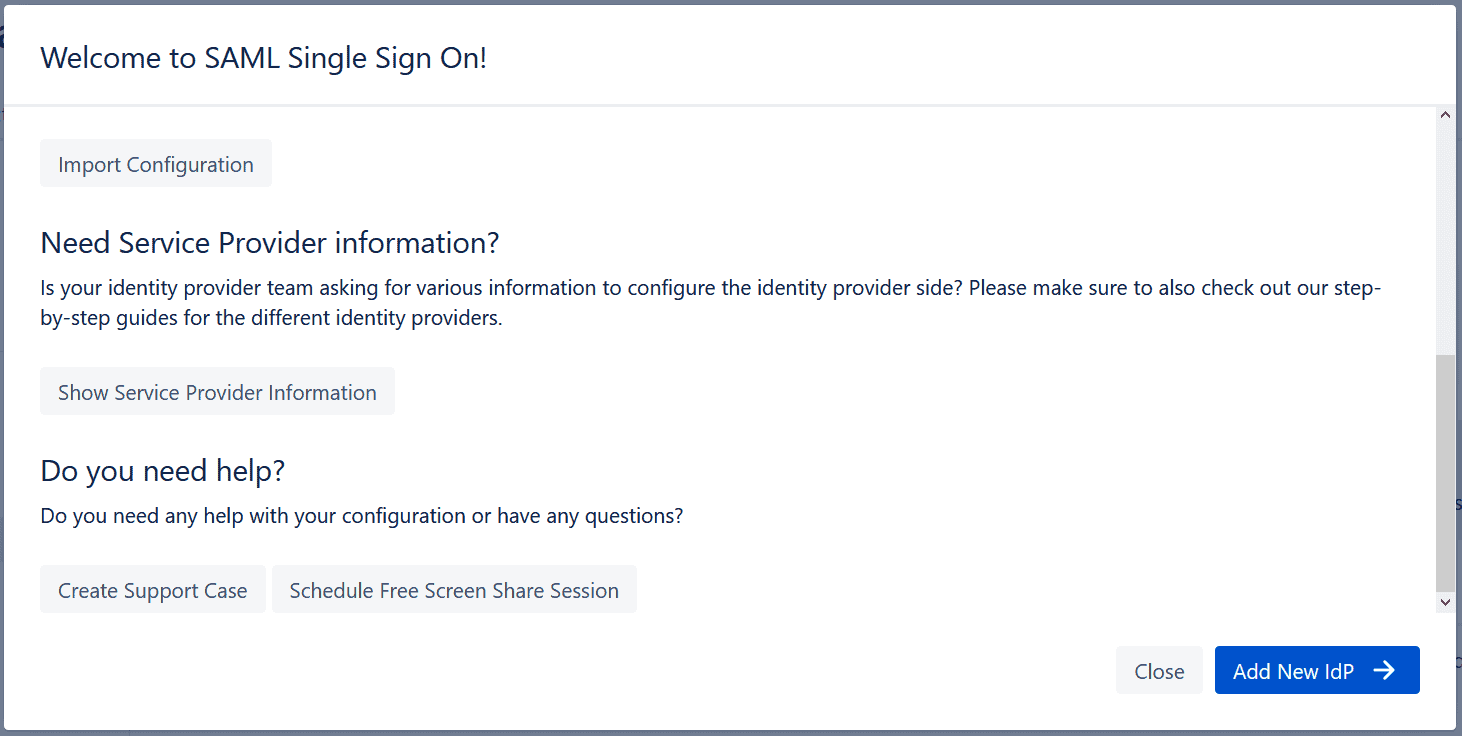
While the most common action on the Welcome page of the wizard is to add the new IdP to start the configuration, there are a couple of additional things you can do:
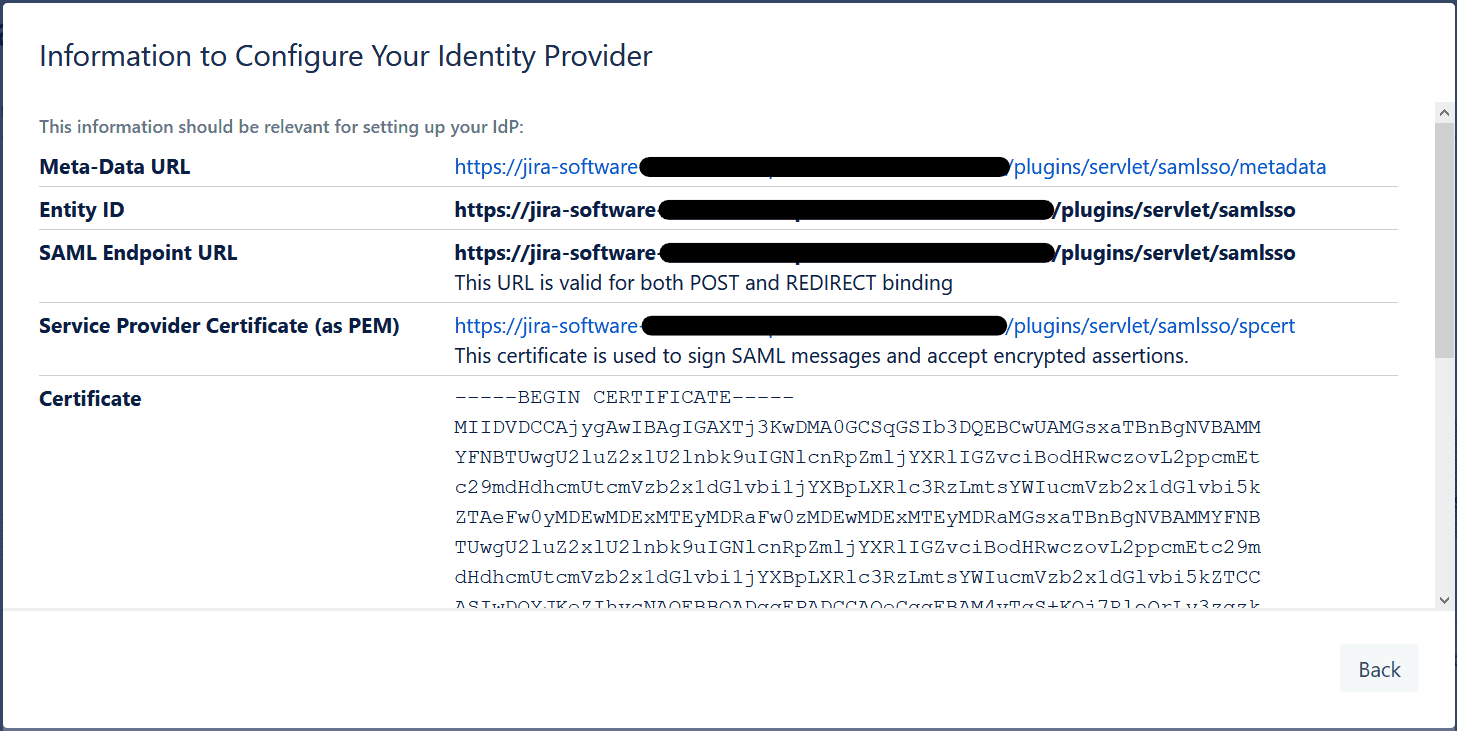
- Show the information about SAML Sign On that is needed to configure it as a SAML Service Provider on the IdP. The information shown includes:
- The Meta-Data URL
- The Entity ID
- The SAML Endpoint URL
- The URL of the Service Provider Certificate, which is used to sign SAML messages and accept the encrypted information sent from the Identity Provider, called “assertions” in SAML terminology.
- The plain-text content of the certificate itself.
All this information will be provided to you by the wizard later on so you can use it to configure the app. The reason you have the option to show it is so you can share it with your team at large, in case anybody else is in charge of configuring the IdP.
- If you’re already lost and feel like you’d need an expert through this process, you can create a support case or schedule a video call.
Step 2. Selecting an Identity Provider
If you decide to start from scratch, the first step will be to choose your SAML Identity Provider. The most common Identity Providers come with preloaded templates into the app, and you will be able to choose them from the dropdown.
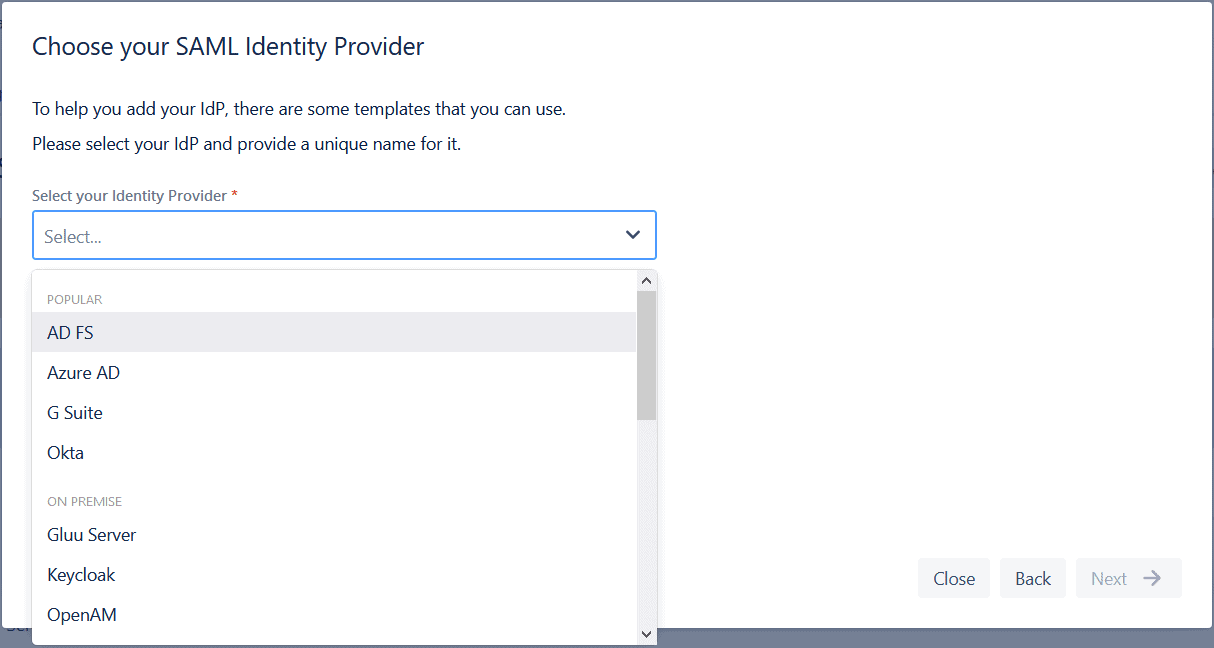
Here’s the full list of the Identity Providers that are supported out of the box:
1. The most popular Identity Providers for SAML SSO for Jira Data Center:
2. On-Premise Identity Providers for SAML SSO for Jira Data Center:
3. Cloud Identity Providers for SAML SSO for Jira Data Center:
If your Identity Provider is not on this list, you will still be able to follow the configuration wizard, but you won’t have preloaded information about them.
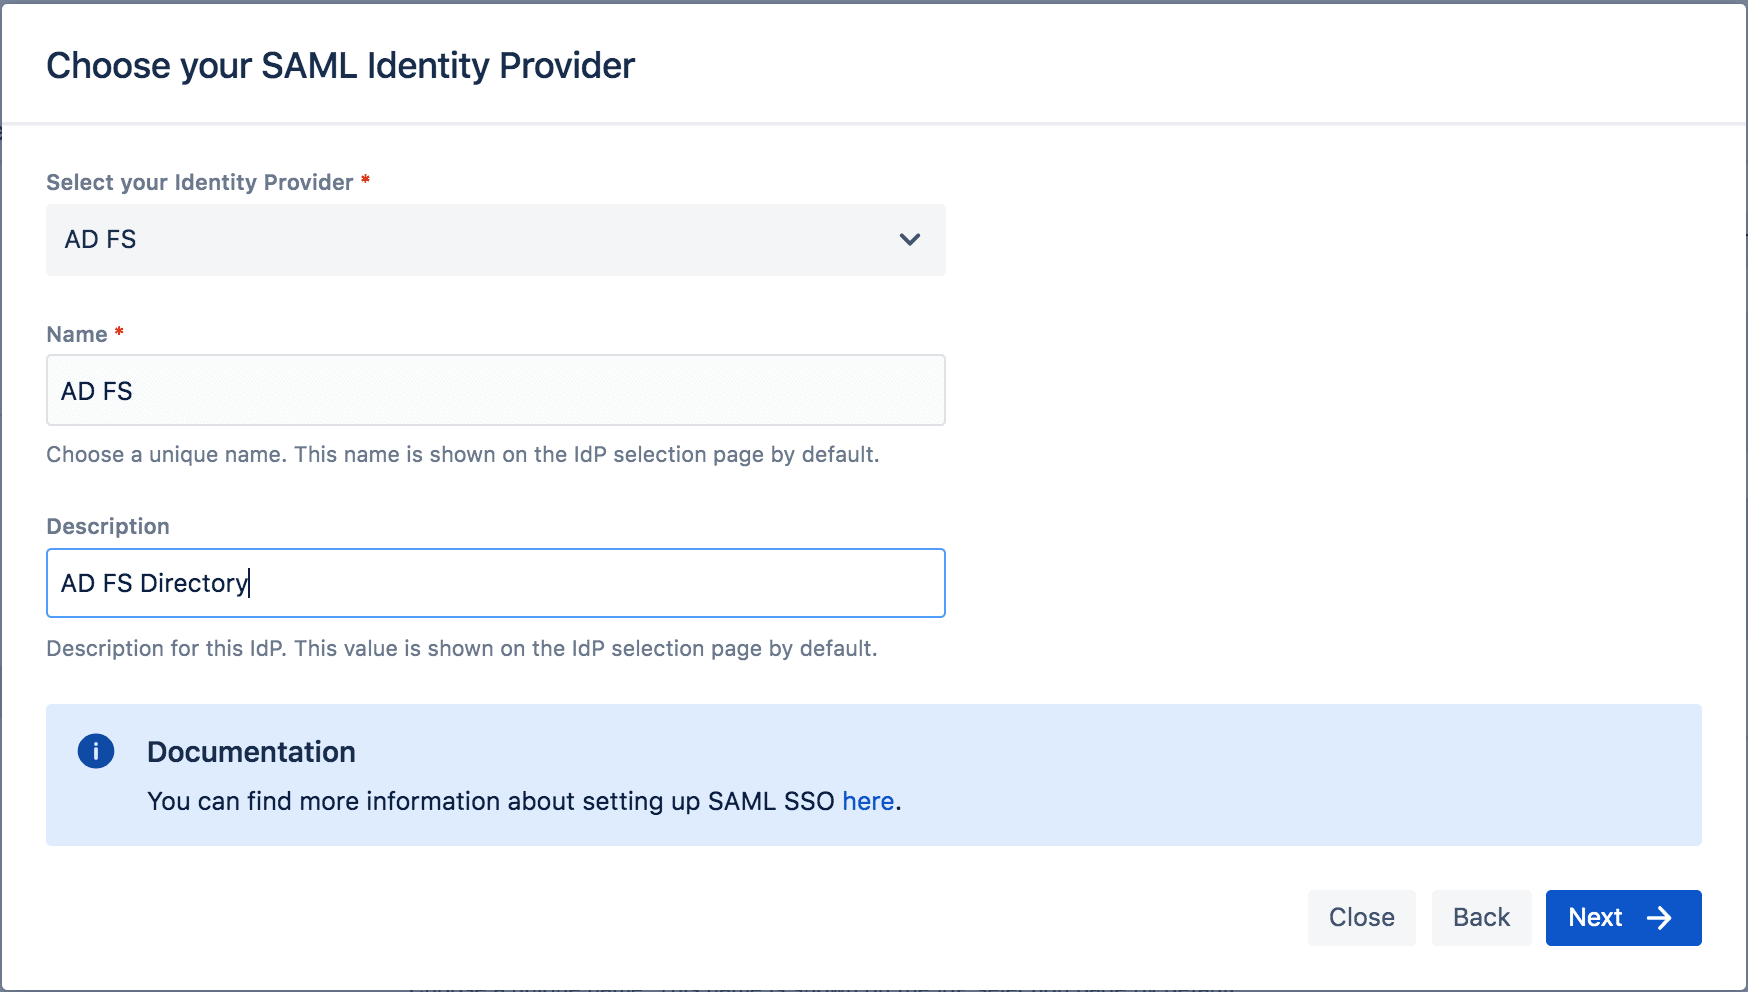
When you select an IdP from the dropdown, a link to the full configuration guide will load at the bottom.
Before proceeding, simply add some information so your users can recognize this authentication option:
- The name that you want to be displayed on the IdP selection page (more on this later)
- A sufficient description of the IdP (optional)
Step 3: Exchanging Metadata between your Identity Provider and Jira SAML SSO
In order to be able to communicate using the SAML language, the IdP and the Service Provider (in this case is SAML SSO for Jira) need to handshake with the exchange of metadata. Metadata comes in an XML format and can be shared via a URL.
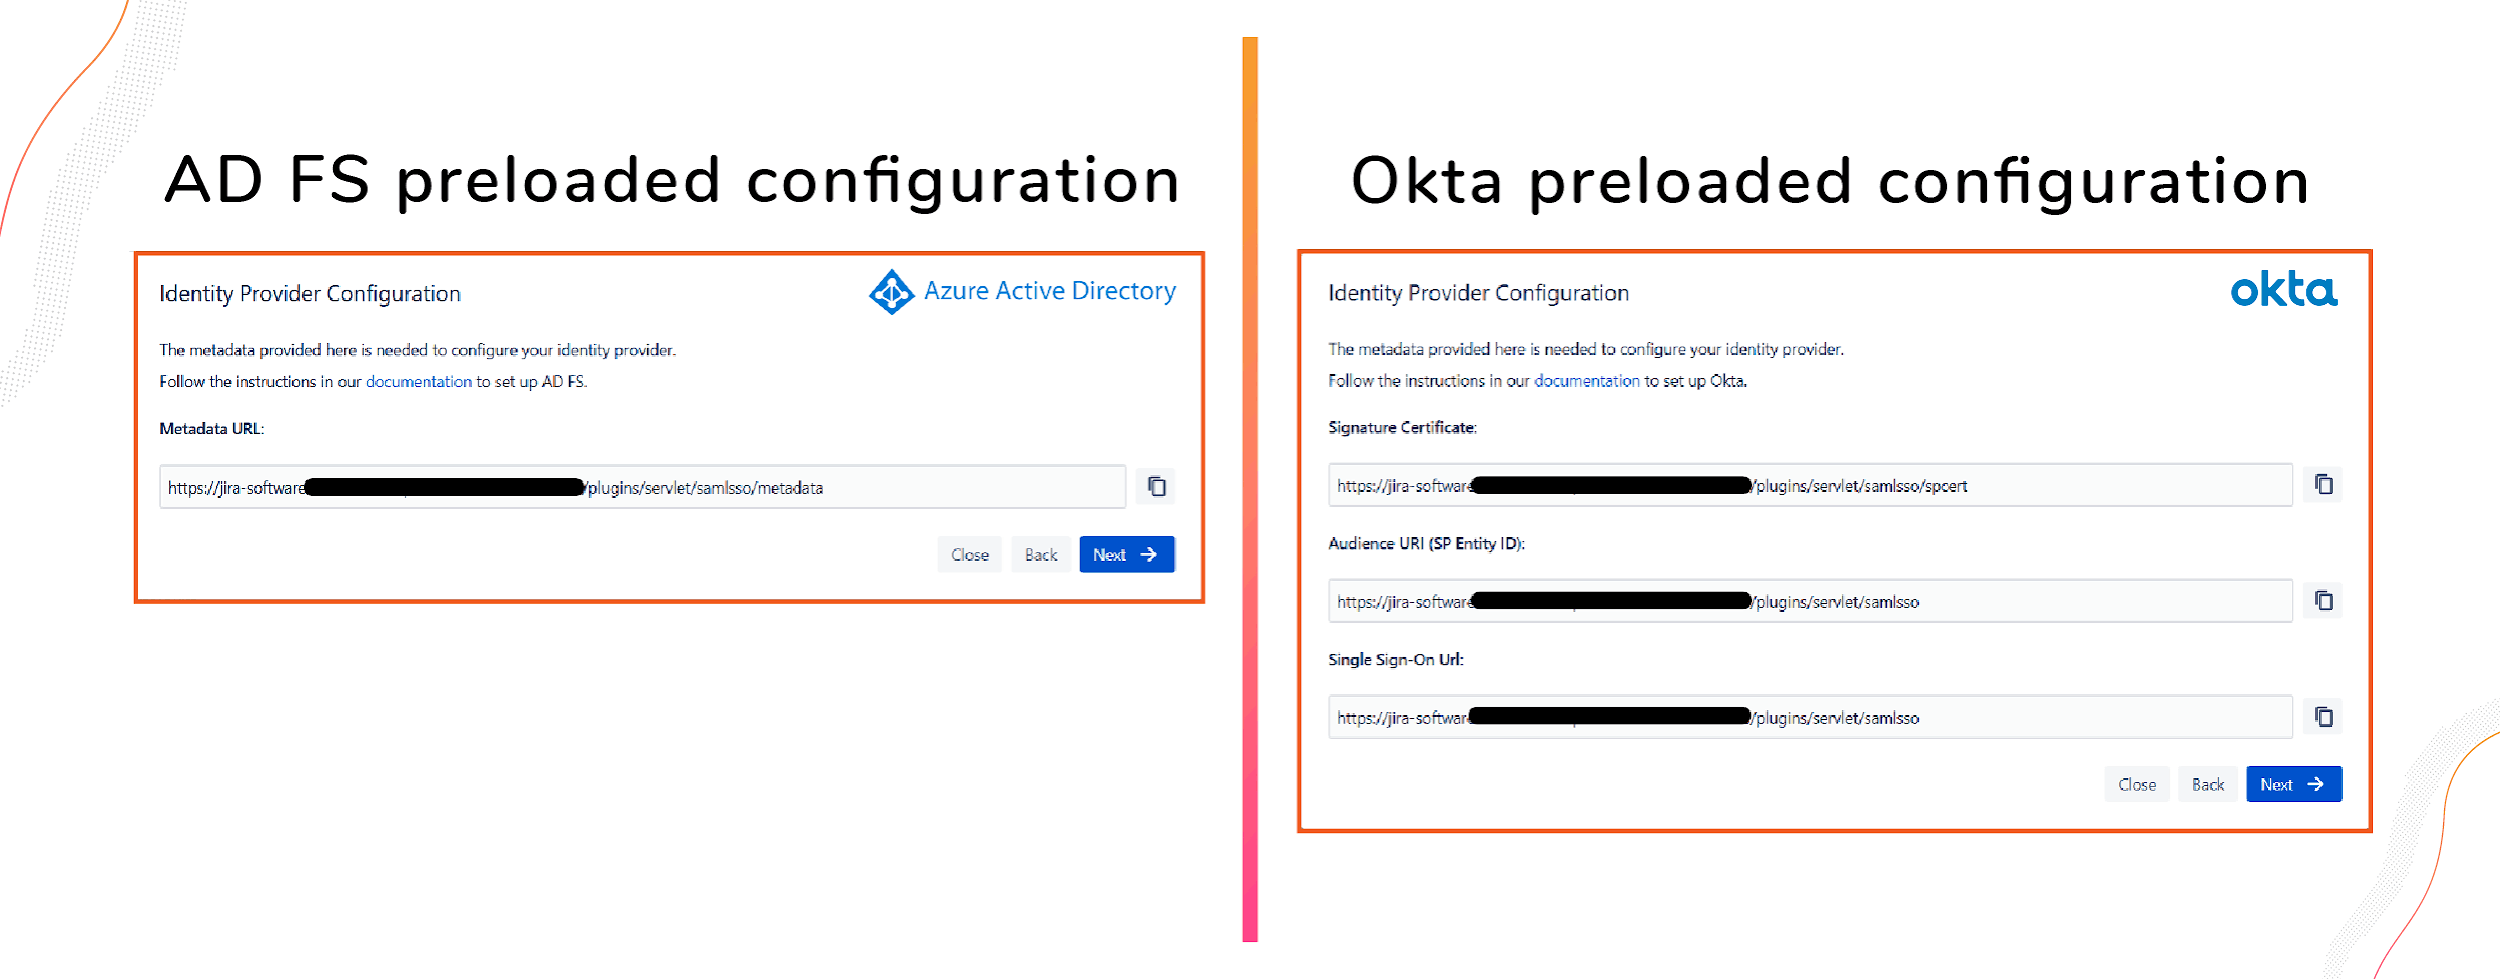
First: Load Metadata from SAML SSO for Jira into your Identity Provider
Hitting “Next” to continue the process right after Step 2, you will be prompted to paste the metadata information from SAML Sign On for Jira in the IdP configuration.
How you need to enter this information depends on the specific IdP. SAML SSO will preload all the necessary URLs configured to guarantee that the corresponding IdP can read them. Additionally, a link with step-by-step instructions on how to complete this task is provided.
Second: Load Metadata from the IdP into Jira SAML SSO
To complete the metadata exchange, you will need to import the metadata from the IdP into the app. You will be given 4 options:
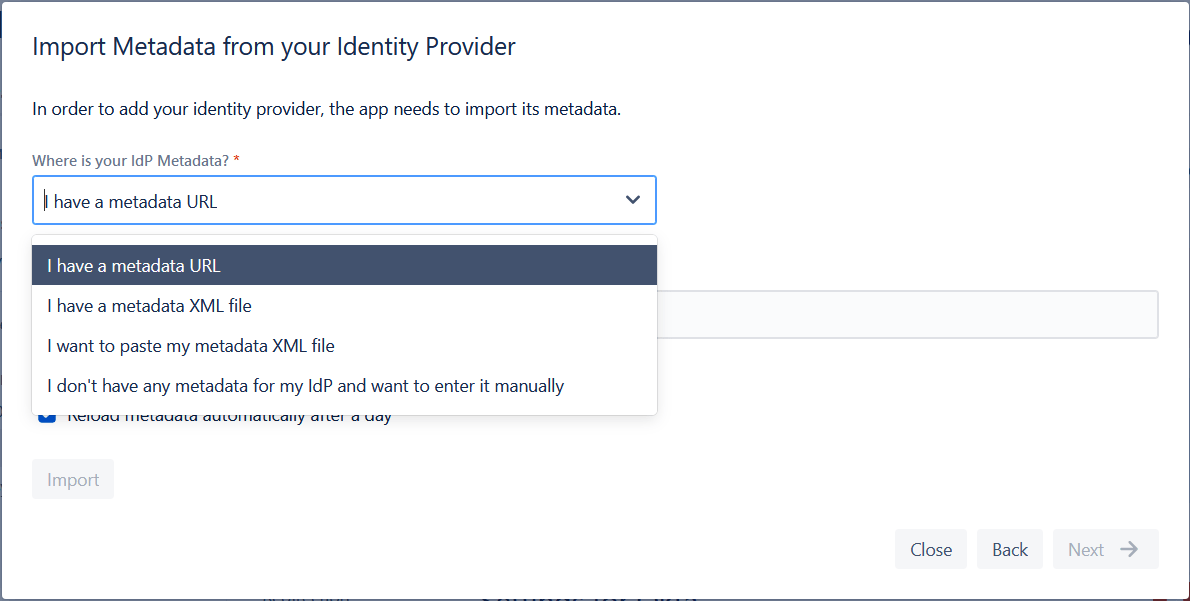
- Provide a metadata URL, just like the ones provided above by the wizard
- Upload an XML file downloaded from the IdP
- Paste the metadata from an XML file into the UI
- If everything else fails, you can also enter the metadata manually.
Step 4: Does your NameID Attribute from the IdP Match the User IDs?
Any SAML-based single sign-on process works by matching user identities on either side of the process (the Identity Provider and the Service Provider, in this case, Jira). However, this match is not a given. It’s very common to have different variations of the user’s identity on both sides. For example:
- The email address on the IdP, and the Full Name in Jira
- The email address on the IdP, and the e-mail address without the domain in Jira
These two scenarios will fail to create an automatic match with SAML SSO. But don’t worry, the wizard will help you fix this.
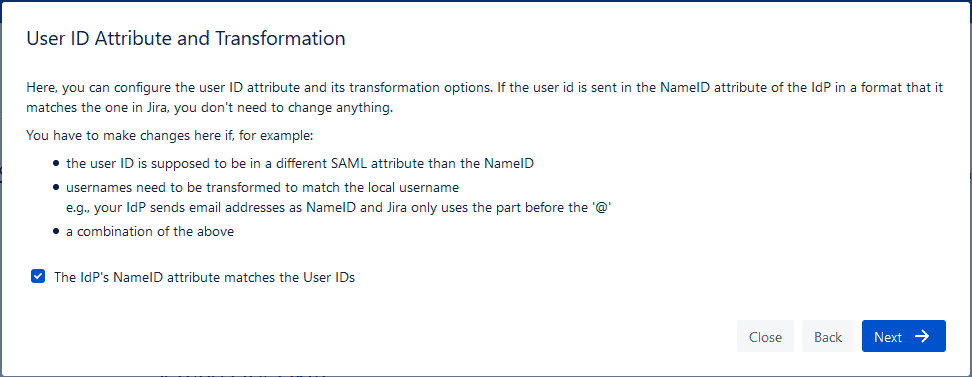
By default, SAML SSO for Jira will take the information that the Identity Provider sends in the NameID attribute from the SAML response and compare it with the User ID in Jira.
- If the NameID SAML attribute matches the User ID in Jira, then you already have a match, can leave the box checked and hit next. The show will go on.
- If you DO NOT have a match, the authorization would fail. Uncheck the box to unfurl the options and build a match with Regular Expressions.
Transforming the NameID or other attributes to match the Jira UserID
Instead of asking what attribute from the IdP you should choose, you should ask the team about the structure of user IDs in your Jira database.
Once you have an answer to that question, you can figure out what attributes coming from the IdP is a stronger candidate to create robust and consistent matches. For example, finding a match based on email addresses will be different to basing it on full names.
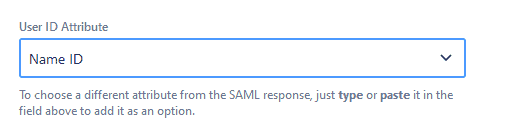
If the NameID is not the right attribute, select a different option from the SAML response and type it in the User ID Attribute field.
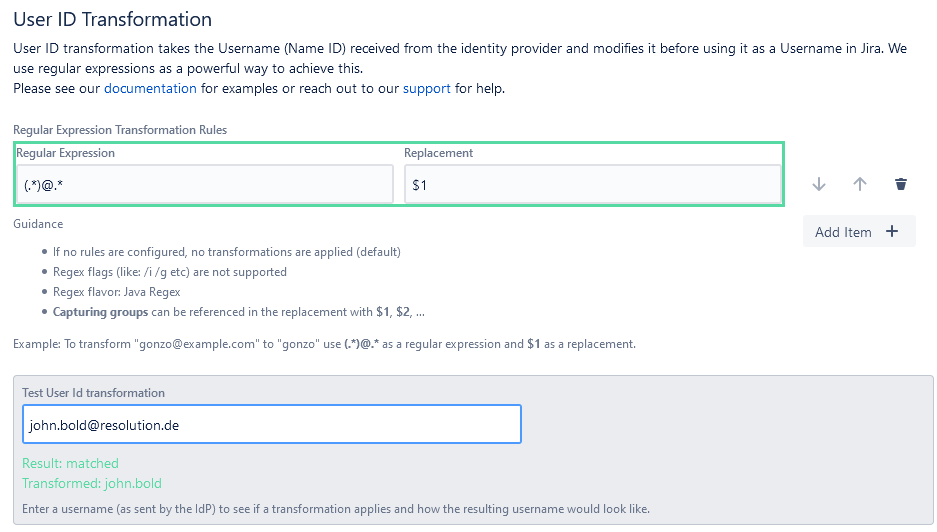
If necessary, you can create rules.
Rules will transform the username that is being passed by the IdP using regular expressions.
The most common example that you can see in the screenshot is stripping the domain of an email address. In that way, you would trim an email address like john.bold@resolution.de to john.bold, which contains the first and last names.
With additional rules, you could iterate in the transformations to further refine the attribute until you get the desired match.
For example:
- Transform “john.bold“ into “john bold“ by replacing the period with a space
- Capitalize “john bold” into John Bold
You can easily find all kinds of Regex transformations online on pages like Stack Overflow. To read more about them, here’s a good starting point.
Step 5. Creating and Updating Users
What you have configured until now is enough to authenticate your users with SSO for Jira Data Center.
Of course, you still will need to test and make sure that you get no errors. But assuming that succeeds, the configuration can be considered done.
So in this step, we will configure how you want to provision your users.
In this context, provisioning users implies both creating them if they don’t exist yet in Jira, or updating them with the most current information from the IdP.
Why is it important to update users?
If you are the administrator of a Jira instance with more than 300 users, you probably know how important it is to make sure that the information about your Jira users is always accurate.
In particular, keeping group memberships in check allows:
- granting access to Jira to every user who should have it (and to nobody else)
- granting users the right permissions for their jobs.
Obviously, group memberships are not static. Employees come and go, they get promoted and assigned to different initiatives. That’s why updating user profiles is a big piece of any single sign-on solution that is worthy of its name.
Many companies use their Identity Providers as the single source of truth for identity and access management. The IdP stores which applications a user should be able to access and what permissions apply for each application. Any changes are managed on the IdP first so that they propagate to the applications.
SAML SSO for Jira Data Center gives you three options to propagate user and groups data from the IdP into Jira:
- using the SAML attributes
- synchronizing users via the API
- or not doing anything.
Let’s quickly see the implications for each.
Using the SAML Attributes (Just-in-Time provisioning)
The SAML responses sent by the IdP contain user attributes like email, name, organizational affiliation, or telephone. Information about which groups a user is a member of is also included. And that information is vital to manage access and permissions in Jira.
Pros of Just-in-Time Provisioning:
The beauty of using SAML attributes is that:
- User data is updated automatically during every SAML login, so there is no manual effort involved.
- When a user tries to log into Jira for the first time without having an account yet, he can be created during the authentication process. That’s the main reason for calling this method Just-in-time provisioning.
Cons of Just-in-Time Provisioning
As convenient as JiT provisioning is, you should be aware of the limitations:
- users that don’t log into Jira (or that don’t log through SAML SSO) will never be updated or created.
- since the authentication needs to be successful to update the user, JiT can’t be applied to user deactivation.
- The settings you define will be applied to every successful login attempt. Consider this when weighing the configuration options below.
How to Configure Just-in-Time Provisioning
If you choose to update users in SAML SSO for Jira with the SAML attributes, you will have several configuration options that refer to the creation and modification of users.
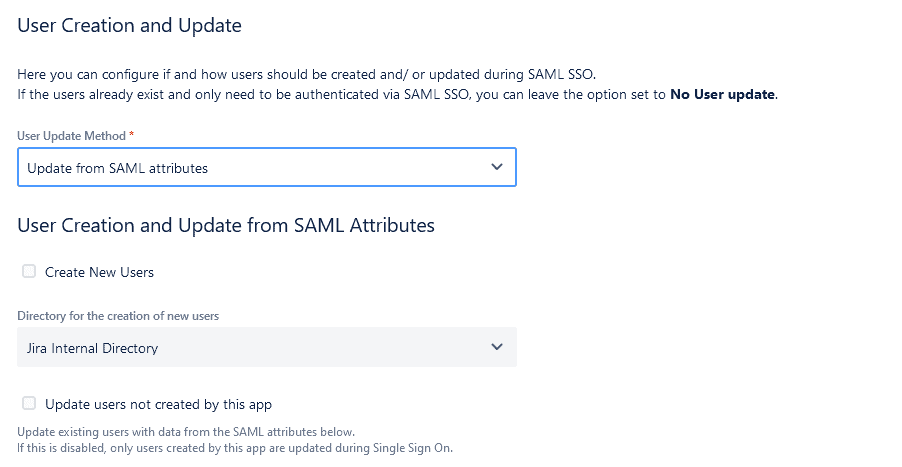
- Decide whether you want to create new users
- Specify in which directory you want the users to be created. This option is more interesting for other Atlassian applications, like Confluence or Bitbucket, that can centralize their user directories in Jira. Since we are already in Jira, the Jira internal directory will be the default option anyway. Storing users in the Crowd directory is also an option if that’s part of your Atlassian stack.
- You can also restrict updates only to users who have been created into Jira by the SAML SSO app, leaving existing users to remain unaffected.
On the same screen, you will be offered some additional options regarding how you treat groups:
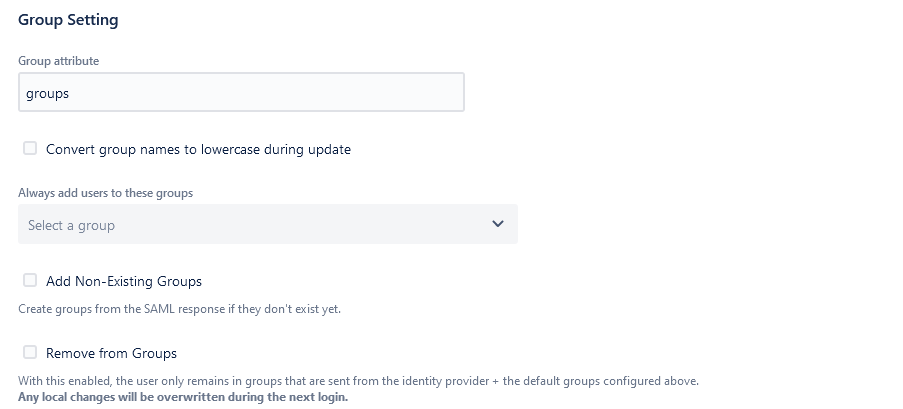
- Define the SAML attribute that will pass the information on group memberships from the IdP.
- Define to which groups will the user be added by default. I.e., Jira users, or the group that gives access to the project where you run employee requests if there is one.
- Decide whether each and every group contained in the SAML attribute will be created in Jira if it doesn’t exist yet.
Hint: this is a good idea only when your IdP is well-maintained and doesn’t store historical info about access to abandoned software, as well as archived groups, departments, or initiatives. - Override local group memberships, so that the user only belongs to the groups in the default groups plus the groups passed in the SAML attribute.
Synchronize Users via the API (User Sync)
Again, remember that for many organizations the IdP is the single source of truth for identity management: access to applications, permissions, group memberships, and authorization policies are all managed centrally.
When this is the case, it’s extremely important to ensure that service providers are synchronized with the IdP so that even the tiniest divergence between Jira and Okta, for example, is out of the question.
SAML SSO includes the possibility to synchronize the Jira directory with the selected IdP with a feature called User Sync that is also available as a standalone on the Atlassian Marketplace.
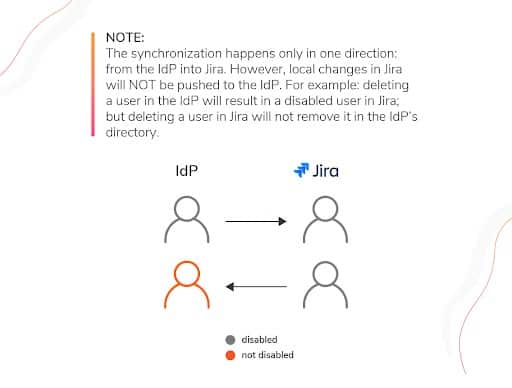
Note: The synchronization happens only in one direction: from the IdP into Jira. However, local changes in Jira will NOT be pushed to the IdP. For example, deleting a user in the IdP will result in a disabled user in Jira; but deleting a user in Jira will not remove it in the IdP’s directory.
The options in the wizard will create a basic configuration that you can customize in the advanced settings (take me there).
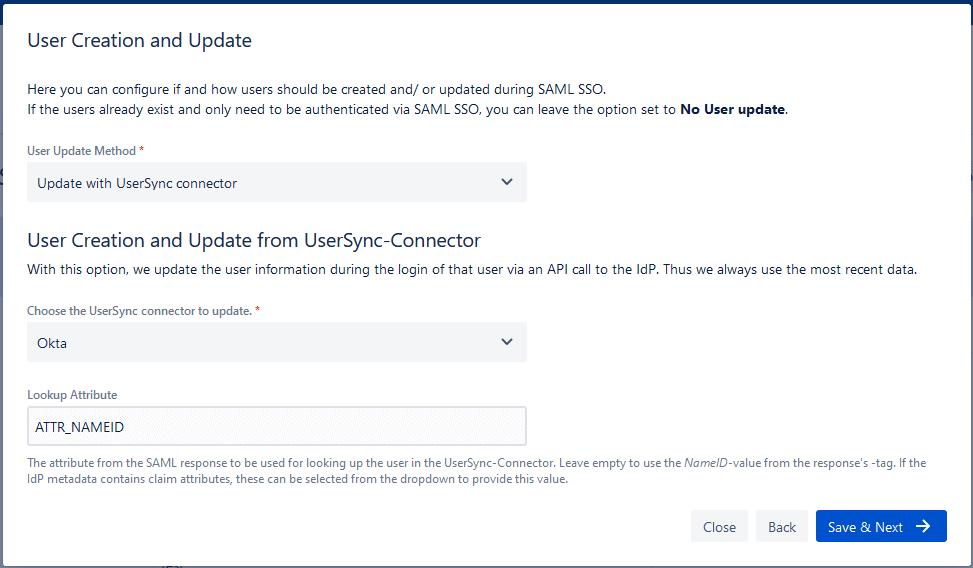
In order to set up User Sync with the wizard, you will need to have configured a connector with your IdP already. If that’s the case, simply:
- select your connector from the dropdown (see your IdP guide on how to set it up)
- select which attribute from the SAML response should be used to look up the user
If you haven’t created the connector yet, you can always move ahead by selecting to not update users. This way the wizard will finalize so you can test whether SAML SSO works. You will be able to configure the User Sync later in the regular configuration for User Sync.
Note: This step will only use the user sync to update or create users during the SAML SSO process. User Sync can also be used to synchronize the entire user database or specific groups. More about this in the User Sync section of the advanced configuration, at the end of this guide.
Don’t Update Users
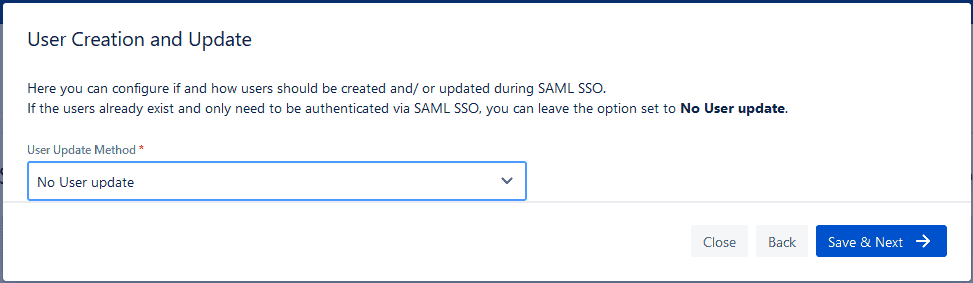
You can also decide to not do anything if all you want SAML SSO to do is to authenticate your users. This can be enough for small organizations where all users are already in Jira assuming that user permissions don’t change too often.
Step 6. Testing the Configuration of SAML Single Sign On for Jira Data Center
Finally, you’re ready to test your authentication engine and experience the seamless flow your users will enjoy.
To test the settings, you will have to impersonate a user and try logging into your Jira from an incognito session using the SSO URL.
These are some things you need to check before starting the test:
- Have at least one user-ready in the IdP so that you can impersonate it
- Make sure you have access to the full credentials (username and password) for that user
- If you are not creating users during the SSO login, the user will have to exist in Jira as well
- If that is the case, make sure that the NameID from the Identity Provider matches the username in Jira, as seen in Step 4
How to Conduct the Test
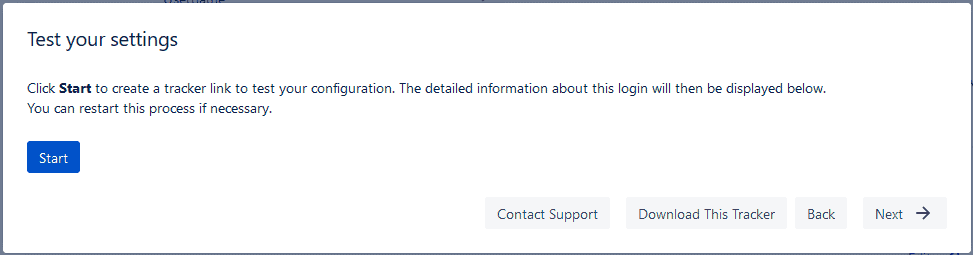
- Click the start button. The tracker info will load below and display a “waiting” status.
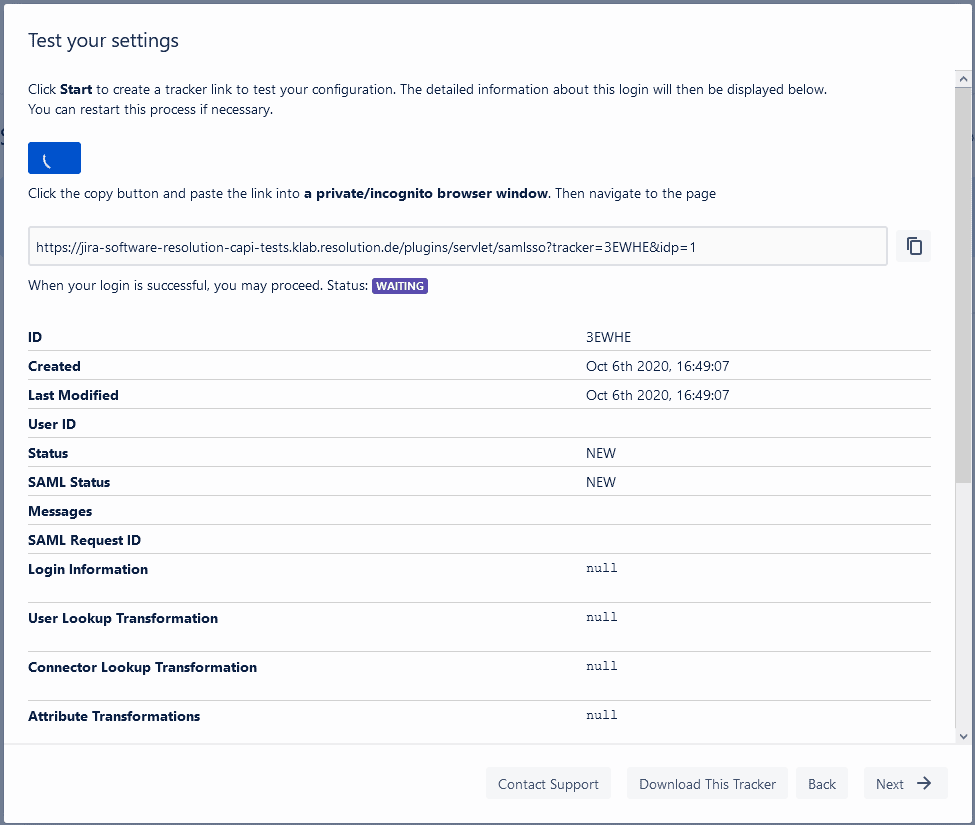
- Copy the tracker link provided

- Open an incognito window and paste the URL
- Try to log in with a test user
- At this point, your login will either succeed or fail, and the information shown by the test will reflect that.
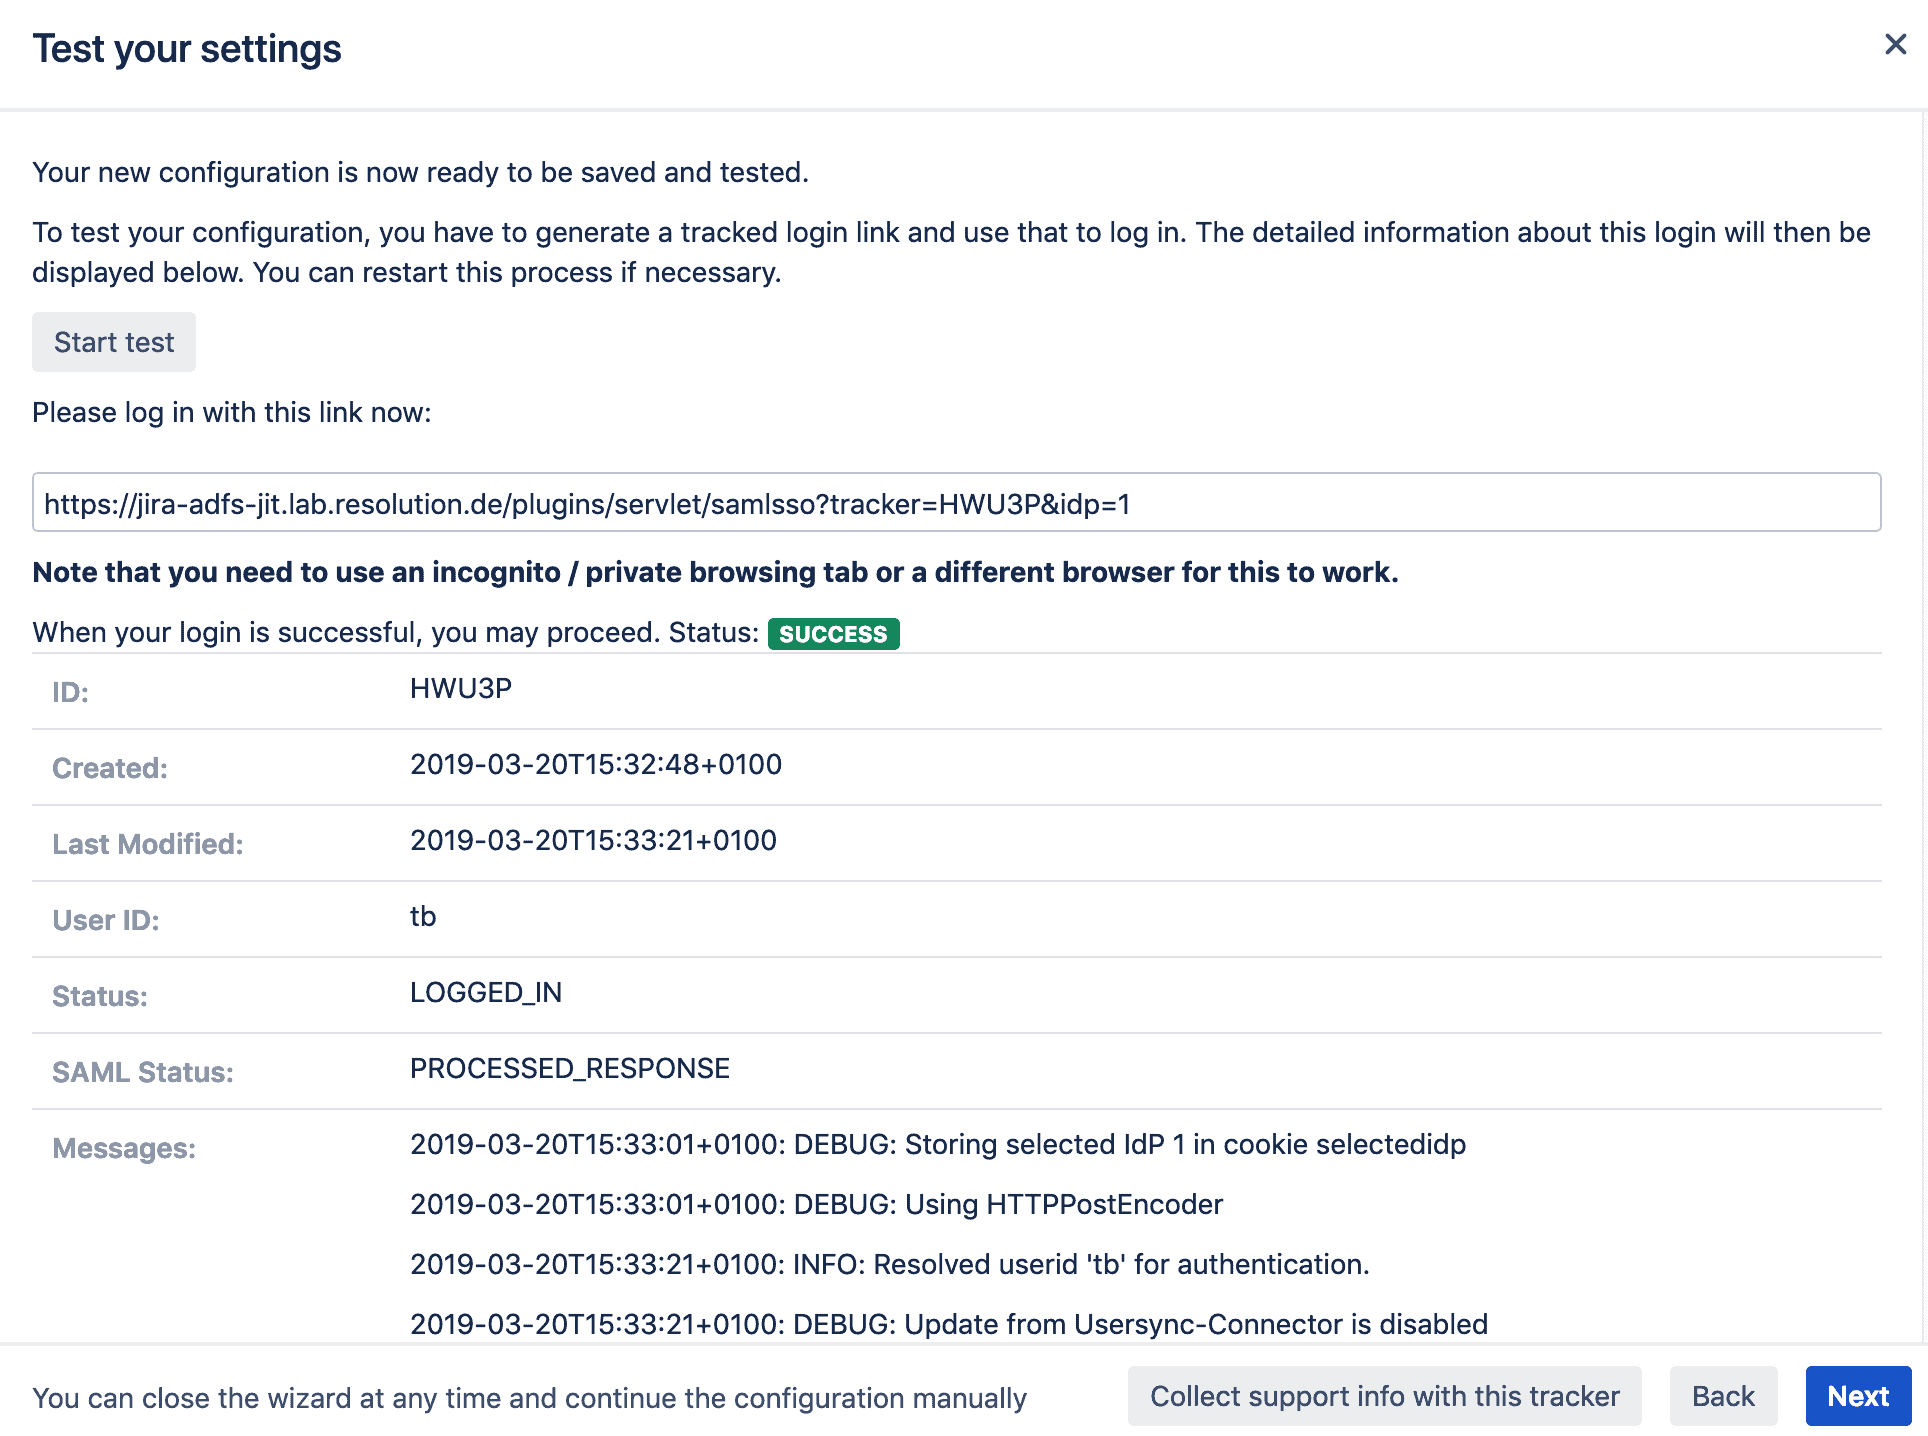
- If the test is unsuccessful, we always recommend downloading the tracker information to analyze what went wrong. You can also contact support to look at it and help you troubleshoot your installation.
Step 7: Redirect Users to the SSO Login
Important note: Remember to provision a local administrator and to back it up in the Identity Provider so that you can still access the instance using SSO after you enable the SSO redirection in Step 7.
If you forget to do this, you will still be able to access traditional basic authentication by appending the parameter ?nosso to your base URL. For example, www.acme.jira.com/login would become www.acme.jira.com/login?nossso
Now that your Single Sign-on is working, you need to take your users to log into the IdP instead of Jira. This can be achieved by simply redirecting users from the standard Jira login page to either:
- the IdP login page
- the IdP selection page (if you have configured more than one IdP)
SAML SSO for Jira Data Center will do this automatically for you when you click on the “Enable SSO Redirect” box.
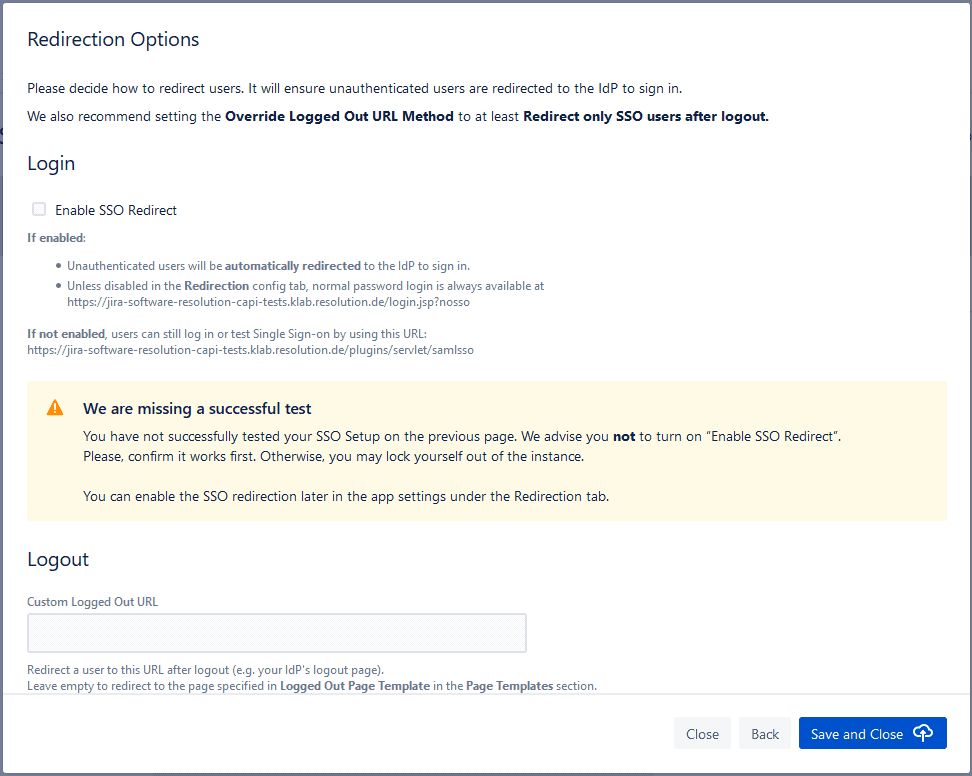
Note: You can skip the test if you want to set the redirection configuration first, but you should NEVER enable the SSO redirect without a successful test, or you will lock yourself out of the instance!
What happens if I enable the SSO Redirect?
When you enable the SSO redirect:
- unauthenticated users will be automatically redirected to the IdP to sign in when they access the login page
- local authentication will still be accessible if you append the ?nosso parameter to the login URL
What happens if I don’t enable the SSO Redirect?
If you don’t enable the SSO redirect, you will still be able to use SAML SSO to log in using the URL provided. This can be a very good idea when you want to keep testing the solution with a selected number of users before rolling it out to the entire organization.
Logout Redirections
On this final step of the wizard, you need to decide when to redirect users once they close their Jira session.
Note: without a redirection, the SSO process would be triggered again and there would be no way to log out!
But since SAML SSO supports single logout or SLO, users can:
- Close the session on the Identity Provider if a user logs out of Jira
- Close the Jira session if the user logs out from the IdP
For that reason, once the SLO has happened, the user can be redirected to the IdP login page.
Configuration of Advanced Enterprise Features
While covering every detail of the advanced configuration doesn’t fit into this guide, we will go into a selection of the most widely used options that you can set up in the configuration menu.
You will be able to access the menu directly after the wizard closes.
How to Connect Multiple Identity Providers
A large percentage of SAML SSO customers have complex enterprise infrastructure and a number of different Identity Providers. You can easily support this requirement by configuring more IdPs.
To do so, simply:
- go to the Identity Providers tab in the configuration menu
- Click on the “Add new IdP”
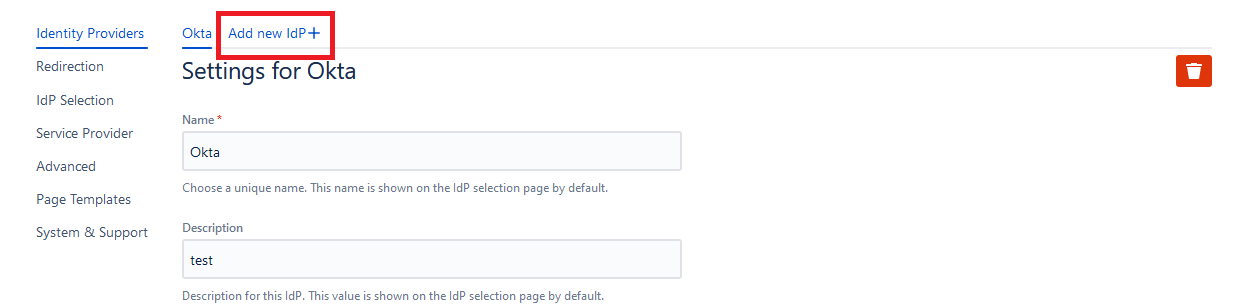
This will launch again the wizard so you can follow it to configure your additional IdP.
How to Select between Multiple Identity Providers
Once you set up more than one IdP, you will need to jump over to the “IdP Selection” tab.

You will be given three options:
- Define a default IdP: Each IdP will be assigned a unique weight or score, and the lowest weight will be the default.
- Allow users to select their IdP from a list: This is the only option that gives some control to users. The list of IdPs will be ordered by weight.
- Assign IdPs to email domains: With this option, users will be prompted to enter their email and will be redirected to the corresponding IdP login.
If you choose the last option, you will be able to match email domains with IdPs on that same screen. Read the instructions to understand how to use Regular Expressions (no, you don’t need to be trained in Regular Expressions) . And then click on the “Add Item” button.
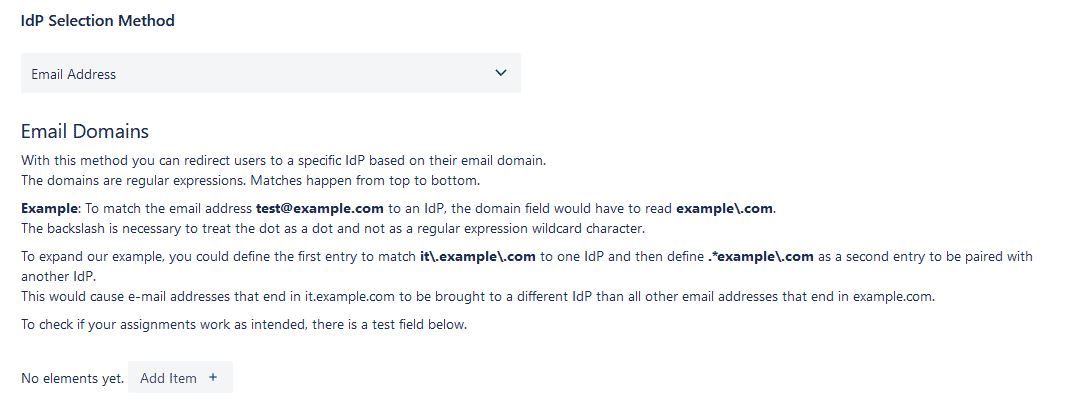
You will see a pair of input fields.

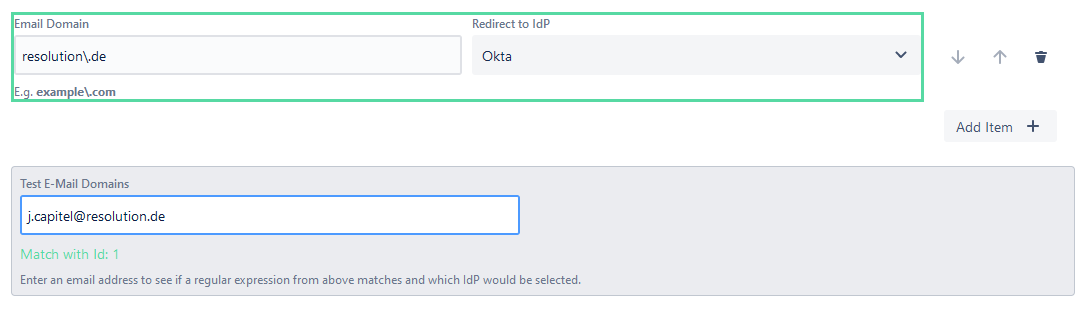
For each domain, you will have to create a new match:
- Add the domain on the left side with the format example\.com
- Assign the IdP on the right (needs to be configured)

- Test the match with an existing user
Advanced Attribute Mapping
Towards the bottom of the “Identity Provider” tab, you will find options for Advanced Attribute Mapping. In this example, we will show the options when you selected “Just in Time Provisioning” as the user update method for this IdP.
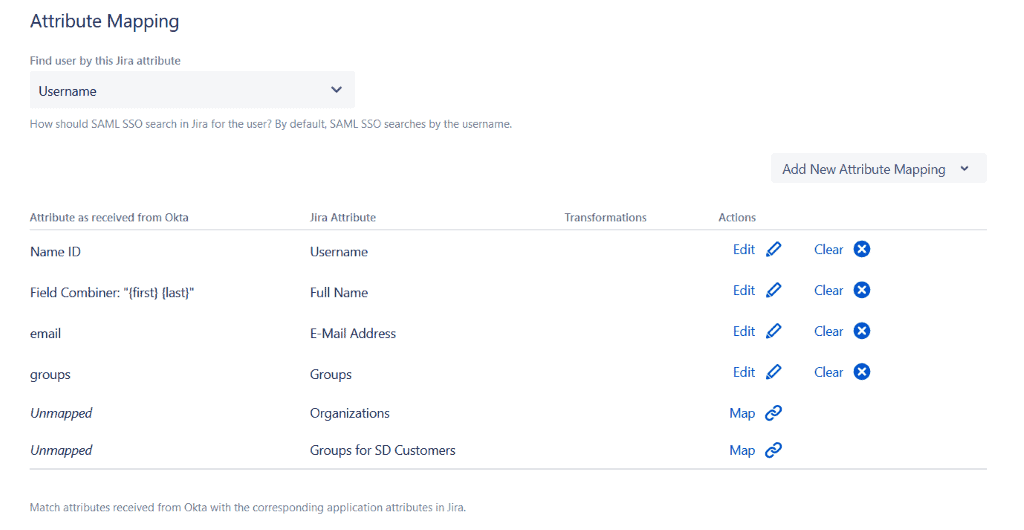
Default attribute mapping using Okta as the IdP for Jira.
The goal of attribute mapping is to ensure that you get the right information about your users into Jira, no matter how or where it is stored by your Identity Provider.
The rule of thumb for mapping attributes is simple. If it impacts what a user should be able to access or do in Jira, it makes sense to send it with SAML.
The basics of attribute mapping are also simple:
- Step 1. Define which attribute in Jira should be used to find the user and apply the mapping rules that follow. And if the primary attribute is not sent for some of the users, you can add alternatives.
- Step 2. Select which attributes from the IdP (on the left) should be mapped to which Jira attributes (on the right). If you’re using one of the major IdPs, default values for all these fields will be pre-populated so you only have to make minor tweaks.
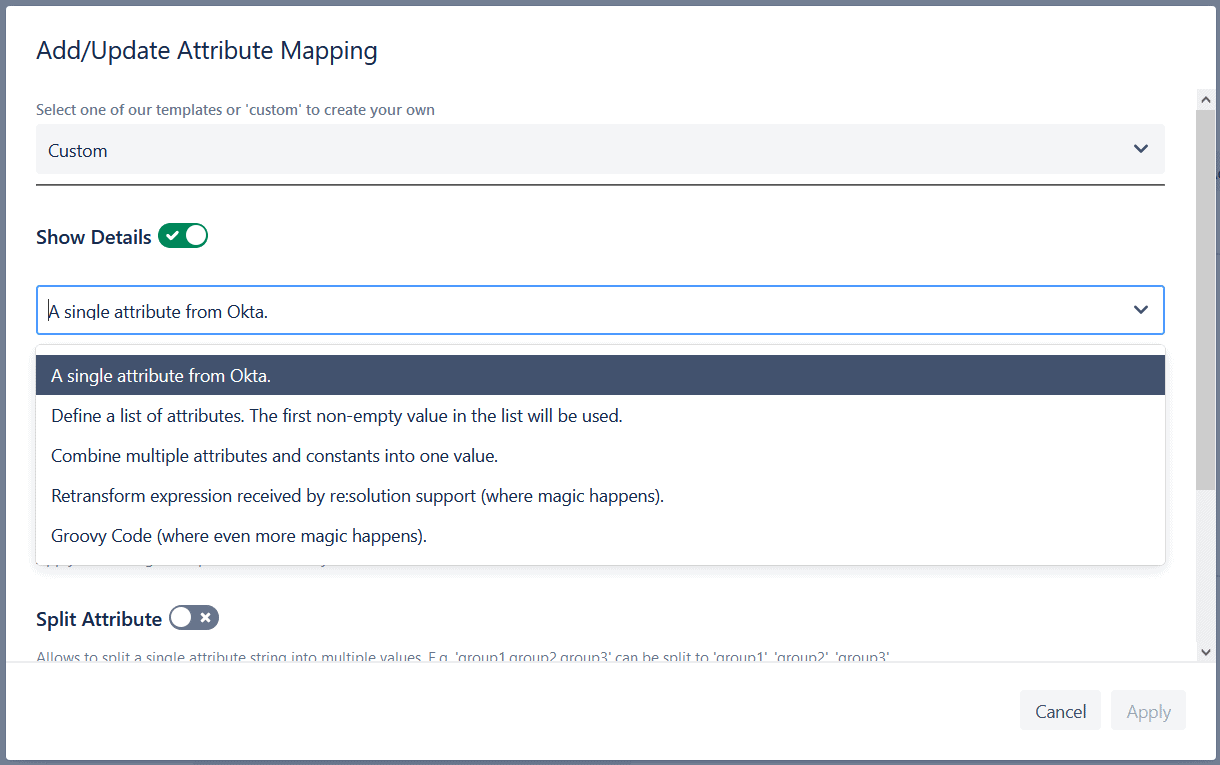
- Step 3. If you don’t want Jira to store the attribute literally as the IdP sends it, then you can define transformations.
Regular expressions can be used to define transformations. But if you’re not a Regex expert, don’t panic! A ton of useful options have been added to SAML SSO for Jira version 4.0:
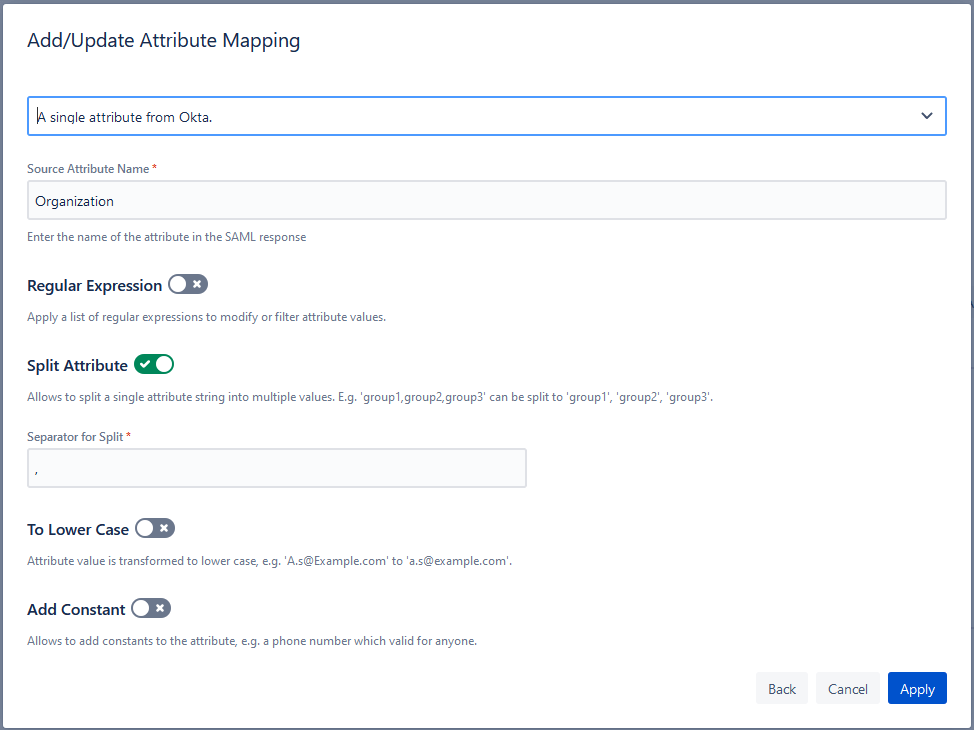
- Strip off email domains without the need for custom regular expressions
- Combine multiple attributes into one
- Retransform expressions for custom needs with the help of our support team
- Power your transformations with Groovy scripts
Read more about Advanced Attribute Mapping here.
Page Templates
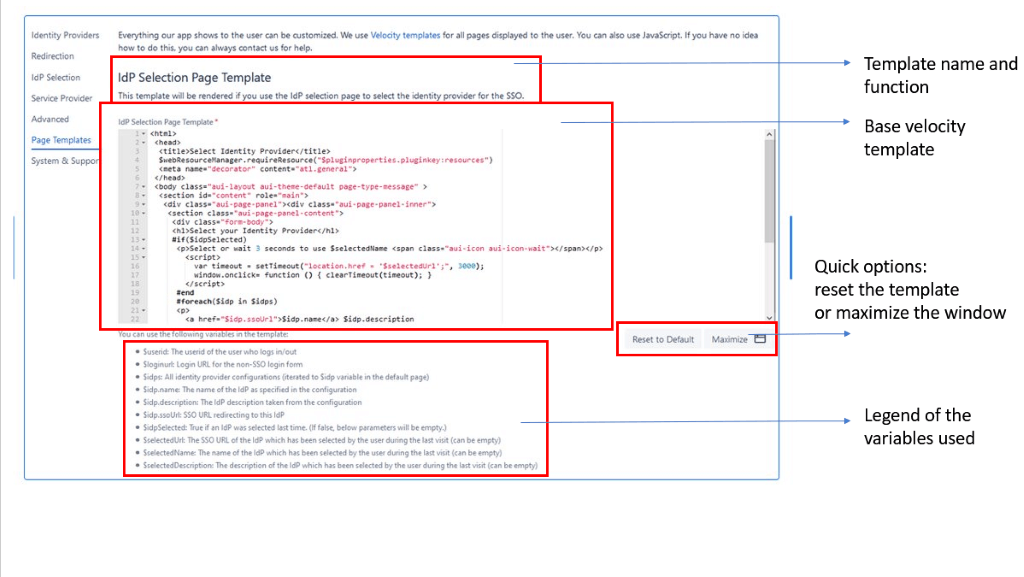
Everything the app shows to the user can be customized using velocity templates. For each of the page templates, you will always be given the same options:
- Template base code
- Legend of the variables used in the template
- Did you mess it up? Just go back to the default again
- Expand the code window
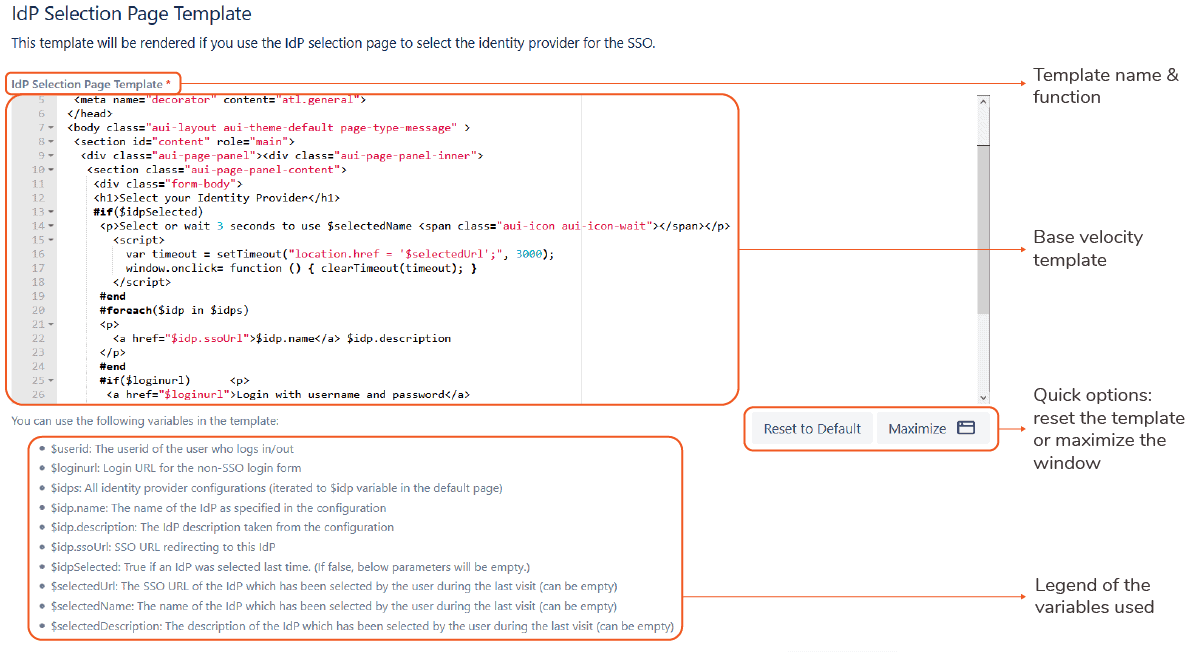
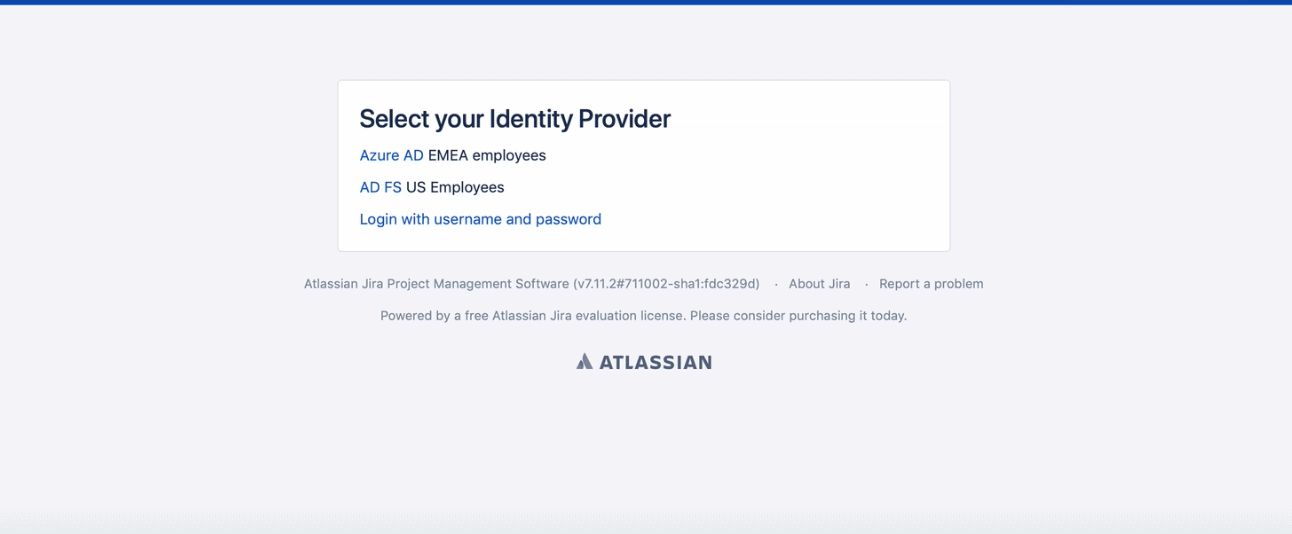
Example: the IdP Selection Page Template
This template will be rendered if you choose the IdP selection page to select between multiple IdPs.
This is what it looks like out of the box once configured with two different IdPs:
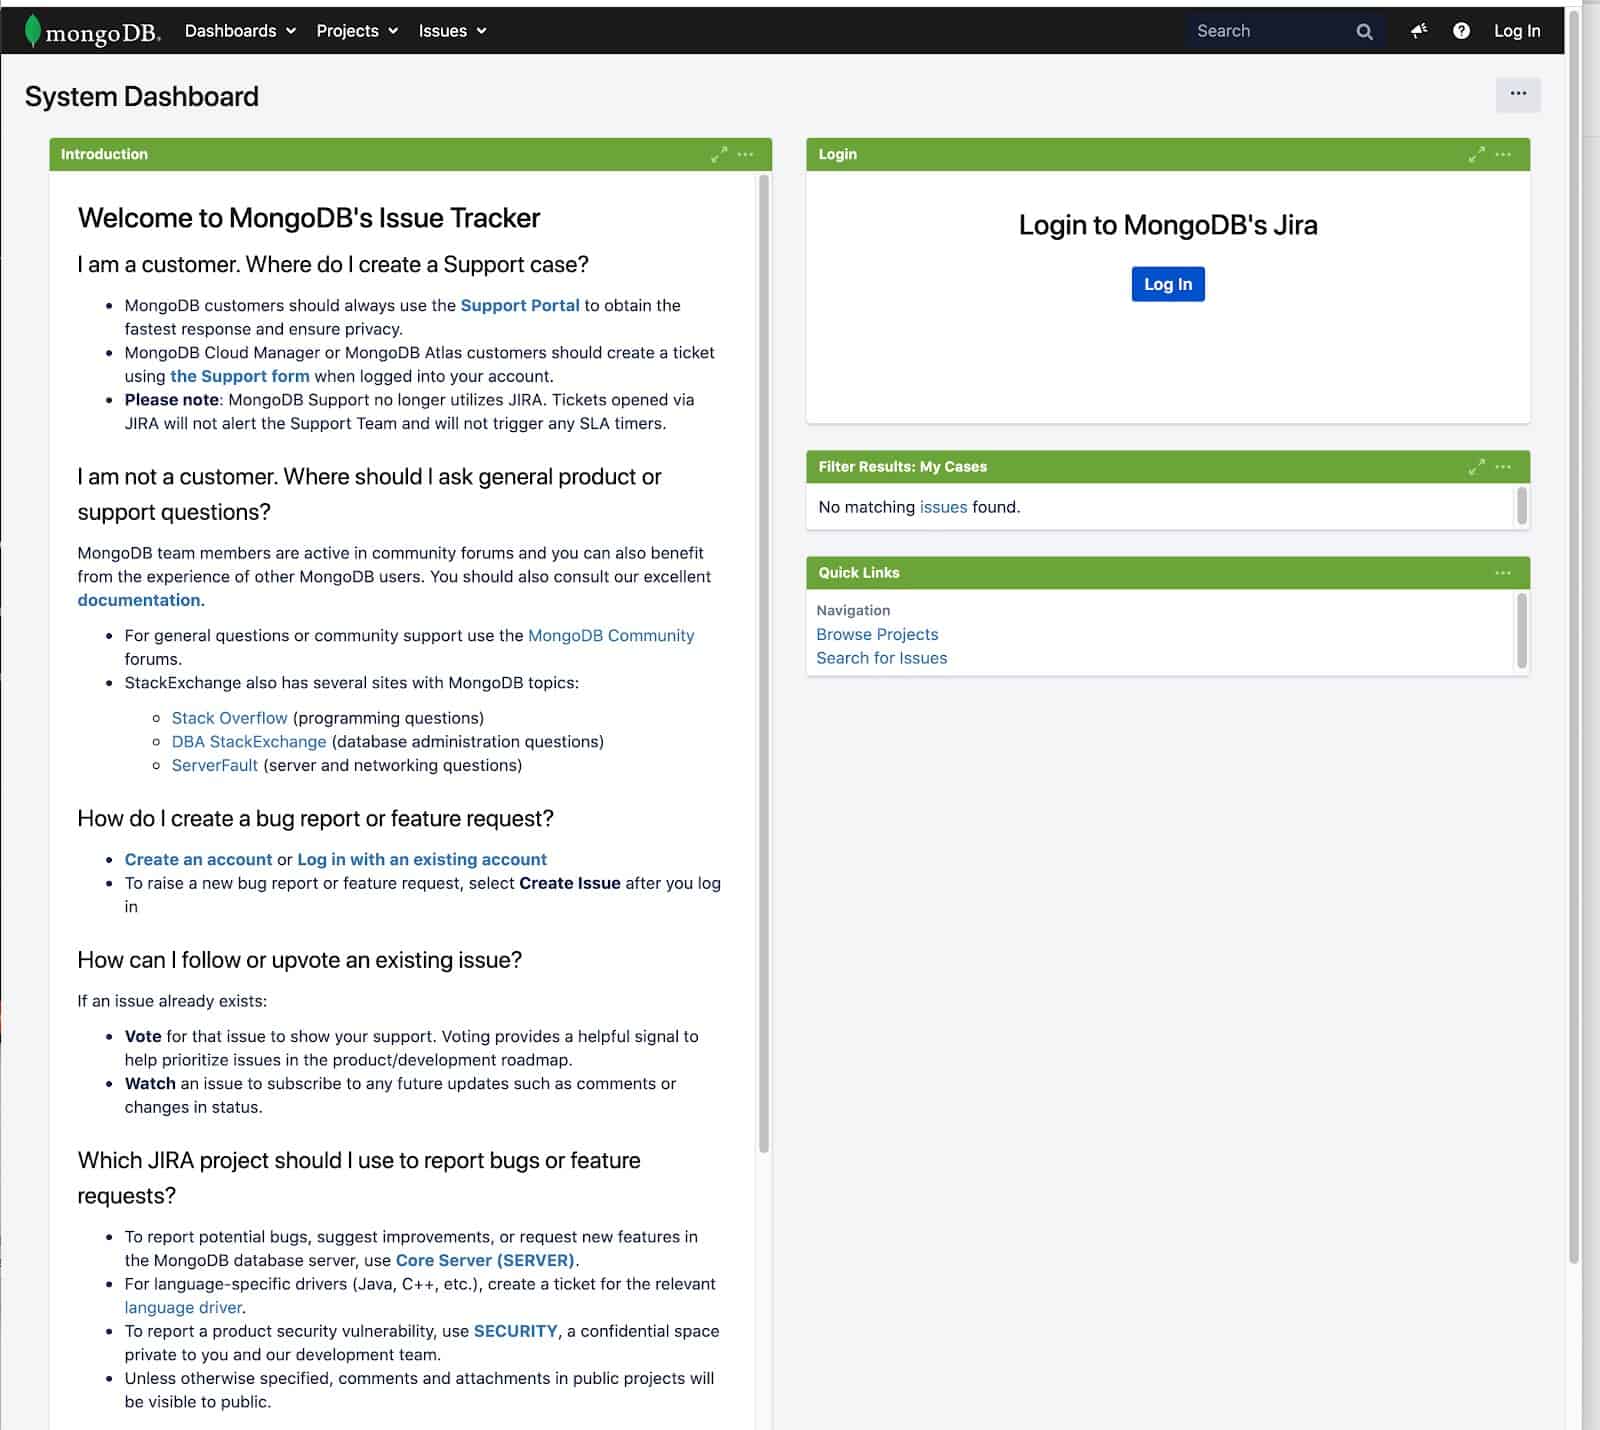
This is what MongoDB made out of it:
And this is what it often looks like for large universities with a federated structure and dozens of adhered research institutes:
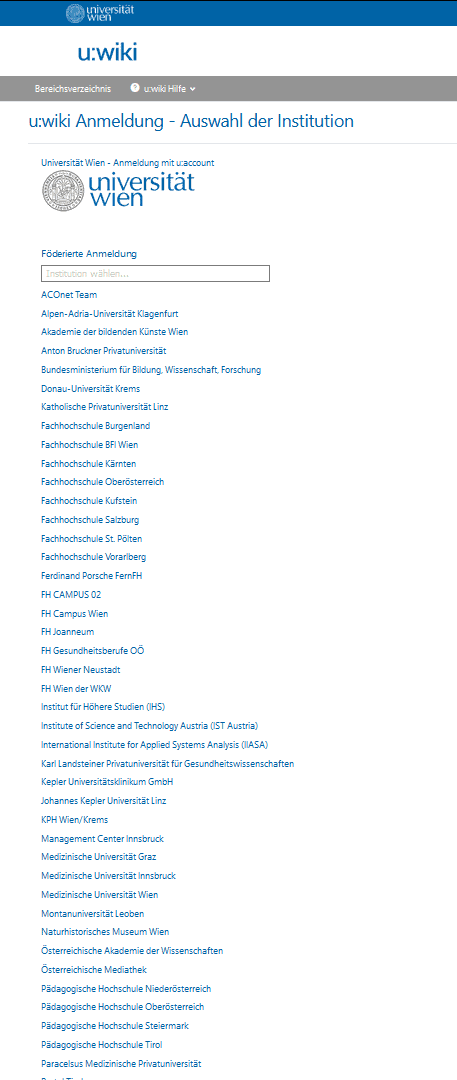
… and the list goes on.
Other Templates
The IdP selection page is the most prominent template. In the end, it sits at the front of any employee’s experience. But it’s not alone. Here’s a full list of the other templates, and their functions:
- IdP Selection By Email Page Template: This template will be rendered if you choose the email address to select between multiple IdPs.
- Error Page Template: This will be rendered when there is an error in the SSO process that prevents SAML SSO from creating a valid session within Jira.
- Service Desk Error Page Template: This template will be rendered when there is an error in the SSO process that prevents a customer from authenticating into the Jira Service Desk customer portal.
- Logged in Page Template: This template will be rendered when a user tries to access the application’s login page but is already logged in.
- Logged Out Page Template: This template will be rendered after a user clicks the logout button, according to the Logout Redirection settings.
User Sync
In step 5 above, you had the option to create and update users during their login using synchronizations with the Identity Provider. Basically, SAML SSO would look up in Jira every user trying to log in, then use the API to update Jira with the most current data from the IdP.
This happens for a single user for each successful login. Users who don’t log in would not be affected.
However, it’s also possible to synchronize the entire IdP’s user directory to Jira – independently of whether users log in or not.
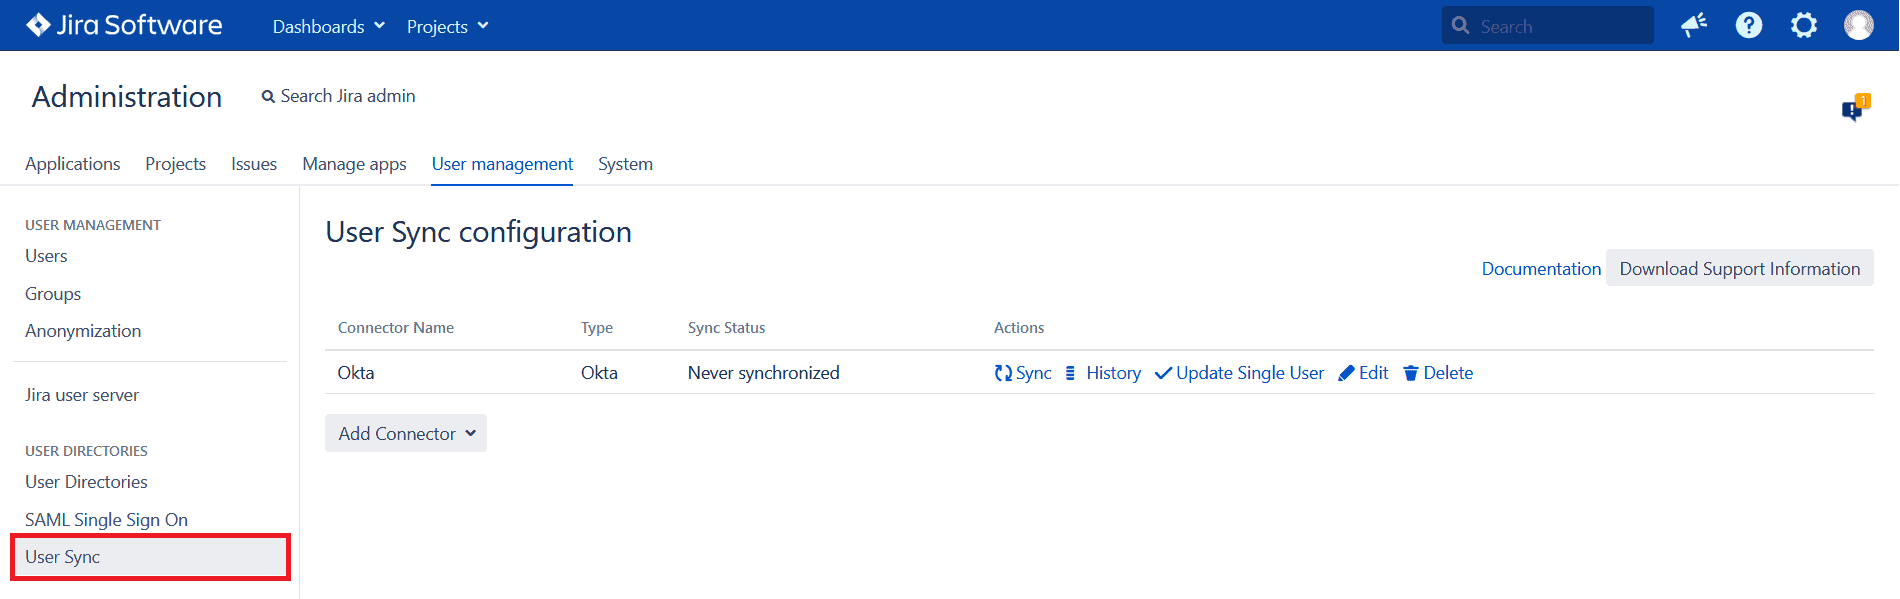
To do so, you will have to create a connector with the User Sync feature, which is accessible as a separate app in the Jira Data Center User Management options.
You can create as many connectors for as many IdPs as you wish. It’s also possible to create different connectors for the same IdP. For example, one to take care of inactive users every night and another to update attributes once every weekend.

These are the basic decisions you need to take when creating a new connector:
- What will happen when a Jira user does no longer exist in the IdP?
You can decide to keep it, disable it or delete it. - Will this synchronization run regularly or only when manually triggered?
You can use chron expressions to schedule it (remember to check the box first) - Will this connector synchronize all users or only a subset?
By default, the connector will not apply any restrictions. It will 1) update all users from the IdP into Jira and 2) create in Jira any user that has been newly assigned to the group or groups defined for Jira users in the IdP.
Advanced Settings
There are many possibilities in the advanced settings. Let’s hone in on the group management options:
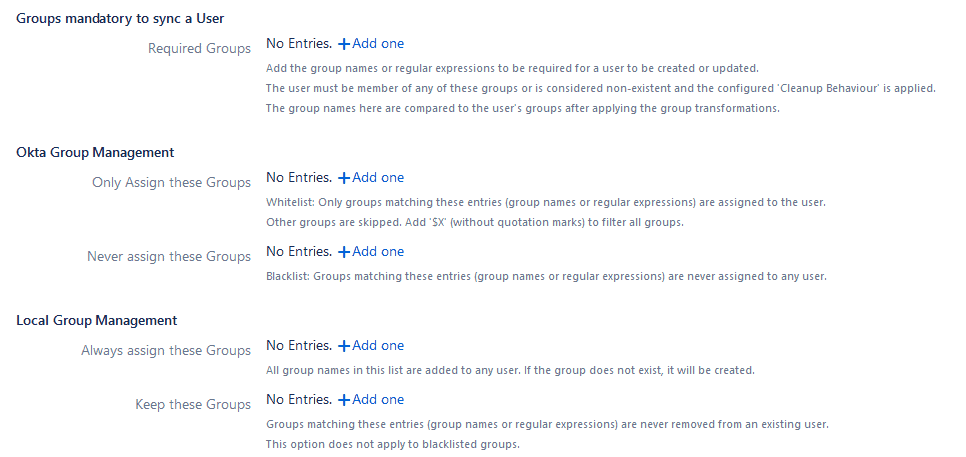
- Mandatory groups that users need to have in order to be updated or created in Jira: Users from the Jira local directory that don’t have these groups will be cleaned up. This setting can also be used to restrict provisioning for a subset of users. For example, only the users in the group Jira Users will be created in Jira. This also works with regular expressions. For example, jira-.+ matches jira-users, jira-devs, jira-admins, etcetera.
- Whitelist and Blacklist groups from the IdP: When a whitelist has entries, only groups in that list are assigned to the user. Groups on the blacklist will never be assigned to users.
- Forcing groups on Jira: You can set groups that will be assigned to every user, and protect groups so that they are never removed, even if absent from the IdP.
Conclusion
In this comprehensive guide to SAML Single Sign On for Jira Data Center, we have looked at the differences between authentication and provisioning, and the difference in coverage between Atlassian’s pre-installed Data Center app and resolution’s Jira SAML SSO for Data Center App so you can make the best decision moving forward.
We have also seen how to configure the app step by step, guiding you through the full extent of the wizard and the most important advanced configuration options. Throughout the guide, we have explained the meaning of each step and pointed at the most important decisions that you will have to make in this process, like how your users will be updated, or what IdP selection method will be in place.
To find out more about SAML Single Sign On for Jira, you can visit Resolution, browse the documentation for specific guidance, or schedule a screenshare session.
Recommended Reads:
- How to Use SAFe in Jira
- Power Scripts for Jira: The Foundational Guide for Atlassian Admins
- How to Create Tables in Jira: The Complete Guide
- The Comprehensive Guide to Xray for Jira: The Leading Test Management Tool
- Jira Tableau Integration
- The Guide to Migrating Jira: Preparation, Planning, Testing, and Execution