

Organizations are always struggling to manage their ever-increasing information in one place. Jira proves to be a great platform for managing all the project-related data intuitively helping you handle issues, tasks, stories, and bugs in a hassle-free manner.
Jira is not only limited to IT departments anymore but extends to HR, marketing, and operations as well. So if you are in marketing/ sales, you can handle your quotes in Jira like a pro. This blog post will guide you on how you can do that effortlessly using Jira and its add-ons.
Here’s what we’re going to cover in this blog post:
- Why Use Jira to Create Quotes
- Managing Quotes in Jira without add-ons
- How to Manage Jira Quotes with add-ons
- How to Use Table Grid to Manage Quotes in Jira
Why Use Jira to Create Quotes
A quote is often the first official document shared with a vendor/ supplier and as such it’s important to have it in a precise and clear format with accurate information.
If you are using Jira in your marketing/ sales teams, then it only makes sense to handle your quotes in it too. With a feature-rich platform like Jira, you could easily share professional-level quotes with your customers generated directly from issues.
You can also have up-to-date information about your products and can easily incorporate them in your quotes. You can even use Jira to work as a central repository for all your product information and manage and generate quotes from it.
Managing Quotes in Jira without add-ons
So we use Jira to create quotes. But how do we manage and organize them?
There are a few ways to manage quotes in Jira without using add-ons. In Jira Cloud, you can add tables directly in the description field of the issue.

The same can be done in Jira on-premise using either the Visual mode or the text mode. In the text mode, the pipe character (“ | ”) is to define the cells of your table and a double pipe (“ || ”) for the headings, then insert this into the description field of the issue that you want to work on.
Note: Learn more about how to create basic tables in Jira on-premise.
However, there are many disadvantages to this approach. First, for creating such tables you need to enter data manually in the rows and columns. This might lead to incorrect or misplaced data. Plus, you can’t create dependencies between columns of your table across multiple projects or issues in your instance. You can do a bit more with Visual Basic here, but it’s a lot of work, honestly.
Jira supports Groovy as its native scripting language. As such the administrator can build a scripted solution for synchronizing and handling quotes across multiple projects, but without proper APIs and addons, this requires significantly more work. And most Jira users do use add-ons like ScriptRunner to develop and run their scripts anyway.
From the above cases, it is clear that working with add-ons goes with a sound reason. So why not employ a ready-to-use, dynamic, and intuitive add-on?
How to Manage Jira Quotes with add-ons
Introducing TGNG – Table Grid Next Generation

The Table Grid Next Generation add-on enables you to embed and structure vast information related to an issue in just one single table. You can do this using the intuitive TG features.
Let’s have a look at what Tabe Grid can do for you.
- It provides you with a familiar spreadsheet-like interface with structured rows and columns for increased usability. There are a lot of column types you can choose from like Sequence, String, Date, etc. You can apply different filters to group columns according to a range of fields (like assignee, labels, status, or the column type).
- Like in spreadsheets you can easily apply formulas to columns for quick and easy calculations.
- You can have drop-down lists with single select or multi-select options.
- You can dynamically populate rows or columns of the grid from external databases like SQL, PostgreSQL, Oracle so you don’t end up making manual data-entry mistakes. You can even access a remote REST API through a URL and populate your grid from data present there. Rules and restrictions can be applied to ensure your data is coherent and consistent across multiple projects and issues.
- You can import and export data from CSV and Excel files with just a touch of a button.
- It also provides integration with the customer service desk to directly map queries/ tickets in your grid.
TGNG has a cool interface along with enhanced features based on feedback from the community. And true to its word, it can be used for a variety of use cases.
Common Use Cases for TGNG
TGNG can handle large datasets with the least fuss possible and serves to work as an interface to move this data across multiple tables through the entire ecosystem of Atlassian products.
Some of its use cases are listed below:
- Creating invoices and managing quotes
- Keeping track of test execution plans
- Onboarding a new employee to the service desk
- Managing the internal purchase process of an organization
- Keeping note of expenses and remittances
- Tracking development team progress in an organized manner
- Dynamically updating product lists by taking data from different Java APIs and Rest interfaces
How to Use Table Grid to Manage Quotes in Jira
An Advanced Use Case: Creating and Managing Quotes in Jira
Let’s see Table Grid Next Generation in action. In this section, we’re going to walk you through some of the TGNG features that can help you manage your quotes in Jira.
Getting Started
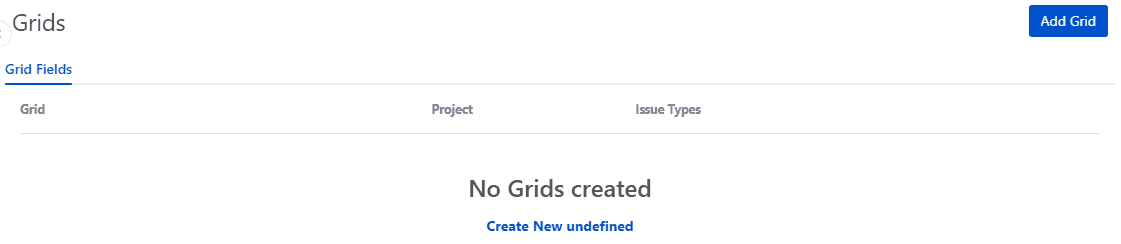
Once the plugin is installed, this is the first thing you need to do on the administration page:
- Navigate to a block called “Grids”. Grids are what we call the tables.
- Once you click this, it will take you to a page allowing you to create your first grid.
- The list is initially empty. You start by clicking the ‘Add Grid’ button on the right.
Note: Getting started with TGNG can be a bit different for Jira on-premise. To learn more about it, check out this documentation page.
Creating the Grid
Here’s how you create a grid:
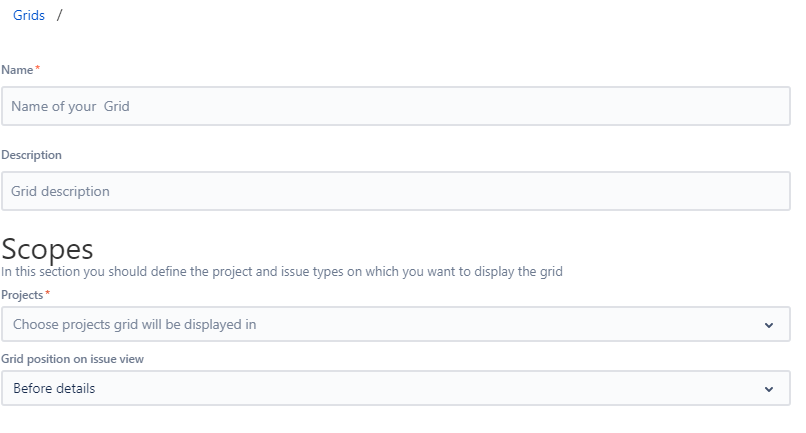
- You start by giving a name to your new grid. It will help you distinguish your table. Don’t forget to give a hint of its purpose in the description.
- Since you may want to display your grid only for specific projects and issue types, you can define them in the ‘Scope’ section.
- By default, the grid configuration comes with predefined columns.
- Configure the columns according to your needs.
- Click on “Save” next.
Viewing the Grid on the Issue
To see your grid in the issue view, create an issue within the respective project and relevant issue type and see the grid.
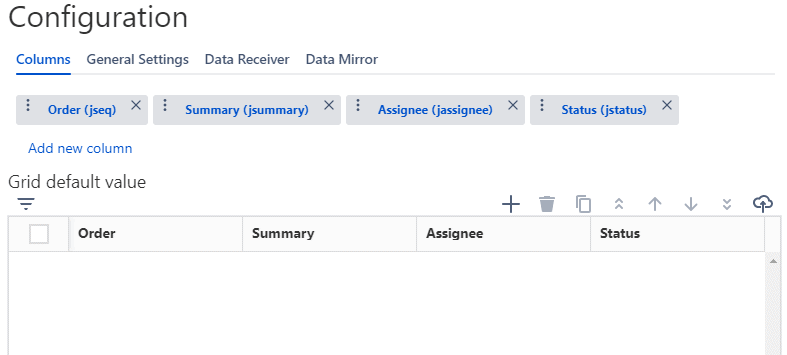
Grids come with different column types which you can easily configure according to your specific needs:
- String
- Textarea
- Single Select List
- Multiple Select List
- Sequence
- Number
- Formula
- UserList
- Date
- ….etc
Read this to learn more about these column types.
From the above list, we are going to refer to the string, list, sequence, and formula as the primary column types to be used for quotes.
So how do you configure different types of columns in the grid?
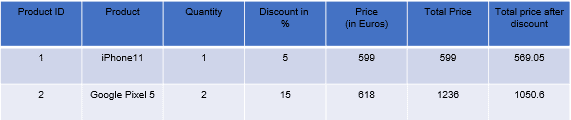
Note: We will be using the above example throughout this section.
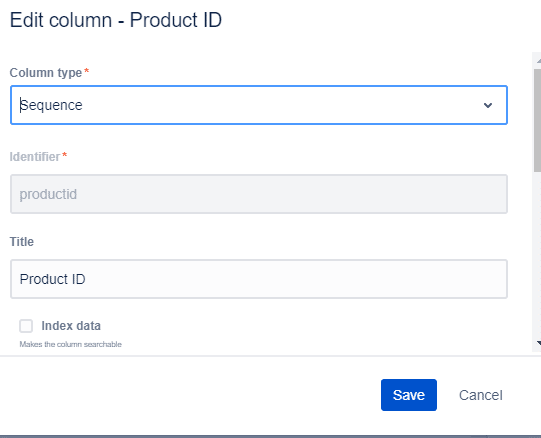
Using Sequences to Configure Columns
Product identifiers (ids) can become mundane to be arranged sequentially according to your inventory. Specifically for ids that are ordered in nature. You can easily use the ‘Sequence’ column type to assign the product id automatically in a sequence.
This can also help you identify and group/ filter columns using their product id without extra work. For this, select the column type as a sequence when creating the column.
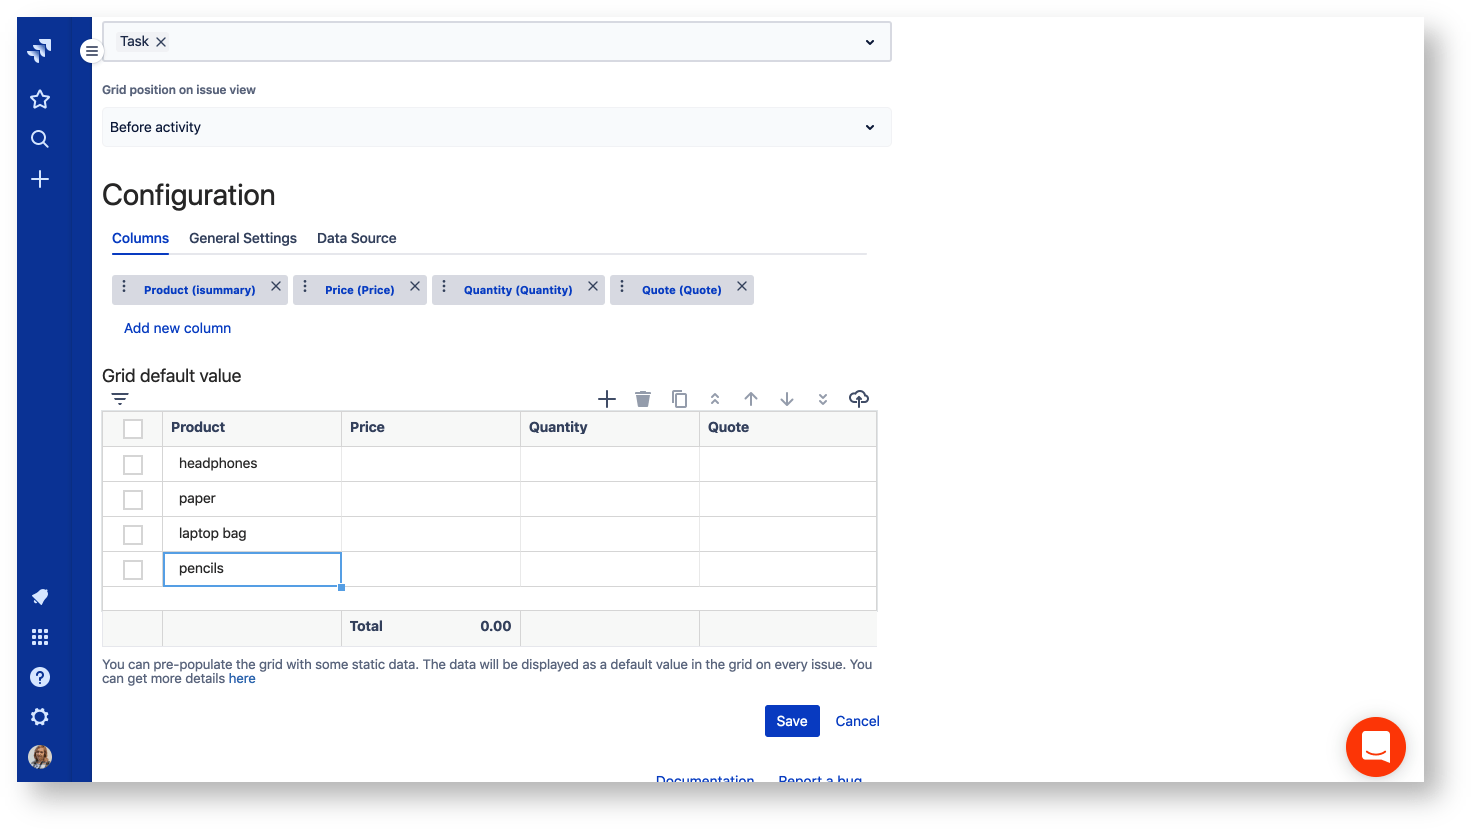
Adding Static Data in your Grid
You can fill the grid with some static data. Instead of manually entering the data every time, you can display the static data as a default value in the grid on every quote. This can be added to the grid configuration page.
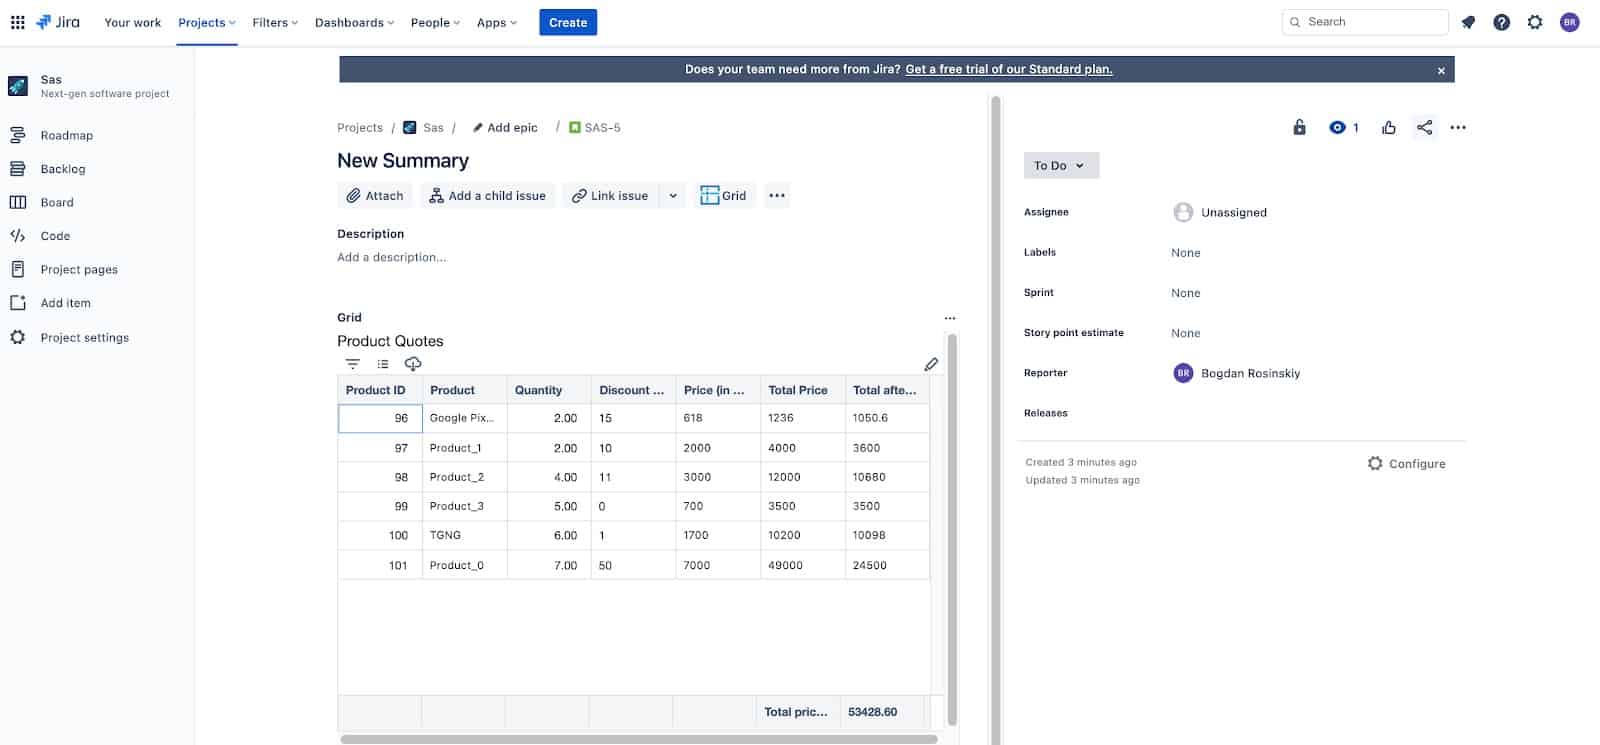
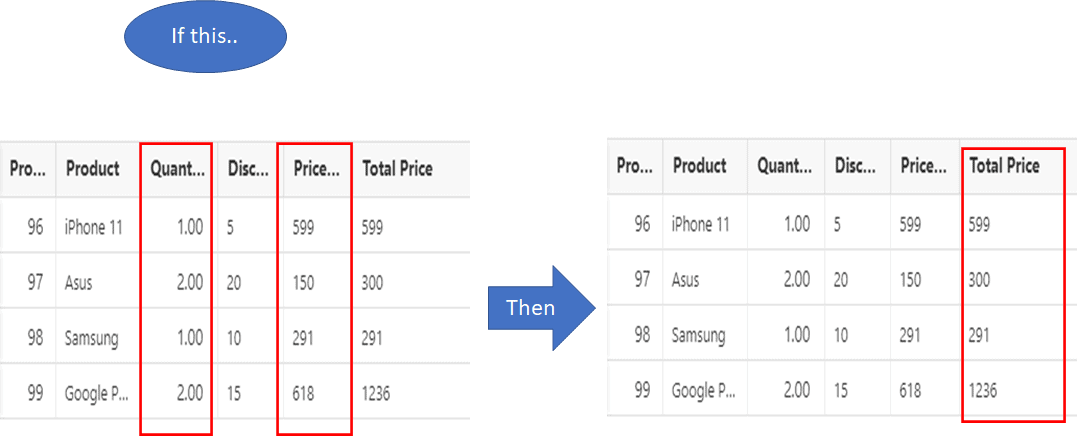
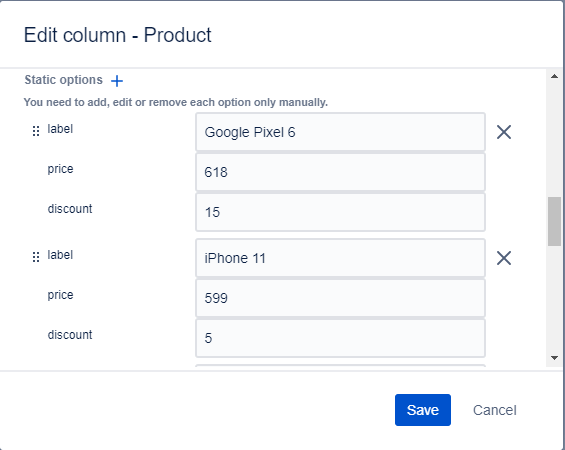
In the example below, you can see that the product names have been filled with static data. This can be useful when you need to add products in your quotes beforehand or if you have predefined values for some of them.
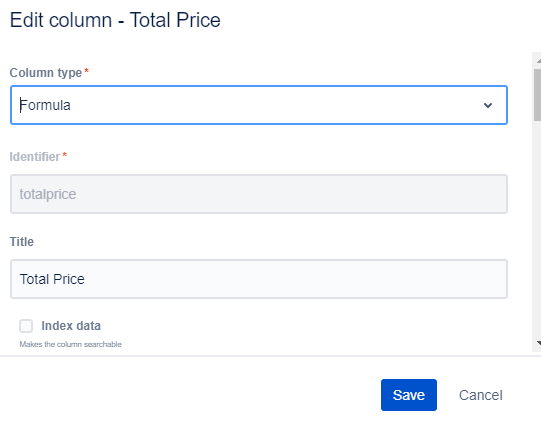
Using Formulae Column Type
Sales quotes often embed information that needs to be used in some form of calculation. They can be used to apply discounts on products, aggregate the prices by finding the total sum, adding the VAT charges, etc. So there is an obvious need for using formulae in columns when it comes to handling quotes.
The ‘Formula’ column type can support many different types of calculations in the form of Javascript.
You can add a formula to a column in a grid by selecting the formula column type in its configuration.
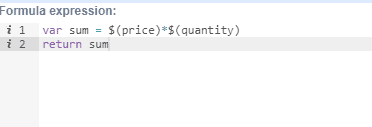
We can then apply the required formula in the formula expression tab. In our example, when the price and quantity are entered, then the total price is automatically calculated using the formula shown below.
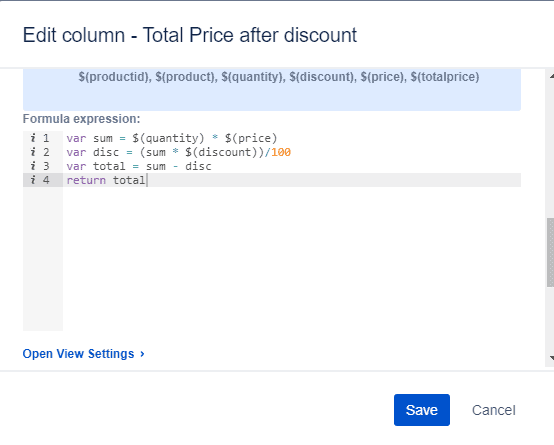
You can even use advanced formulas and add a little logic to calculate the values of columns. In our example, total price after discount has been calculated by using the following formula:
In addition to this, every column by default also has an aggregation function. This can be used to calculate simple aggregations like min, max, sum, average to even complex ones which can be configured using javascript and a little logic.
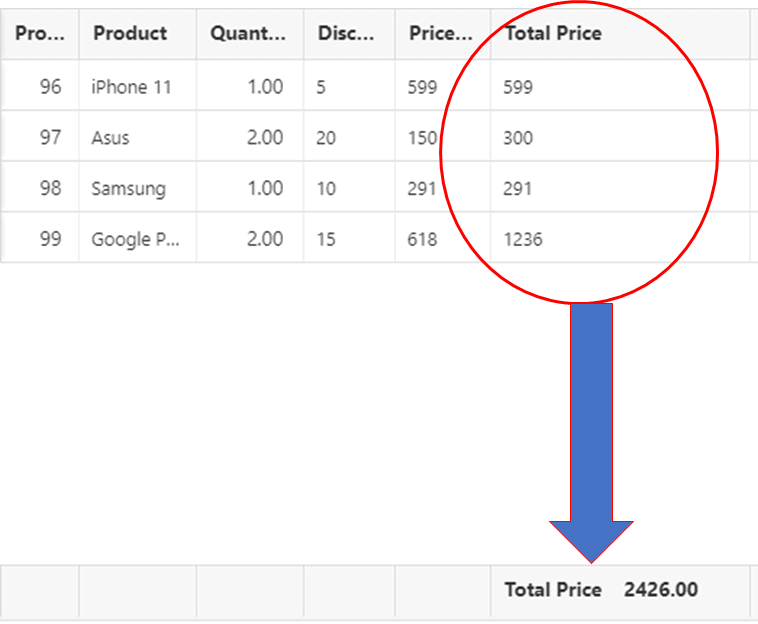
Once the total price after discount has been calculated, the aggregated sum of the total price column is shown at the end of that column. This can be done using the aggregation operation “sum” for the column.

Using Column Value Placeholders
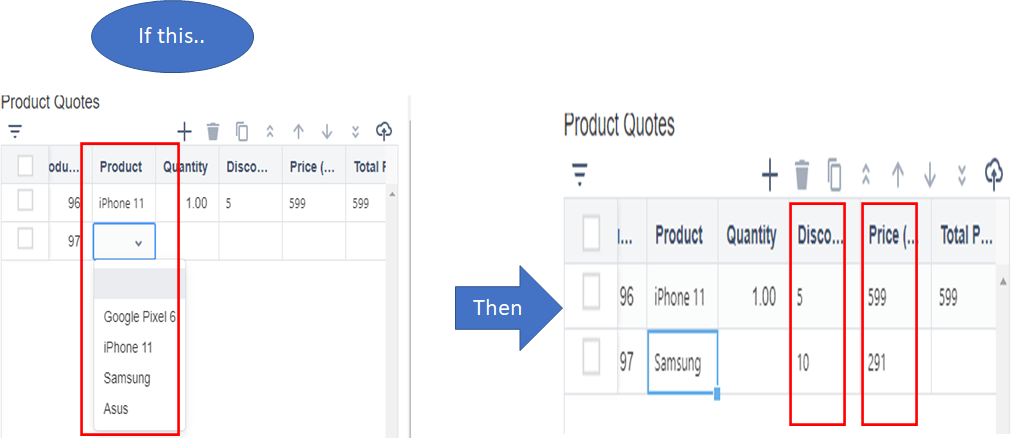
Column value placeholders allow you to create dependencies between columns in your grid. For example, a cascading list that filters column data based on the value from another column. This gives you unlimited control of how you can pull data into your table from across your Jira instances and help you to fill data in the columns dynamically.
In our example, the product column is a drop-down list where the price and discount of the product are already provided. So, when the user selects a particular product from the drop-down list, its corresponding price and discount are automatically filled. To pre-fill this price and discount for a product, we have to mention it in the option attributes of the product column.
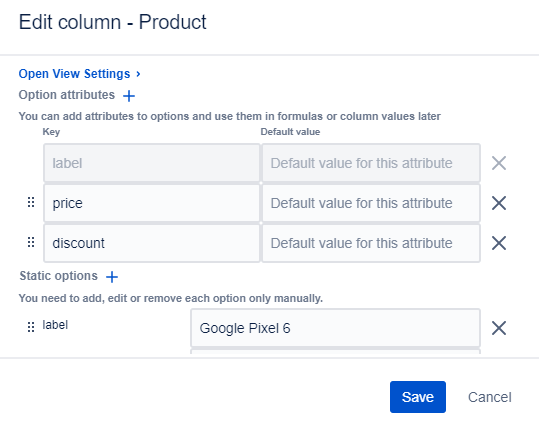
Option Attributes
To know more about option attributes, read this.
Once the option attributes are provided, you have to fill in the values for the product, price, and discount.
This saves a lot of data-entry time, as you don’t need to search the price for specific products and enter them manually. Just select the product and let the column value placeholder do its magic!
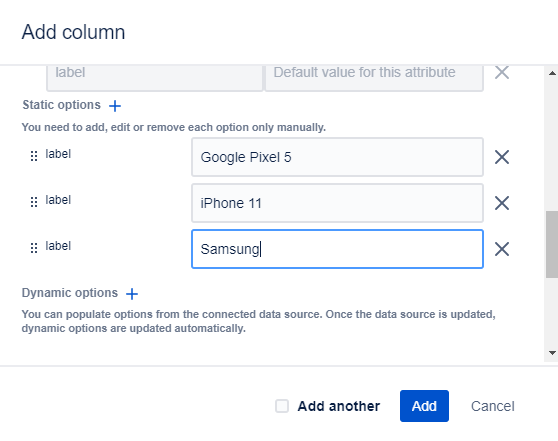
Dropdown Lists
It’s very common to make data entry mistakes while filling in the product information manually. The product names can go wrong, the prices can be entered incorrectly affecting the total price of the product, and so on. These mistakes could confuse your team and can hamper your sales quotes.
All this can be avoided using TGNG’s list feature. In simple terms, this works as a drop-down list for all your products. You can select the required product, even automatically fill the price according to the selected product as shown in the formula section. Evidently, you can never go wrong with entering your product details again.
These lists come as single-select lists or multi-select lists.
- Single select lists are drop-down lists with one selectable option.
- In multi-select lists, you can choose multiple options.
Both of these come in Static and dynamic entry options.
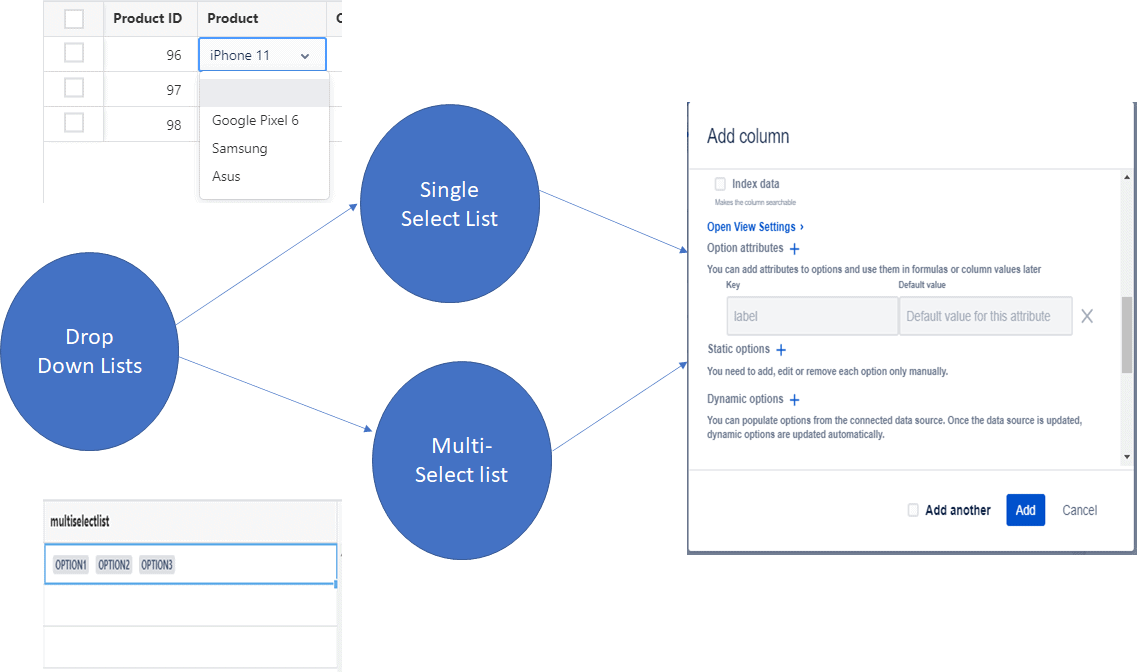
For Static Options: Simply enter data in the label and its corresponding value field. You can see this as the drop-down list (Single/ Multi-Select) while adding the rows.
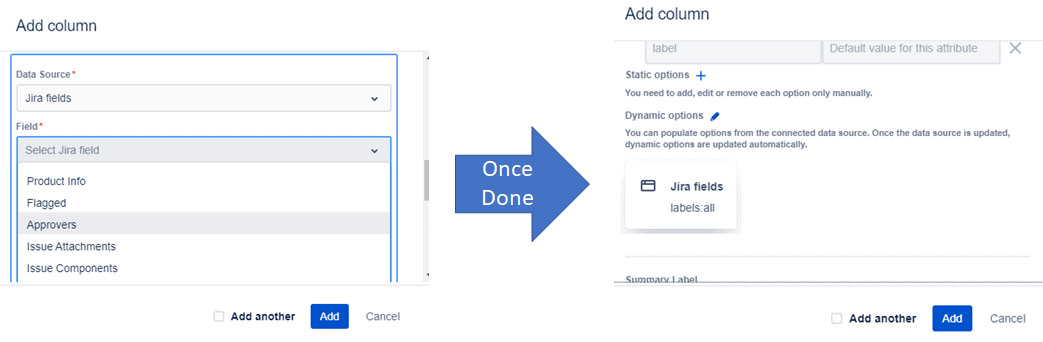
For Dynamic Options: Dynamic options are for filling up the drop-down list (Single/ Multi-select) on the fly by extracting data either from Jira fields or from a data source.
Here data sources can be databases or Jira Fields. TGNG supports MySQL, PostgreSQL, Oracle and Microsoft SQL Server, and even REST APIs as databases.
Read this documentation to learn more about how to add data sources.
To populate the data in the list dynamically, you can use:
- Jira fields
Select the data source as Jira Fields, choose the required field, and decide the scope (e.g: for current values or all values). Then choose the mapping and you are good to go!
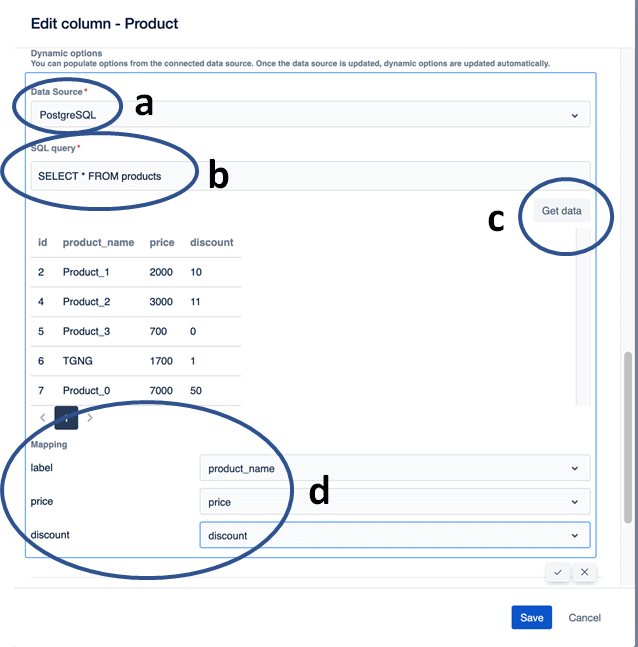
2. Database Like SQL
Here,
- Select data source: The type of database (SQL, PostgreSQL, etc) is selected.
- Enter the SQL query: The query used for fetching the data from the database.
- Get the data: The fetched rows from the query result are displayed.
- Map the data: Map the data in the grid to the rows fetched from the database.
Using Data Receiver to Pre-populate the Rows of the Grid
The grid is capable of connecting with an external database. If you have your product catalog saved in SQL (or any other supported database) and are worried about how to auto-populate this product data into the rows of your grid, then data receiver is the way to go.
The steps followed for this are pretty much the same as for selecting the data source for the dynamic options in lists.
For creating a data receiver, click on the tab named “Data Receiver” while configuring the grid:
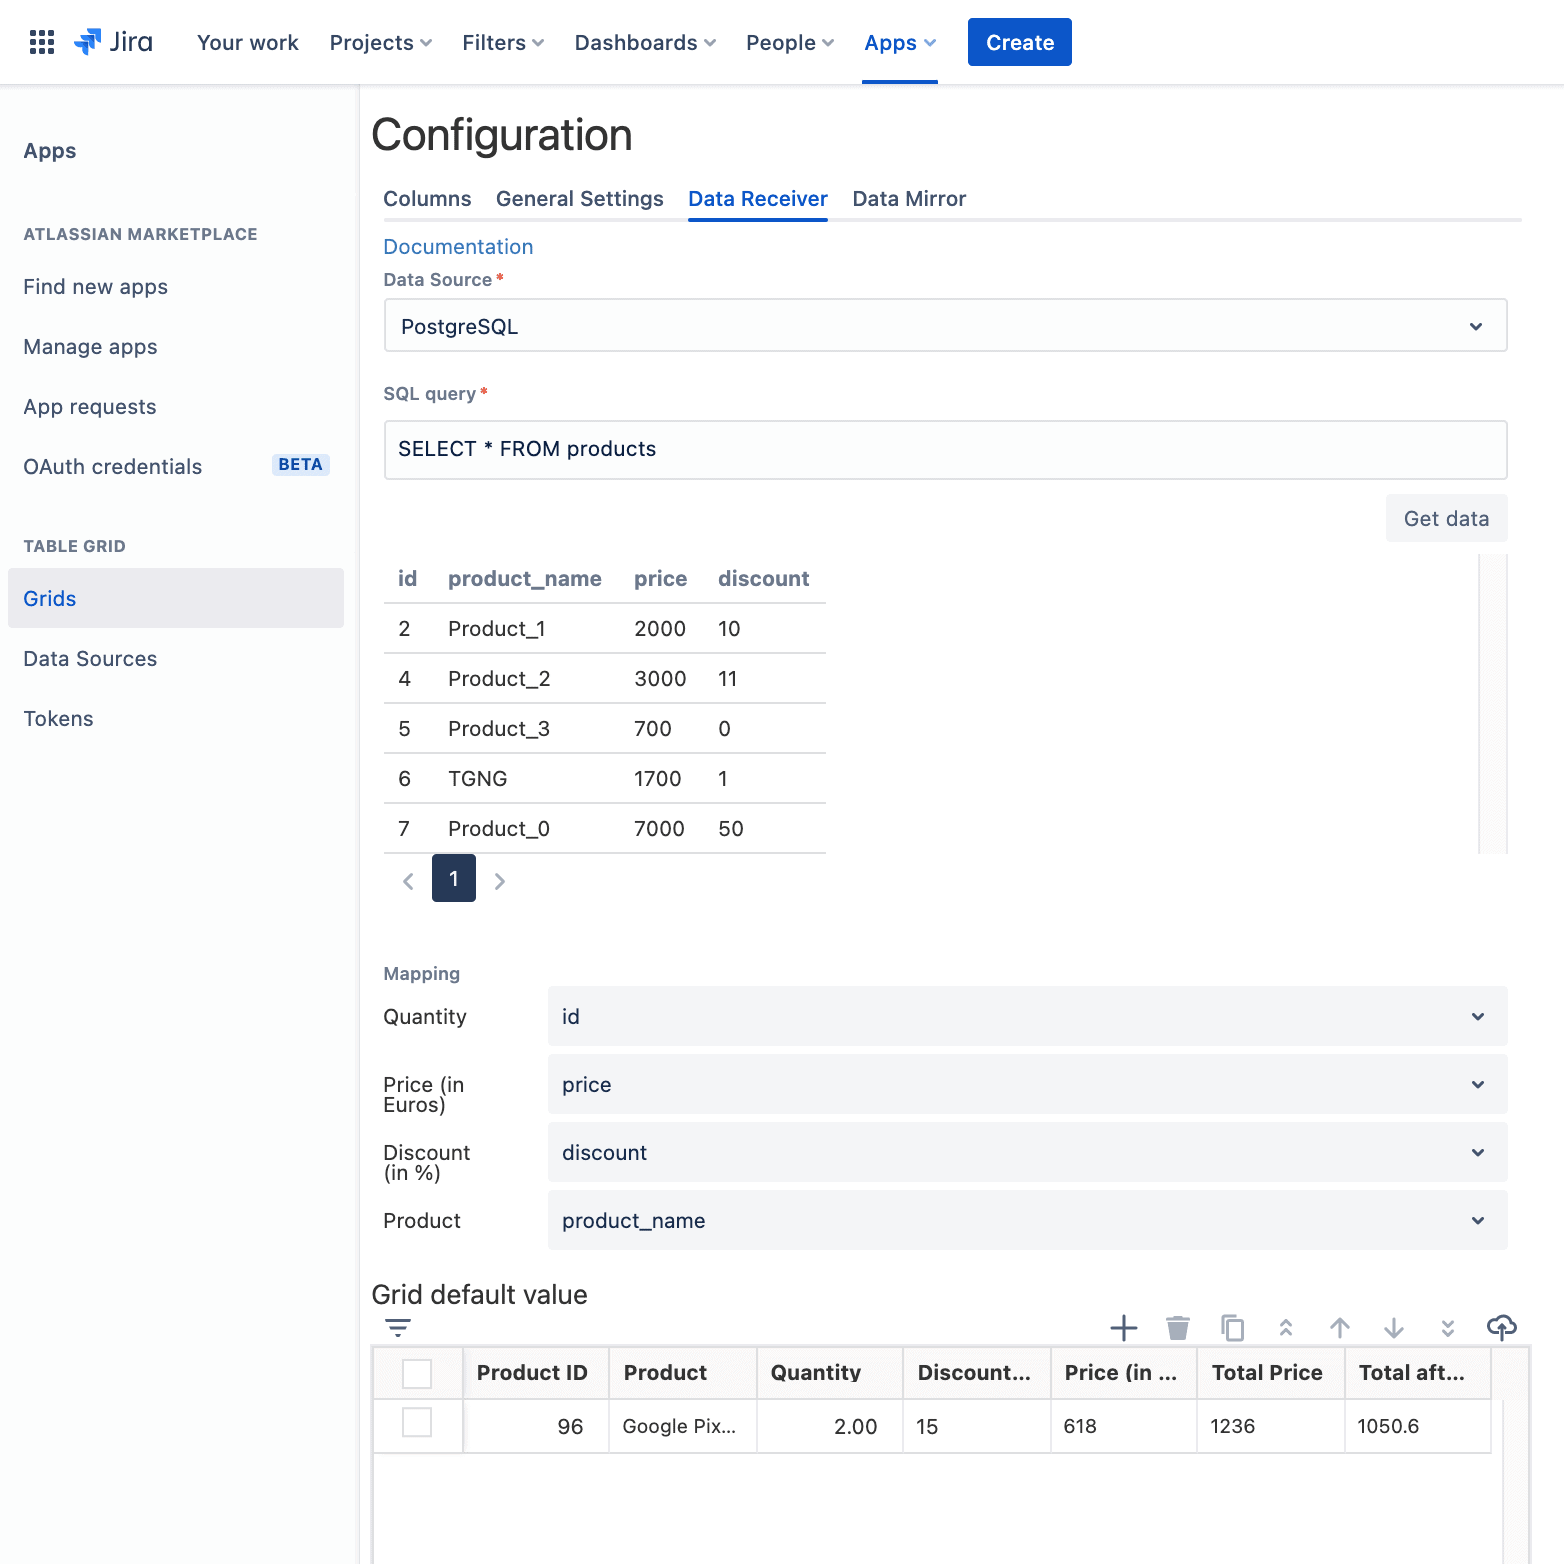
Once, the data receiver has been set up, the rows of the grid will be automatically populated with the column mappings specified. This is powerful because anytime there is a change in the database, it gets reflected automatically in the grid as well.
Note: You can also use driving tables in TGNG to work as a central repository for all your products and use it to manage data in your grid. Currently, driving tables are only supported on Jira on-premise. To learn more about it, check this out.
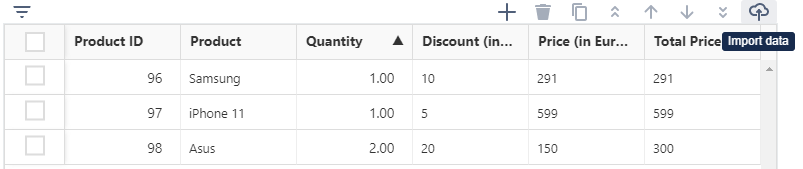
Import Quotes from CSV and Excel
If you have been old-school storing your sales quotes in Excel /CSV files, be rest assured. TGNG’s import feature can directly allow you to get all your data from these files and embed it directly into your grid. This can save a lot of your time.
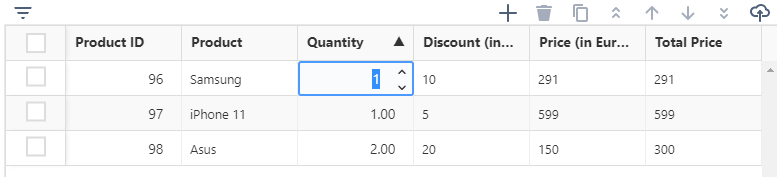
Inline Editing
This powerful feature allows you to edit data in a much simpler and faster manner.
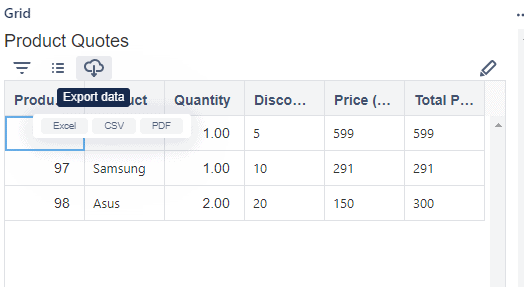
Export your Data
You can easily export your data into a PDF, CSV, or Excel file. This is helpful to make your quotes truly portable. You can print or save them on your computer to make them accessible anytime, anywhere.
Conclusion
In this blog post, we saw why it’d be more efficient to manage quotes in Jira using Table Grid. It would save you a lot of time and you won’t need manual entries and can prevent mistakes. With TGNG, you can pre-populate your product data, add formulae for calculating VAT, discounts, etc, use column value placeholders to auto-fill columns, and even fill rows in the grid from an external database.
Table Grid serves to make your sales quotes manageable, portable, readable, and usable. And with its intuitive interface, you can easily configure the monotonous task of creating sales quotes with just a click of a button.
Recommended Reads: