

This article was written by Aliaa El-Nashar from Infosysta.
Every role within a company requires a specific tool that will be used predominantly for work. A graphic designer most likely uses Photoshop more than a developer would. A content strategist would probably have more experience with CMS tools than someone in sales or legal. It is what the role demands, and clearly, there’s nothing wrong with that. But if there’s one tool everyone is required to use to varying degrees, it’s email because it is the most universal means of communication. Both with your colleagues within the company and with others outside.
As such, optimizing the way you use it is vital. So if your company is dependent on Jira to catalog tasks and what everyone is working on, integrating it with your email can do a lot of good. Especially if your organization uses Outlook.
Today we will be sharing eight benefits of integrating your Jira account with Outlook, using a Jira plugin for Outlook, and offering a walk-through of the steps you need to take to make this integration happen.
Why Should you Consider a Jira Plugin for Outlook?
There are various benefits to utilizing a Jira integration for Outlook that will optimize your workflow and increase your efficiency.
No more time will be wasted switching between Outlook and Jira to create tickets and log work. Everything is much simpler when you can do both in the same place.
In this article, we will use a solution called OTJ Jira for Outlook by Infosysta to implement such an integration.
One: Use Outlook to Create Jira Tickets from Email
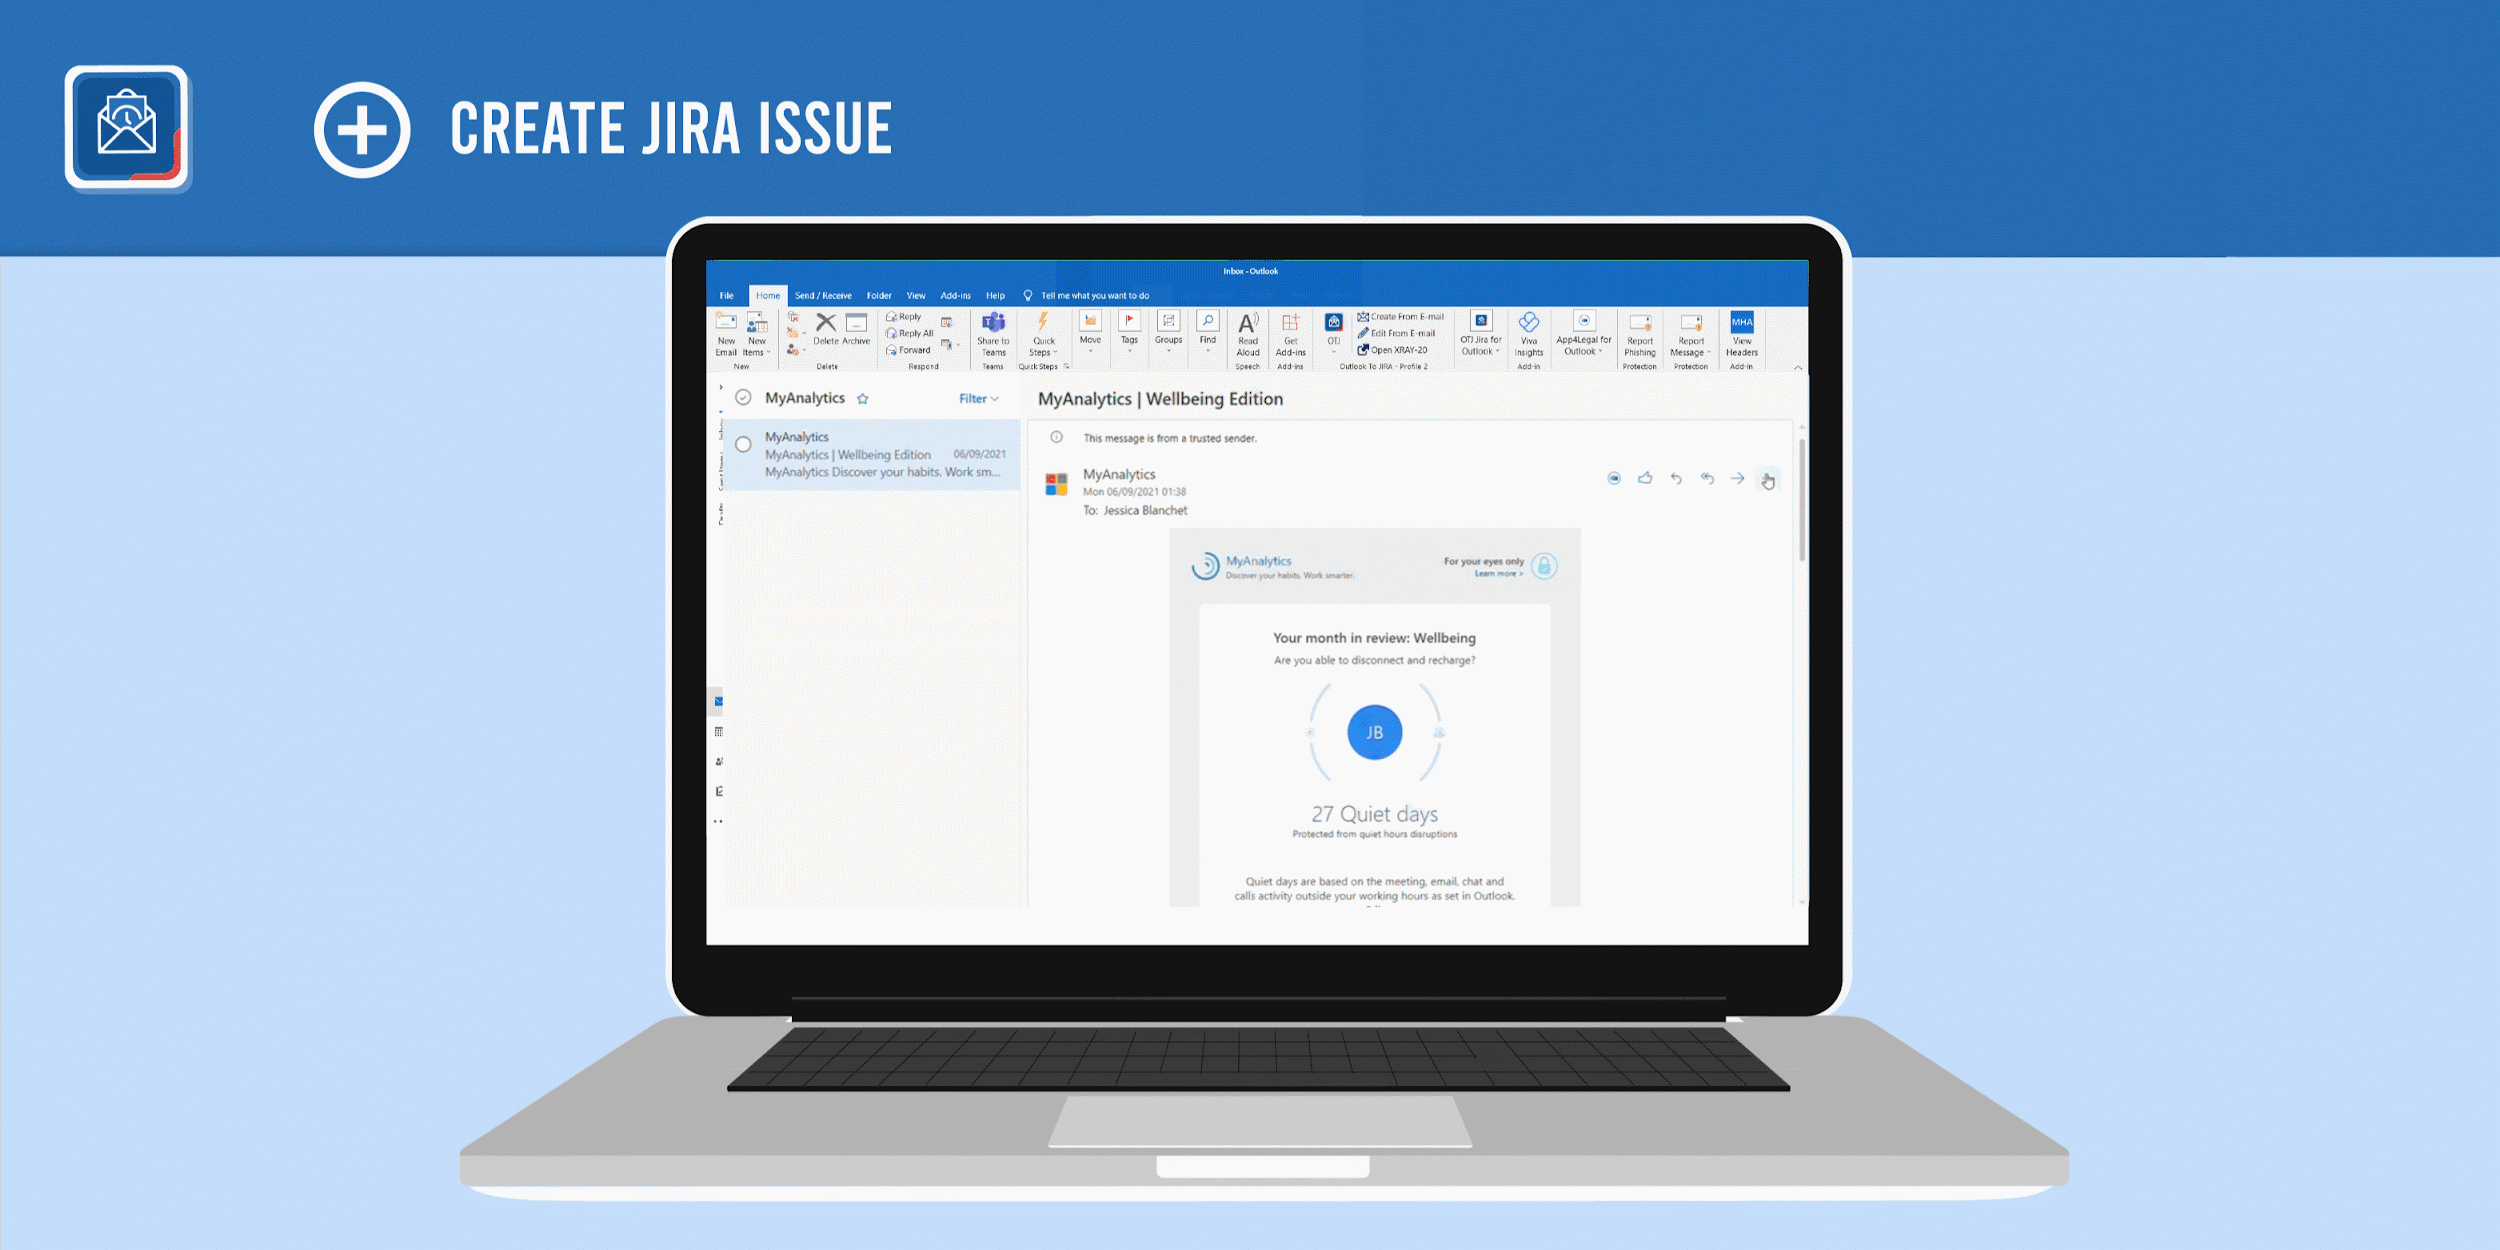
Once the integration is in place, you can start making use of the plugin by creating Jira tickets. Whether they are regarding a specific email you’re working on, or anything related that you may have remembered on the spot, you can quickly create a ticket without heading back to Jira.
Two: Attach Emails to Jira Tickets
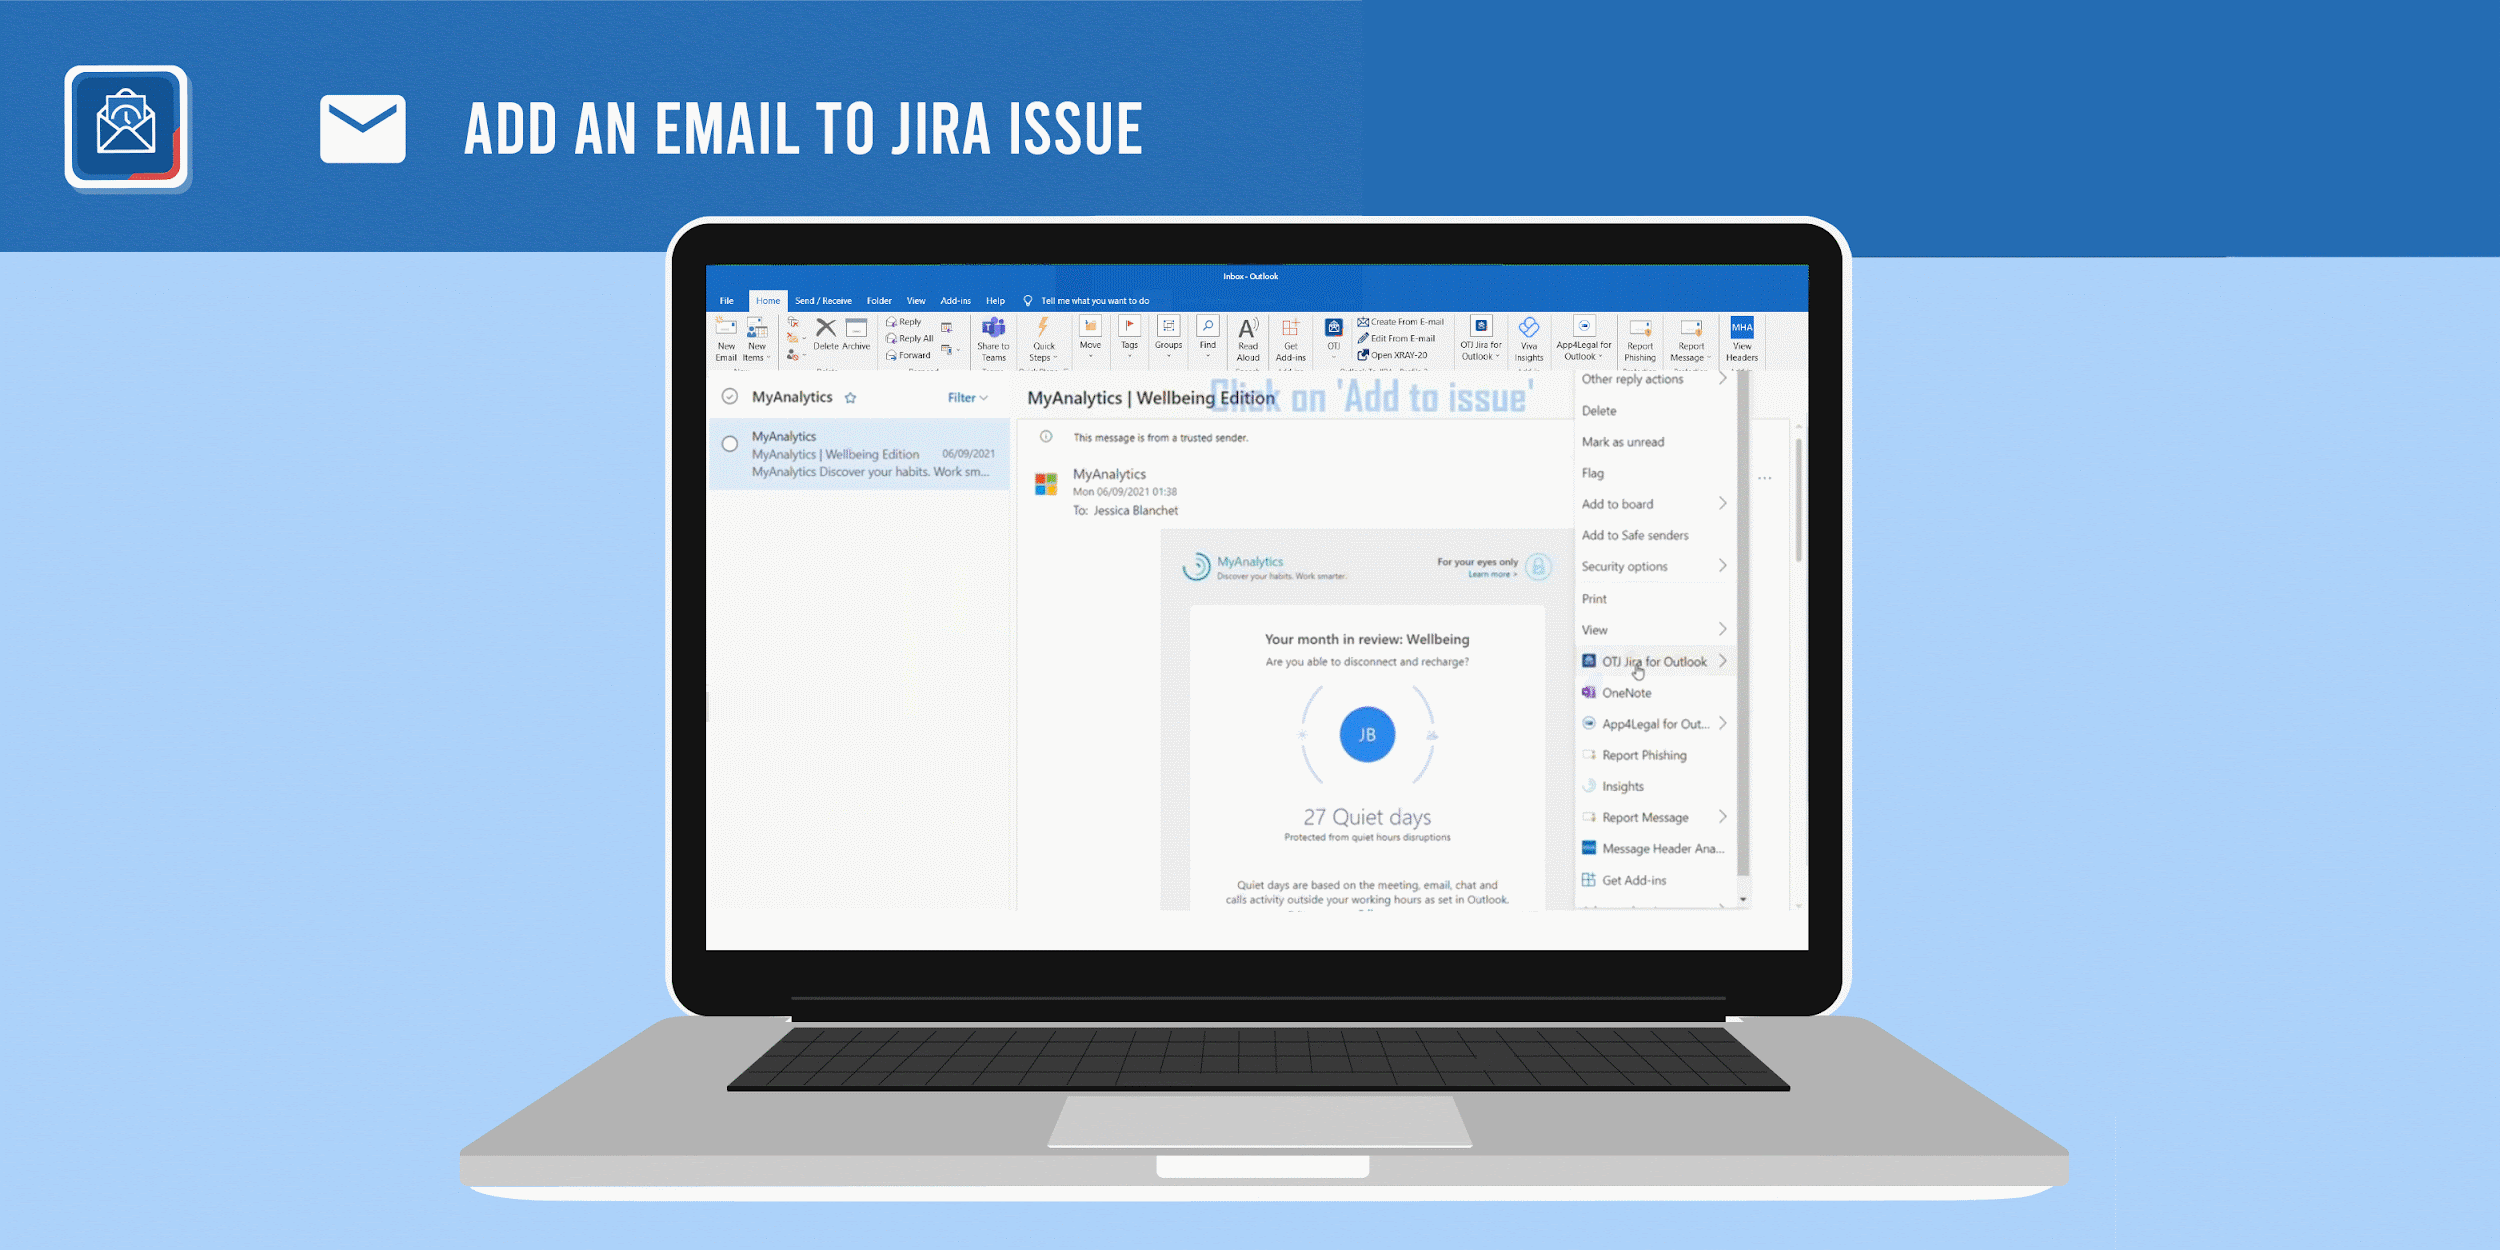
With the help of an integration, you’ll be able to locate tickets you’d like to attach specific emails to. Additionally, you can turn specific emails into tickets in the first place, converting all the email’s contents into a Jira issue’s attachments.
Not only that, users have the option of using an email’s content to update a preexisting Jira ticket by adding it to a comment.
Three: Assign Jira Tickets from Your Email
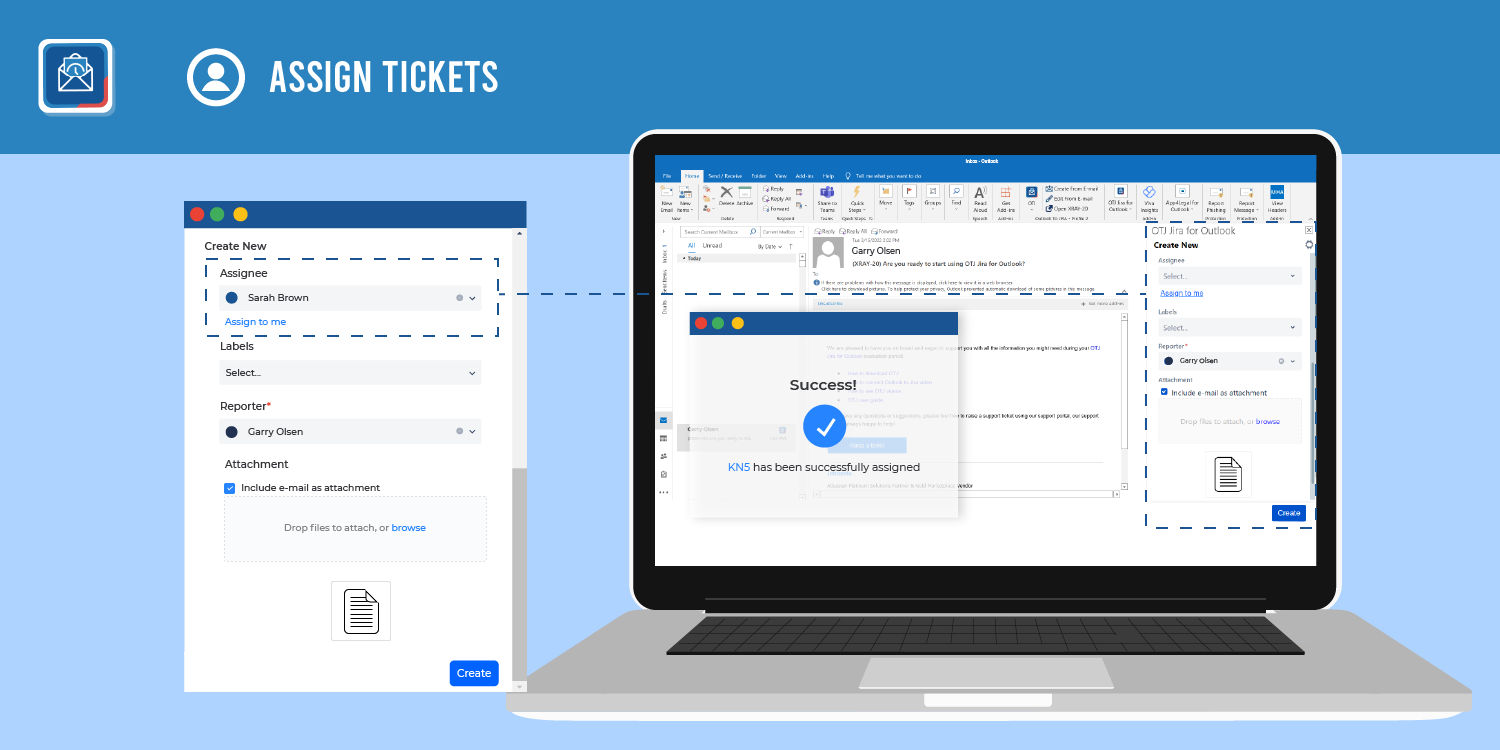
One thing that’s really ideal is if a specific email isn’t particularly relevant to your line of work or what you do. In that case, you can send it to the best person to deal with it by assigning the ticket to them as you create it.
Four: View Issues Related to Emails
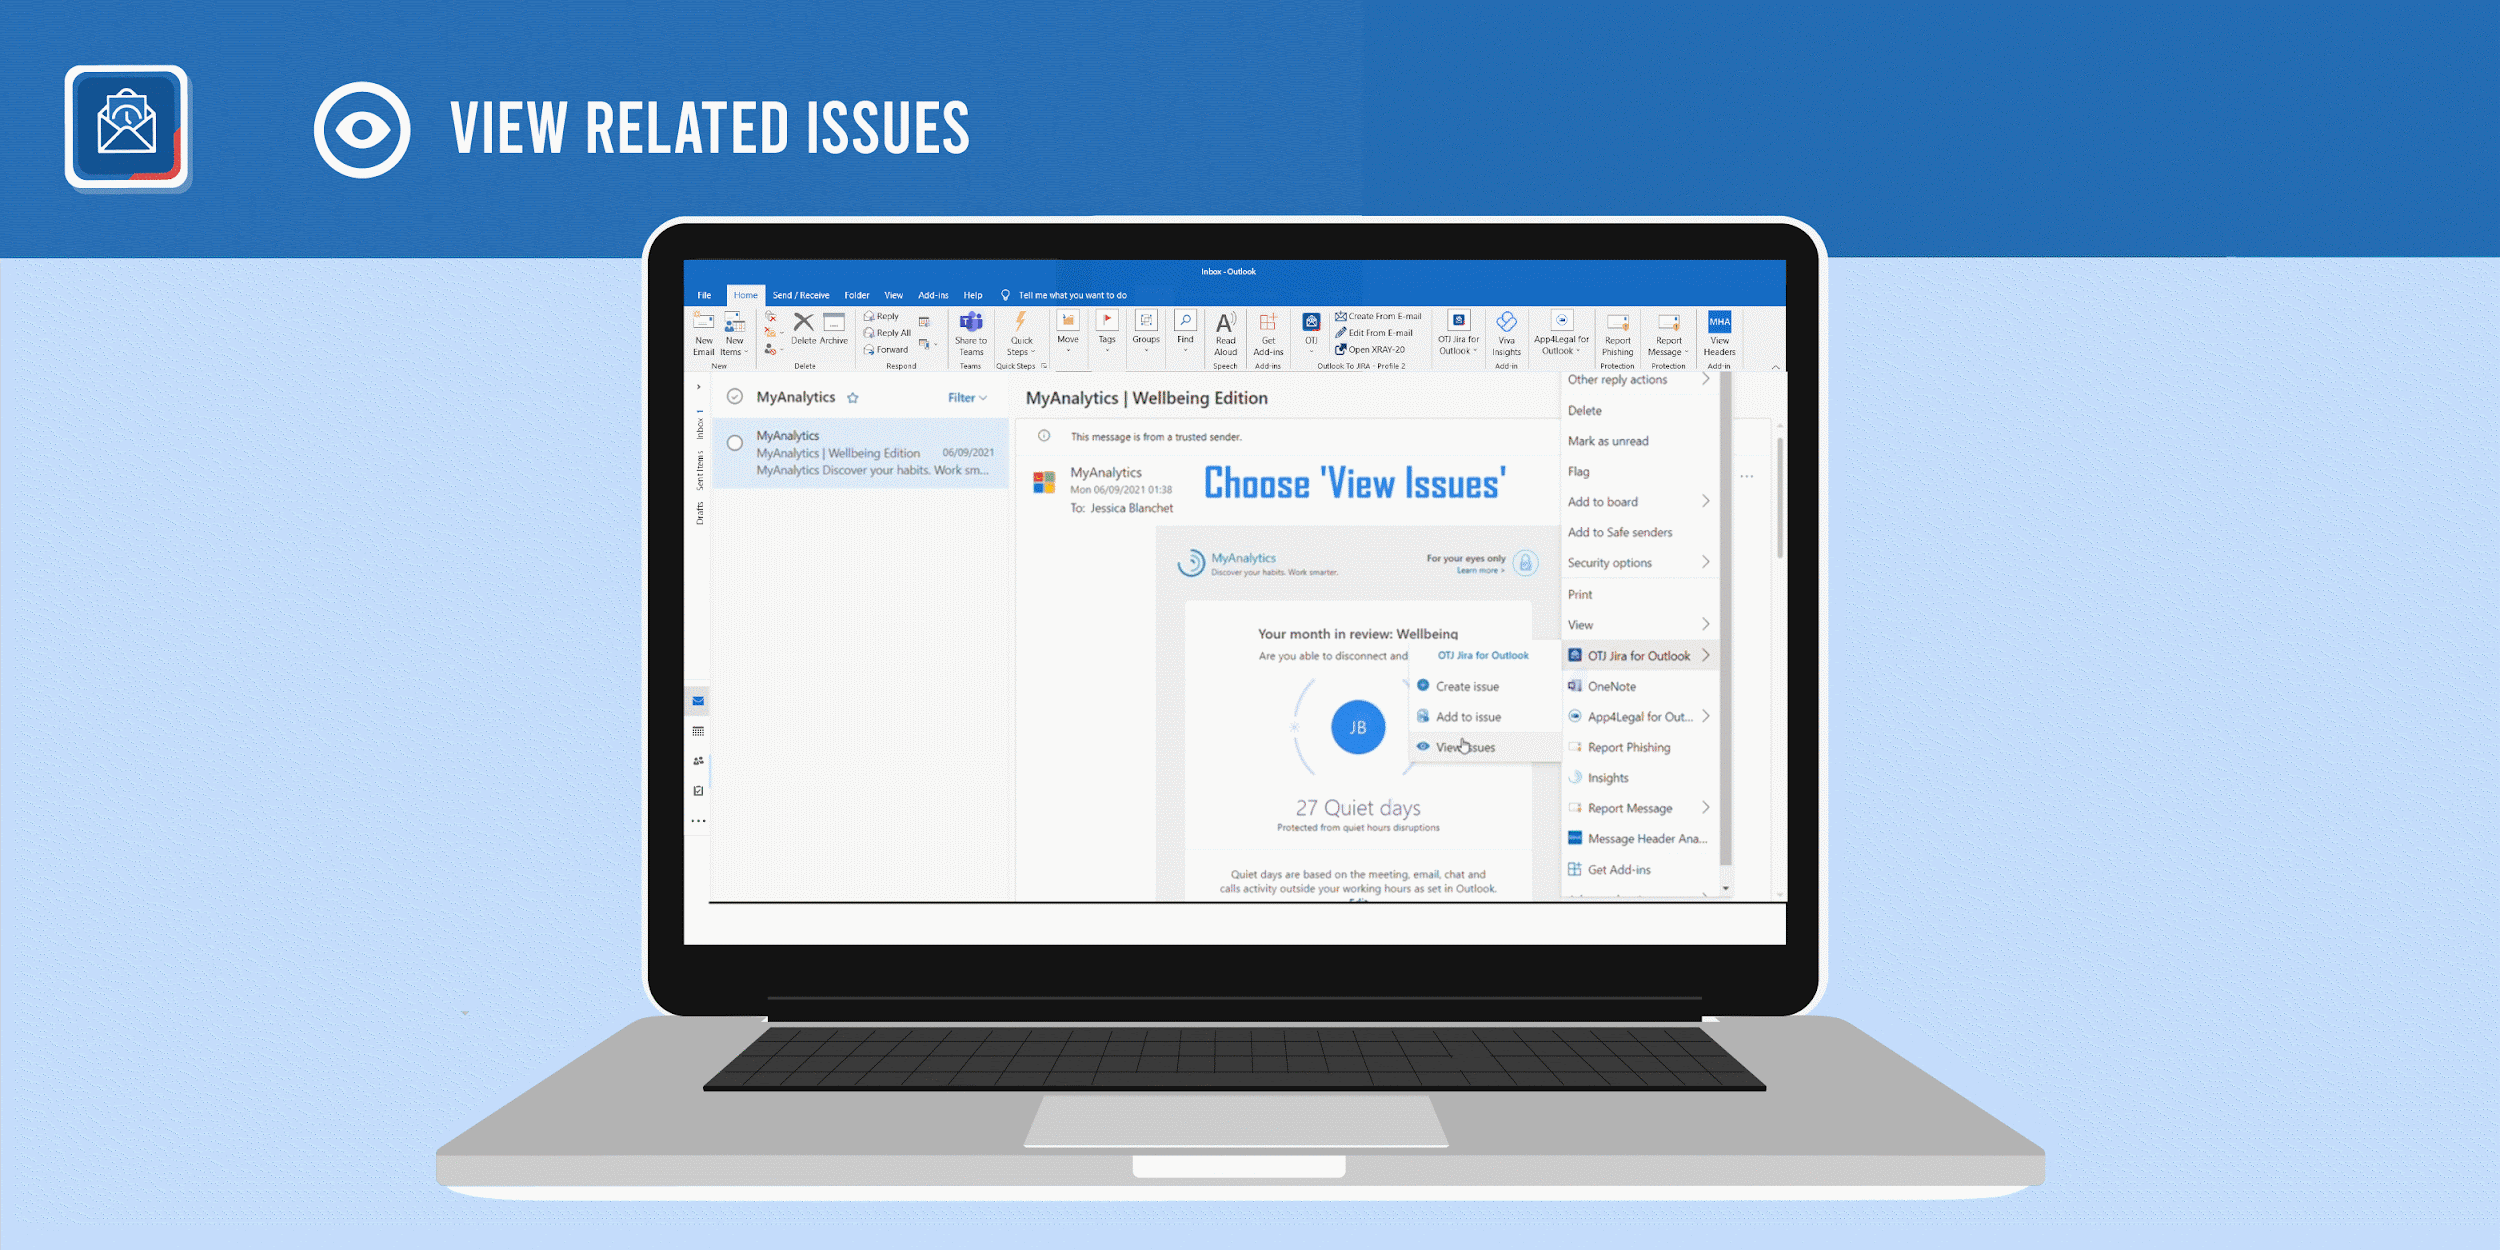
There will be times when you’ll have more than one ticket created from the same email. Unfortunately, if you receive a lot of them on a regular basis, the ones you need could get lost in your inbox.
With a Jira plugin for Outlook, you could view related issues to a specific email, giving you a very convenient way to learn more about a customer’s ticket history.
This could help you get a better understanding of recurring problems or how involved the customer is with your brand.
Five: Log Work from Your Email
In some cases, your job might require you to answer dozens of emails or correspond with potential clients, for example, or form liaisons. Since you’ll officially be working from your email, it would be helpful to be able to log work without leaving and heading to your Jira dashboard.
Not just that, if you have any meetings scheduled via your Calendar or Teams, you can also log that as work from your Outlook.
Six: Import Files from Your OneDrive Account
If you have files or images that are prevalent to a specific ticket, you should make them available on your OneDrive account. When you connect your Outlook to Jira, you’ll be able to access your email’s cloud and then find the right files to include in your Jira tickets and attach them.
Seven: Use Code to Extend Jira Ticket Functionalities
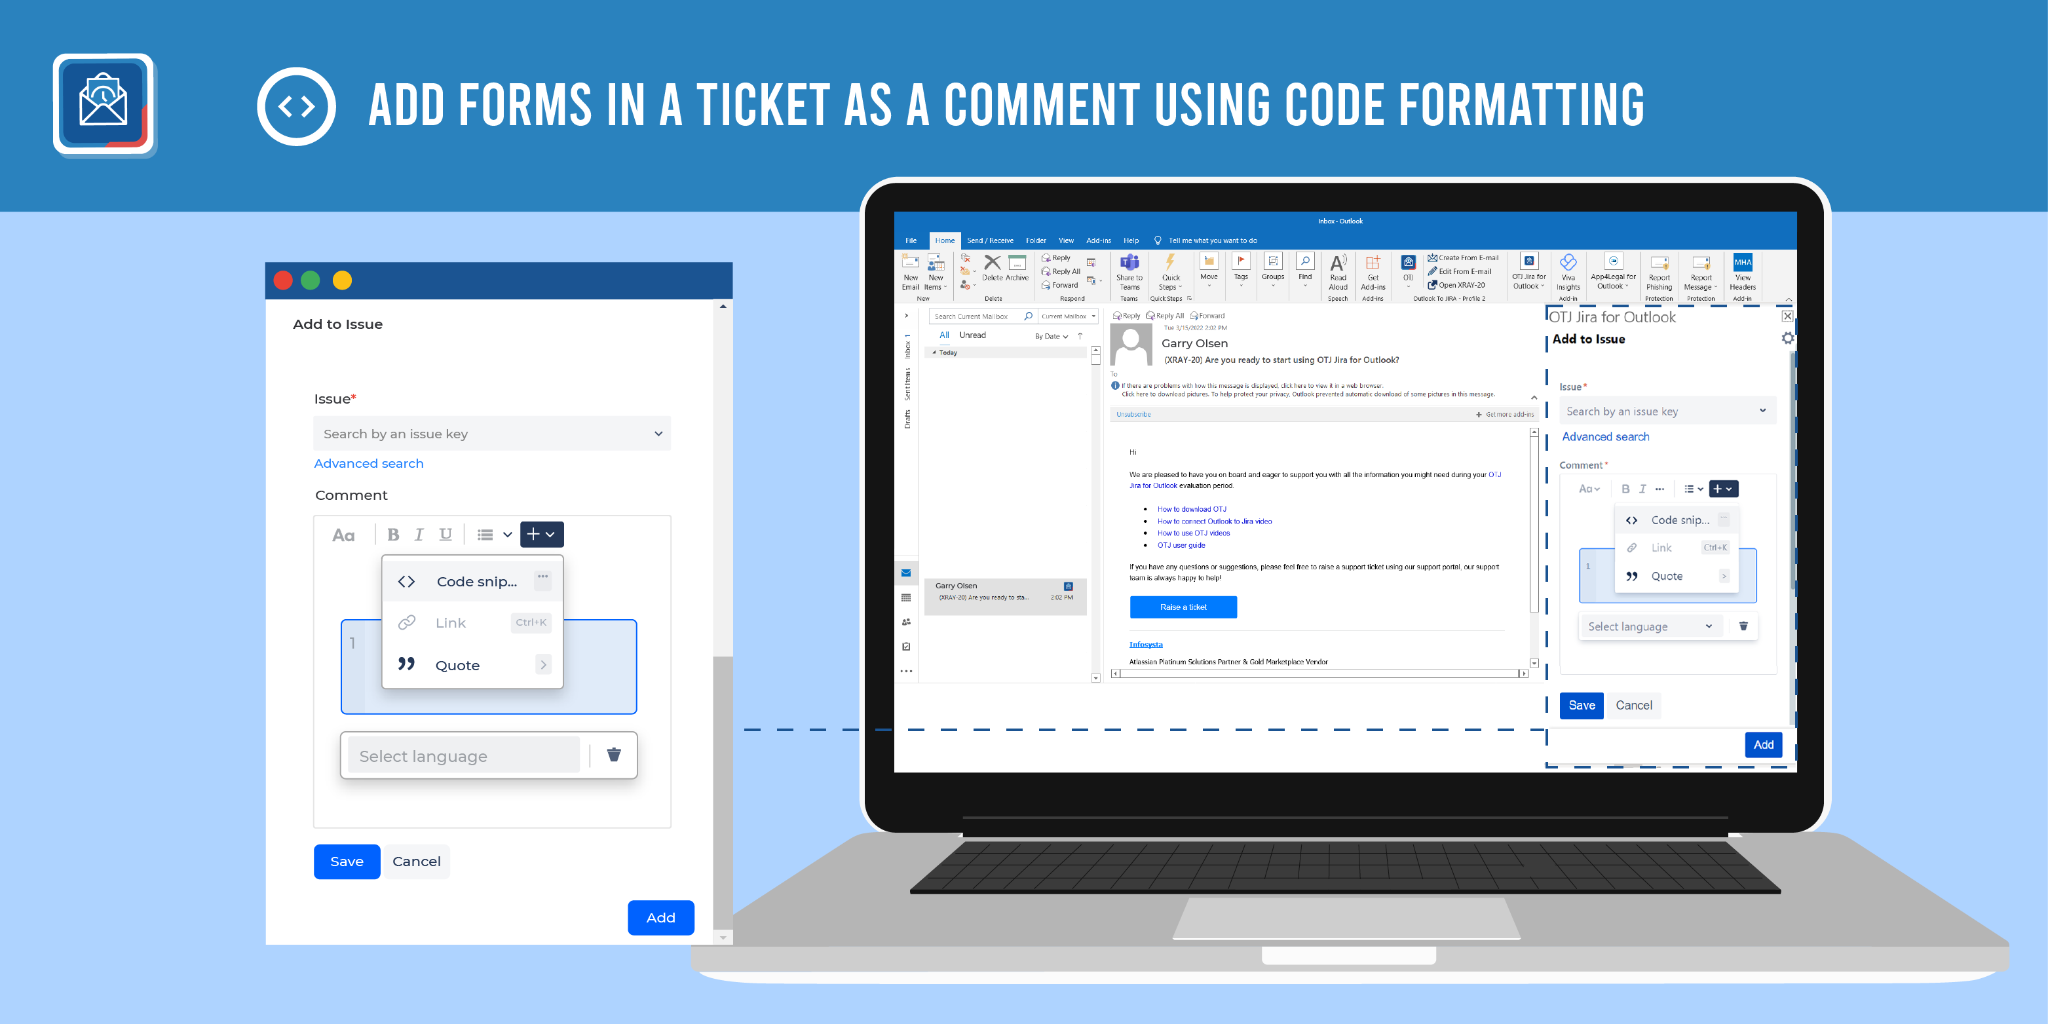
Did you know that it’s actually possible to use coding within your Jira tickets, even when creating them from your Outlook email?
Light code can extend how far you can go with your Jira tickets. You can change the formatting, or embed things from outside, like forms or graphs. This will then be reflected in the ticket’s description.
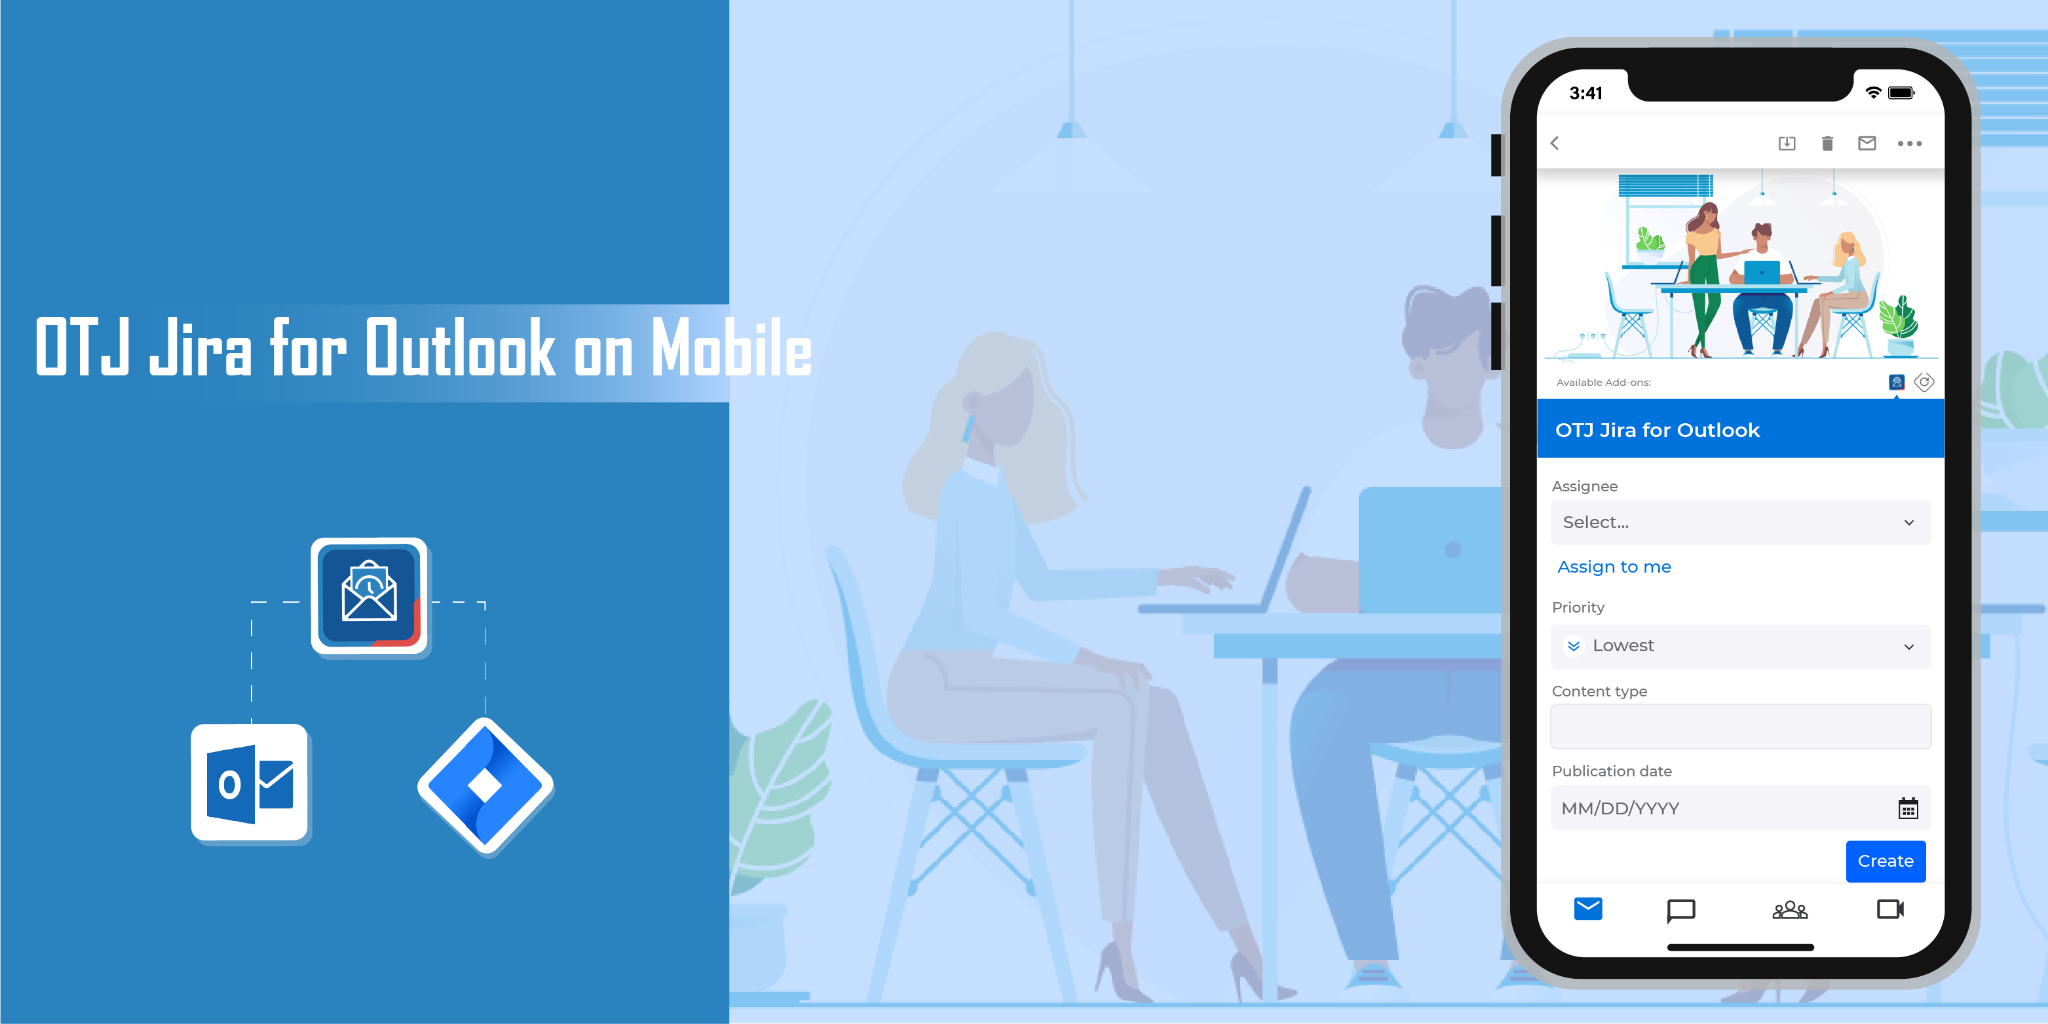
Eight: Access these Functions through Mobile
Another thing that will ease your work process is that OTJ Jira for Outlook is available both for desktop use as well as mobile use. This means you can take whatever features you like from your laptop to your phone, and work on the go.
How to Integrate a Jira Plugin and Start Creating Jira Tickets from your Email
Now that we’ve given you eight pretty good reasons to consider a Jira plugin for Outlook, it’s time to learn how to make it happen.
Step 1
To start, you’ll need to find the tool in the Atlassian Marketplace, then choose your ideal hosting option, whether it’s on the Cloud, Server, or Data Center.
Step 2
Download the app and create an account.
Step 3
Head to your Outlook email and install the app with the following steps:
- Go to ‘Get Add-ins’
- Search for ‘OTJ Jira for Outlook’
- Choose the right add-in
- Click ‘Add’
This video can help guide you through the steps.
Step 4
With the add-in now available on your Outlook, you should connect the plugin with your Jira account.
To do this:
- Go to the OTJ Jira for the Outlook add-on
- Click on “Create Issue”.
- Add your Jira website link.
- Sign in with your email.
- Click on “Generate an API Token”.
- Click on “Create API Token”.
- Add a short label.
- Click on “Create”.
- Ensure you copy and save the token
- Add it to the empty space
This video can help guide you through the steps.
You’re now all set to start creating Jira tickets from your email!
Step 5
Go to an email you’d like to turn into a ticket, or simply create a new ticket.
To create an issue, you will need to:
- Head to OTJ Jira for Outlook
- Click on ‘Create issue’
- Select ‘Issue Type’
- Click on ‘Assign to me’
- Choose ‘Create’
To add an email to an existing issue, you will need to:
- Head to ‘OTJ Jira for Outlook’
- Click on ‘Add to issue’
- Choose the right ‘Issue’
- Insert whatever you want to include
- Click on ‘Add’
These videos can help guide you on how to create an issue and add an email to an existing issue.
Conclusion
Microsoft has always been a major powerhouse in the industry. But it’s been stepping up its game recently, offering a myriad of solutions for companies worldwide. As such, a lot of organizations are opting to use Outlook as their primary mailing tool.
They also are more inclined to move towards agile methodologies and utilizing Jira. Being able to form a connection between the two to create the optimal workflow, will help companies make the most of both these incredible tools by using them simultaneously.
Recommended Reads: