Jira has been around for more than a decade and is still standing strong. Agile teams love the power it brings in the form of Scrum and Kanban projects. It is also one of the most popular tools for issue and bug tracking, helping teams monitor, track, assign, and report day-to-day operations. Jira integrations, on the other hand, is what every team needs to extend the platform’s potential beyond its limits.
So here, we will discuss how Jira can be integrated with other tools and apps. But before that, we will have a look at why such integrations are needed in the first place and also delve into a few use cases. We will also cover how choosing the right integration solution can help you get the benefits you have always expected from Jira integrations.
What’s covered in this article?
- Do I Need Jira Integrations?
- Jira Integrations: Common Use Cases
- What to Consider When Integrating Jira and other Work Management Systems
- How to Set up Jira Integrations with other Apps/ Systems
Do I Need Jira Integrations?
A quick detour: What is Jira?
Atlassian has a lot of Jira products: Jira Software, Jira Work Management, Jira Service Management, and Jira Align are a few popular ones. It’s used by different teams like Development, Product and Project management, Operations, Sales, Customer support, and the like.
Jira Software is very popular among the development and project teams due to the gamut of in-built templates it offers that accommodate purpose-built agile scenarios. Issues (also called cards) in Jira define a single unit of work and workflows are tracked using boards by passing these issues across them. That makes it easy for teams to have a uniform and consistent source of information in a single Jira interface.
And then you go to its Marketplace and find many apps supporting integrations with Jira. And you can’t help but wonder, why do you need them in the first place?
But before we see the why part, let’s see how Jira natively tries to integrate with different applications, like GitHub.

We consider this use case because GitHub is popular among the development teams who often need to collaborate with the project managers using Jira and hence a Jira GitHub integration is much sought after since it can help eliminate manual ways of working.
Automations in Jira can help integrate Jira and GitHub natively, but it is limited by the templates it offers. Also, it is available in Jira Cloud without any extra addon or subscription but can be accessed as an add-on (aka an app) on Jira on-premise.
Sometimes Jira APIs allow fetching data and synchronizing it between Jira and other applications like Salesforce.
These are just examples we have considered. There are still a lot of native features for integrating Jira with other applications like Confluence etc. But all these methods are rigid in the terms of functionalities offered and often involve initial setups that require time.
Plus, since many Jira integration apps are already available in the marketplace, it makes sense to use them for advanced integration use cases and leverage the different choices they offer. Since they have different integration templates, configurations, number of applications supported, deployment models, etc, it is easier for companies to hit the bull’s eye by finding an app fulfilling all their integration requirements.
Alright, let’s quickly head back to the topic we were about to discuss: Why do we need Jira integrations?
Stop Manual Synchronization and Get Automated
Teams use Jira to manage their daily work, but it’s also a fact that they need to collaborate with other teams at some point. These can be in the same company or with other companies (cross-company) that might be partners, suppliers, customers, or vendors.

Such different teams are already comfortable with their own environment of software applications. These can be ServiceNow, Salesforce, GitHub, Azure DevOps, Zendesk, HP ALM, or another tracker.
All these apps are tailor-made for specific functions and support different tasks like managing sales pipelines, managing DevOps projects, handling customer support, handling development issues, tracking bugs, etc.
The useful information is locked away in different applications, across different teams. But it can become very useful if unlocked and synchronized in the correct manner. For this synchronized information exchange, teams should avoid context switching between different applications, or resort to manual methods like emails or phone calls.
As a Jira user, would you not like to envision having Jira as your single source of truth, with information coming in and going out of it automatically, in real-time to different applications, such that your business processes are automated end-to-end?

Such integrations can help you:
- increase visibility on the critical business information that can be accessed anytime within tools that you already use.
- automate information exchange and in turn business processes. Due to this, the information is always coherent, consistent, and accurate.
- filter relevant information that can be accessed by authorized users whenever needed.
- increase cross-collaboration and communication across teams and help them work together effectively towards common business goals.
- bring transparency between team members resulting in better planning and resource allocation. It also helps all team members to be “in agreement” with what needs to be exchanged and how integration must happen thus reducing unnecessary friction.
Jira integrations can just make this seemingly difficult task look like a walk in the park where you take a break from manual ways of doing things to automate them.
But before we start walking that path (literally), let’s quickly have a look at the different use cases you can possibly carry out with Jira integrations.
Jira Integrations: Common Use Cases
Like I already mentioned, teams can be co-located in a single office space or can be miles away, and if one of them uses Jira, then you can definitely think about integrating it with apps other teams use.

Let’s have a look at a few such scenarios.
Development and Quality Assurance Teams
Perhaps the most common outsourcing that you might be familiar with is development and quality assurance. It’s not uncommon that the dev team uses GitHub or Jira and the quality assurance (QA) team uses Jira.
The QA team has to send bug reports and create new issues to be handled by the dev team. But manually doing this can mean that they create issues in both Jira and GitHub. This can lead to duplication and waste of time.
A Jira integration here can mean that such bug reports and issues are automatically created in Jira and then status updates or any comments thereon are synced bi-directionally.
With such an integration only valid information useful to both teams can be passed.
For instance, the QA team might not be interested in all the attachments that the dev team uploads in their issues, but might only need a few of them along with status updates.
Development and Project Management Teams
Another use case for Jira integrations would be between a development team using GitHub, Jira, or Azure DevOps (if you have a DevOps team) and the project management team using Jira. The project managers are responsible for managing the day-to-day operations of software projects and they do it well in Jira.

For this, they either raise issues or work items manually in the other application and then information is passed back and forth. Sometimes they can even end up making 2 projects for the same work, again for duplicating information manually.
With a “Jira to Jira/ Azure DevOps/ GitHub” integration, these teams can pass critical information back and forth automatically. They can even choose to filter and map information across these applications such that “High Priority issues should be assigned to George- a Senior Developer while network or infrastructure issues should be handled by John – the SysAdmin”. Here, the workflow on both sides can be mapped to synchronize information smoothly.
Customer Support and Development Teams
Say your customer support agents use Zendesk, ServiceNow, or Jira Service Management and the development team uses Jira.
After the agents perform a root cause analysis of the tickets customers have raised, they either respond to them with a workaround or simply forward the requests through an email to the development team. The dev team then creates an issue for it and starts working.

By the time the issue is worked on, the customer support agents have to make frantic phone calls and send endless emails to the dev team to get updates on the ticket, so they could update the status to their customers. If a Jira integration is in place here, all this manual back and forth can be avoided and these teams can enjoy real-time updates about the current status of the tickets within their own familiar tools.
Sales and Development Teams
Imagine your sales team uses Jira or Salesforce and your development team uses Jira, GitHub, or Azure DevOps. The reason we are discussing the sales teams here is that they have direct access to closed deals, customer queries, and feedback.
If such valuable information is siloed, it can become unproductive. Sometimes it’s possible that this information can also be beneficial for the other team members. So creating issues or work items from Salesforce or Jira can definitely help the dev team to work on them faster and improve the SLA. The sales team in turn can enhance their customer experience with prompt answers to customer questions.

What to Consider When Integrating Jira and other Work Management Systems
But treading on this path is not easy. The variety of apps available on the Marketplace can confuse even the most sorted person and eventually defeat the purpose of getting an integration tool in the first place.
So walk slowly, take your time, explore your options, maybe take a free trial and then make a decision. Hurrying this up is surely going to be heavy on your pockets, not to mention the time and effort you would waste on it.
Before you get in the driving seat, keep the following checklist in mind, just so you make your choice a little bit easier.
Secure Information Exchange
There is no point stressing the importance of secure information exchange because its need is obvious. Token-based authentication mechanisms, encrypted data both in transit and at rest, secure transfer protocols like HTTPS, and role-based access control are just a few starters.

But the whole point here is to keep your information secure from “man in the middle” attacks, data being sent to the wrong destination, or being received from the wrong source, and the like.
Restricting Confidential Information to Authorized Access
An additional aspect of the above point is restricting the information access to authorized users only. This can be envisioned in an environment where the integration is decentralized. Meaning that both the senders and the receiver independently have control over what they send and receive.
So you simply don’t send information you don’t want the destination application’s user to view and you deal with the information the destination application sends you the way you want to. This solves the problem of unwanted viewing, editing, or misusing information. It also means your confidential information stays with you, your destination instance admin won’t mess up your sync and you don’t have to worry about the effects of changes the other system makes.
Serve Advanced or Complex Integration Uses-Cases
Integration needs are pretty dynamic. There is always a new set of data you need to exchange periodically, or a new logic to sync data with or something completely tailor-made for you.

Acknowledging these changes and having the integration tool adapt to them with ease and minimal technical tweaks or configurations should be high up on your checklist.
Ease of Use by Both Technical and Non-Technical Users
You might think, integration is definitely a topic for geeks, but that doesn’t mean it should only be restricted to a certain IT cubicle in your organization. The beauty of an integration tool must be reflected in the way it can be handled by both technical and business users alike. Maybe choose tools that have both drag-and-drop interfaces or low-code configurations so that all kinds of people can use them with equal ease.
Number of Supported Applications
Since all we are talking about here are different Jira integrations, it means at the other end you can already imagine a wide range of applications. Be it another Jira instance or ServiceNow, Azure DevOps, Salesforce, and much more.
This is a checklist point for obvious reasons, the more applications the tool supports, the more possibility of you having to connect with just another of your department or a new supplier/ customer altogether.
Automatic Handling of Downtimes and Failures
The Facebook and Whatsapp outage is sufficient evidence of the reality of downtimes and failures. They are just a part and parcel of a software application’s life. So you can’t run away from them but can definitely choose a tool that can hopefully outrun them.

Looking for information that has changed since the last downtime and applying it in the same order as its initiation, checking if all the sync updates are applied correctly without the need for manual intervention is important and can be achieved if the right tool is chosen.
Distributed Architecture
And last but not least, further elaborating on the 1st point in this section, having a centralized processor handle all synchronizations is just not a feasible option.
Firstly, because every time there is a change in the sync, it needs to be configured on the central hub, making it a single point of failure.
Secondly, it defeats the purpose of having both sides independently control information exchange, which is an important consideration we saw earlier.
And thirdly, a distributed architecture leads to loosely-coupled systems, less dependent on one another, thus making the entire integration more manageable and scalable.
I will use a solution called Exalate to demonstrate Jira integrations with other tools. Let’s also see the reasons behind it.
- It supports decentralized integration, where both sides independently control information exchange. This is achieved with the help of sync rules present on both sides.
- It uses an intuitive scripting engine that can be accessed through the Script mode so you can purpose-built even the most advanced or complex integration cases with it.
- It implements a JWT-based token mechanism for source and destination authentication, uses HTTPS, and has role-based access controls in place. You can learn more about its architecture and the security mechanisms it implements in this whitepaper.
- It has 2 configuration modes: Visual mode (point-and-click interface) for business users and Script mode (Groovy scripting language) for technical users.
- It supports Jira integration with another Jira instance (cloud or on-premise) and also integrates with Azure DevOps, Zendesk, ServiceNow, Salesforce, HP ALM, GitHub, etc.
- Its transactional synchronization engine ensures all synchronizations are handled automatically in case of downtimes and system failure within the least amount of time.
Having understood the reasons behind the choice, let’s see how it can be practically used for different Jira integrations.
How to Set up Jira Integrations with other Apps/ Systems
Step 1: Prepare the Groundwork
Before proceeding with integrations, it is necessary to take a step back and understand the purpose behind it. What are the expected benefits of it, shortcomings, or pitfalls you are ready to overlook? Also important to note what information must be exchanged, who has access, and at what times. These important integration and synchronization questions need to be addressed beforehand.
Identify the use cases you want to bring under synchronization, identify and explore the tools for it (we have chosen Exalate if you have directly jumped here), and take a proof-of-concept in the form of a free trial if necessary.
Assuming you have done all this groundwork and much more than that, feel free to proceed to the next step.
Step 2: Install Exalate on Jira and the Other Application
We start by installing Exalate on both Jira and the other application.
As already mentioned it supports decentralized integration, so it needs to be installed on both your Jira (on-cloud or on-premise) and any of the other applications it supports.
Installing it on Jira Cloud is pretty straightforward. I will cover that here.
Go to settings, click “Apps” and go to “Find new apps” in the left-hand menu. On the marketplace Apps section, type “Exalate” in the search box and click enter.
There are a few Exalate apps like Exalate for ServiceNow, GitHub, etc. Choose “Exalate Jira Issue Sync & more”.
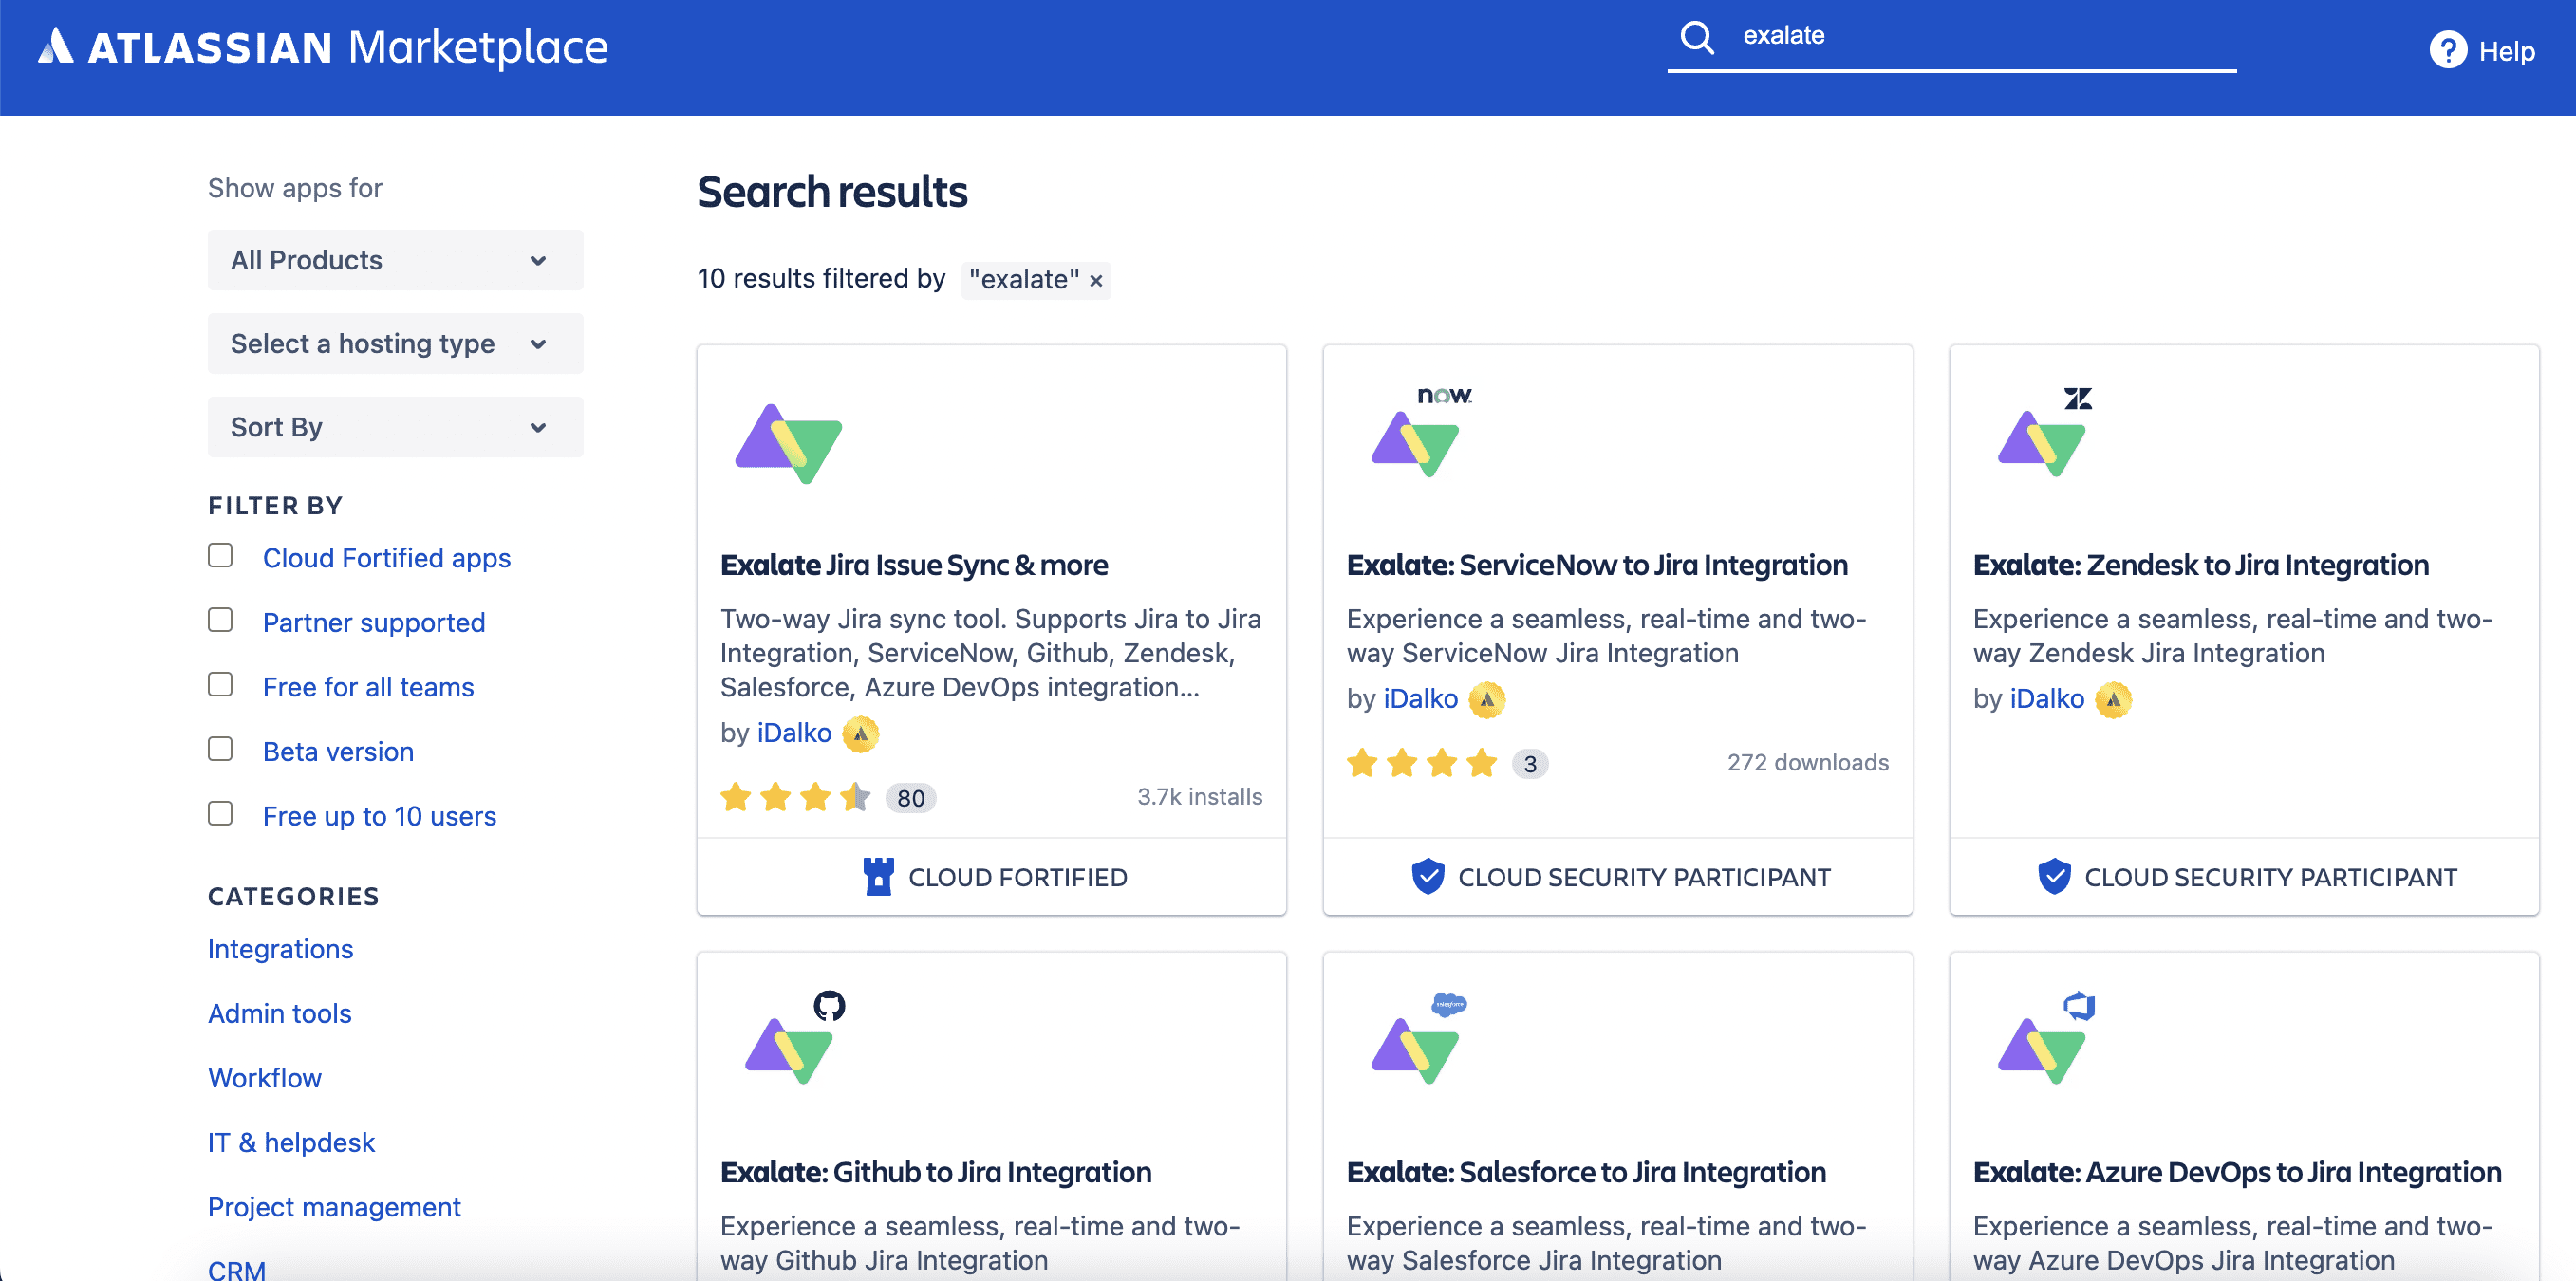
Click the “Try it free” button on the next screen.

From there follow the installation wizard. After a brief wait, Exalate will be added in your Jira cloud instance.
You will see the “Get Started” screen on Exalate. In case you don’t, you can go to Exalate from the left-hand menu as well.
To do this, click on “Apps” like you did before and click “Connections” under Exalate in the left-side menu after.
And to install Exalate on other applications, you can check this documentation page. Select the tracker you want and follow the steps.
Step 3: Connect Jira and the other application
To proceed with Exalate, the first thing you need to do is to create a connection between Jira and the other application. A connection works like an initial handshake which authenticates both the sender and receiver.
You can start creating a connection from either Jira or the other side. No matter which side you start, Exalate has a uniform UI on both ends. So it shouldn’t be a problem to follow.
Under “Connections”, click the “Initiate connection” button in the middle of the screen.
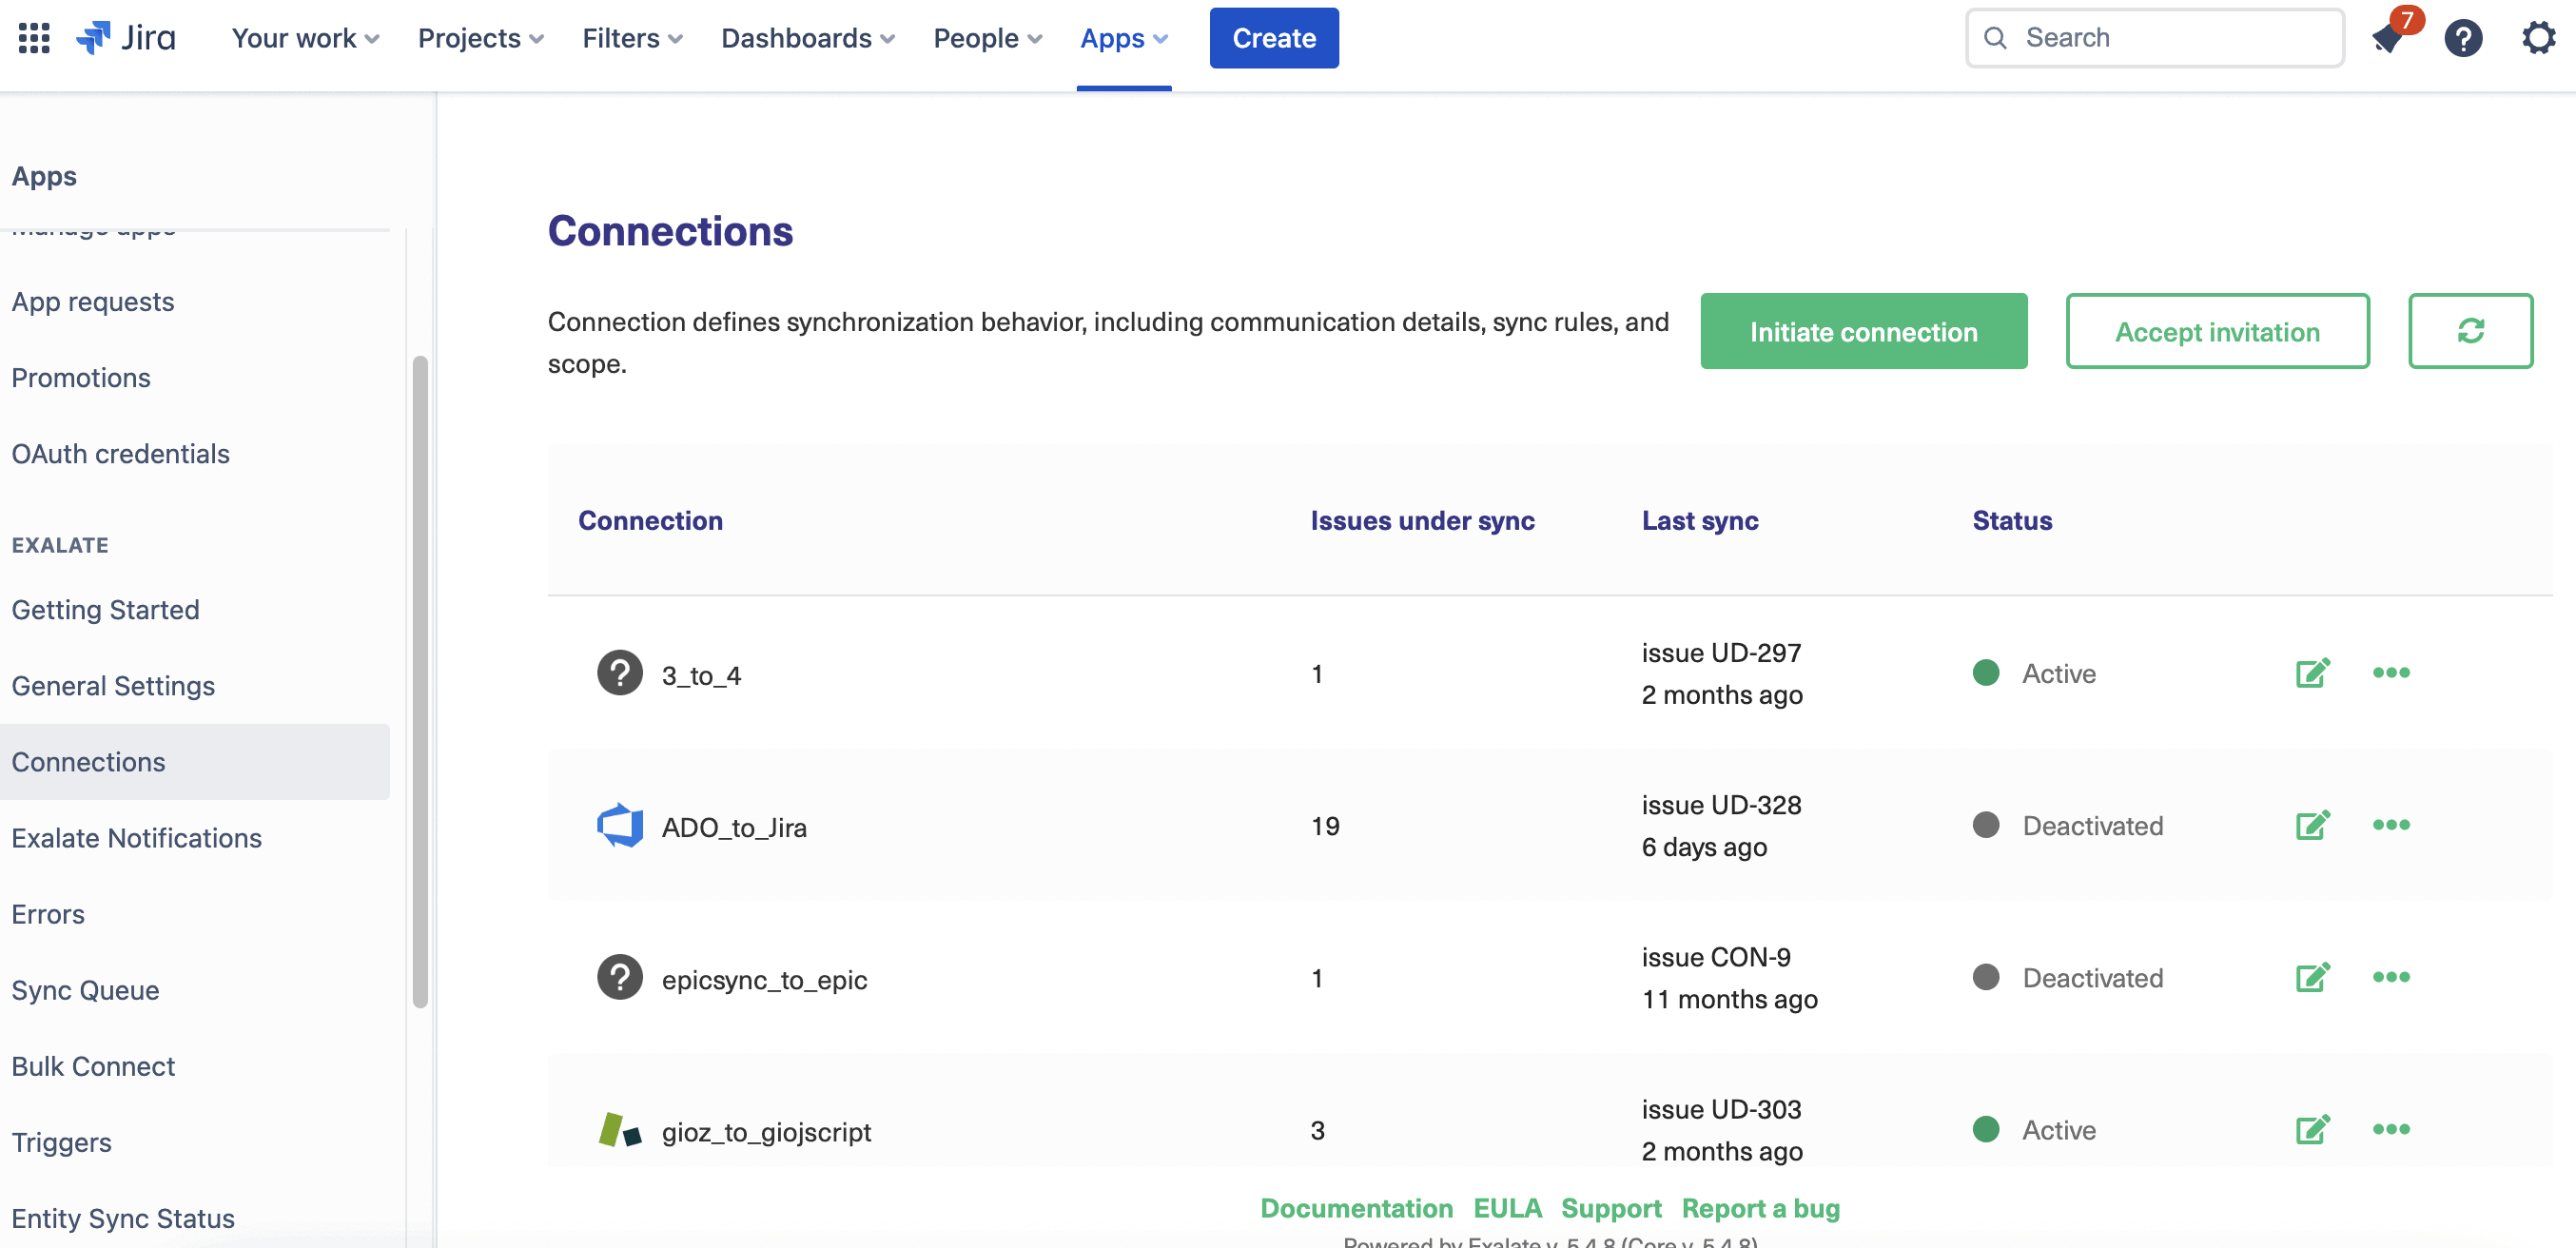
The next screen prompts you to enter the destination URL. In our case, it can be the other Jira instance or any other application Exalate supports. Then a check is performed to ensure Exalate is installed on the destination instance.
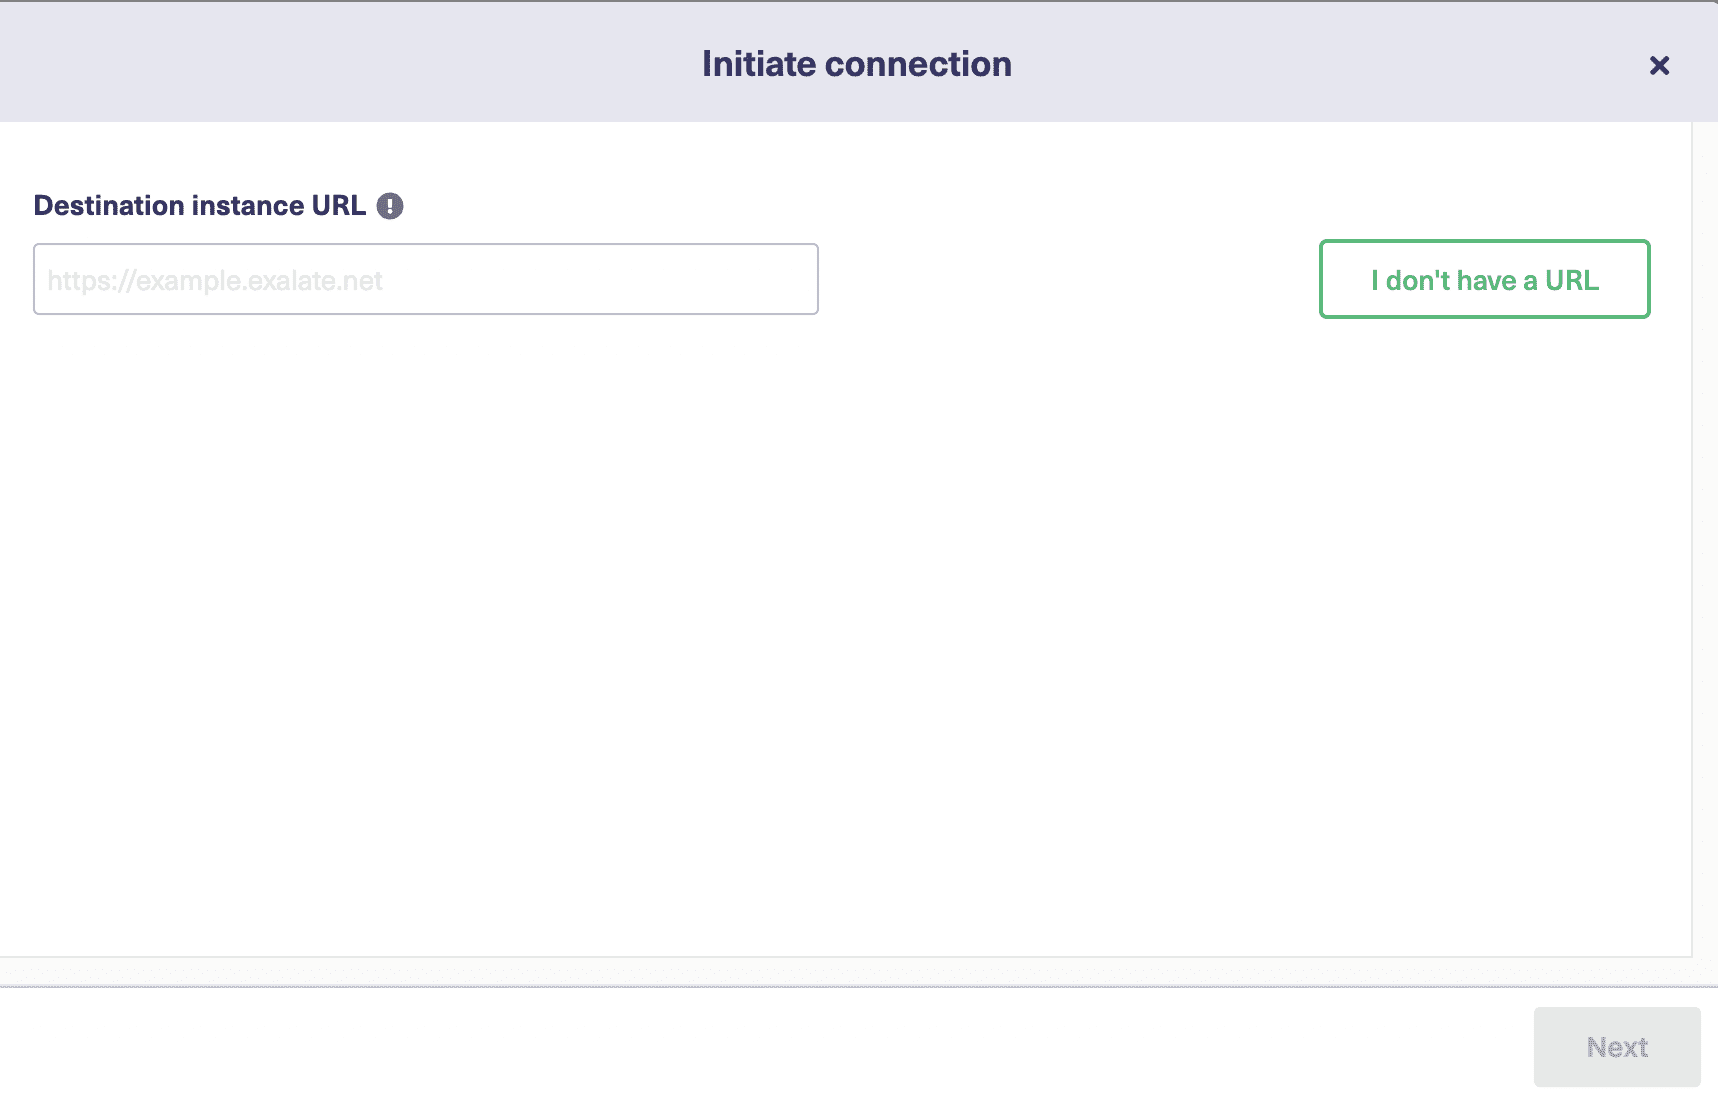
Based on what the other application is and Exalate’s version on it, you will need to choose between either 2 or 3 configuration modes. For instance, if you have ServiceNow on the other side, you can choose between two modes but for a Jira to Jira integration, you will have three modes to choose among.
The Basic mode, the Script mode, and the Visual mode.
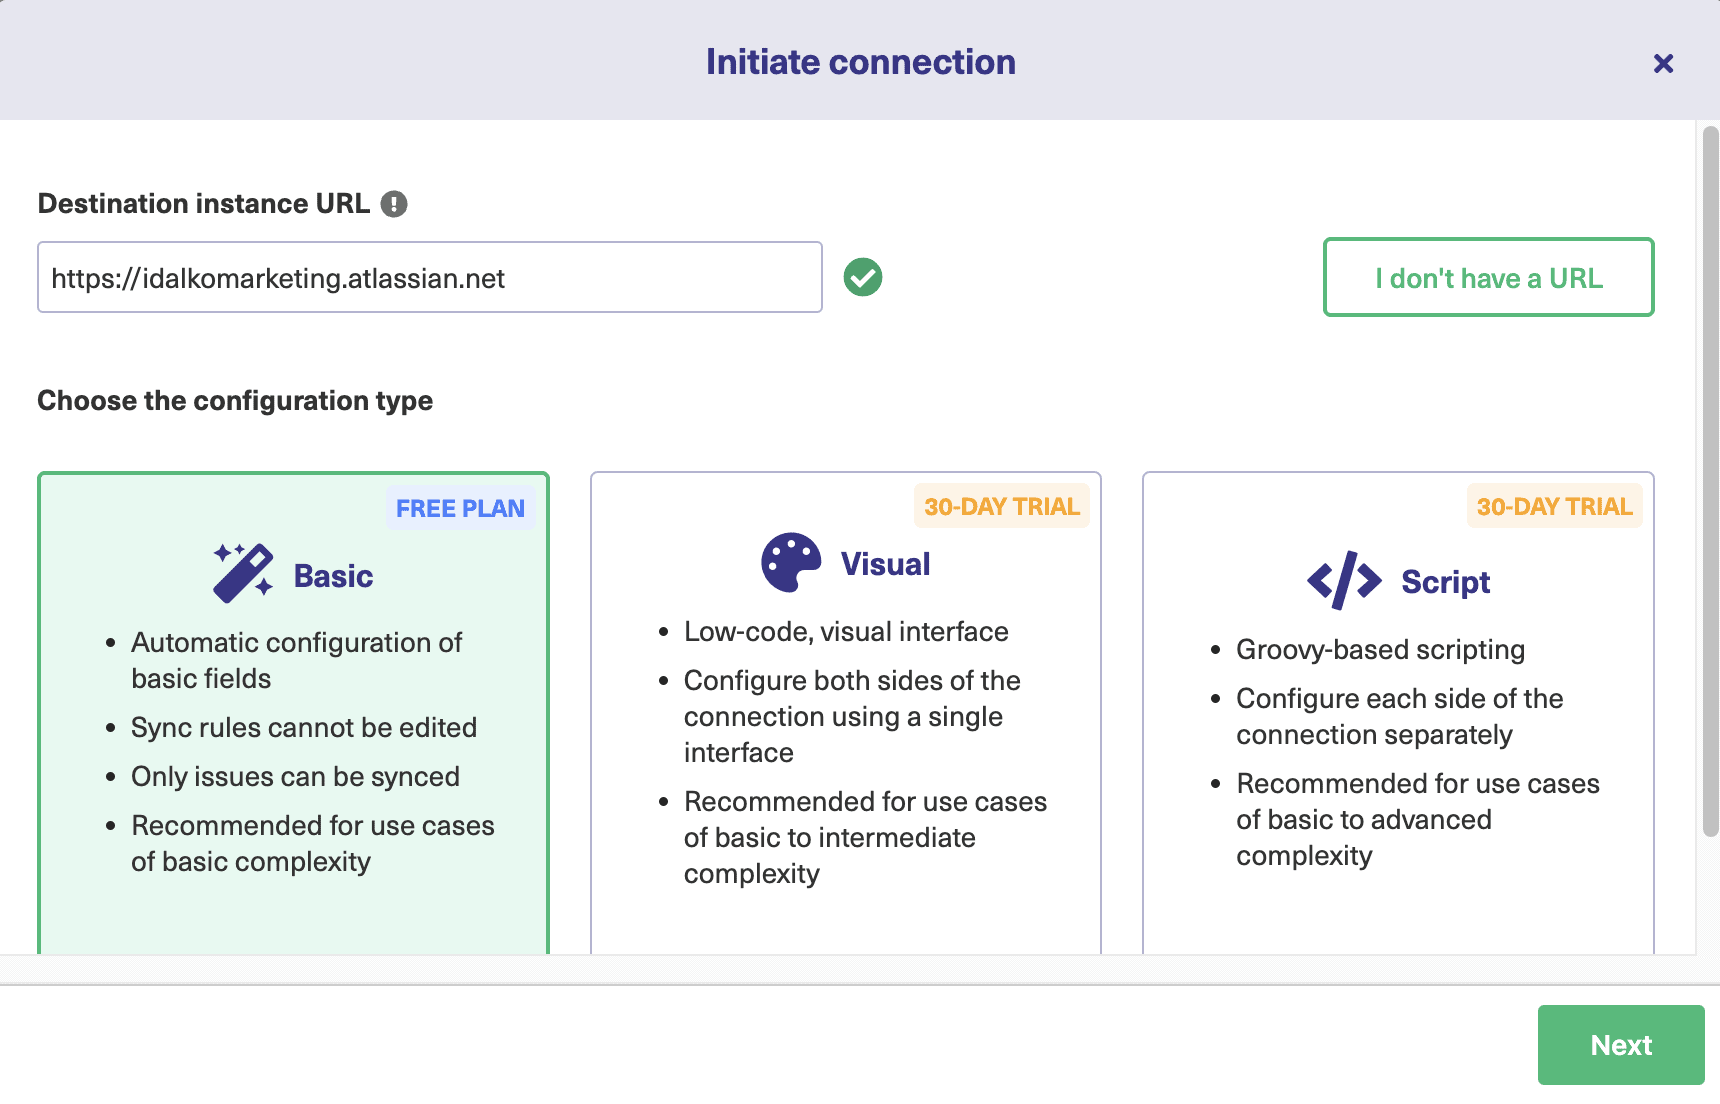
Let’s go over a brief explanation of each.
The Basic mode supports pre-built mappings between Jira issues and the entities on the destination. For instance, Jira-Azure DevOps would have issues mapped to work items, for Jira-Salesforce issues are mapped to Cases, and so on.
Note that these mappings cannot be modified. To modify them the connection must be upgraded to either the Script mode or the Visual mode, which offer greater configuration features.
Basic mode is available to sync issues in Jira and GitHub, work items in Azure DevOps, Cases in Salesforce, Incidents in ServiceNow, and tickets in Zendesk. It comes with a Free Plan allowing you to sync 1000 entities for free per month. Since it does not allow you to customize your synchronization behavior, it is best suited for simple use cases where you can try Exalate firsthand.
But what makes all these efforts worthwhile is to explore the Visual and the Script modes.
The Visual mode is a point-and-click interface that allows you to integrate 2 applications in a much more advanced manner. You can add new mappings, prioritize the information you want to send and receive, and even filter entities you want to synchronize through intuitive visual screens.
You can even add custom logic for advanced use cases. It is easy to understand by business users, as it does not involve coding. It can also be used if a single user has access to both the source and the destination applications, in which case you can control the synchronization from one side itself.
Perhaps what makes Exalate stand out as a tool is the Script mode which offers an intuitive Groovy-based scripting engine that helps you synchronize even the most complex or unique use cases.
So technical users can adapt easily. This mode allows both sides to independently control the synchronization through sync rules. So admins on both sides can change the sync rules to control information flow.
We will have a look at all the 3 modes in detail now since the screens are a little different for all of them.
Note: If you’re looking to integrate multiple Jira instances, then you should watch this tutorial:
Starting with the:
Basic mode
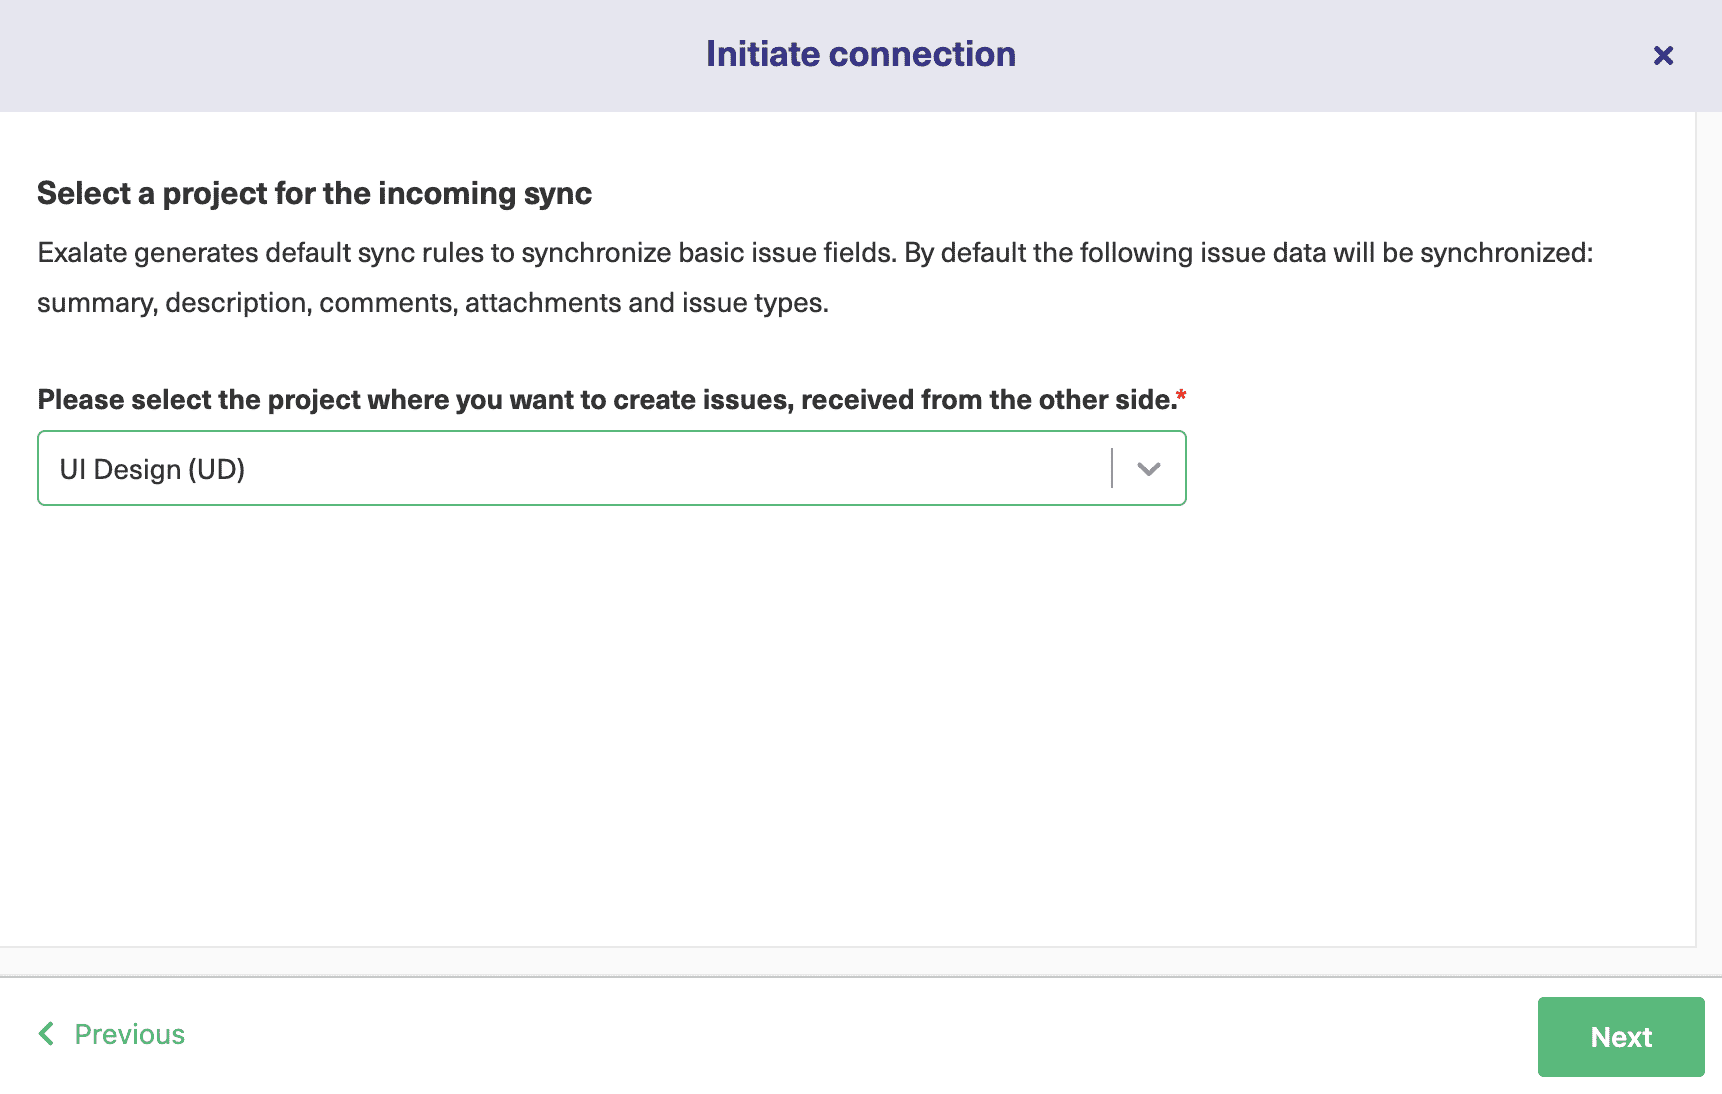
Once you choose the Basic mode and click “Next” to go ahead, you will be asked to choose the project on the Jira side, since we have started initiating the connection from the Jira side.
Select the appropriate one from a drop-down list and click “Next”.
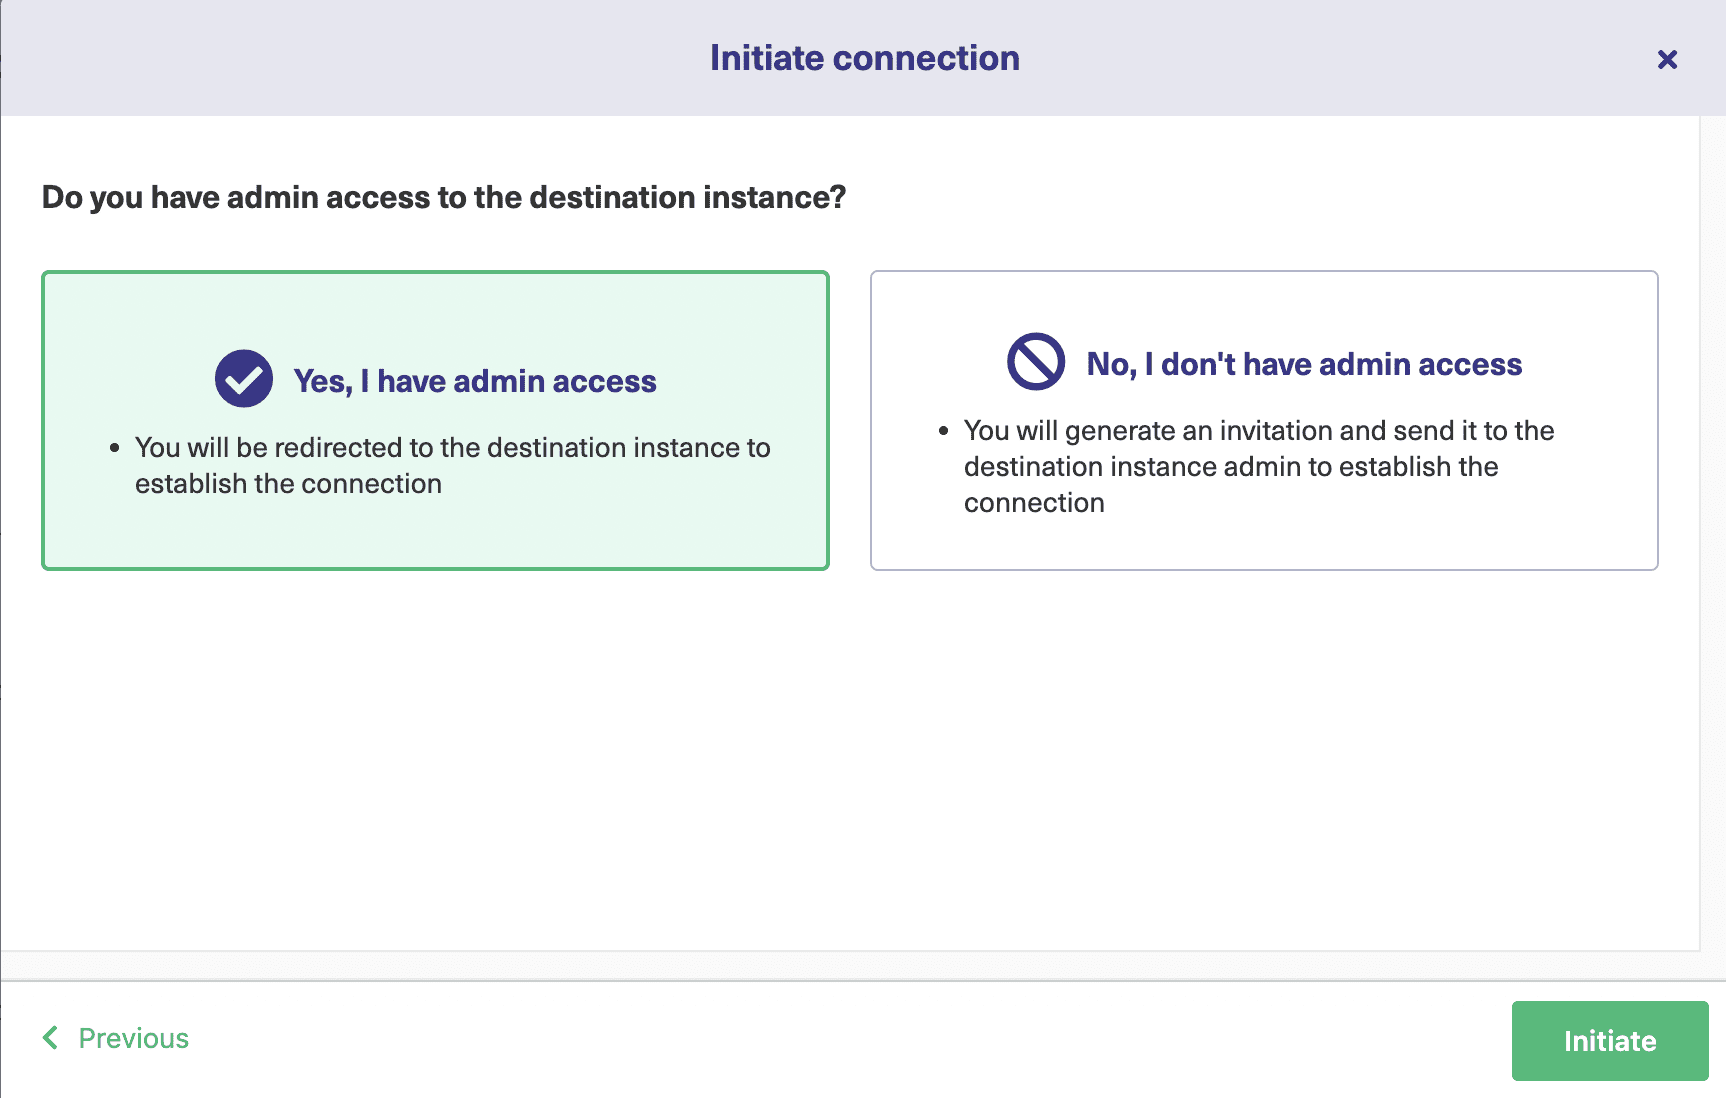
You then have to verify admin access to the other side.
If you have access, a quick verification will redirect you to the destination side (other applications i.e Jira, GitHub, etc). This process will be reversed if you start from the other side and want to establish a connection with Jira.
Depending on whether the other side has any projects or repositories you will be asked to select one in this instance. Do it like you just did. If there isn’t anything like that, then click “Confirm”.
Then you can start by entering the issue key and directly synchronizing with the other side by clicking “Exalate” as shown below. If you navigate to the destination right now, specific entities like tickets and incidents can be synchronized by entering their details.
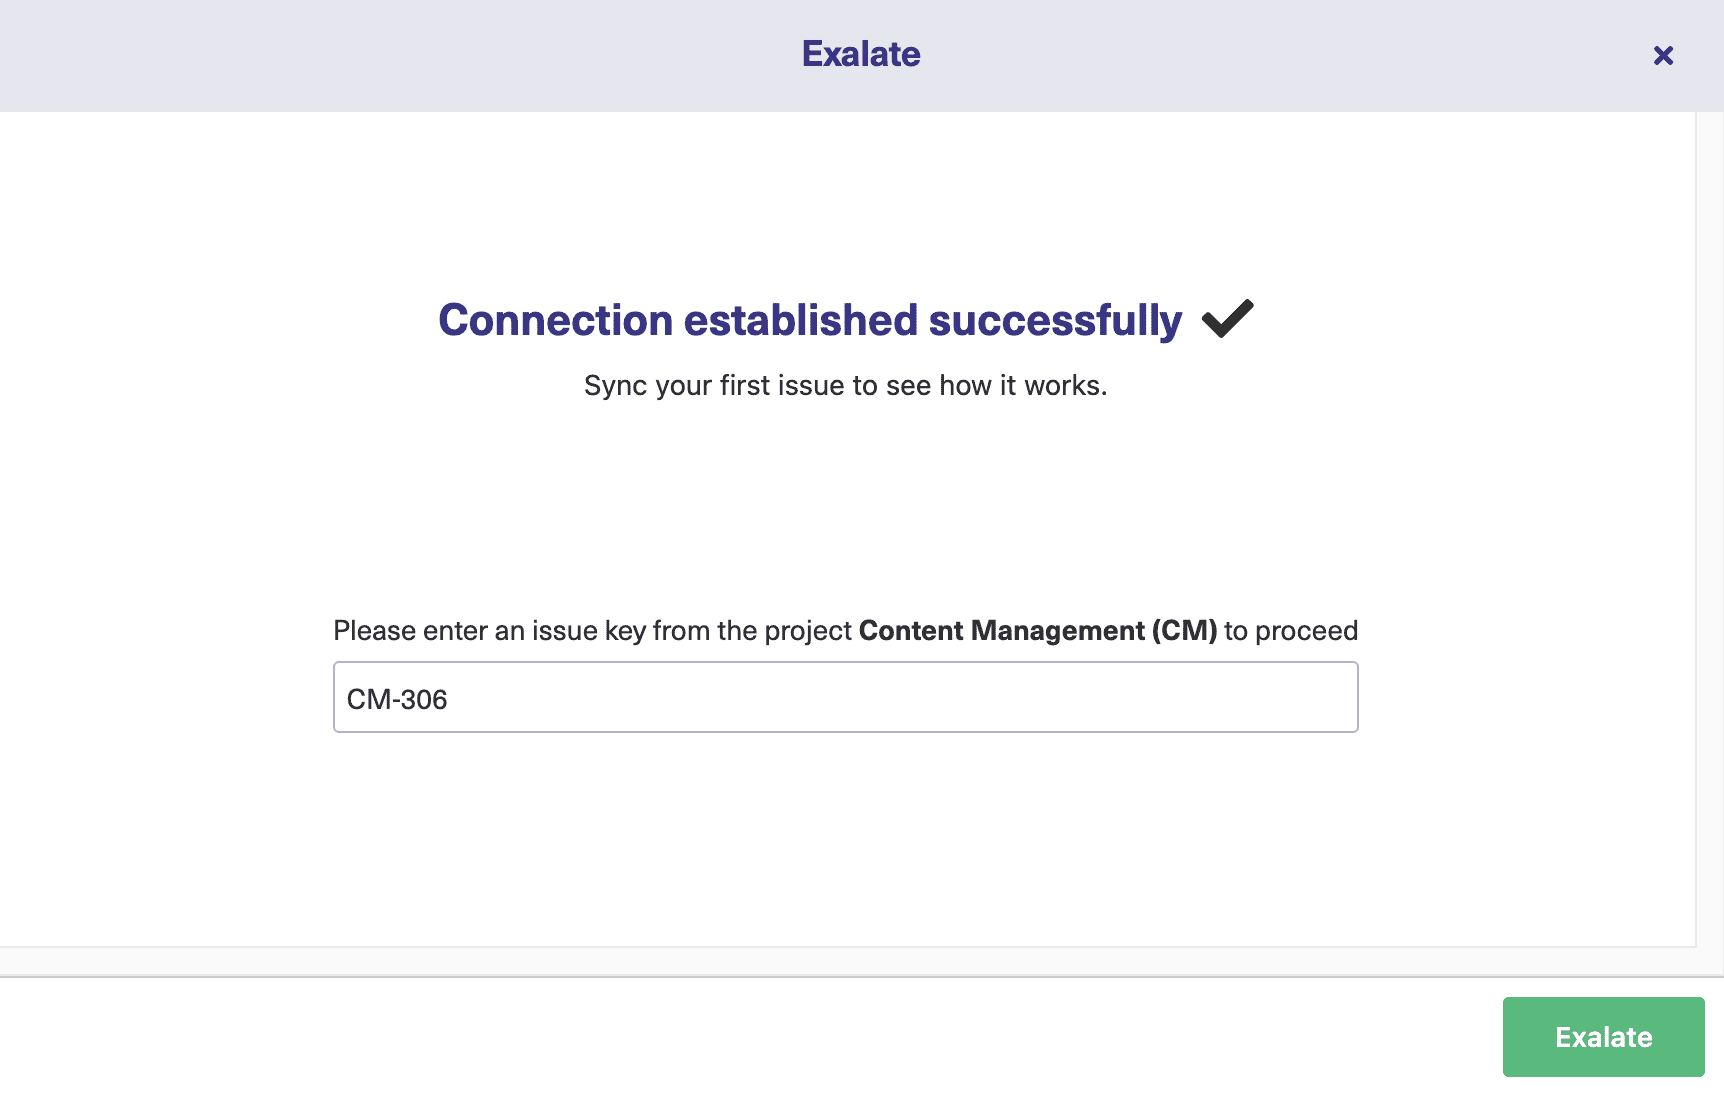
After a while, you will see your Jira issue being successfully synchronized with the other side.
Visual Mode
To establish the connection using this mode, choose “Visual” and click “Next”. You will be required to name the connection on both the Jira side and the other side. Choose a proper name to avoid confusion later. And then write in some description to help you remember.
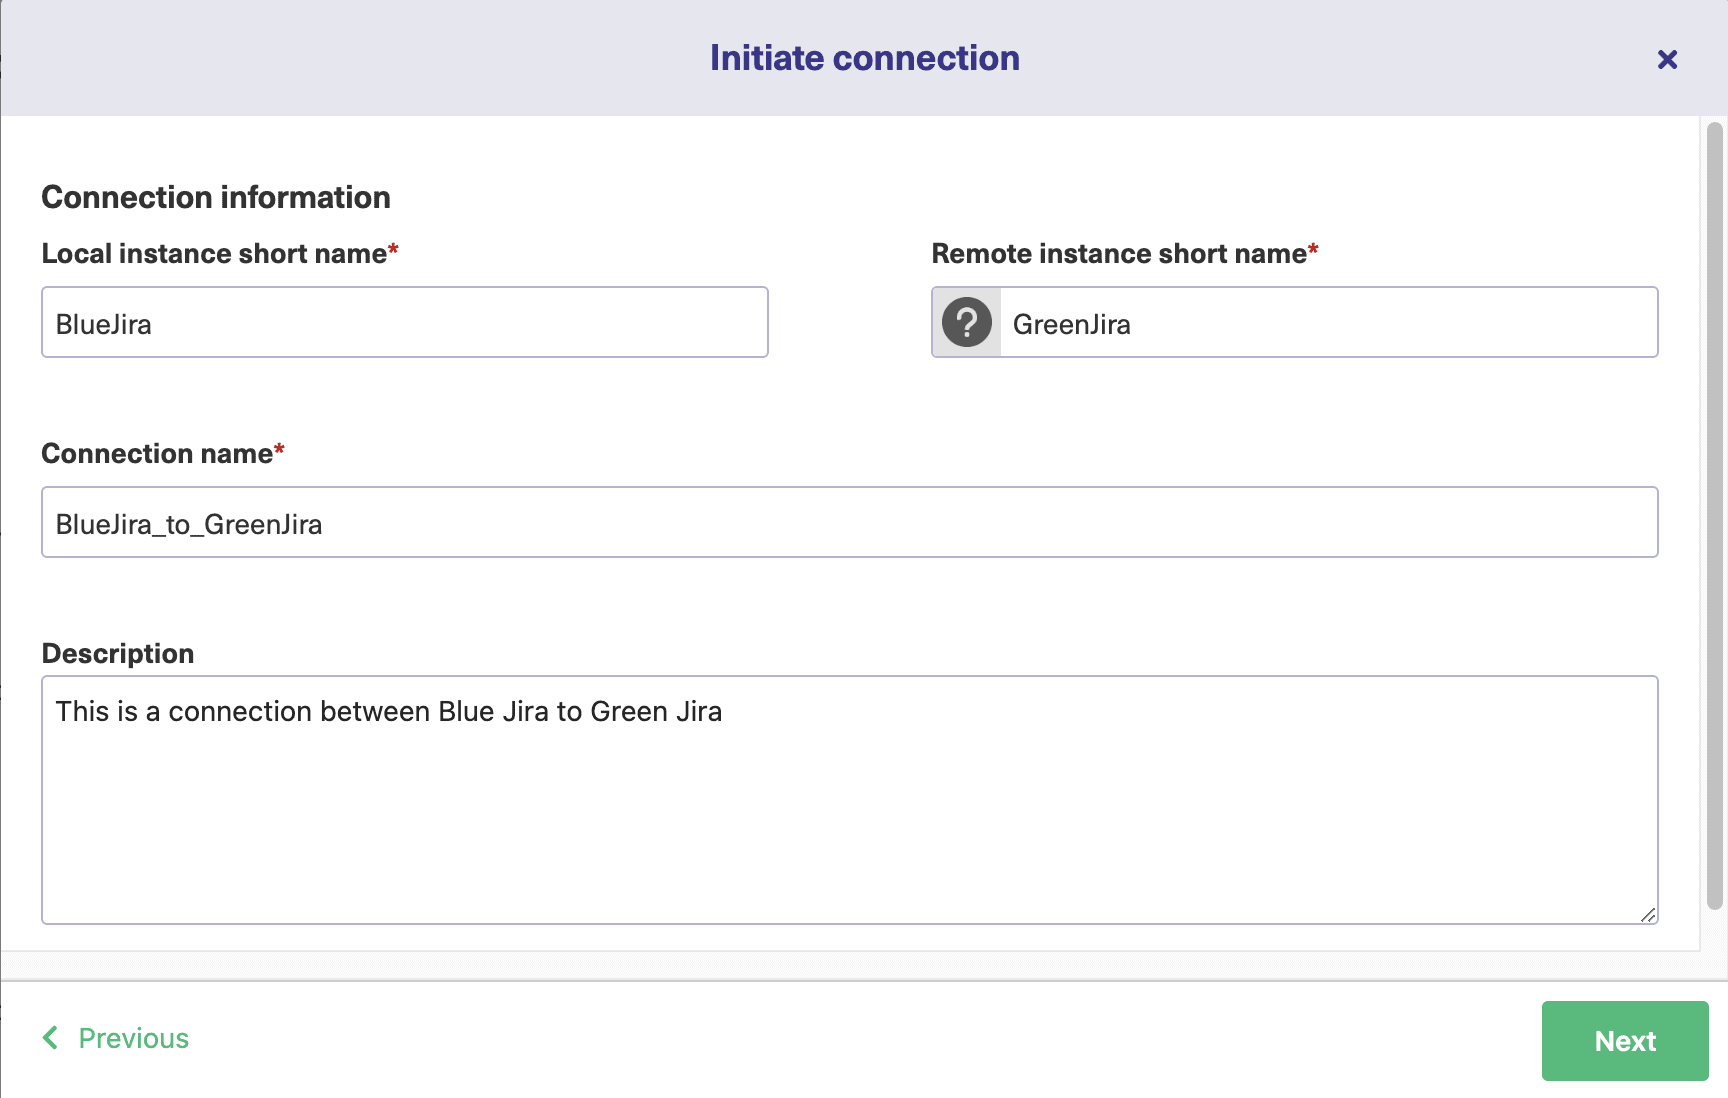
Then you will be asked to select the project on the Jira side, do so as you did for the Basic mode.
Then again verify if you have admin access to the other side. After a brief wait and upon successful verification, you will be choosing the project or repository on the other side if applicable. If not, then the connection is successful.
You can then proceed to Step 4 for configuring the connection.
Script Mode
If you want to see how the Script mode connection is established, click “Script” and then hit “Next”. Name the connection like you did for the Visual mode and then click “Next”. Choose the project on the Jira side and click “Next”.
There is an invitation code that is generated now. This is a unique code that will need to be copied to the destination side. Click on “Copy invitation code” to copy it and save it someplace safe.
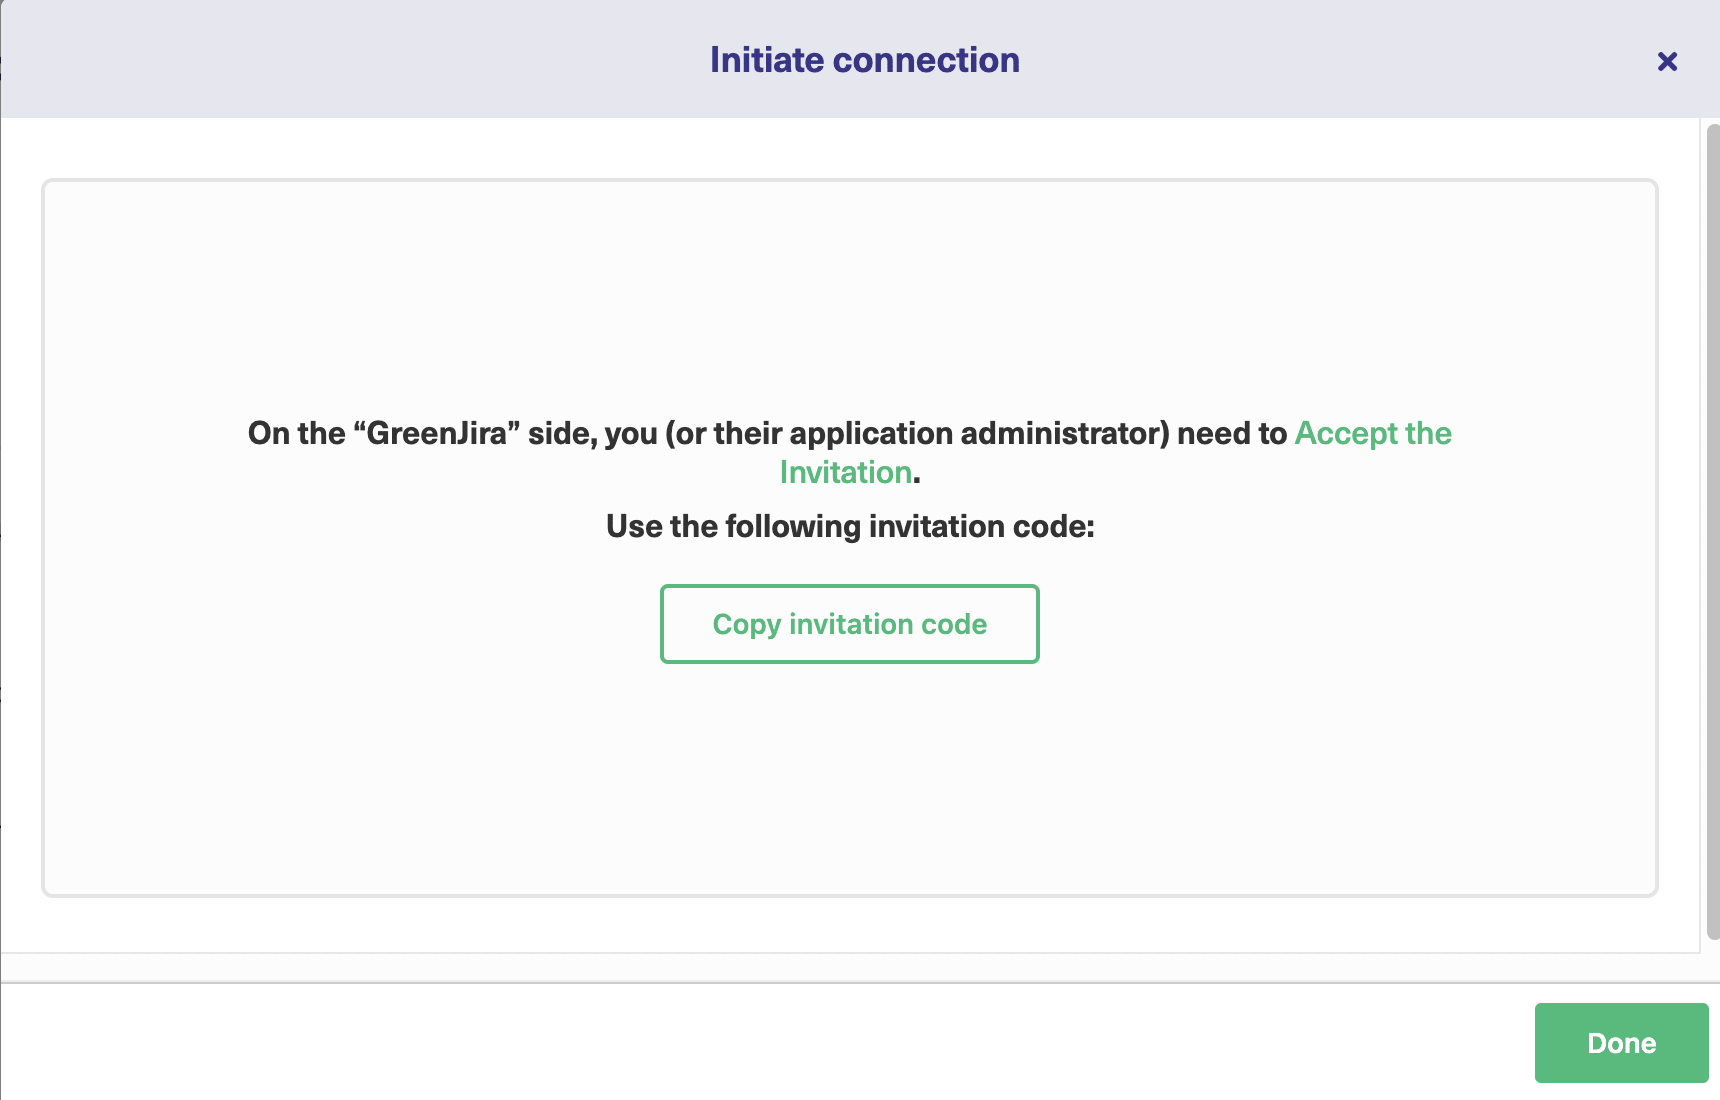
Then head over to the other side. Depending on the application, navigate to the Exalate app. There under the “Connections” menu of Exalate click “Accept invitation” and paste the copied code into the large text box.

Then once again if applicable choose the project or repository on the other side and click “Confirm”.
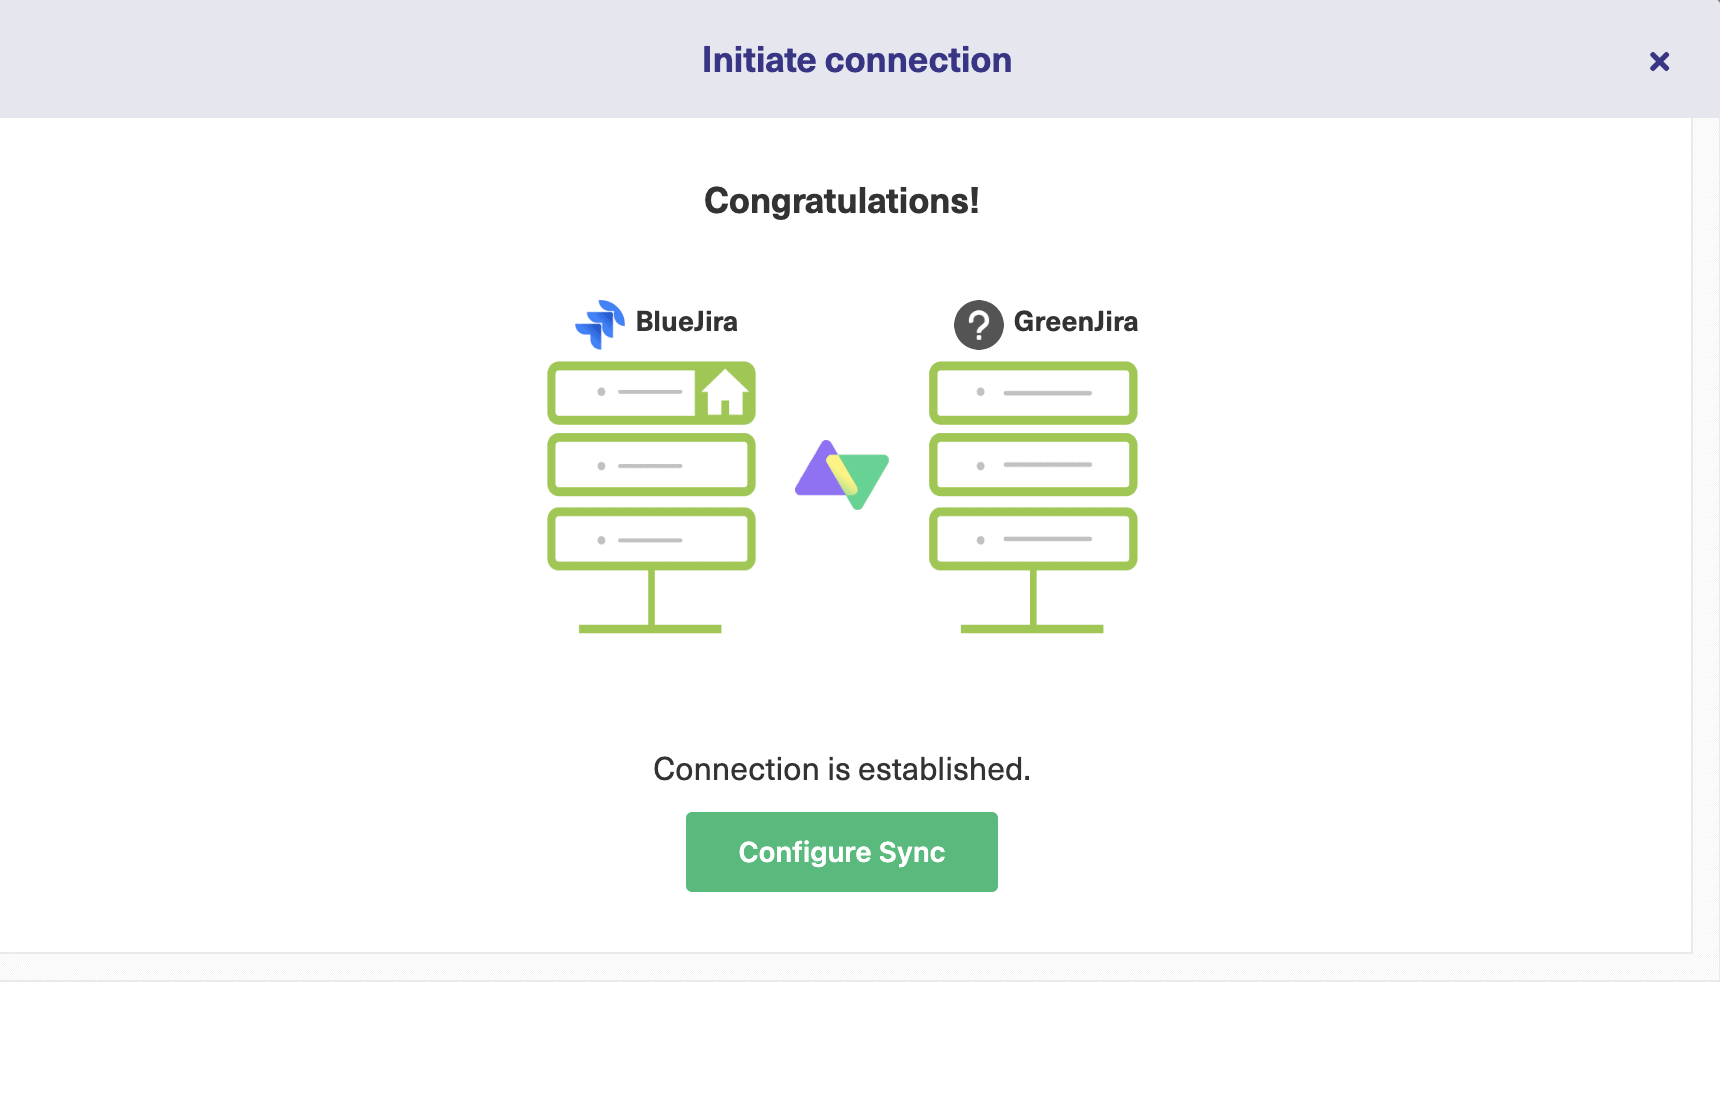
Your Script mode connection is successful. Proceed to the next step to configure the sync.
Step 4: Configure the Connection to Choose What to Share and What not to
The basic idea of this step is to decide what needs to be sent and received from Jira and the other side.
So you need to configure the connection for that. There are 2 ways to do this. Either click the “Configure sync” button shown on the screen above or go to the “Connections” tab and click on the edit connection icon in front of your connection name.
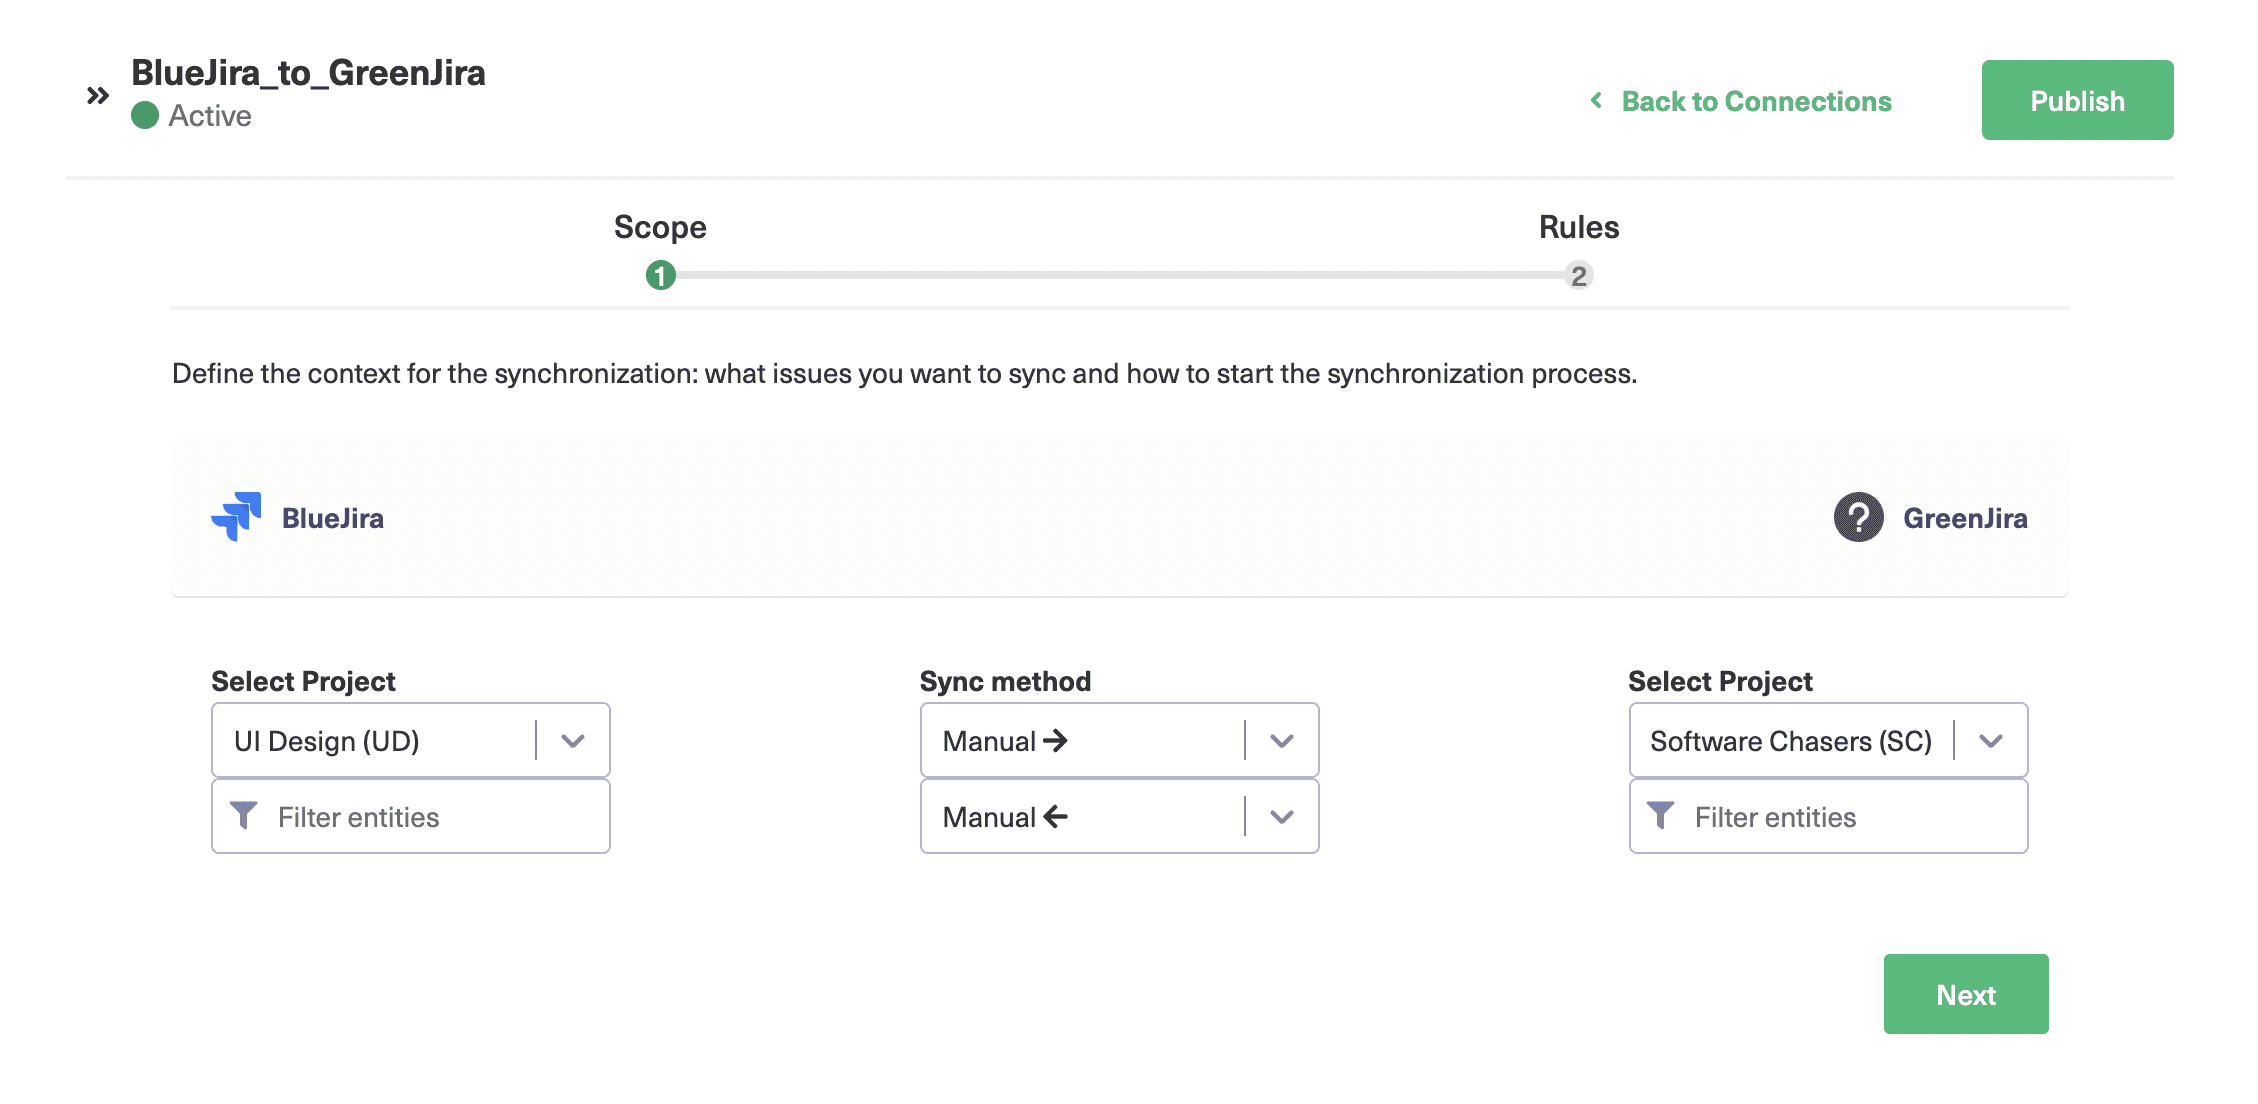
Either way takes you through the same screens.
I will discuss only the Jira side here, but it shouldn’t be different for any other applications as well. It will just be tailored according to the specific application.
Configure the sync using the Visual mode
You can edit the Scope and the Rules in the Visual mode.
The Scope screen decides which entities under which projects (if applicable) need to be passed between the 2 sides.
For instance, you can choose the Jira project on one side, and click on “Filter entities” to choose which entities you want to synchronize. You can also choose whether the sync is manual or automatic and whether the sync direction should be uni or bidirectional, the arrow directions will guide you through.
Here, the destination side is Zendesk, but it can be any other depending on which application you want to synchronize with.
The filter entities screen on the Jira side will look like this. To apply them on the other side, configure them the same way on that side too.
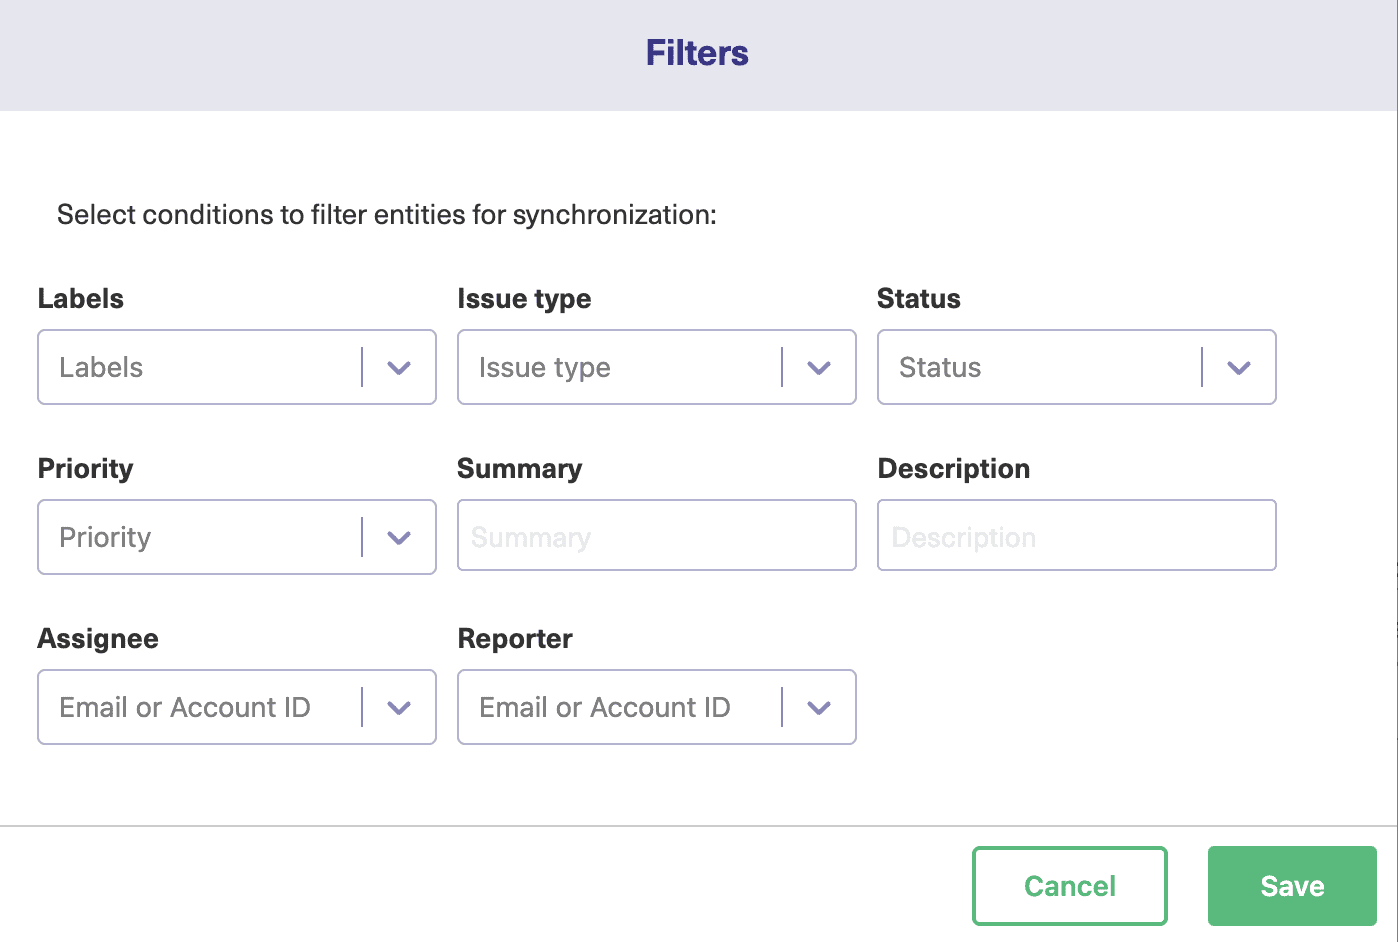
There are a lot of entities you can choose to filter like Priority, Labels, Assignee, etc.
Once you choose what needs to be done, click “Save” and you will return to the previous screen. Then you move ahead to configure the “Rules”.
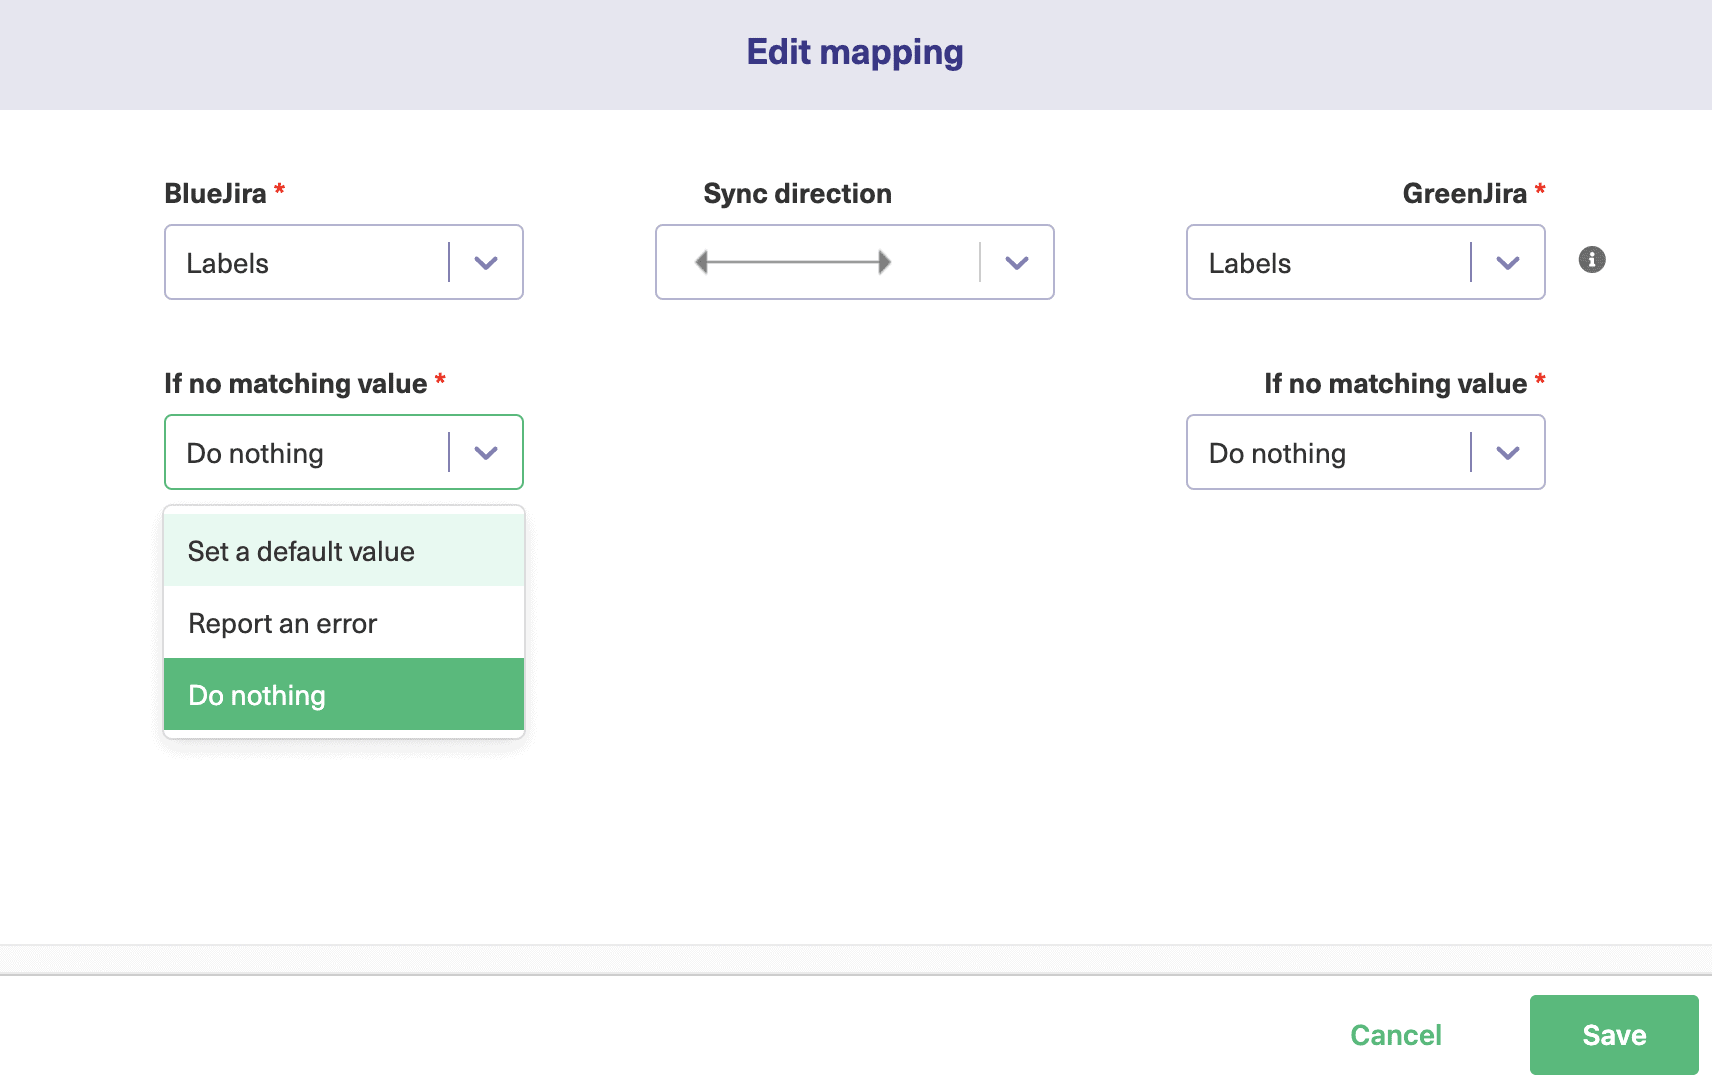
These Rules specify the mappings between Jira and the other application entities. Like Issues being mapped to tickets, incidents, or work items. These default mappings can be edited by clicking the edit icon on the right side of the mapping or you can choose to delete any if you don’t need it. Drag and drop them up and down to prioritize them.
You can even add a new mapping by clicking the “Add Mapping” button.
Perhaps you want Priority in Jira to be mapped as a short description in ServiceNow so the other team handles it according to their needs. You can choose such on both sides.
You can even choose what happens in case no matching values are found. You can choose to do nothing, report an error or else set a default value.
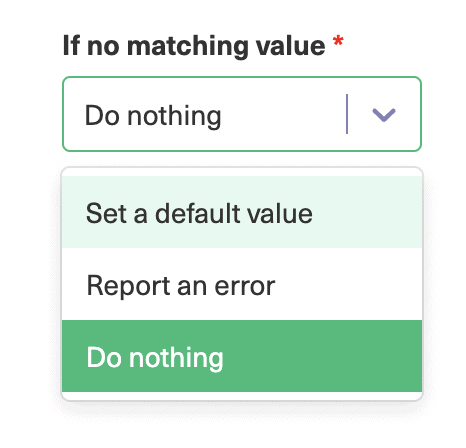
Mappings can be added by selecting appropriate ones from a drop-down list or you can add a new one by adding a script as well.
You are done for now with the Visual mode and you can directly skip to step 5 if you aren’t interested in the Script mode. But if you want to know how it works, read along.
Configure the sync using the Script Mode
For Script mode, Exalate uses Groovy-based scripting to control what information is sent and received.
You can edit the connection just like for the Visual mode by clicking the “Configure sync” button or by editing the connection.
Here you can see 4 tabs here: Rules, Triggers, Statistics, and Info.
The Rules tab is what we are going to look at in this section. Triggers are to be covered in the next step.
Under the “Rules” tab, you will find some code that looks like this:
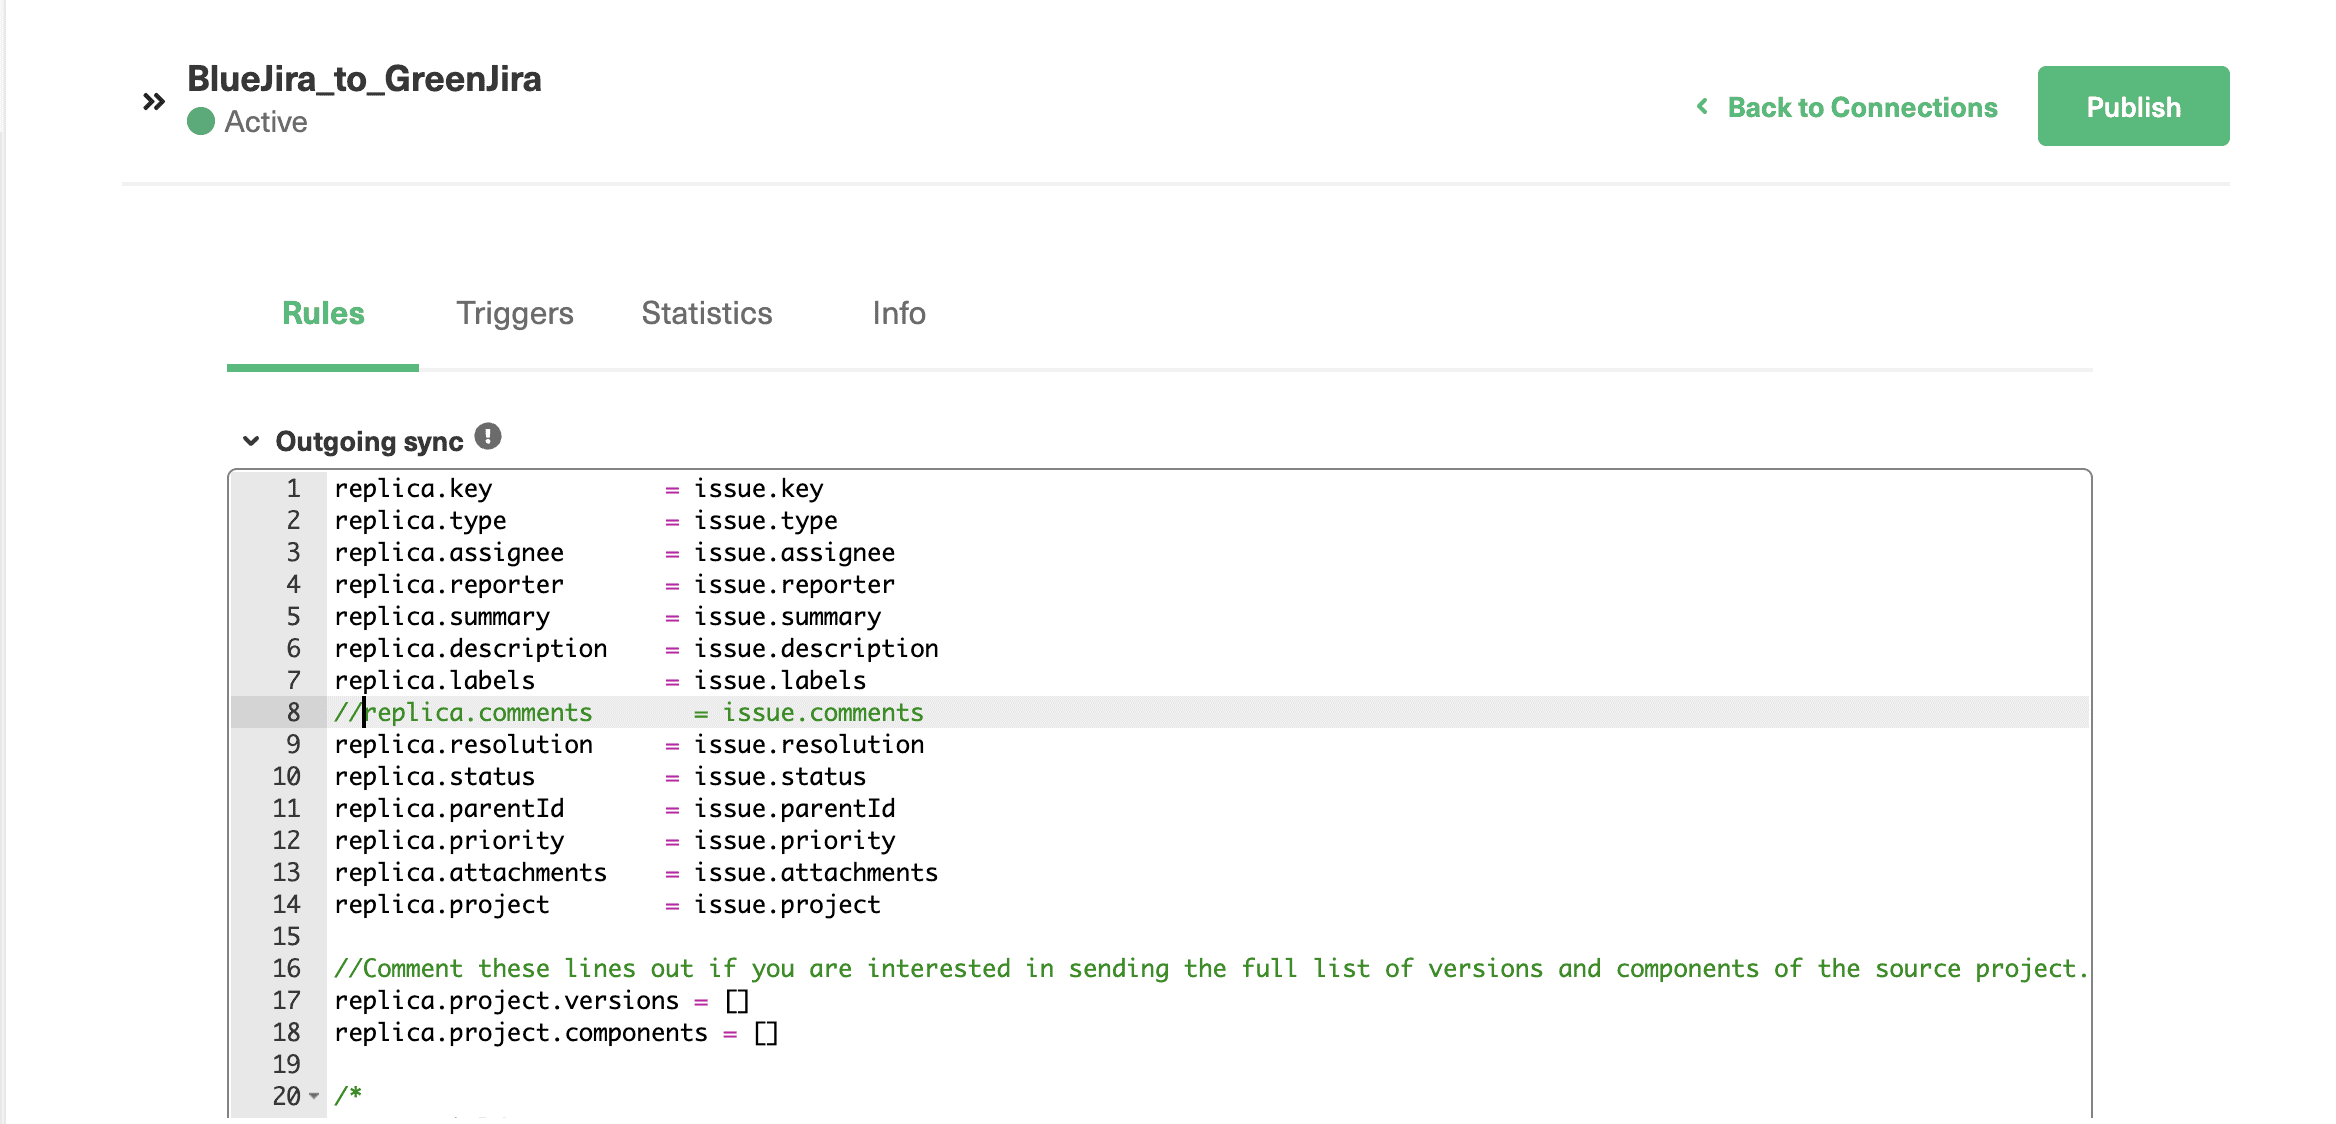
These are called sync rules and they exist on both sides of the connection as “Incoming sync” and “Outgoing sync”.
As in the image, the Outgoing sync on the Jira side decides what information Jira will send across to the destination instance and the Incoming sync decides how it wants to receive information from the destination.
These rules exist on the other side, just their Outgoing and Incoming syncs are reversed.
The information from the issue is saved in a replica. This works like a placeholder allowing you to store information that you need to pass back and forth.
For controlling the information flow, you can remove the sync rules by deleting that line or by commenting it.
Adding comments (“//”) in front of the line in the Outgoing sync, for e.g: //replica.description=issue.description means that the description will not be passed from the Jira side. The synchronization engine simply ignores the commented lines.
You can add new scripts to this code as well. There are a lot of script helpers Exalate provides that you can refer to.
Step 5: Automatically Synchronize Information through Triggers
To start synchronization automatically, you can use triggers. These are conditions you set, that when satisfied, start the synchronization process in line with the sync rules you have set.
The trigger screen can be accessed in the Script mode by clicking on the “Triggers” tab. If not, you can access it from the left-hand menu as well.
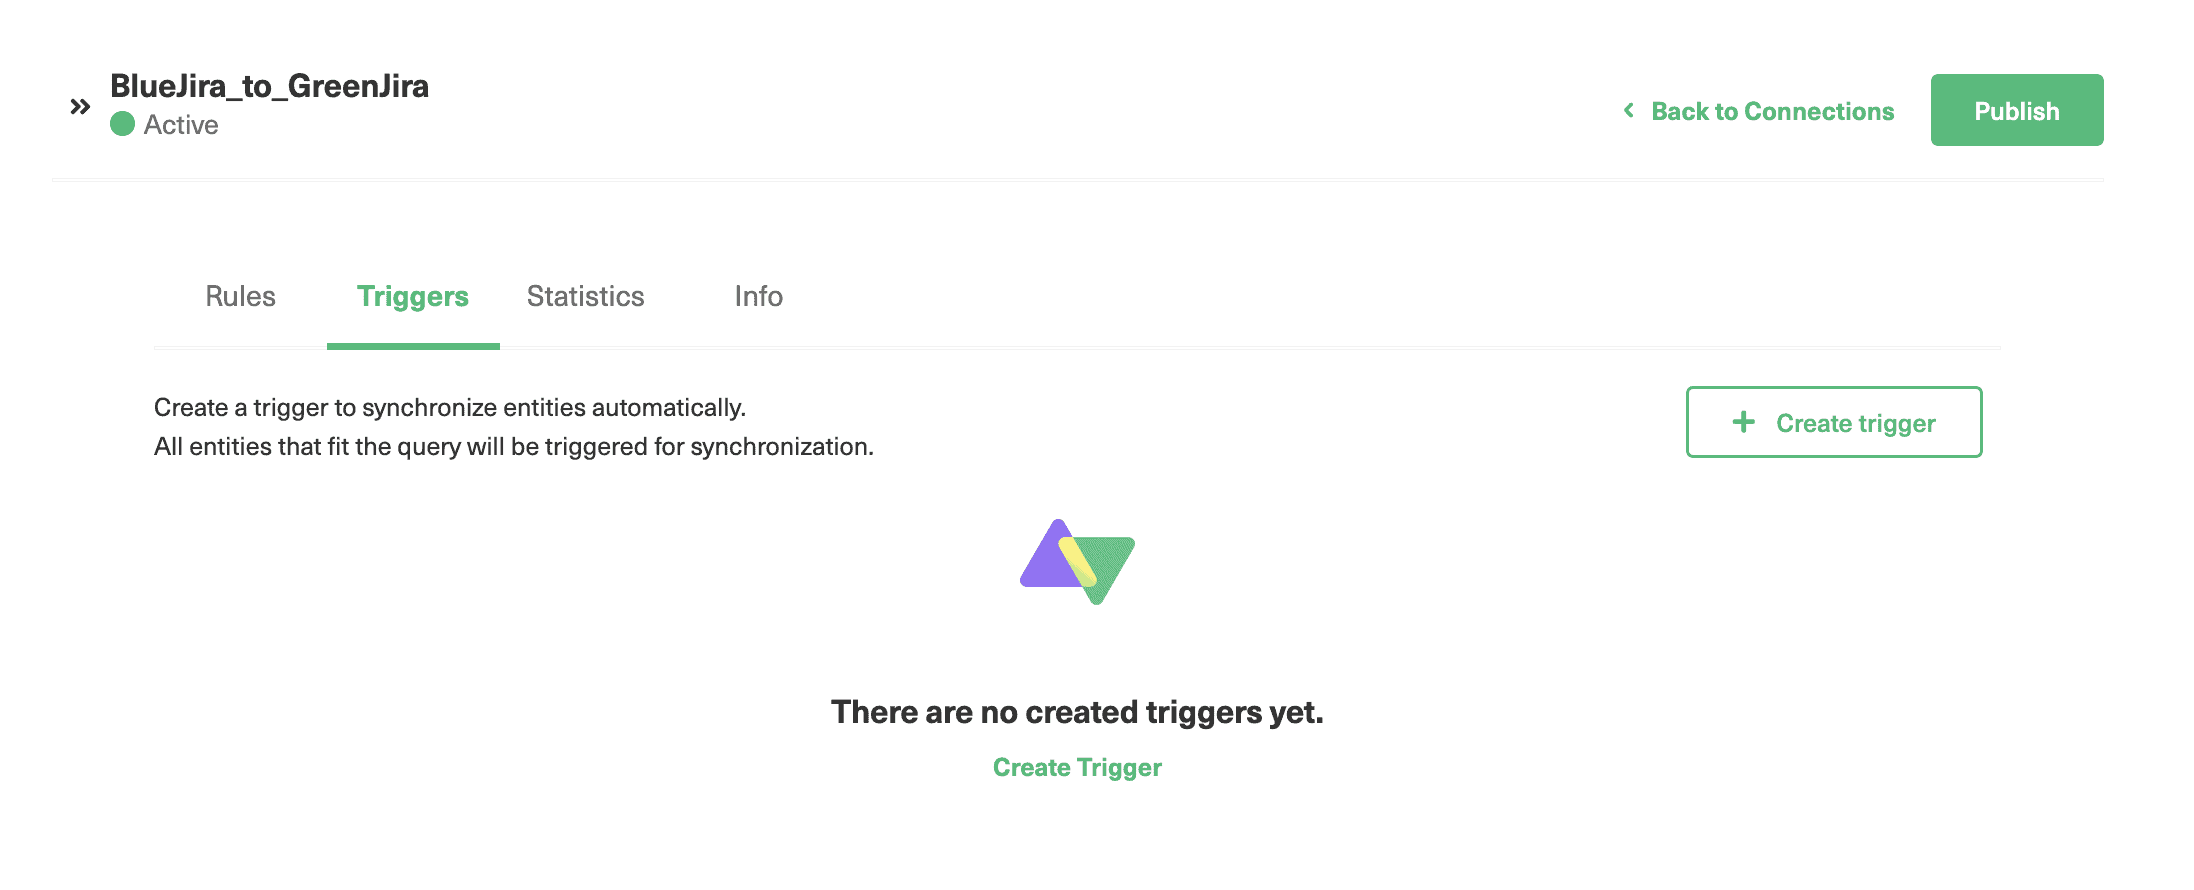
Click on the “Create trigger” button and you will be taken to the “Add trigger” pop-up.
There you can choose the entity to which you want to apply the trigger.
In the “If” section, mention the conditions in the form of “Jira Query Language”. This will be platform specific. So on the other side, it would include the query suitable to that application.
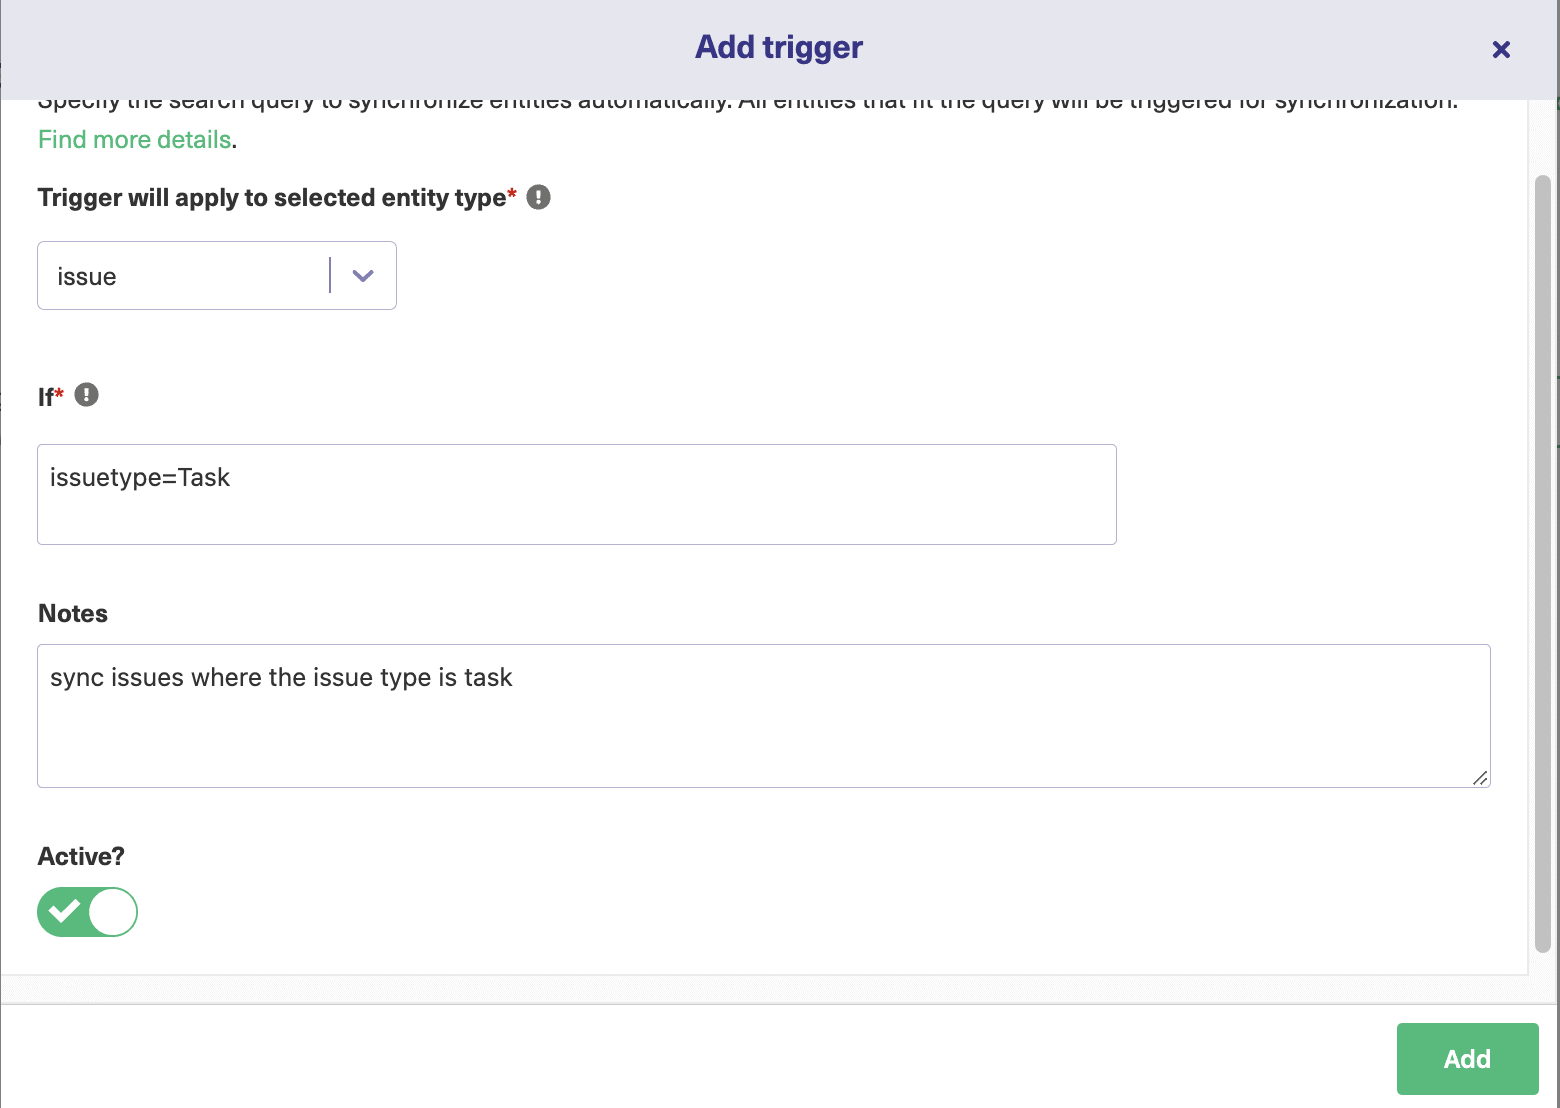
For instance in the example shown above, we are going to synchronize issues having the issuetype as Task. Leave “Notes” for the triggers. Activate the trigger by clicking the “Active” button and then click “Add”.
You can see your trigger on the previous screen. You can also choose to edit or delete the trigger from there. There’s also an option to “Bulk Exalate” issues matching the trigger criteria from here.
Step 6: Enjoy your First Synchronization
You are all set to see your first issue being synced!
You create issue types meeting your trigger criteria and see the issues being synced automatically.
Exalate has its own panel in the Jira issue view as well. You can access it directly from the issue as shown below.
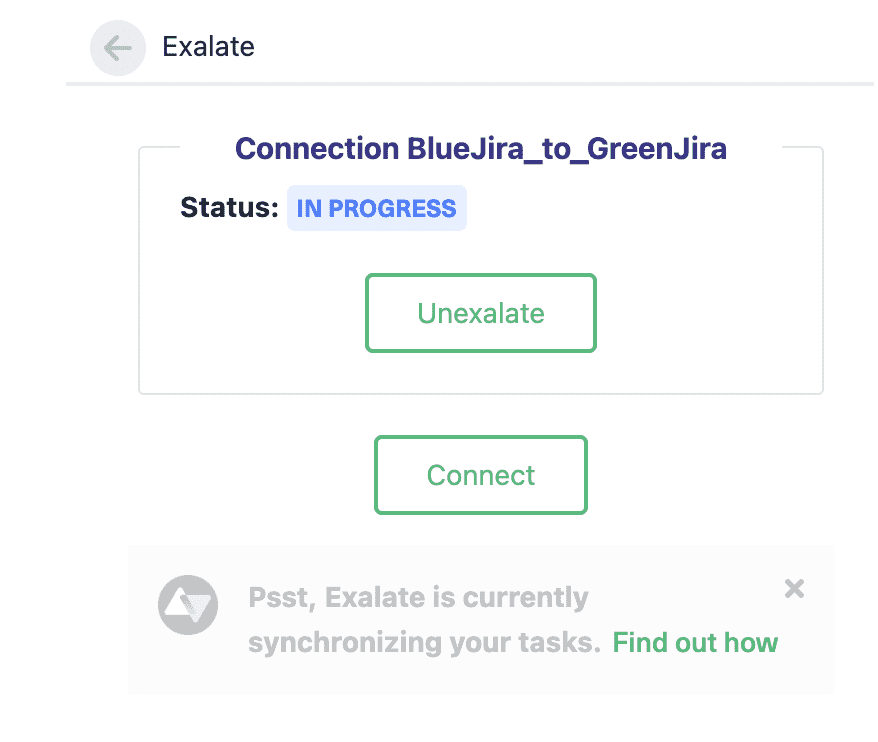
Click on “Exalate”, then choose the connection you want to synchronize with.
After a while, your issue will be synced to the other side.
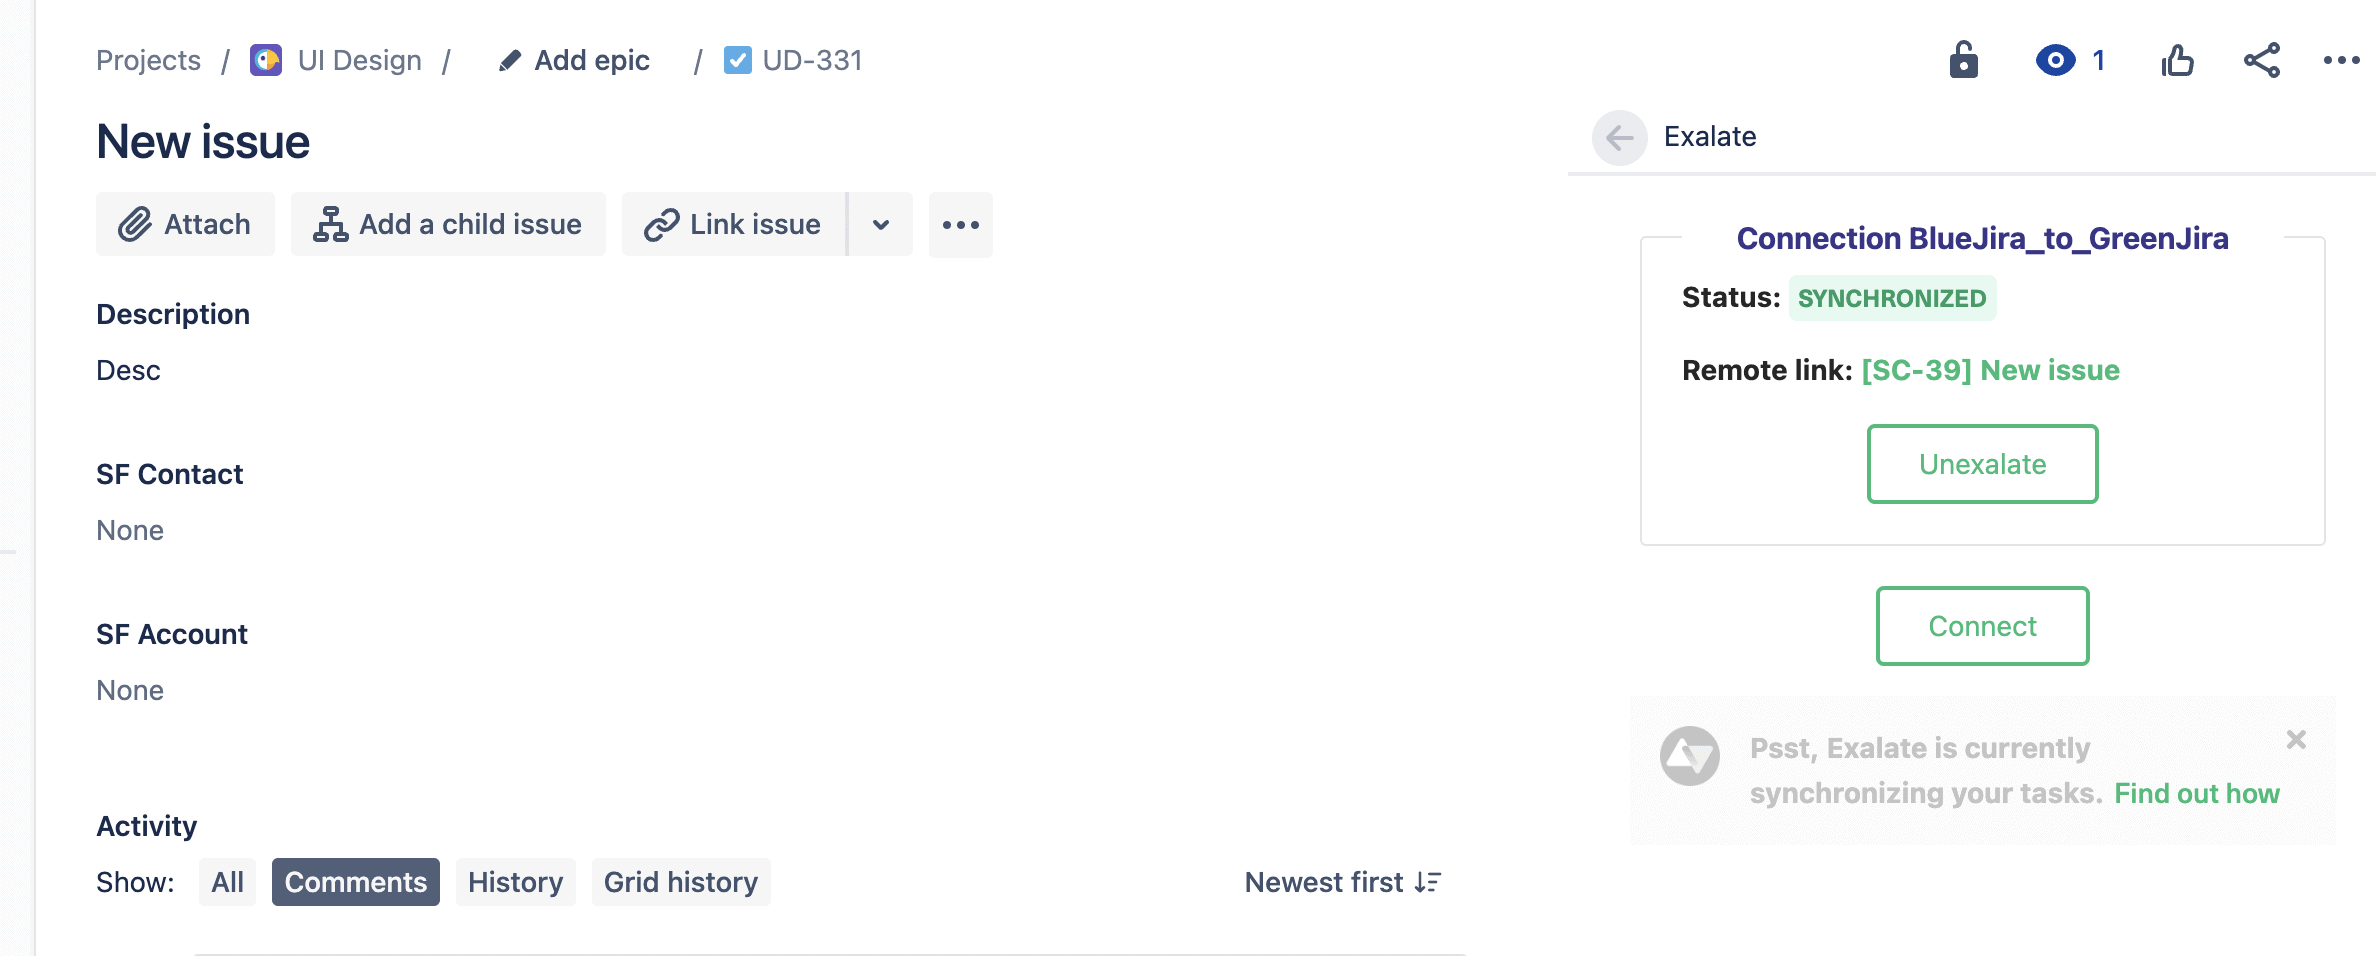
This is another way of manually synchronizing Jira issues.
Conclusion
Jira is an excellent tool for many teams and its power can be harnessed with a load of applications available on its marketplace.
We saw how Jira integrations can help your teams unsilo themselves and collaborate with other teams to experience increased productivity and efficiency.
We also had a look at what must be considered while choosing the integration tools from the marketplace because you are going to be spoilt for choice there. And finally we chose Exalate as our tool because it natively supports all our checklist criteria: flexibility, decentralized integration, reliability, and secure information sharing.
So roll up your sleeves, prepare an integration plan, explore the tool, and decide for yourself.
Recommended Reads:
- Jira to Jira Sync: How to Synchronize Multiple Jira Instances in 8 Steps
- How to set up a Jira Salesforce Integration
- How to Set up a Jira HP ALM Integration
- How to Set up a Jira Azure DevOps Integration
- Jira GitHub Integration: the Comprehensive 2023 Guide
- How to Set up a ServiceNow Jira Integration
- How to Set up a Jira Zendesk Integration (the 2023 Step-by-Step Guide)


