

Jira is one of the most powerful task-tracking tools out there. Its key strength is in the huge range of options that it has on offer, which allow teams to customize the platform to reflect real-life workflows and extend the product to the organization’s precise requirements.
And while Jira is best known for its use in software development, it’s just as useful for sales, marketing, and accounting teams who want granular control over the functionality and deployment of their task tracking manager.
This guide will provide everything you need to get started with project management in Jira and how to make the most of the platform for your organization. And Jira is the perfect platform for agile…
What is covered in this blog post:
- What is agile project management and who is it for?
- Why use Jira for project management?
- How to use Jira for project management
- Use cases
What is agile project management and who is it for?
Agile project management is an iterative working approach that prioritizes regular releases of completed work, with user feedback built in at every stage of development.
The polar opposite of that, of course, would be the traditional model of building a complete product and then showing it to customers – and only then finding out if they like it.
By incorporating customer feedback at an early stage, the team is able to finetune the product for real-world applications and prevent wasted work. All of this typically makes work faster and more efficient, while the framework fosters improved collaboration within the team and greater transparency regarding successes and failures.
Agile is widely used in software design, but it can do much, much more than that. Furthermore, Jira has been built to support agile project management from the ground up – and it comes with a comprehensive toolset for the framework.
Two of the leading agile methodologies are Scrum and Kanban, and both are fully provisioned by Jira.
Scrum is geared to tracking and managing work within short sprints, while Kanban focuses on the continuous completion of tasks. Because of this, Scrum is a good fit for substantial projects, that can be broken down into a series of scheduled releases (whether this means creating a product or designing software). Kanban, meanwhile, is best suited to simple projects and processes that may run over long periods of time (customer support, for example).
Why use Jira for project management?
For many teams, simple, visually focused task tracking tools like Trello or Monday will be entirely sufficient – team members can create, assign and close tickets as issues arise and work is completed. Jira adds value by offering enormous power and flexibility where there are more complex requirements. For example, in Jira you can:
- Customize workflows to add progress stages for tasks and approval criteria
- Visualize task lists with scrum and sprint boards, allowing you to apply the agile framework
- Take advantage of built-in automation – for example, notifying individuals when tasks are transitioned or scheduling issues to close if feedback isn’t provided by a deadline
- Use the Atlassian Marketplace to further customize and enhance your instance
- Make use of Jira Software’s 3,000+ integrations with partners ranging from Adobe and AWS to Zoom and Zendesk – and potentially connect your entire workplace software stack to Jira
Given this, the sky is really the limit as to what you can do with Jira!
How to use Jira for project management
Getting started with Jira means taking on the various moving parts that define how work is tracked and managed on the platform.
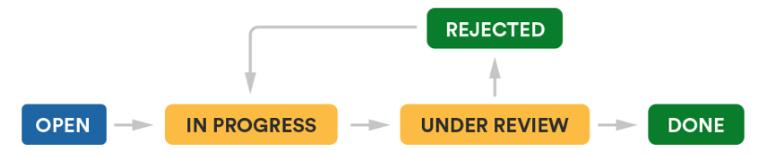
Tasks in Jira are referred to as Issues. These are created within Projects and can be viewed on Boards. The process by which issues are moved through the workflow (for example, going from “Open” to “In Progress” to “Complete”), can be selected from a Workflow Template (or can be customized to suit the team’s requirements).
So, the first step to getting started is to create a project…
Create a new project
The project is the overarching structure that holds a group of issues together. A team might work on a given project for months or years – or a discrete, short-term project might just be in use for a week, and then be closed once its requirements are met.
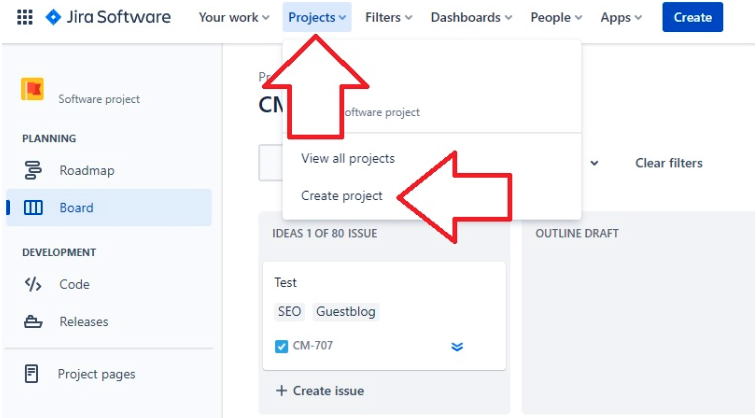
To create a new Project go to “Projects” on the top menu and select “Create Project”.
You can then pick the type of project that you want to create. There are dozens of customized options to choose from, with templates categorized by use for software development, service management, work management, marketing, human resources, finance, design, operations, legal, and sales – and for individual users.
The next step is to name your project and to give it a key (a shortened representative name). Then you can choose whether the project is team-managed or (if you’re an admin) company-managed. Team-managed projects can be set up by anyone on the team and are relatively simple to get going. You can select whether the project is open, private, or has limited access assigned. Company-managed projects, on the other hand, have to be set up by admins, and they require additional configuration of screens, workflows, and permissions.
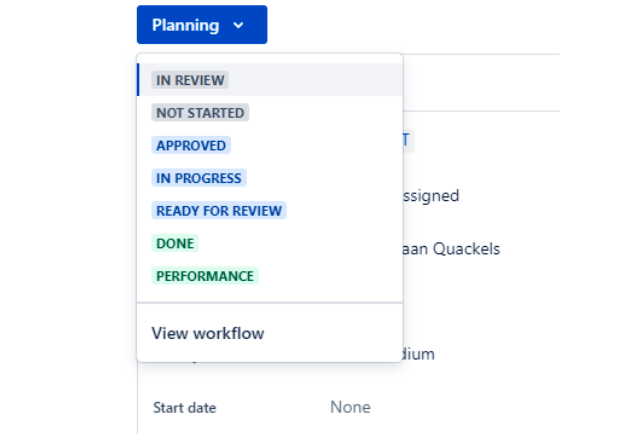
Choose a workflow template
The workflow is the process by which tasks get completed. This might just be an individual picking up the task and marking it complete once the work is done, but in other cases, work will need to be checked, tested, and approved – or other steps may apply.
The task status comes with the added benefit that the state of the task is immediately clear and team members have visibility on both what you’re working on and what you have lined up to do next.
Your project will come with a default workflow template. This may be as simple as:
To Do > In Progress > Done
It is also possible to authorize the passage to several statuses from a single status.
This translates to the following structure:
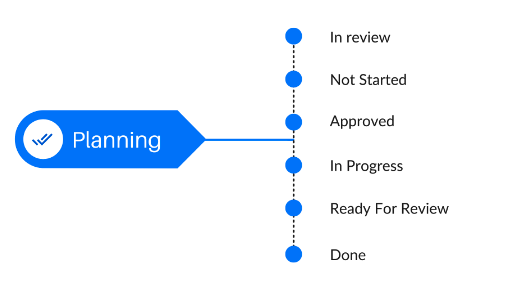
Your admin can also customize your workflow if standard templates aren’t a precise fit for your requirements. By doing this, they might add extra stages, conditions, and approvals.
Do keep in mind, though, that the more unique your workflow is, the less it’ll be compatible with other projects and instances – so it’s worth being thoughtful about whether you need a bespoke workflow or whether subtasks and automation might be able to provide all the features and functionality that you need.
Setting up your board
Boards allow you to easily visualize the status of tasks as they move through the workflow. What’s more, Jira comes with both Scrum and Kanban boards as standard, making it easy to implement agile management.
To set up a new board:
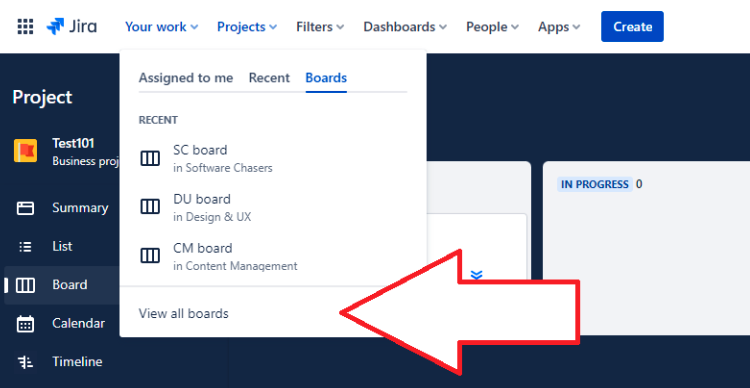
- Go to “Your work”, then “View all boards” and then click on “Create board” in the top right
- You then have the option to “Create a Scrum board” or to “Create a Kanban board”.
- Next, you can choose to create a “Board from an existing project” or a “Board from an existing Saved Filter”
And you’re done! With your board in place, you can still make adjustments, for example, adding or removing columns to suit your team’s requirements.
One useful feature is to set a Work In Progress (WIP) limit, which determines the maximum number of issues that can sit in one column at a time. This rule highlights where bottlenecks are forming, and it obliges the team to clear the queue before they move forward with new tasks.
Create an issue
Time to get to work! Tasks in Jira are referred to as Issues. An Issue might mean addressing a problem (“Fix these typos on the website!”) Or it might mean completing a piece of work (like commissioning and approving a logo design) or carrying out a task (such as addressing a customer query).
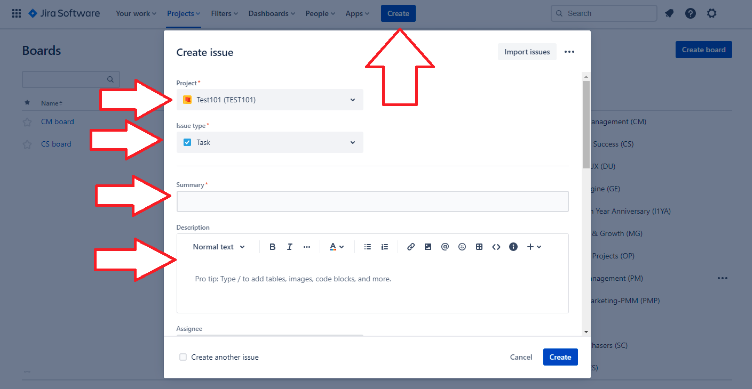
To create an issue, click “Create” in the top bar on your display. You can select which Project your Issue will appear in (it’s worth getting this right to save having the problem of needing to move the Issue later).
Then select the Issue type. Not all Issue types are available in all versions, but you can pick from:
- Epics – large blocks of work that can have multiple tasks assigned to them
- Stories, tasks, and bugs – single, discrete items
- Subtasks – smaller jobs that can be added to tasks
Next, you’ll need to create a brief summary of the task, as a title, as well as a more detailed description of what needs to be done. It’s worth zooming in here, to provide all the information that may be needed to complete the job – and don’t rely on the assignee knowing what is expected or being familiar with the Issue if the specifics aren’t laid out for them.
To assist you with this, you can include files and images alongside the description to fully lay out the task’s requirements.
But that’s not all! You can also set:
- The reporter (if it’s not you) and the assignee (if a specific individual needs to complete the task)
- The priority of the Issue, noting how important it is relative to other tasks
- The due date, if the task has a deadline
- Labels – which allow you to link tasks together, based on shared themes or features
- The estimated time to complete the task (“Original estimate”)
- Linked issues, connecting one task to another – indicating that one Issue needs to be completed before the next task can be started; or indicating another connection between two Issues
Subtasks can be useful in some cases for breaking up jobs while keeping them bundled together. For example, when creating an ad design, you might have subtasks for separately commissioning and approving the ad’s text and layout. This makes it clear which elements are still being worked on and which are complete, while the Issue as a whole can be progressed through the workflow.
In some cases, you may also want to clone issues – for example when a finished task needs to be performed again, but the original job remains completed. To do this, go to the Actions menu from the drop-down in the top right when viewing an issue and select “Clone”.
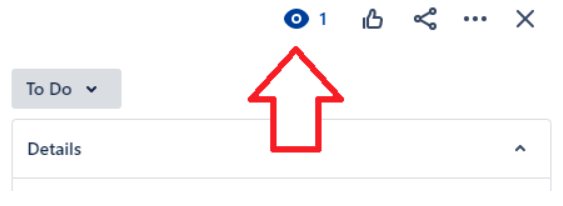
By default, the reporter and the assignee will receive updates about the status of issues. By clicking on the eye symbol in the top right of the Issue view, you can also add additional watchers, keeping them abreast of updates on the issue. You can also add comments to Issues – below the description – and you can share Issues, either by grabbing the URL, or using the share button in the top right of the screen.
Invite your team
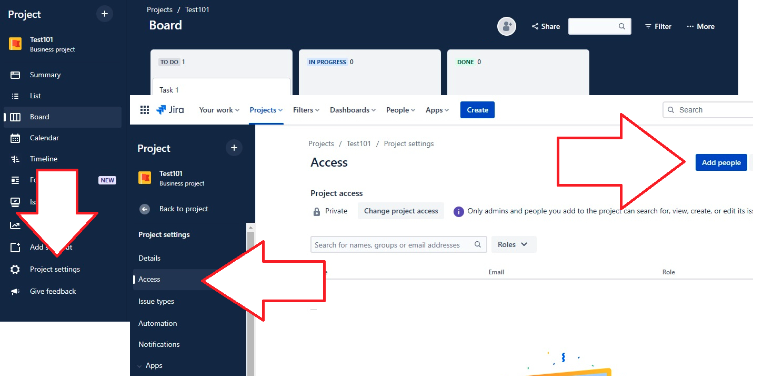
If you need to add users to your project:
- Go to the left sidebar and click ”Project settings” and then “Access”
- Click on “Add people” in the top right of the screen
- You can then choose to invite an individual or group by typing a name or email address
- Then select the individual or group’s role on the project: as an Administrator, Member, or Viewer
You can also remove individuals from the project from the same screen.
The polar opposite of that, of course, would be the traditional model of building a complete product roadmap and then showing it to customers – and only then finding out if they like it.
Use cases
According to Atlassian, more than 65,000 companies around the world use Jira Software, with teams ranging in size from one through to 20,000. Indeed, Jira is at work in sectors ranging from automotive to financial, government, and retail – and companies like Audi, Samsung, Pfizer, and Walmart are all clients.
And while software development, bug tracking, and test case management are some of the most common use cases – assisted by Jira’s extensive integrations – there’s also much more you can do.
That might mean using Jira as a service desk (tracking customer queries as they’re addressed by the team) or, simply, as a powerful, scalable task tracking system.
Conclusion
All of this illustrates the enormous power that Jira offers for a wide range of business use cases. Providing customized workflows, tailored permission sets, and comprehensive reporting – accessible on desktop and mobile – Jira comes with world-class functionality. In short, with Jira’s tools at your hands, you’ll be working faster and more efficiently as you level up your business!
Recommended Reads:
- Jira Automation: Get the Basics Right
- 8 Reasons You Should Consider a Jira Plugin for Outlook and How to Integrate It
- How to set up a Jira Salesforce Integration
- Jira GitHub Integration: The Comprehensive Guide
- How to Set up a Jira Azure DevOps Integration
- How to Set up a ServiceNow Jira Integration