

Jira is a supremely powerful task tracking tool, which allows you to manage work and workflows at scale. Beyond that, though, the platform enables you to work faster and smarter. And that’s where automation comes in…
What is automation for?
You can automatically take care of simple, repetitive tasks by building automation rules into your Jira instance. This means that your team can prioritize high-value items, rather than having to spend time on busy work such as manually escalating issues, closing old tickets, or changing statuses when issues are progressed.
And this scales up. Jira’s automation tools make it easy to create complex systems that respond to a range of triggers, which could – potentially – progress an issue from creation to completion.
This guide will lay out exactly what you need to know about the types of automation on offer and how to get started – as well as some ideas about how these tools could be suited to your needs. So let’s get started!
What is covered in this blog post:
Jira automation, quick start guide
Create and set up Jira automation rules
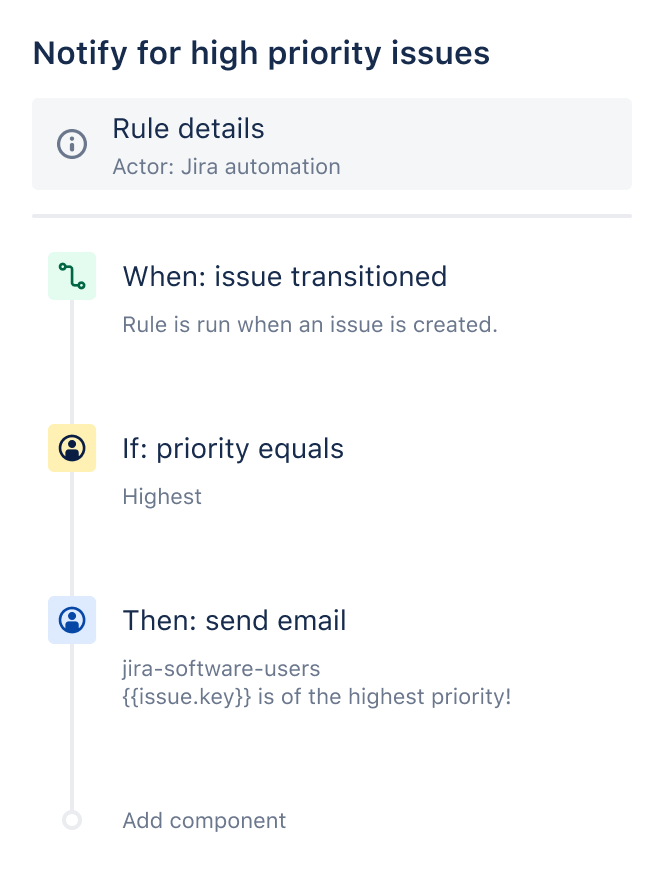
To set your automation process in motion, you’ll need a rule. Rules automate actions based on your instructions.
Rules have three components, which define what happens and when:
- Triggers – which start the process
- Conditions – which finetune the scope of the rule
- Actions – which carry out the process that you’ve described
Components in Jira automation
Triggers: Triggers wait for defined events to take place in your Jira instance and will then execute the automation rule. You can set triggers to run on a schedule or as needed. General triggers include:
- Field value changed – when a field value is changed
- Form submitted – when forms attached to an issue are submitted
- Incoming webhook – when an HTTP POST is sent to a specified webhook URL (allowing a third party to trigger an automation rule)
- Issue assigned – when the assignee of an issue is changed
- Issue created – when an issue is created
- Issue deleted – when an issue is deleted
- Issue linked – when an issue is linked to another issue
- Issue link deleted – when an issue is unlinked from another issue
- Issue moved – when an issue is moved between projects
- Issue transitioned – when an issue is transitioned from one status to another
- Issue updated – when issue details are updated
- Issue commented – when a new comment is added
- Issue comment edited – when a comment is edited
- Work logged – when a work log is created, updated, or deleted
- Sprint/Version created, started, or completed – when a sprint or version is created, started, or completed
- Manual – the rule can be manually triggered by a user
- Multiple issue events – the issue is triggered when multiple issue events take place
- Scheduled – the rule is set to run on a designated schedule.
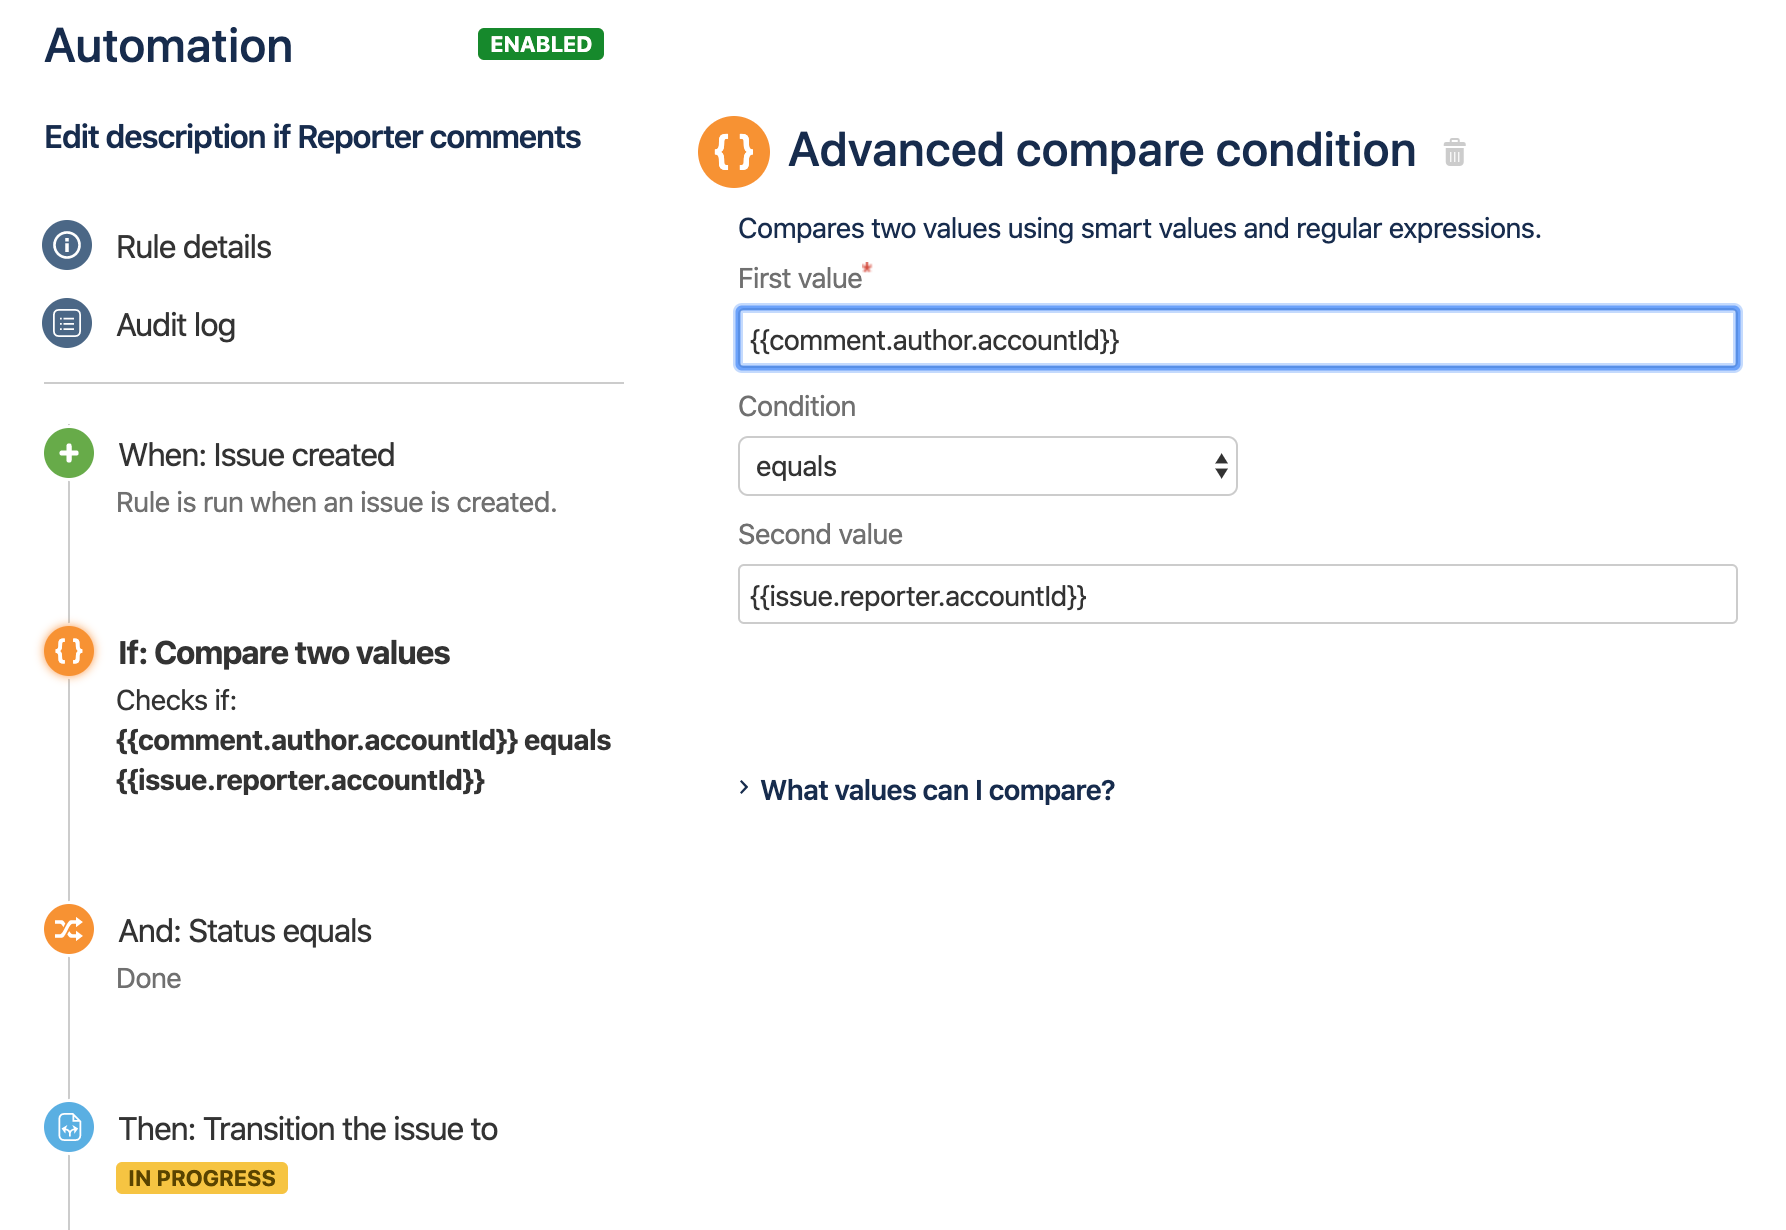
Conditions: Conditions allow you to finetune when your rule will operate. If the requirements of the condition are not met, then the rule will stop. Conditions you can pick from include:
- Issue fields condition – this checks whether an issue field meets a specified criterion
- Advanced compare condition – this compares two values, using smart values/regular expressions. You can pick from the following comparison methods: “Equals”, “Does not equal”, “Starts with”, “Contains” and “Does not contain”
- Affected services – this checks if an issue’s affected services field matches the chosen specification
- Form exists – this checks whether a form exists on the issue
- If/else block – this condition performs different actions depending on what conditions are met
- Issue attachments – this checks the comment or description fields for attachments
- JQL – this checks to see if an issue matches a specified JQL query.
- Related issues – this checks if related issues can be found on the trigger issue
- User – this checks whether a user can be found or whether they are in a specified group
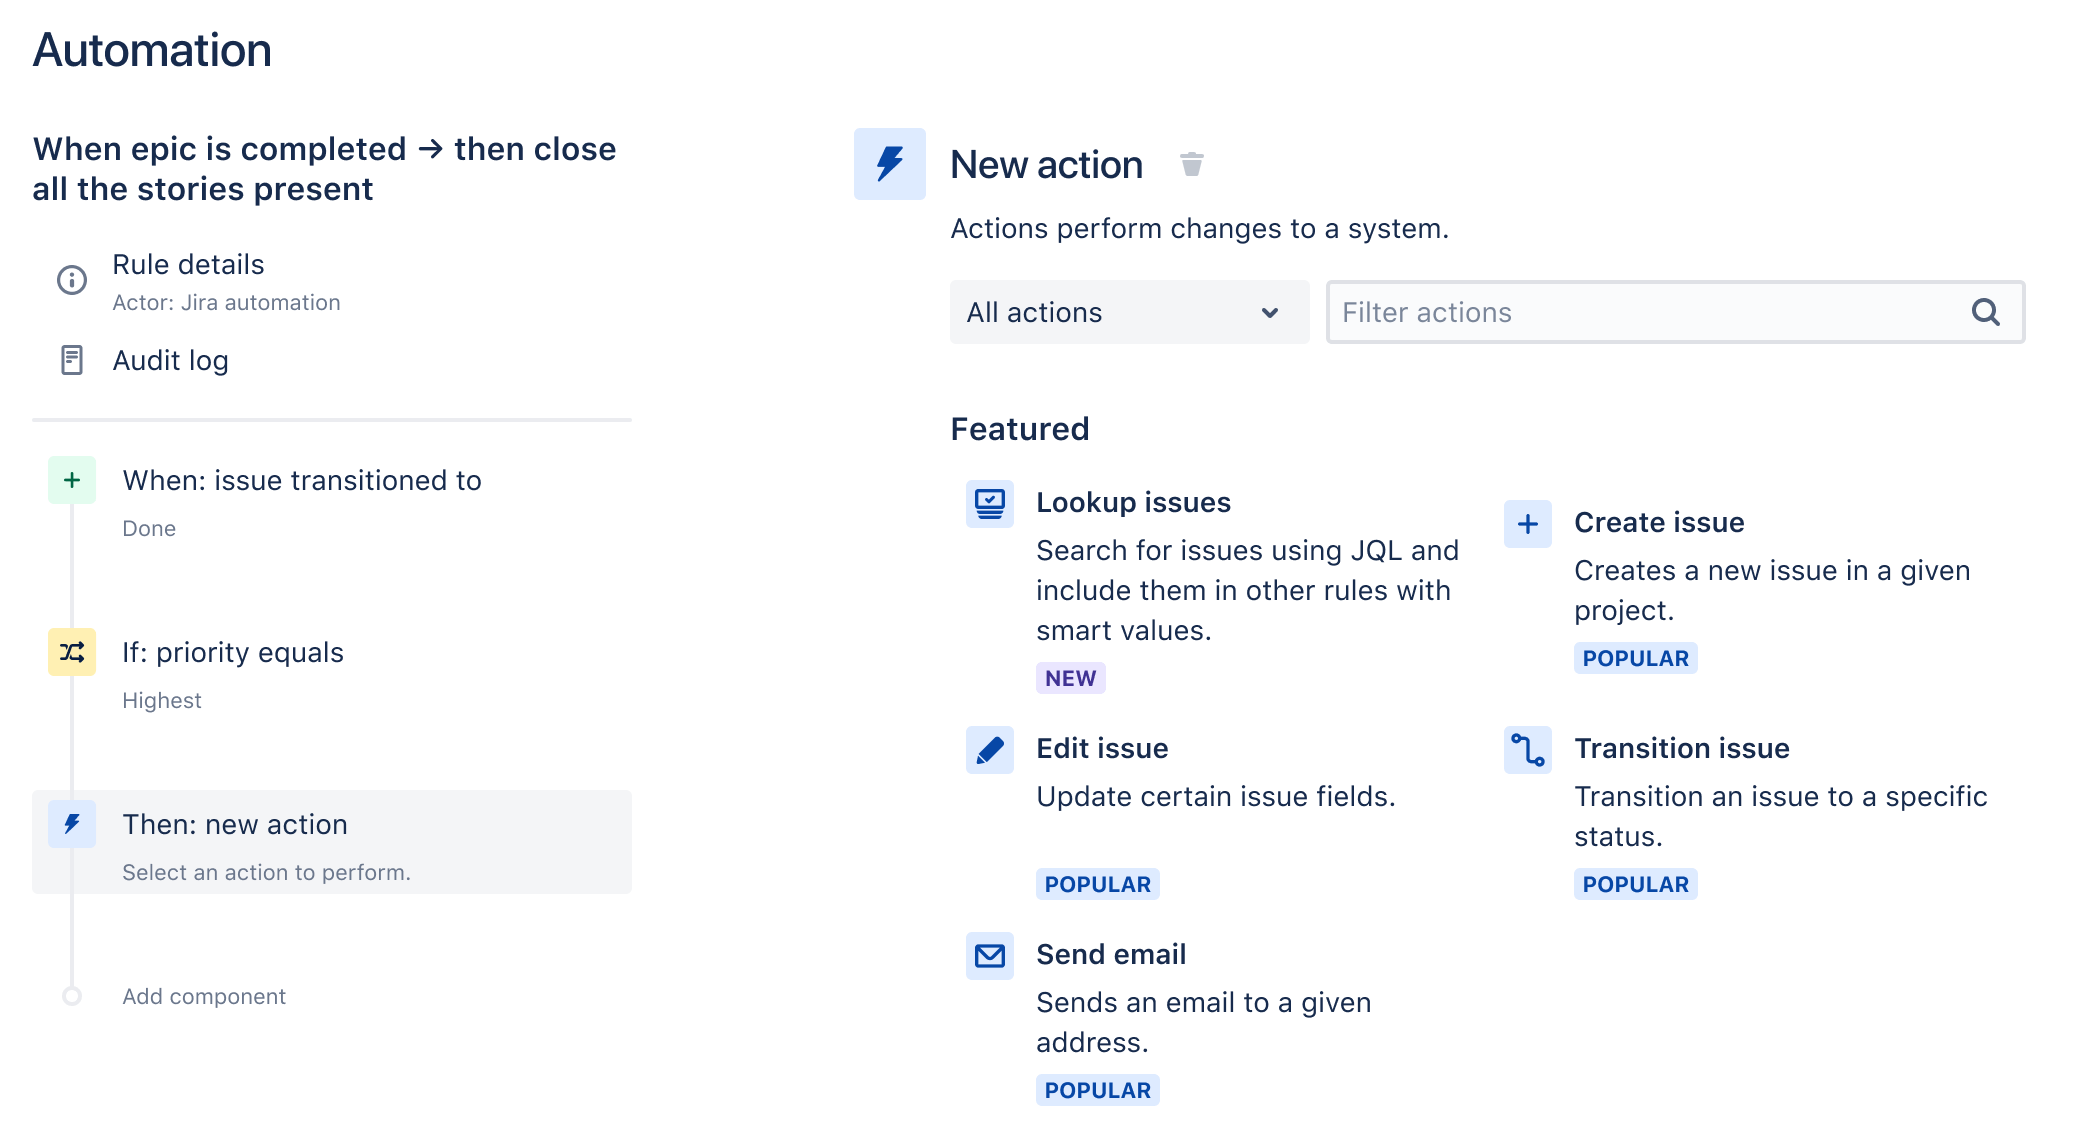
Actions: Actions are the most important part – they actually carry out the process that you want to automate. Actions you can pick from include:
- Assign issue – assign an issue to a user
- Attach forms – attach one or more forms to an issue
- Clone issue – create a copy of the issue
- Comment on issue – add a comment to an issue
- Complete sprint – end an active sprint chosen from the Jira Software board
- Copy form – copy one or more forms from one issue to the current issue
- Create issue – create an issue of any type on a project
- Create sprint – create a sprint in a chosen Jira Software board
- Create sub-tasks – create sub-tasks on an issue
- Create variable – define a smart value, for use on other actions/conditions on the rule
- Delete comment – delete a comment
- Delete issue – delete the current issue
- Delete issue links – remove any issue links on the current issue
- Edit comment action – edit a comment’s visibility or its contents
- Edit issue – edit the current issue’s fields with specified values
- Edit object – update an object’s attribute values
- Edit request type – update an issue’s request type
- Link issues – link one issue to another
- Log work – logs time against an issue
- Lookup issues – search for up to 100 issues using JQL
- Manage watchers – add or remove watchers on an issue
- Transition issue – transition, an issue through the workflow
- Send email – sends an email, with fields using smart value customization
- Send Microsoft Teams/Slack/Twilio message – sends a message on Microsoft Teams/Slack/Twilio when the rule is run
- Send web request – sends an outgoing web request
- Start sprint – starts a sprint in the chosen board
- Log action – logs a value to the audit log
- Delete attachments – remove attachments based on their filename
- Re-fetch issue data – refreshes smart values with the latest field values
Smart values in Jira automation
Smart values enhance your ability to access and edit data using your automation rules. For example, you could use the following:
{{now.plusDays(10)}}
So your rule will reference the current date, plus 10 days. There is a wide range of smart values that refer to issues, projects, lists, text fields, users, conditional logic, date and time, math expressions, and development – and which will significantly boost the power of your rules.
Setting up a Jira automation rule
Now you have all the component parts, we can run through how you would actually set up a rule.
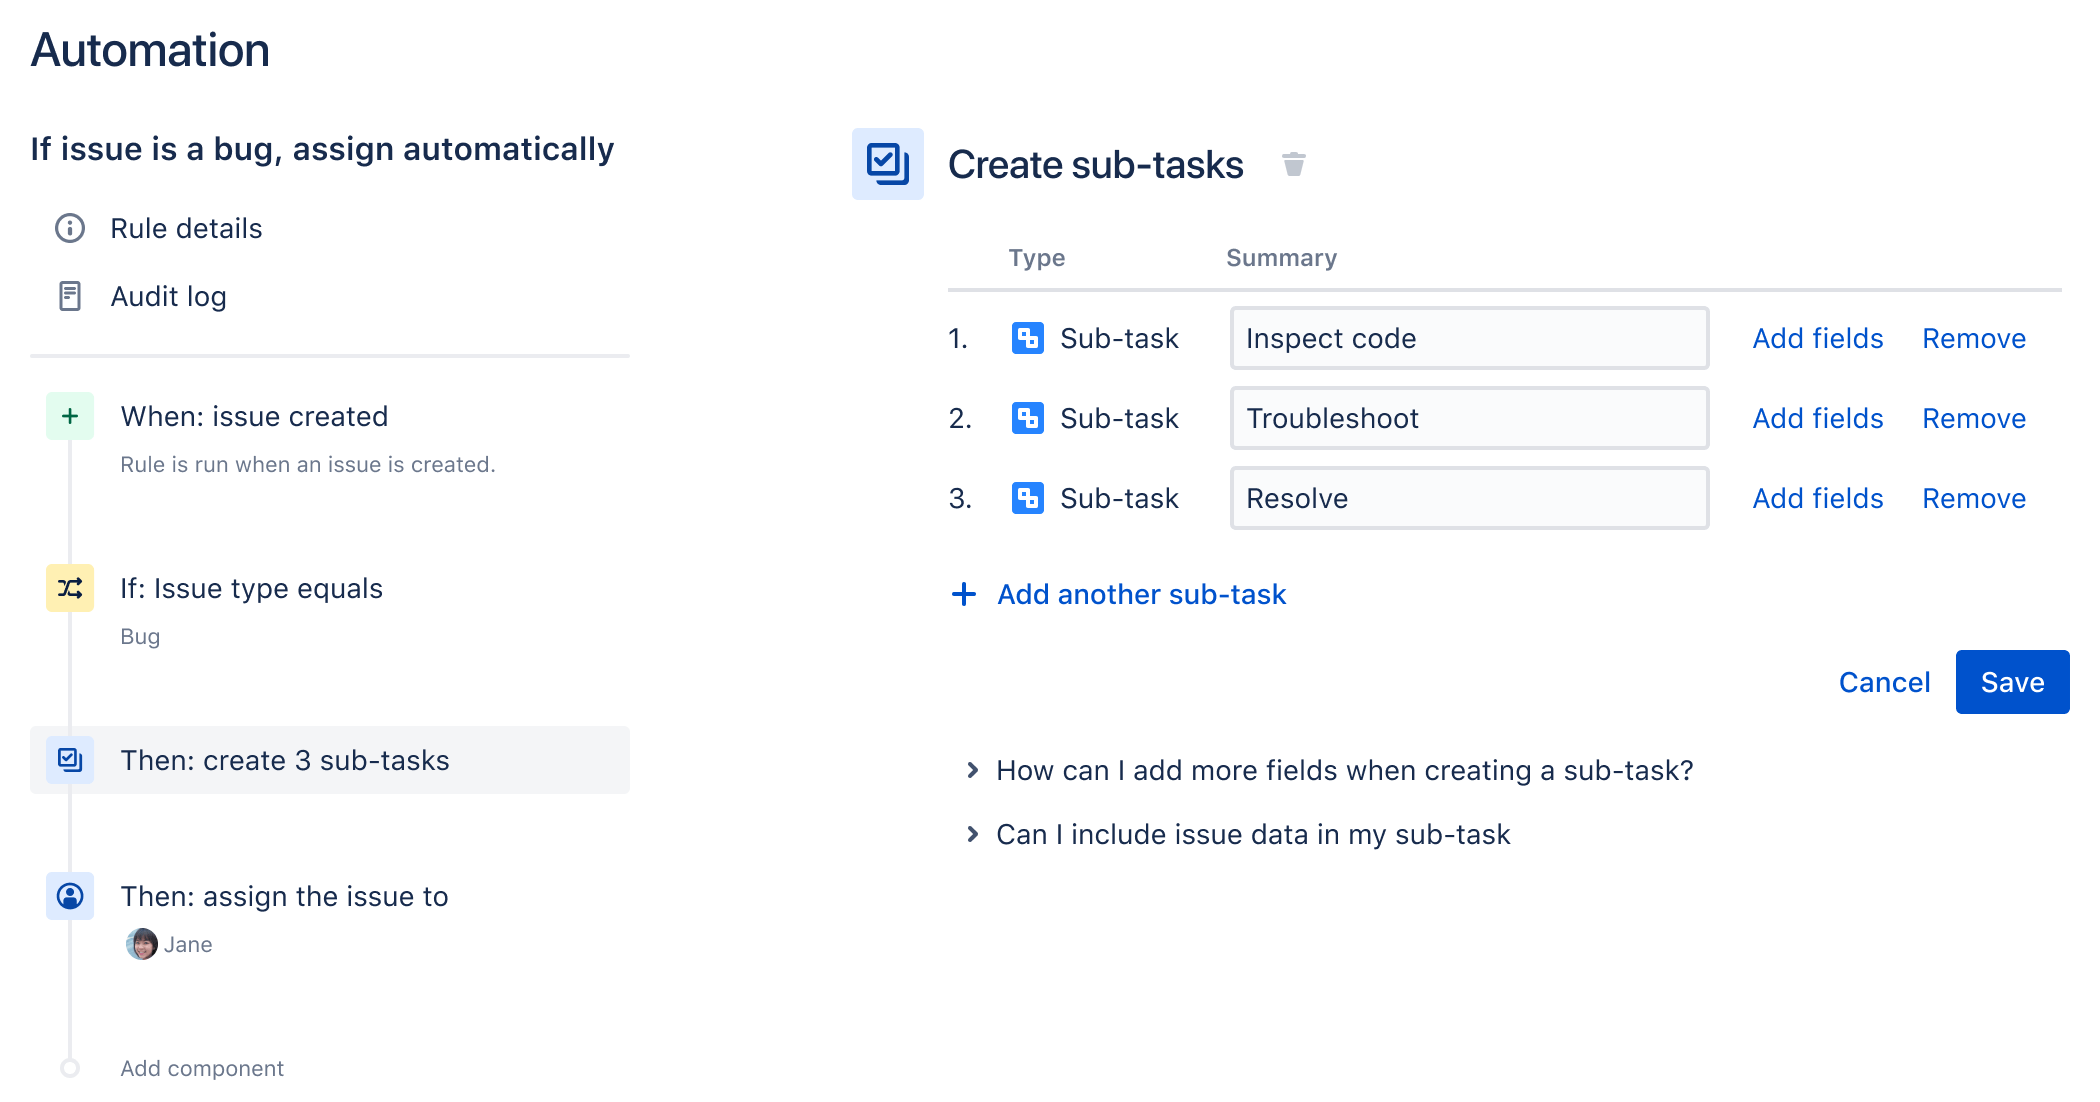
For example, we might create a rule so that when a new task is created, a sub-task is made requiring a team member to check its priority. To do this:
- i) Go to the Automation settings and select “Create rule” in the top right
- ii) Click on the “Issue created” trigger and save
iii) Choose “New condition” and click on the “Issue fields” condition
- iv) Then set the Field to “Issue Type”; the Condition to “equals” and the Value to compare to “Issue”; and click save
- v) Choose “New action” and click on the “Create sub-tasks” action and then add a sub-task, called “Check priority” and save
- vi) Click on “New action” and click on “Assign issue”
vii) Choose a user as an assignee and save
viii) And finally, name your rule and turn it on – and you’re done!
Track your automation usage
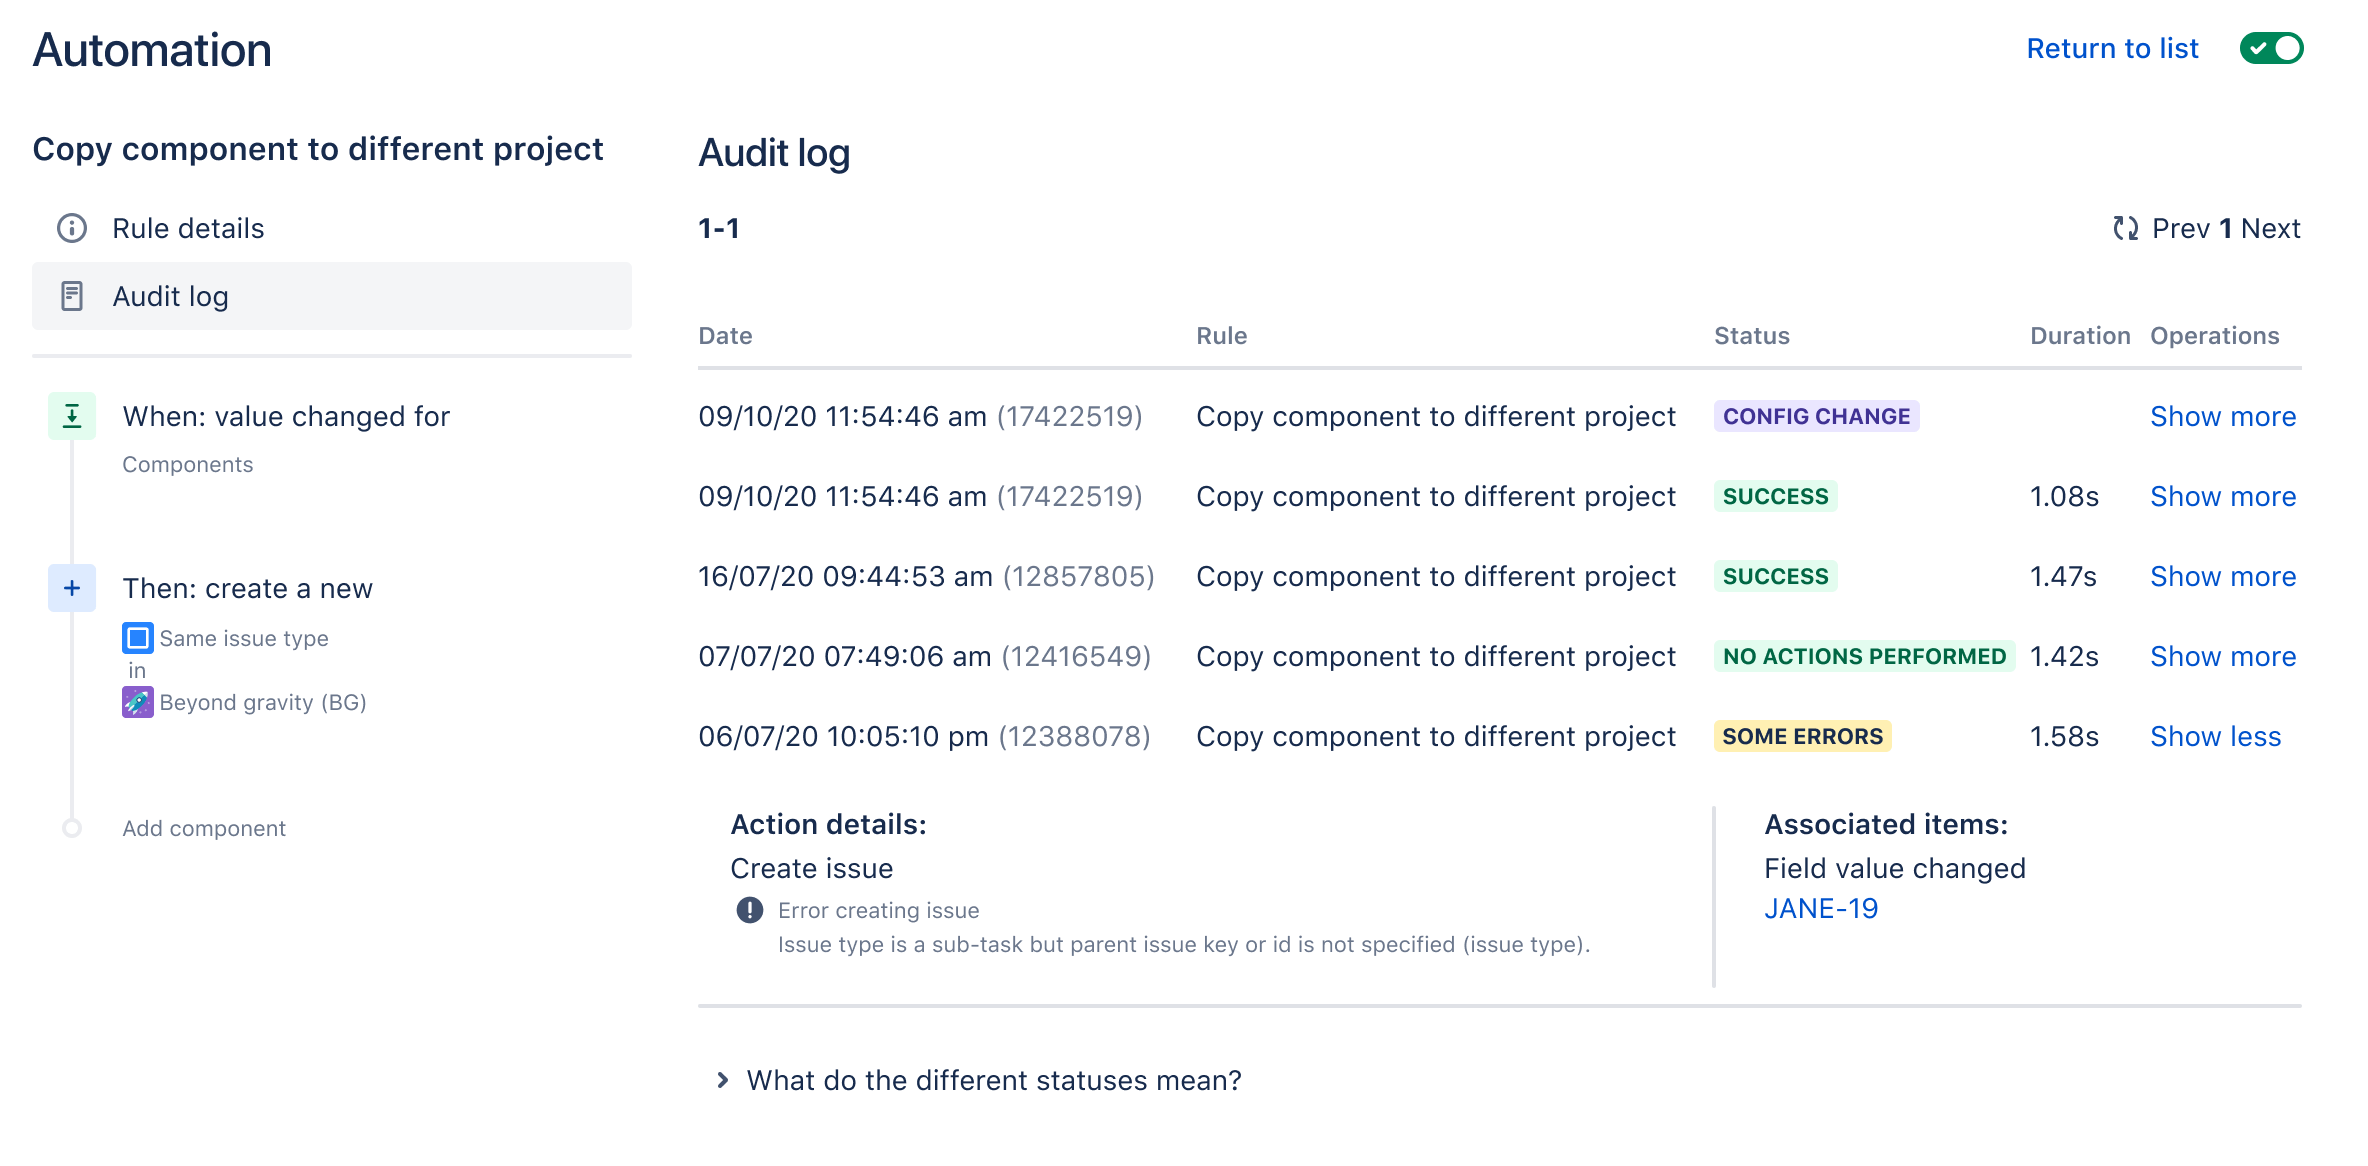
Every rule comes with its own audit log, which lays out when the rule was triggered, what actions were performed, and the outcome of the process. For additional detail, you can review these metrics by project or globally.
At a more fundamental level, your rules also have a status visible on their status screens: enabled, disabled, or draft. This makes it clear what’s active and what isn’t.
Use cases
Here are examples of a couple of common use cases that illustrate the potential of automation in Jira.

Match up parent issues and sub-tasks: Automation makes it simple to keep sub-tasks and issues synchronized. If you have multiple sub-tasks attached to an issue, for example, then you can automatically transition the parent issue once the last sub-task has been completed. And here’s how to set that up:
- Select the “Issue transitioned” trigger and set it to execute when an issue is marked “Done”
- You need to add an “Issue fields” condition, checking if the issue type is a sub-task – this means that all other issues will be unaffected
- Then we branch the rule and select “parent” as the related issue type (so the rule will run on the parent of the issue that triggered the rule); and include a “Related issues” condition on the rule, noting that sub-tasks have “status = done”
- We then want to set up a “Transition issue” action, so that the parent issue will be given the status “Done”
- Finally, you need to name your rule and switch it on
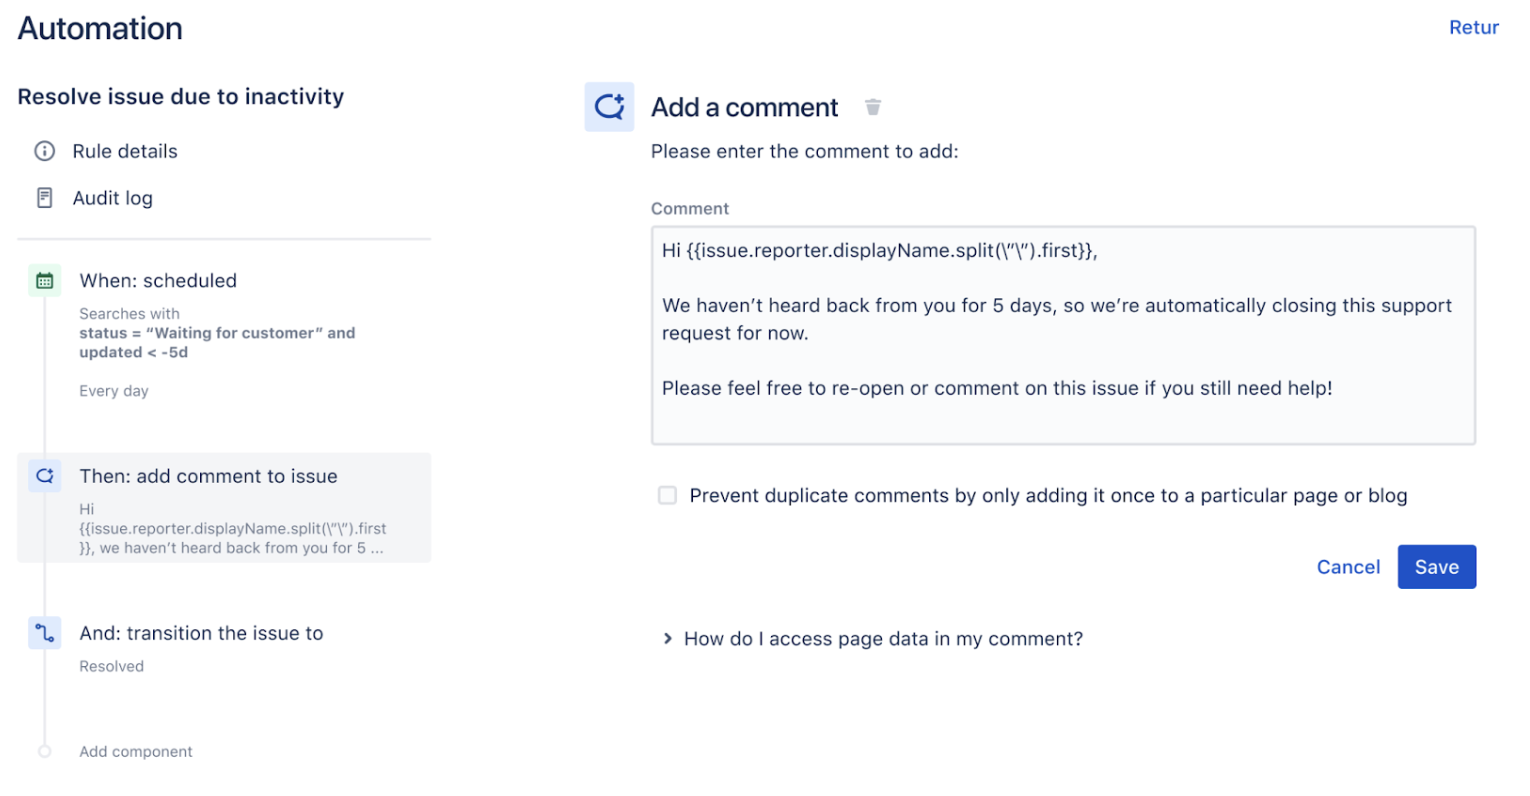
Scheduling tasks: Scheduling tasks, checks, and reminders can quickly and easily help to ensure that your team stays on top of their workflow. For example, if you haven’t received feedback following a query, you might schedule a reminder to be sent, while the issue is closed. To do this:
- Using the “Scheduled” trigger, set the schedule to run daily, and check status = “Waiting for feedback” and updated < -5d (or as preferred) – if these criteria aren’t met, the rule will trigger
- Then add a “Comment on issue” action, adding a note that the issue has been closed as the feedback has not been provided
- Then use the “Transition issue” action, to change the issue’s status to “Resolved”
- Lastly, you need to name your rule and activate it
Conclusion
This guide illustrates just how powerful automation can be – and how it can save your team from wasting time on boring, repetitive tasks, which can instead be handled instantly by the system itself.
A few simple steps can actually shave minutes or hours off the day – and automation rules can help you to better reflect your team’s workflow in Jira, with absolutely minimal effort, while cutting out friction and unnecessary obstacles. Time to accelerate!
Recommended Reads:
- 8 Reasons You Should Consider a Jira Plugin for Outlook and How to Integrate It
- How to set up a Jira Salesforce Integration
- Jira GitHub Integration: the Comprehensive Guide
- How to Set up a Jira Azure DevOps Integration
- How to Set up a ServiceNow Jira Integration
- Jira Integrations: Integrate Jira and Other Systems Bidirectionally