
Using Jira’s Components feature, you can break projects up into smaller subsections. This makes projects simpler and easier to manage – with Components combining tasks into jigsaw pieces that fit together to fill out the bigger picture.
Given this, Components can be an extremely useful tool for tracking and managing work. In this guide, we’ll explain how to set up Components and how to make the best use of them.
What is covered in this blog post:
- What is Jira Components, and what is Jira Components used for?
- Why should you use Jira Components?
- How to add Components to your Project
- Use cases for Components
Let’s get started!
What is Jira Components, and what is Jira Components used for?
 A Component is effectively a generic container for Issues, which acts as a subsection of the Project. Components form an additional step on the Jira hierarchy, sitting below the level of Projects. Each Component can be used to group multiple, related tasks together.
And this is particularly useful with more complex projects, where there are potentially many moving parts and many cross-dependencies. In this situation, transparency and clarity are invaluable.
A team might use Components to bring together Issues relating to specific services, APIs, or third-party plug-ins, for example. Alternatively, Components could be used for housework for specific teams, technologies, features, or sub-projects – it’s really up to you.
And despite the name, “Components” don’t have to correspond to a technical part of an engineering project. Grouping tasks together can be just as useful a feature for any team using Jira, whether they’re in marketing, HR, or legal. If Components can assist your team’s processes, then the functionality is up for grabs.
One important feature of Components is that they can only be managed and created by Project admins and Jira admins. This means that there’s top-down management on how projects are compartmentalized, ensuring that there’s an agreed rationale for how Components are structured and maintained.
Why should you use Jira Components?
Components are a useful way to steamline projects, grouping related tasks or breaking projects down into smaller chunks. This makes it easier to separate streams of work and to see how blocks build together towards the project as a whole.
By grouping Issues within a Component, you can then track them together, whether by creating dashboards or by generating reports.
Like Components, Versions and Labels enable you to group Issues, but at different steps of the hierarchy. Versions also act as containers, so can be assigned Issues. What’s more, they populate the Project Roadmap as changes are made. Unlike Components, though, they’re not intended for long-term use and are intended to serve as a milestone, to be reached and moved past.
Labels, on the other hand, allow you to tag Issues with keywords, forming dynamic connections between tasks within the instance. This is extremely useful, but it doesn’t come with the same level of structure as the Component feature and there’s no Label management screen. They also run across Projects, so are more suitable for tagging tasks than for breaking up projects. If you do want to connect Issues across Projects, though, labels may be a better bet than Components. There’s no reason not to use Labels as a separate tool alongside Components, however, connecting Issues in multiple dimensions. One more thing to keep in mind is you don’t need to be an admin to use the labels, so it can become messy really quickly.
Custom fields are another alternative – they’re flexible, can be used to capture all types of information, and can be used to filter Issues. That said, It’s undesirable to create too many Custom fields and they come with their own management Issues, meaning that Components will be a better solution in many circumstances.
How to add Components to your Project
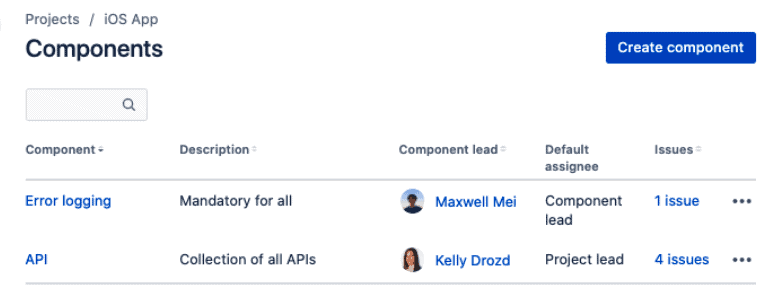
On the Components page, you can create, edit and delete Components for your project. Each Component has the following details:
- Name
- Description
- Lead
- Default assignee
- Associated Issues
Add a new Component
To add a Component (you’ll need to be a Project admin or Jira admin to do this):
- Go to Components in the Project sidebar, give a name that lays out what it’s intended for, and set the default assignee, it’s done.
- You can provide a description and a component lead. Providing explanatory details here will be useful for your team or other individuals reviewing the Component to explain its function and how it is intended to be used. Component descriptions come up as a tooltip when hovering over the Component label.
Select a default assignee
Each Component can be given a designated default assignee and a Component lead. Both these fields are optional.
The Component lead is likely the individual who will oversee the work assigned to the Component, whether that’s as a project manager; or, for example, as a specialist who will complete the tasks that fall under the Component or individual handling this specific area of the project.
If you want to assign a manager and their report to the Component as separate individuals, then you can use the optional default assignee field, so tasks created within the Component will be assigned to a specific team member. The default assignee field overrides the default assigned to the Project as a whole.
And with that completed, you can save the Component – and you’re done.
Tips
Before creating a new Component, project managers should consider whether doing so will help to streamline the project and whether the team’s members will understand what the Component is intended for. If it complicates the workflow or serves no clear purpose to the team, then it’s better not to create it.
Equally, it’s undesirable to create too many Components – otherwise, the system will get buried in unmanageable sprawl. It’s important for managers to maintain the Components that are in place and to remove any that fall out of use. If Components are adding clutter, then they’re not serving the team.
Edit or delete a Component
Components can be accessed from the Project sidebar. Editing and deleting Components is extremely simple. In the list of Components, simply select the “More” (•••) button; and then click either “Edit” or “Delete”.
If a Component is dedicated to a technology that is no longer relevant to the project or if all tasks relating to a specific area of work are completed, then the Component can simply be removed.
Sometimes, you just need to remove a component from the list but not to delete it, it’s why you can “archive” it instead of deleting it. It allows you to keep track of it but your users won’t be able to select it from the list.
Use cases for Components
The Components feature is extremely flexible and there is a range of ways different teams could deploy the functionality. For example:
- An engineering team might break up the different areas of an application into Components, such as the UI, the database, and API functionality; alternatively, they might break tasks into technical specialties or feature groupings
- A marketing team could split tasks relating to different channels into Components, such as social promotion, display advertising, and search advertising
- A legal team could separate out tasks that correspond to different clients within a single Project
Conclusion
Components are a powerful tool to break up Jira projects, whether diving them into parallel streams or into compartmentalized workloads. This makes it faster and simpler to get a clear view of the elements that are building together to form a project, which is particularly useful when running at scale.
Furthermore, the ability to generate stats and report on individual Components means that it’s easier to identify obstacles and problematic areas within the larger project – assisting the team and broader project management as a whole.
Recommended Reads: