
Jira’s power comes from just how much the platform can be extended and customized at every level – from the very top, at the level of projects, epics and components, right down to the level of subtasks. But just what are Jira subtasks and what are they for?
What is covered in this blog post:
- What are Jira subtasks?
- How to create subtasks in Jira
- Managing Jira subtasks
- Managing Jira subtasks settings for admins
- Best practices and tips for Jira subtasks
In this guide, we’ll explain the ins and outs of subtasks, how to create them, and best practice tips to keep on top of them. So…
What are Jira subtasks?

Jira subtasks sit at the lowest level of Jira’s task hierarchy. They are distinct child tasks that are attached to parent issues to illustrate the steps that need to be taken for that issue to be resolved – and as distinct tasks, they can be individually tracked and managed.
While subtasks are standalone child issues, they can also act as a form of a checklist for the parent issue to be completed.
Subtasks allow you to break the workload for an issue into smaller chunks. This means that different elements of the task can be assigned to different team members, and they can be given different deadlines. All of this can assist with planning and tracking the progress of work, as well as identifying blockers.
The only thing that you’ll need to get started is permission to create issues and to have subtasks enabled in your project’s issue-type scheme.
How to create subtasks in Jira
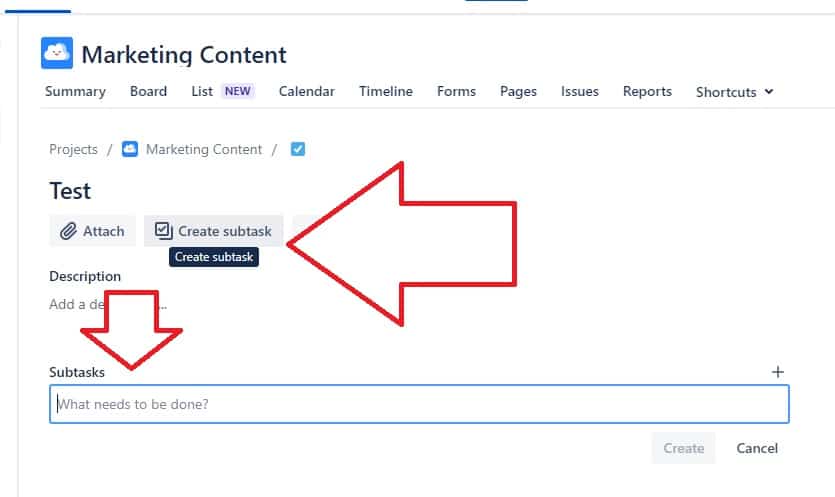
To create a subtask on an issue:
- Go to the relevant, pre-existing issue
- Beneath the issue title, click “Create subtask”
- Create a summary for your subtask and then click the “Create” button
And you’re done! The subtask is now attached to the issue.
Managing Jira subtasks
That’s not the end of it, though. If you want to transform the subtask into an issue, that’s also possible (for example, if the completion of an individual subtask is delaying sign-off on an issue). Equally, issues can be transferred to be subtasks of other issues if it transpires that they’re just a smaller step in the completion of another job.

To turn a subtask into an issue:
- Go to the subtask that you want to turn into an issue
- Click the “Actions” button (…) and then click “Convert to Issue”
- You can then pick between the different issue types available; once done, click “Next”
- If the new issue type does not allow the subtask’s status, you’ll be asked to change it on the next screen; you’ll need to then click “Next” and, lastly, you need to complete any required additional fields for the new issue type, before hitting “Next” and then “Finish” if you’re happy with all the details of the conversion
- Your child issue is now free to make its way through the workflow all on its own!
You can make the same journey in the opposite direction (if the option is enabled and as long as the issue doesn’t have any subtasks of its own – if it does, then these could be removed by converting them into issues, as above). To turn an issue into a subtask:
- Go to the issue and click “Actions” (…) and then click “Convert to subtask”
- Over several screens, you’ll then need to select the relevant parent issue to assign the subtask to, choose the relevant subtask issue type, make any required changes to status and fields and confirm, select “Next” on each screen, and “Finish” at the end, to confirm.
You can also move subtasks from one parent issue to another. To do this:
- Open the subtask
- Go to the “Actions” button (…) and then click “Move”
- Select “Change Parent” and “Next”
- Then choose the new desired parent issue with the selection field and click “Change Parent”
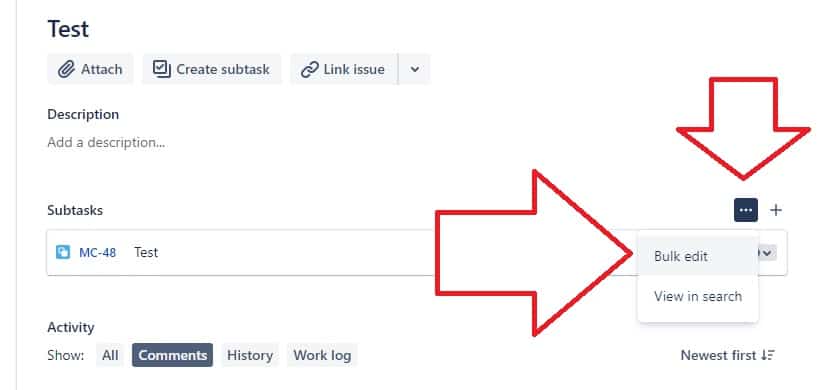
Another option is to bulk edit subtasks, allowing you to make changes quickly and easily. To do so:
- Go to the relevant issue, then go to the subtasks list and click the “More” button (…) and “Bulk edit”
- Select the relevant subtasks and click “Next”
- You can then choose to Edit, Move, Transition, Watch and Stop Watching the subtasks; you’ll then be asked to confirm the operation details you want on the next page and to then confirm the change
Managing Jira subtasks settings for admins
Admins have a number of options for configuring how subtasks can be used in a given project. By default, subtasks are enabled.
To enable or disable subtasks, go to “Settings” (the cogwheel icon) and then issues. Then go to “Issue types” and “Subtasks”, and you can choose to enable or disable them.
To create a subtask issue type, go to “Subtasks” from the “Settings” menu, then select “Add subtask issue type”. Then give the new subtask issue type a name and description and click “Add”.
To edit a subtask issue type, go to the “Settings” menu’s “Subtasks” page and click “Edit” on the issue type that you want to change. You then have the option to edit the name, description, and avatar for the issue type, before clicking “Update” to complete the action.
To delete a subtask issue type, go to the “Issues” page under “Settings”, then go to “Issue types” and “Subtasks”, where you can delete the unwanted subtask issue type. Of course, before deleting the issue type, it’s a good idea to check for any issues of that type in the system and to move them to another issue type (potentially in bulk) to ensure that the information isn’t lost.
You can also create a subtask blocking condition so that issues cannot be transitioned if subtasks attached to them have not been completed. To do this, go to the “Settings” menu, then “Issues”, then “Workflows”, where you need to click “Edit” on the relevant workflow. Next, you’ll need to choose a transition (such as “Resolve”) and click on “Conditions” and “Add condition”, then “Subtask Blocking Condition”, before clicking “Add”. Finally, add the relevant subtask statuses (e.g., “Resolved”) and click “Add” (so the issue cannot be resolved unless all subtasks assigned to it are also resolved).
Best practices and tips for Jira subtasks
Subtasks may seem fairly foolproof, but there are a number of facts that are worth keeping in mind when using them.
- Subtasks shouldn’t be used as a substitute for tasks. Subtasks should represent steps toward completing a task. If there are multiple entirely discrete jobs that make up a larger operation, and they can be individually completed, then they should likely get their own issues, rather than being lumped together. Overusing subtasks will also complicate time tracking, making it more difficult to track the performance of your team.
- Not every issue needs subtasks. Subtasks are particularly useful when it’s worth spelling out a number of sub-steps that will go towards completing a task – and they allow this to be split between different individuals. In a lot of cases, though, this won’t be necessary, and the task can be described and assigned with a single ticket.
- Does using subtasks make the task easier to track and complete? It’s a good rule of thumb to consider whether subtasks will make the job simpler – and if so, then they may well be just the right tool for the circumstances. If they’ll make the task at hand more complicated, though, then simply leave them out.
Conclusion
Subtasks are a great way of breaking up tasks in Jira to provide clear waypoints toward the completion of work. Issues are the basic building blocks of projects in Jira, and subtasks provide an extra degree of granularity, zooming in one level deeper.
Using this guide you can build subtasks into your own task planning, adding another dimension to the deployment and management of work and providing transparency and clarity about what needs to be done – so tasks can be completed quickly and smoothly, on time, and on-target.
Recommended Reads:
- ESM vs. ITSM: Key Differences in Enterprise and IT Service Management
- A Comprehensive Guide to Jira User Stories
- Master Jira Work Management with this Comprehensive Guide
- How To Use Labels in Jira: A Complete Guide
- How to Use Jira for Non-Software Projects (The Pro Guide)
- Jira for Project Management: Level up your Business Activities