

Jira Advanced Roadmaps (AR) feature was built to help teams look forward – laying out the map for the path ahead as multiple teams work together on larger-scale initiatives. The feature provides a collaborative, real-time platform that makes it easy to review the status of work and for teams to communicate their plans.
This guide will explore what the AR feature is for and how to use it. We will cover:
- What the Advanced Roadmaps feature is and why you should you use it
- Creating Advanced Roadmaps plans
- Creating super-epic level initiatives on the hierarchy
- Managing custom fields, exclusion rules, releases, capacity planning, dependencies and scenarios
- And we’ll offer some Advanced Roadmaps performance tips
What is the Advanced Roadmaps feature?
Jira’s Advanced Roadmaps was designed to assist managers with planning – driving collaboration and making it easier to keep track of the big picture across business units. AR pulls data from Jira Software projects, boards, and filters and displays it in a customizable, visual interface. The feature’s tools help managers to allocate resources and to identify dependencies and obstacles before they become blockers.
The feature is available on Jira Software Cloud Premium and replaced the Portfolio for Jira Marketplace add-on, having been rebuilt from the ground up. AR is also accessible as a Marketplace app for Jira Server and Data Center customers – with the same user experience in each case.
And to avoid confusion: Advanced Roadmaps is not to be mixed up with Jira’s Roadmaps, which is available on all Jira Software Cloud plans; or Enterprise Roadmaps, which comes with Jira Align.
Why should you use Advanced Roadmaps?
Jira’s standard or Basic Roadmaps feature will support your team up to the level of epics. AR, on the other hand, will take you further, providing planning features to cover work from multiple teams and supporting company-wide projects and initiatives.
The core purpose of AR is to provide a single overview of your organization’s work, including dependencies and your team’s capacity, meaning that you can track the broader context while also having access to granular detail. All of this can help to ensure that work is completed on target and on schedule.
AR also allows you to draw up multiple roadmaps to account for different eventualities – acting as a sandbox and allowing you to lay out different scenarios, depending on just how projects unfold, before you make changes to the original data. This means that your team can be prepared, for whatever happens.
In addition, AR comes with unlimited levels of hierarchy above the epic level, allowing you to break up projects however you need to – potentially creating a whole family tree of parent-child relationships as you subdivide the project.
How to use Advanced Roadmaps
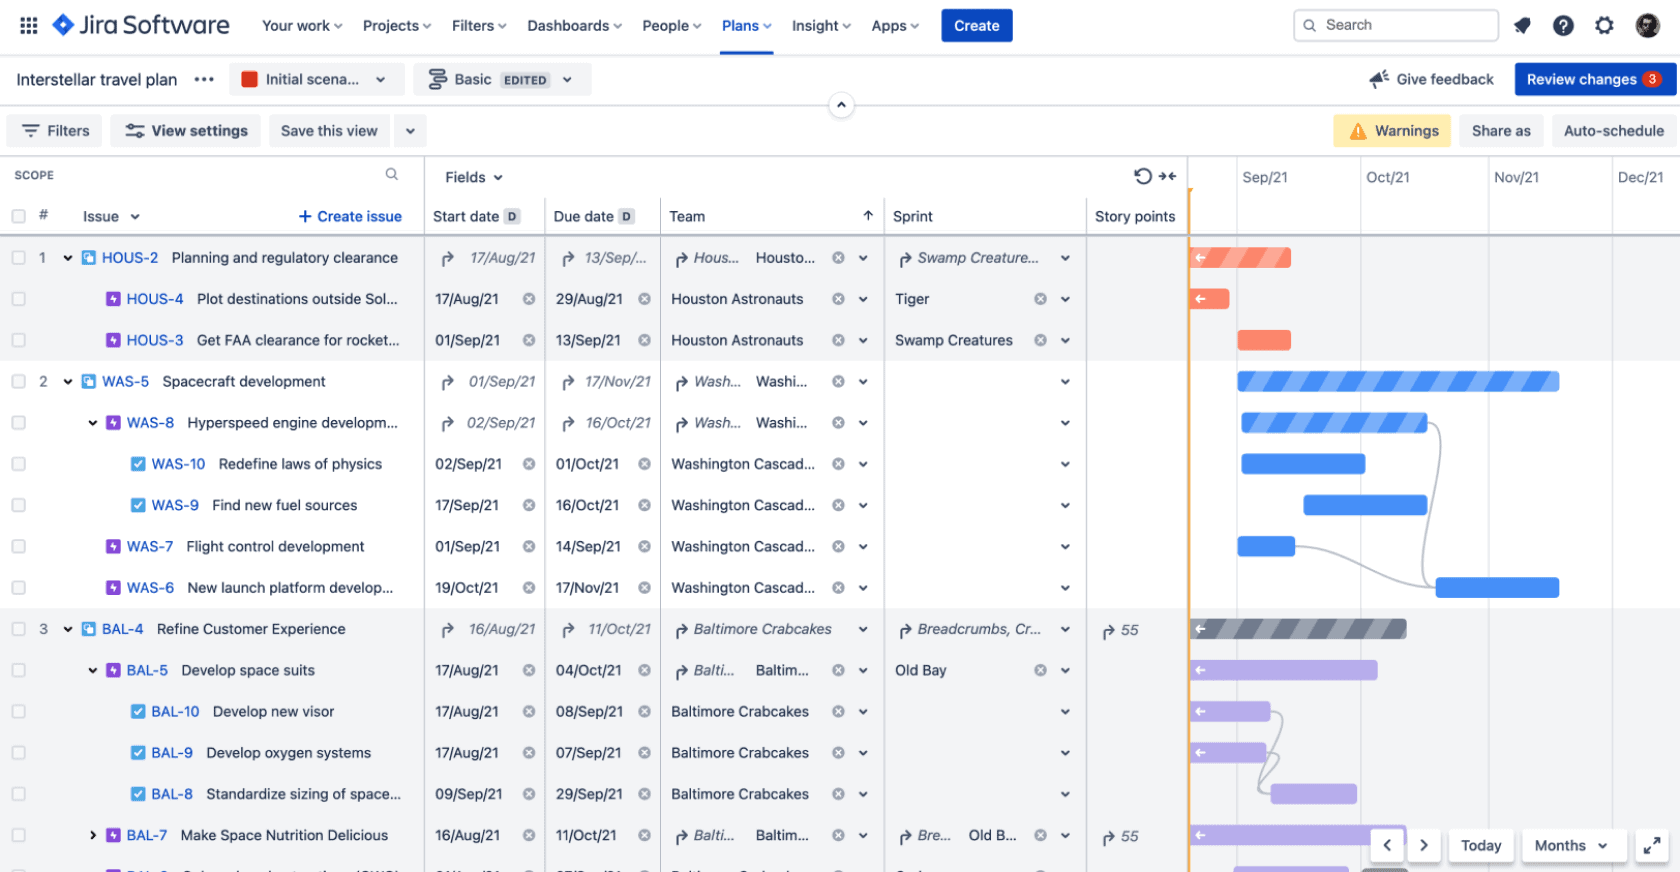
The core component you’ll deal with in AR is your plan. This will combine multiple team roadmaps (and multiple projects), acting as a shared source of truth as you work towards broader, company-wide initiatives. As well as outlining key results and milestones as you move ahead, it also places the work and contribution of individual teams within the broader context.
To create a new plan in Jira Software:
– At the global navigation level, navigate to “Plans” and then click “Create plan”
– You’ll then need to fill out the following fields for your new plan:
- Plan name – very briefly stating what the plan is or what it’s for
- Access – choosing from “Open” or “Private” (the default being for open access)
- Issue sources – you can select to connect the plan to boards, company-managed projects, and/or filters to populate it, hence defining the scope of the plan
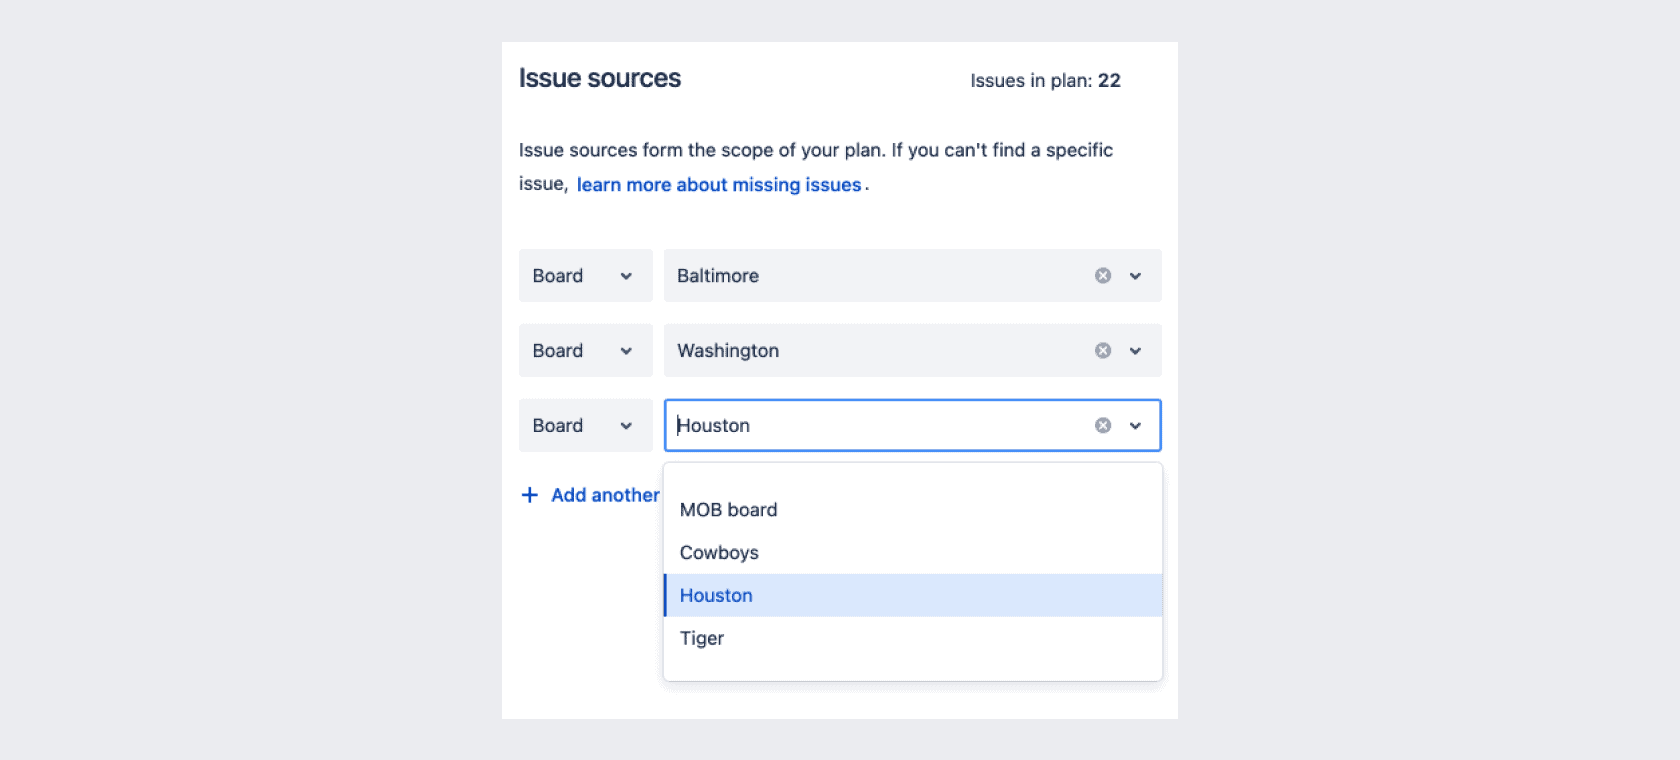
The plan’s issue sources define what tasks will populate the plan – and hence what its focus is. You’ll need to select issue sources when you create the plan, but these can be updated as and when needed.
There are three principal ways to define your issue sources – coming from:
- Boards – meaning that the plan will track the team/s’ ongoing workload and its progress (whether working on scrum or kanban boards; with the former also having access to sprint planning features)
- Projects – so the plan will chart the outcome of a specific project, such as a given objective, product, or feature
- Filters – allowing you to focus on a precisely selected subset of issues
By pulling the issues for a project, you can get a full view of a given team’s workload – allowing the team to be managed straight from the plan.
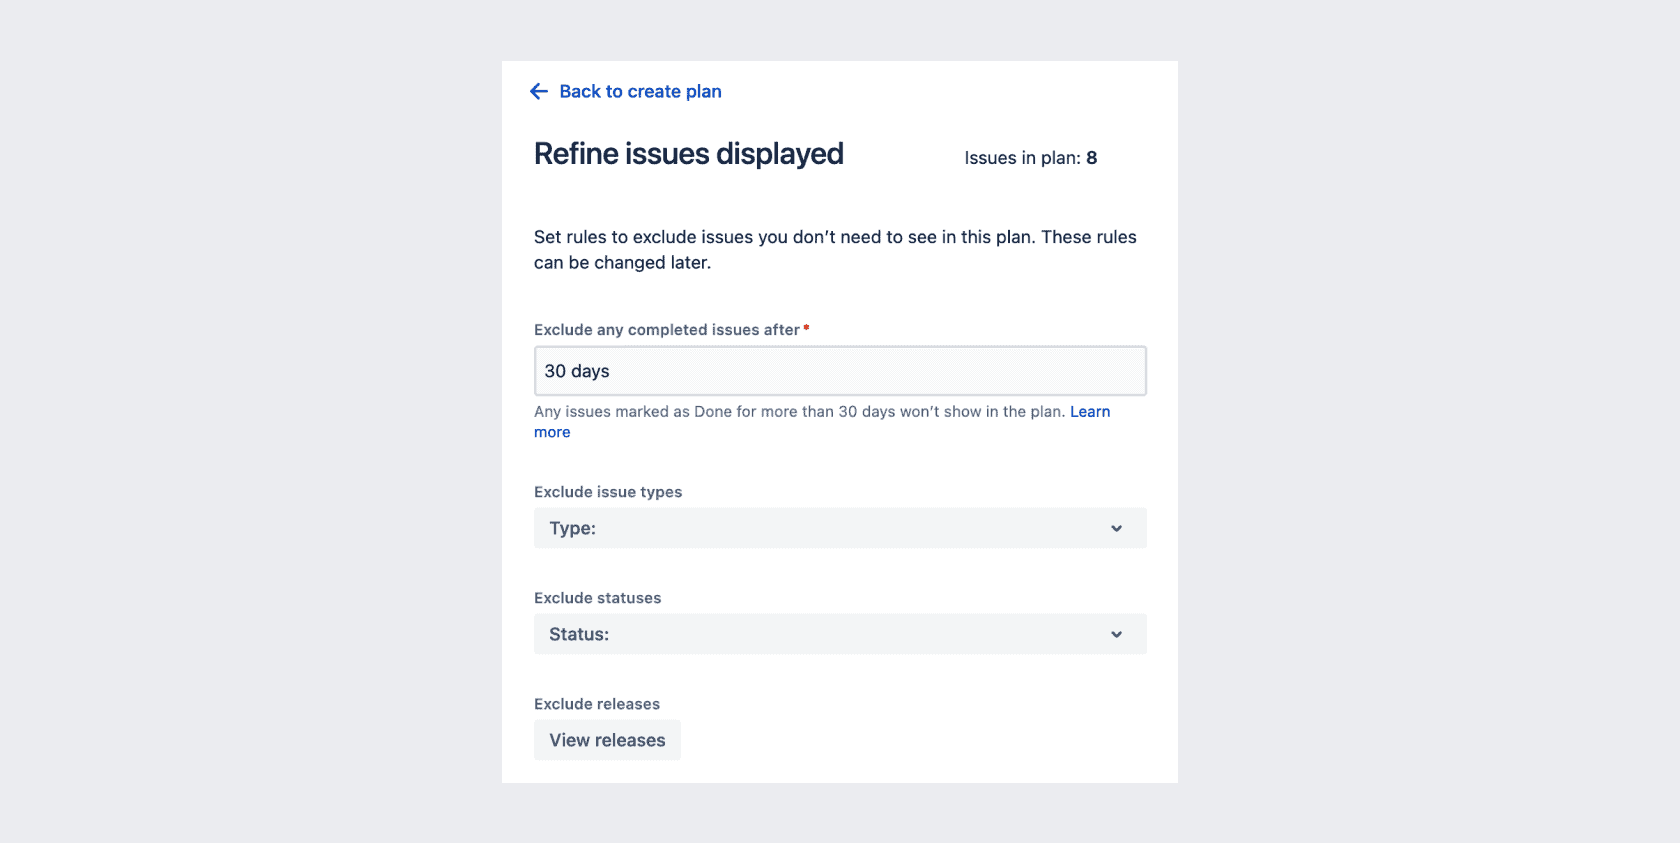
You can also choose to “Set exclusion rules” with “Refine issues displayed” to control the scope of the issues that populate the plan. Options include removing specified issue types, issue statuses, and releases, as well as completed issues. You can also choose to have completed issues appear on the plan for a set number of days, using the “Exclude any completed issues after” field, with the default set to 30 days. Once this is done, click “Back” and…
Then, when you’re ready, hit the “Create” button.
AR plans come with several permission levels:
- Advanced Roadmaps administrator – can access all plans, with admin access
- Advanced Roadmaps shared team management – can access all plans and global management
- Advanced Roadmaps user – can create plans and view and edit plans they are permitted to
- Advanced Roadmaps viewer – can view read-only plans with permission
To edit plan permissions:
- Go to the Roadmap view, then your plan’s settings (“…”), then click “Configure” and then “Permission”. You can then manage which users can view and edit the plan
- By selecting “Restricted” from the dropdown, you can limit access to specific users and groups
Managing Advanced Roadmaps plans
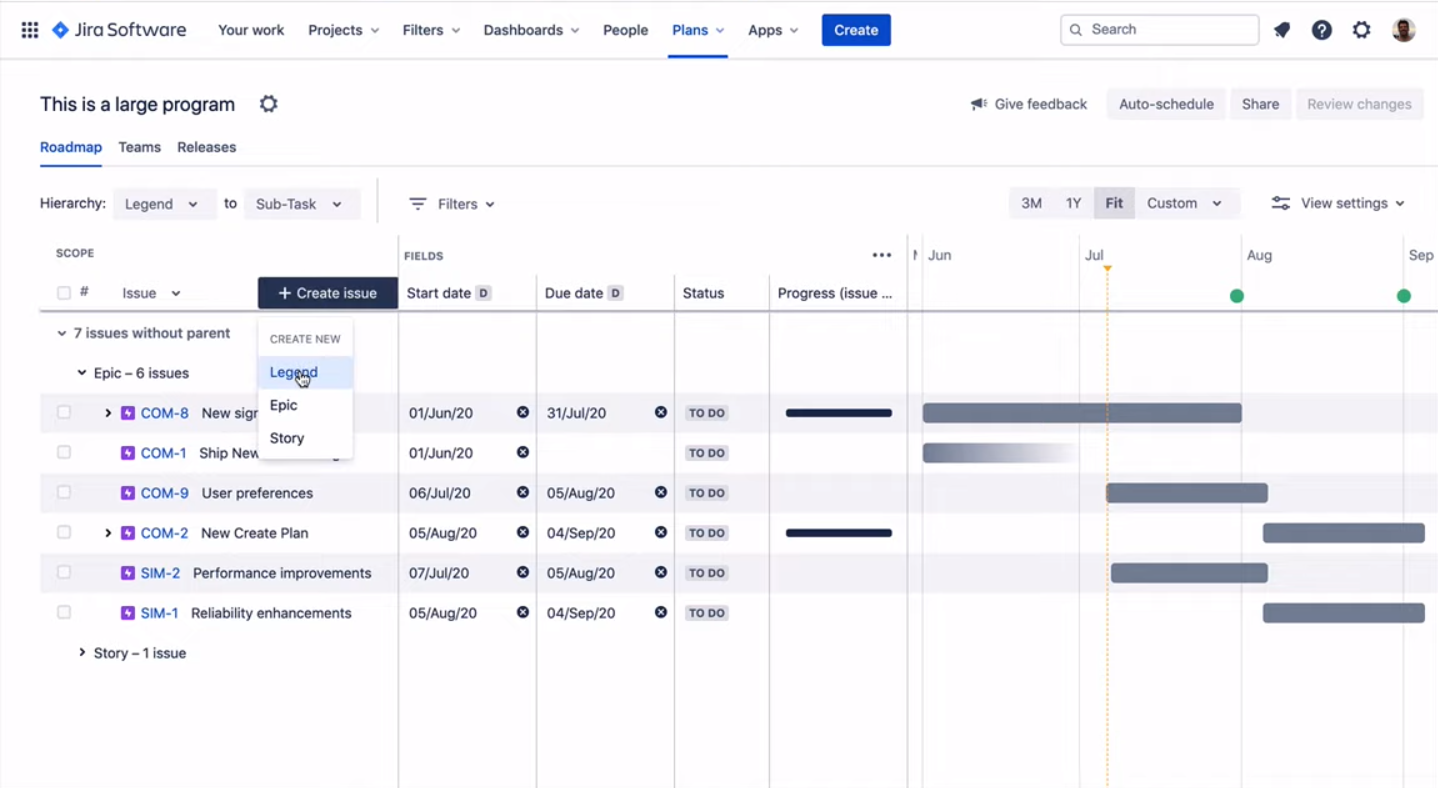
Plans can include tasks from across the hierarchy, from subtasks to stories, issues, and bugs, and on to epics and beyond (for example, using initiative-level containers to hold multiple epics). This is the principal part of what differentiates Advanced Roadmaps from regular Jira Basic Roadmaps.
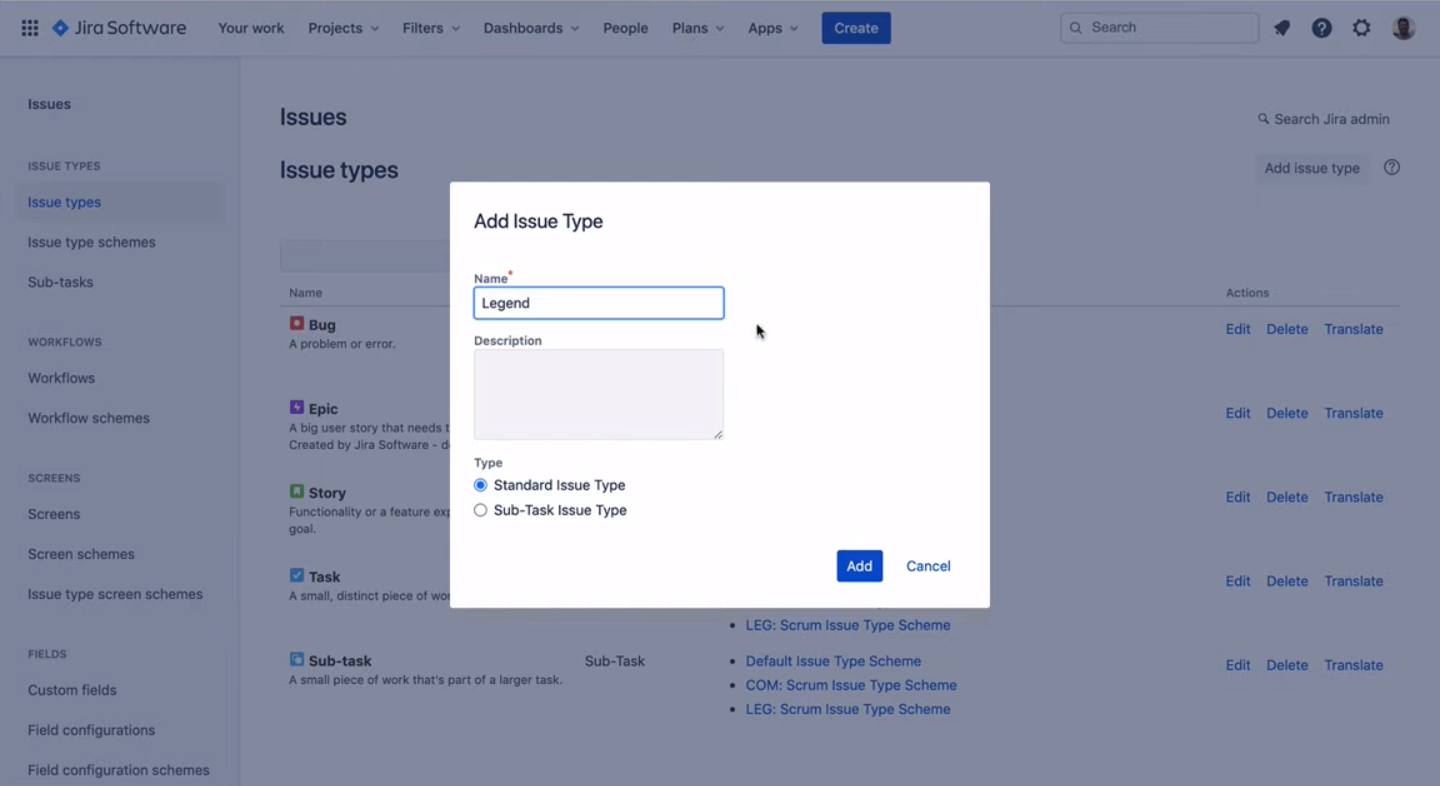
- First, go to “Settings” and then “Issues”
- Then click on “Issue types” on the left and then “Add issue type”
- Give your new issue type a name and description that very briefly explains what it’s for
- Then select whether it’s a standard issue type or a sub-task (standard issue types will be placed above epics, while sub-tasks will sit below Story level and be equivalent to other sub-tasks)
- Then click “Add”
You’ll then need to add the issue type to your scheme:
- Go to “Settings”, then “Issues”, then “Issue type schemes” and then select your new issue type and click on “Edit”
- You can now make edits to your new issue type’s name, description, default issue type, and selected issue types
- Then drag the new issue type from “Available Issue Types” to “Issue Types for Current Scheme” and place it in the desired position in the hierarchy (with an initiative, for example, sitting above epics)
- Then click “Save”
You can now add the new issue type to your Advanced Roadmaps plan:
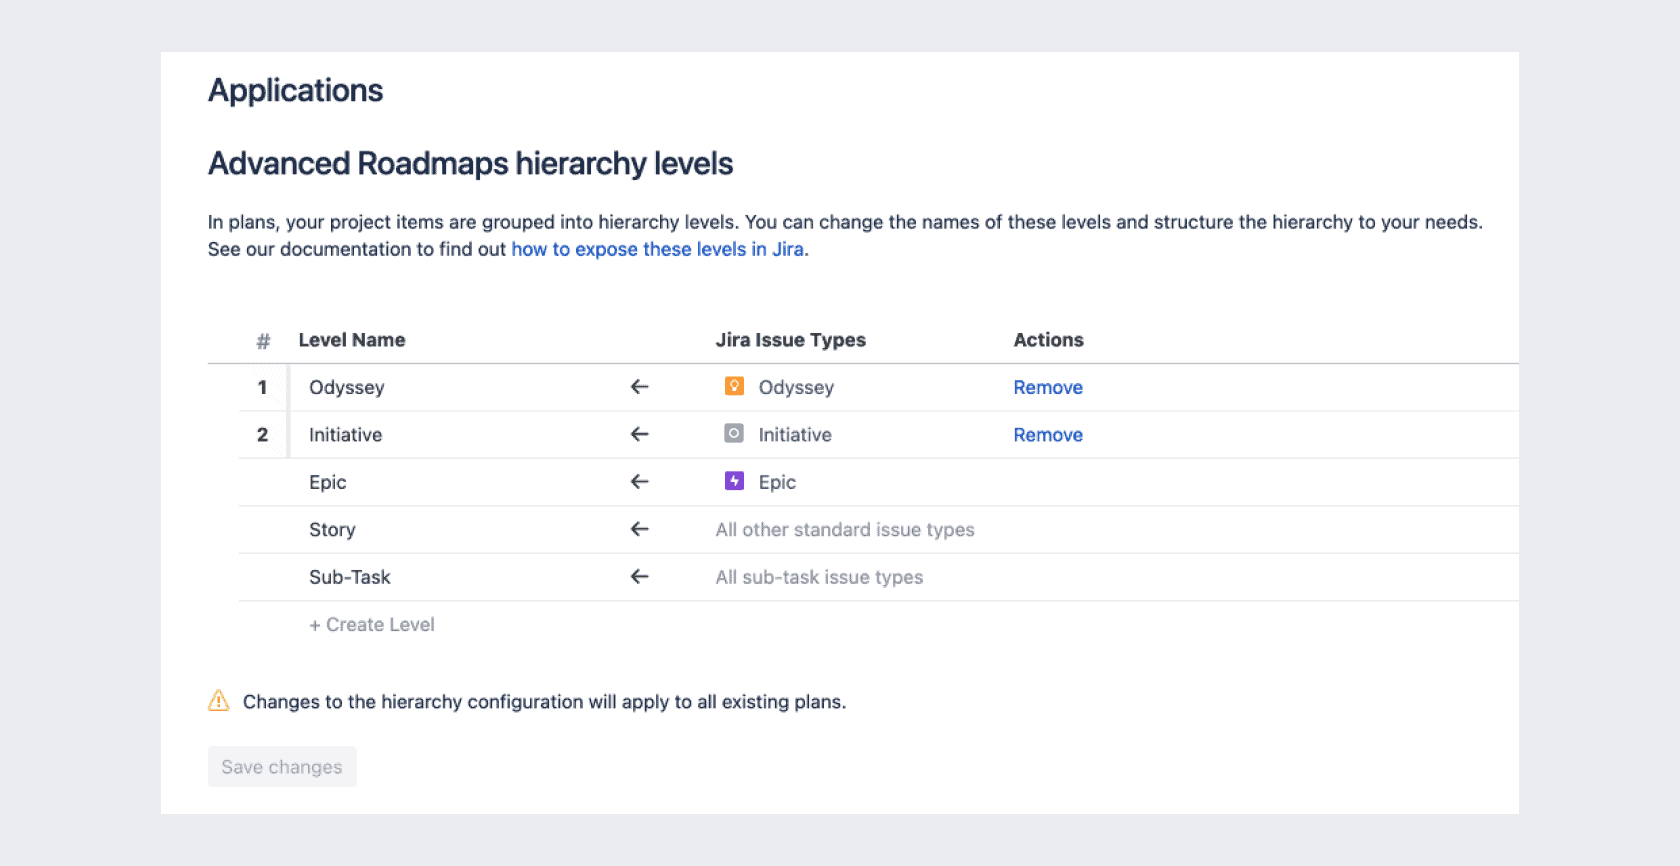
- First click on the issue type hierarchy on the menu; this allows you to connect issue types to the AR hierarchy, with the “Level Name” column on the left indicating the AR hierarchy structure and the “Jira issue types” column on the right representing the issue types on your scheme
- Then click on the “+ Create Level” button at the bottom of the menu in order to add a new level
- You’ll have the option to name this and the dropdown will allow you to associate it with a Jira issue type
- If you need to make changes to the hierarchy structure, you can use the drag-and-drop interface to change the order of your hierarchy levels in AR
- You can then click “Save”
- Then, when viewing the Roadmap, you’ll need to adjust your hierarchy filters from the “Filters” menu in order to add your new hierarchy levels
If you have custom fields on your issues, which you would like to add to your plan, then:
- Go to the “Roadmap” screen, then settings (“…”), then “Configure” and then “Custom fields” – this will display the custom fields currently on the plan
- Clicking “Add custom field” from the top right will then allow you to select from all the custom fields available; then simply use the “Add fields” button to pick what you want
You can edit issue sources from the Roadmap view after plans have been created by going to your plan’s settings (“…”), then click “Configure” then “Issue sources”. If using plans for capacity planning, Atlassian recommends selecting boards as the issue source.
Exclusion rules can also be edited for existing plans from the Roadmap view. Go to settings for your plan (“…”), then “Configure” and then “Select exclusion rules” and you can add or remove rules, as needed.
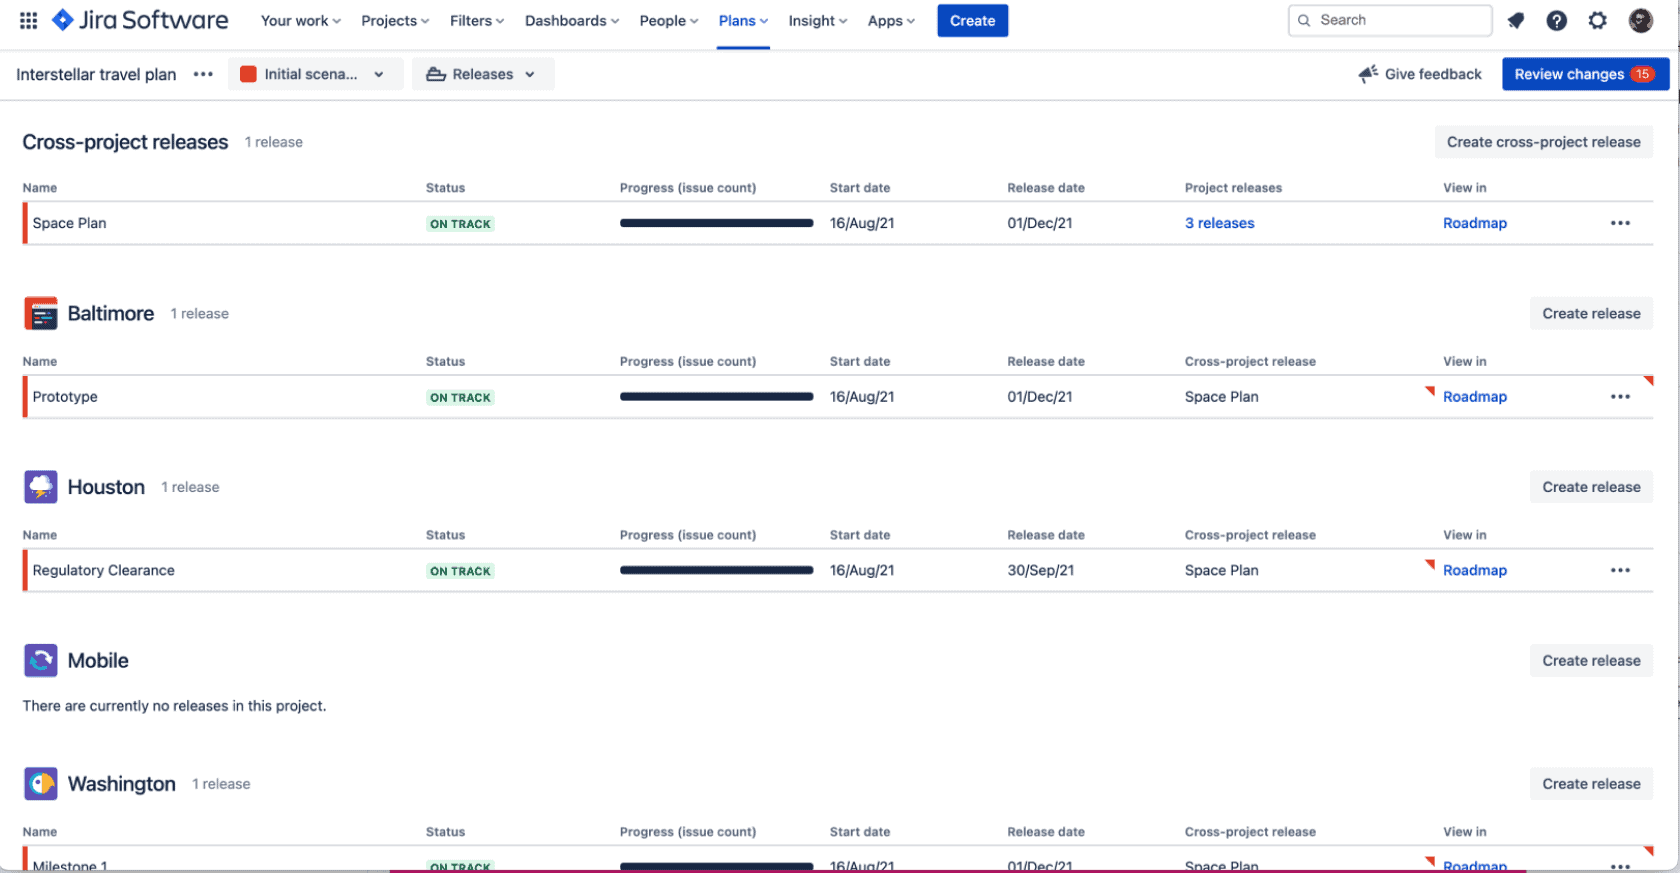
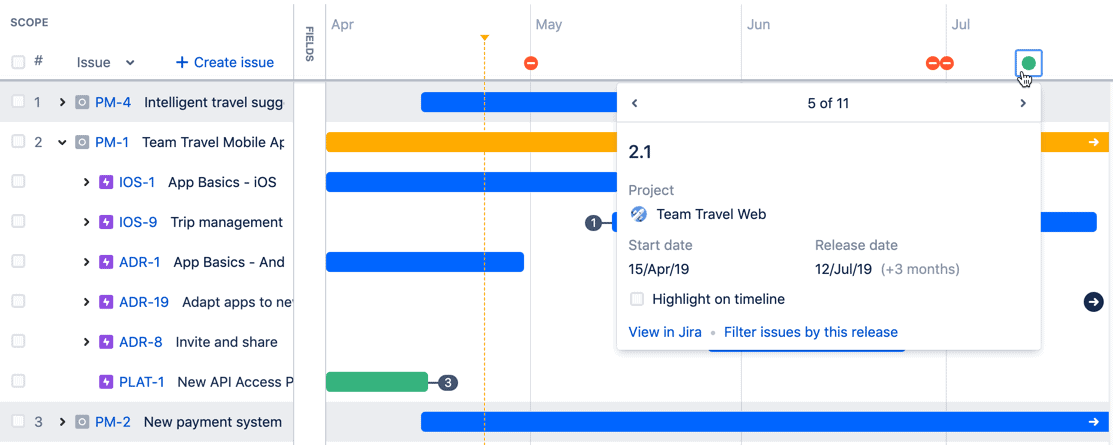
You can also add Releases at the point that you create your plan – denoting target deadlines for sections of work – or you can edit them at any time using exclusion rules or the “Releases” tab. This adds visibility in the plan for work completion milestones, such as program increments or issuing a product release to customers.
Releases can be set for specific dates or when all assigned issues have been completed. AR gives you the option to use single-project or broader cross-project releases. Cross-project releases are a way of bundling multiple single-project releases together. They don’t appear on Jira issues and are solely for AR planning purposes, but they assist with managing and coordinating work across teams, contributing to larger organizational goals.
To see the releases assigned to your plan, go to the “Releases” view using the plan’s menu (“…”). From this page, you can search for releases or filter using on-track/off-track and released/unreleased statuses. Of course, releases that are excluded or archived will not appear. Releases on-schedule are given a green icon, while releases going off-track (with sprints ending after releases) are marked red.
To create a release:
- Go to “Releases” on the dropdown, then, for a single-project release, click “Create release” on the relevant project, add a name, description, Start date and Release date, and then click “Create”
- For a multi-project release, click “Create cross-project release” on the Releases screen, then give your release a name, select the release to add and click “Add release” (as many times as needed) and then click “Create”
To edit a release in your plan, from the Releases page, click settings (“…”), then “Edit” on the relevant release. You can then update the release’s details and just need to click “Save” when done.
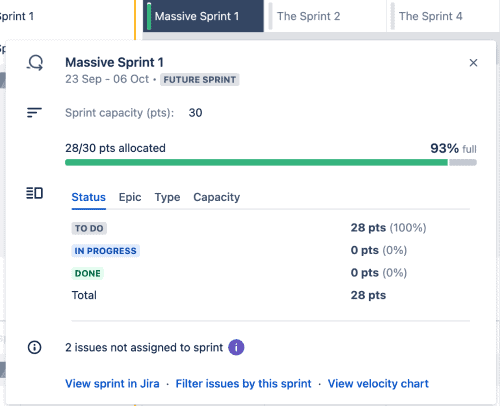
AR also enables capacity planning for teams, allowing you to measure capacity in days and hours. Teams using scrum boards can use story points to measure capacity and have access to the sprint planning feature (allowing work to be tied to specific sprints, release dates and milestones). This highlights when the amount of work that has been allocated goes beyond the team/s’ capacity.
To enable capacity planning (with sprints already set up in a scrum backlog, if relevant; with a board set as the issue source; with the relevant teams associated to the issue source; and with at least one issue assigned to the sprint or team):
- Go to your plan’s “View settings” and select to view either by Team or Sprint
- Then tick “Show capacity on timeline”
AR will then track the amount of assigned work on the plan, comparing estimation values to your team/s’ capacity.
Tabs at the top of your plan timeline illustrate sprints/iterations, with a vertical bar indicating capacity. As more issues are added, a green indicator fills up this bar. If the number of issues added goes beyond capacity, then this bar will turn red, indicating an issue…
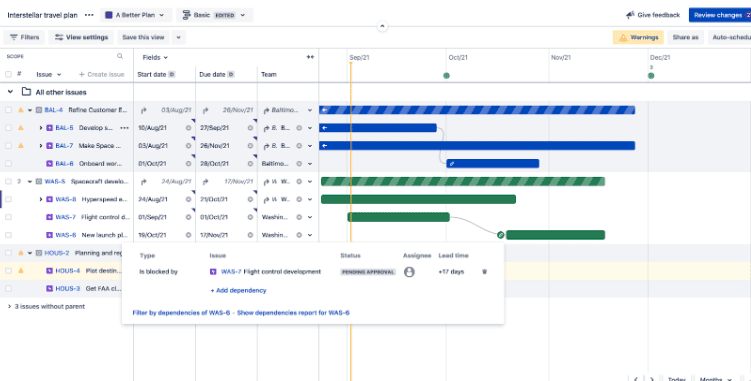
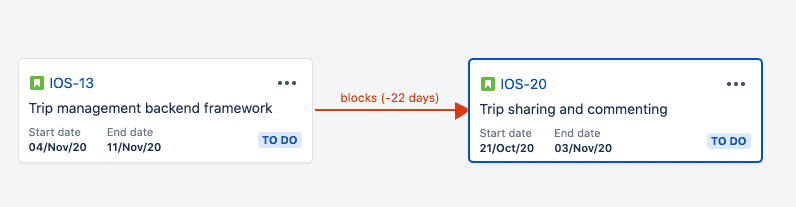
AR allows you to illustrate dependencies on the plan, using badges, lines, and columns to show connections between issues, such as blockers and contingencies. Having a firm grasp of these relationships allows the team to better plan ahead, prioritize work, and reroute in the event of a disruption. AR highlights when dependencies are broken by turning indicators red, providing an immediate visual prompt that issues need to be addressed.
The “Dependencies report tab” adds to this by mapping out how issues relate to one another in the plan. This can be reached from the view dropdown that appears next to the plan’s name.
To add dependencies to your plan, you’ll need to set up custom links in your Jira instance. To do this:
- Go to the Jira Software admin panel via the “Settings” button and then go to Issues
- From “Issue features” go to “Issue linking” and ensure issue linking is turned “ON”; if not, then click “Activate”
- To create a new link type, on the same page, go to “Add New Link Type” and give it a name and description and click “Add”
- Alternatively, you can also edit existing issue links by clicking “Edit” (with fields including “Name”, “Outward description” and “Inward description”); once finished, press “Update”
With your new link type set up, you can now add it to your plan:
- Go to the admin panel, then “Products” and then “Advanced Roadmaps dependencies”
- The dropdown menu then allows you to add an issue linking type; you can also remove linking types with the “x” button or reverse dependency relationships with the “Swap” button; and then, when done, click “Save”
From the Roadmap “Configure” page, you can also change whether dependencies are treated as being concurrent or sequential.
To add a new dependency on your plan:
- From the schedule bar, click on the issue’s badge icon
- Then click “+ Add dependency”, define the relationship using the “blocked/is blocked by” menu, and click to complete
You can also use the drag-and-drop interface on the timeline to add a dependency: simply click on the issue’s dependency badge icon and then drag this to the schedule bar for the issue that you want to connect it to. Releasing the mouse will then create the dependency.
The Scenarios feature provides a sandbox to plan multiple routes to hitting milestones and/or completing projects, without impacting or editing the data in your instance. This allows you to prepare for all eventualities.
To turn scenarios on or off:
- Go to the Roadmap view, then your plan’s settings (“…”), and then “Configure”
- Then select “Scenarios” on the menu and click “Enable scenarios”
- To turn them off, click “Disable scenarios”; on the dropdown then choose the relevant scenario to be saved in your plan and click “Disable”
To create a new scenario from the Roadmap:
- Click “Create scenario” on the Scenario dropdown, give it a name and select a color (which will then be used to highlight changes you make for the scenario)
- Then select whether you want to create a new blank scenario, or if you want to copy the details of an existing scenario, and click “Create”
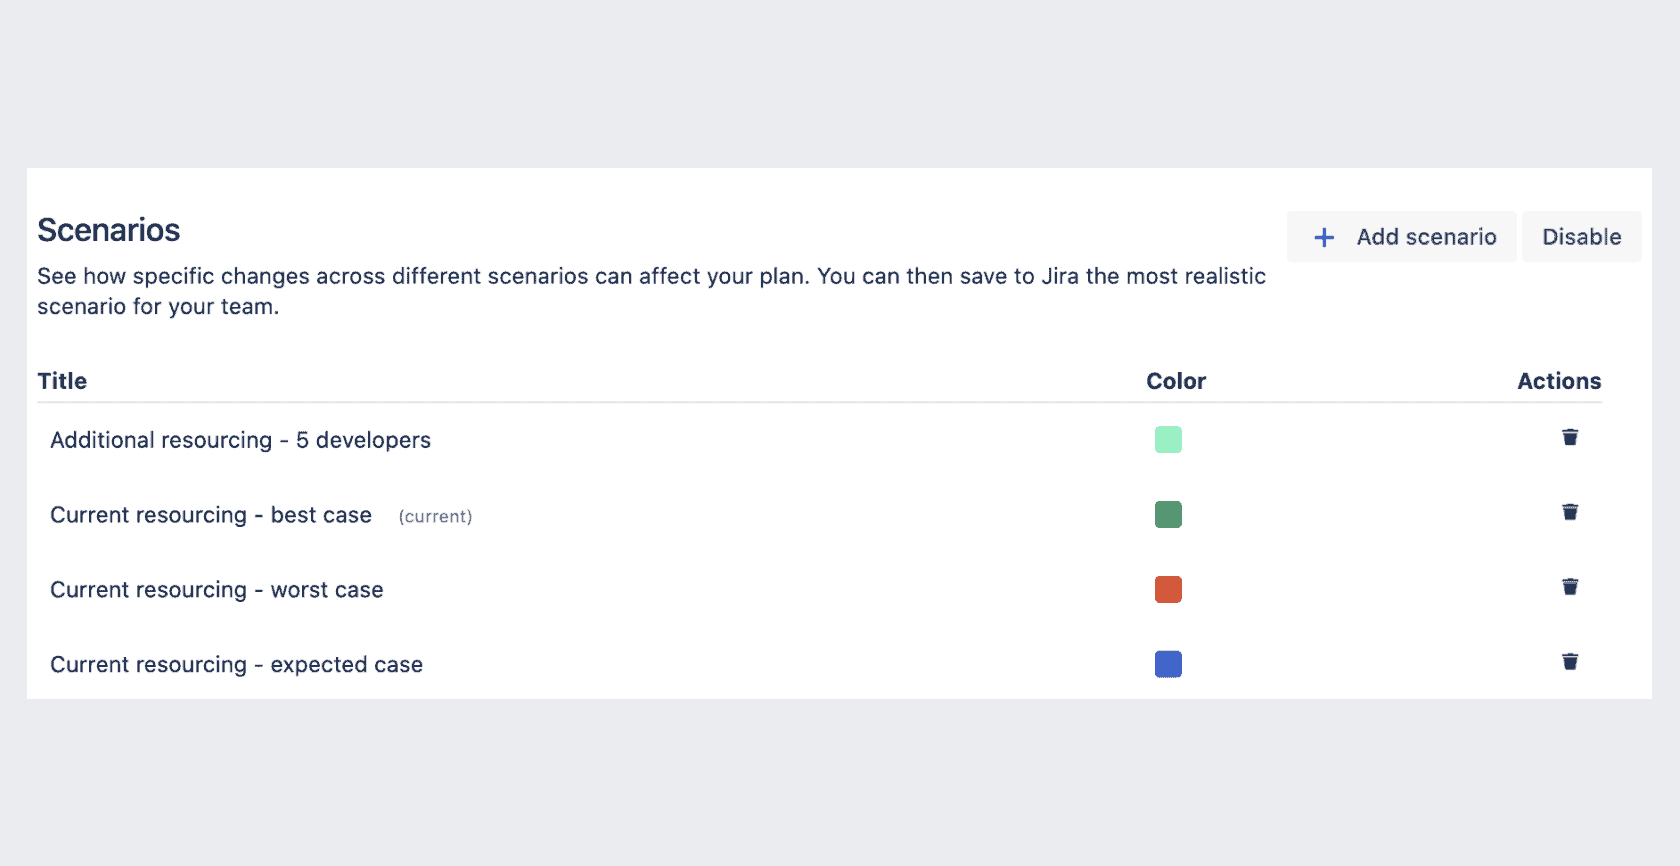
To make changes to scenarios, go to the Scenario menu, then “Manage scenarios”. From here you can change scenario names and assigned colors, and you can delete them.
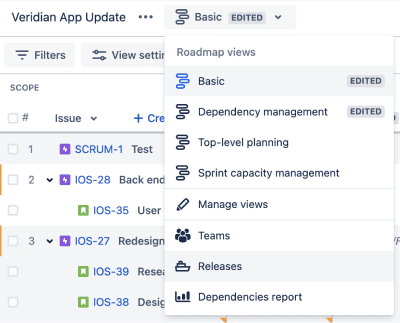
You can also use Saved Views so you can quickly access specific views of your plan and the information that it contains. When dealing with large-scale projects, this is particularly useful as it enables you to easily jump to information that is relevant for given stakeholders or audiences. To access these either:
- Go to the “Settings” menu, then “Configure” and then click on “Saved views” in the sidebar
- Or go to “Views” dropdown and click “Manage views”
Tips for improved performance of Advanced Roadmaps plans
In some exceptional cases, you can find that AR plans slow down. If this is happening then you can:
- Cut down on issue sources – ideally having no more than four
- Reduce the number of issues the plan is pulling – with a soft cap in place at around 5,000 issues
- Cut issues from old releases – this can be done using by exclusion rules, to remove unwanted older issues
- Remove old sprints – excluding completed issues or deleting old sprints from boards should also speed up your plan
Conclusion
Advanced Roadmaps provide a powerful tool for teams to get a better perspective of the big picture, in context, and to plan ahead, across groups, departments and initiatives.
In the new digital economy, it’s important for organizations to break down internal barriers and to operate efficiently and effectively with clarity and transparency – and Advanced Roadmaps is just what’s needed to get that done.
Recommended Reads: