
I had to implement a change approval workflow in JIRA with five different gates. And I thought it was worth sharing.
Gates are points in a process where a number of criteria need to be met, to be able to proceed with the next steps (See the following wikipedia document for more details).
At each gate, you need to submit a particular document that requires a sign-off.
One of the requirements is that you must link the approval to the document under review at that stage. So when approval is given, you must register it as ‘John Doe approved document Business Acceptance Criteria.doc on 20 Sept 2016, with no comment’.
At the end of the process, you must generate a PDF document that summarizes all the approvals, decisions, and comments, which you can archive later.
Using sub-tasks is not always a good idea
We debated different ways to implement this workflow.
We initially embarked on using sub-tasks where the context of the change is documented in the parent. And each approval is created automatically when entering a particular gate.
The ‘to be approved’ document is tracked in the context of this sub-task.
The parent status is automatically progressed whenever the approval reaches its resolution, which can be either approved or declined. The implementation of such functionality is pretty straightforward.
And if someone wants to find out more, let me know and I’ll be happy to blog about it.
The problem we encountered with this approach was that the users got very confused about the concept of parents and sub-tasks. They receive a notification regarding their approval for ‘change approval DOC-123’ but the link references a completely other issue DOC-167. Our users didn’t understand that the approval was a sub-task to track the approval, while the request they approve is documented somewhere else.
It requires the user to switch from one issue to another one, decreasing the usability of the setup, so we decided to look at the solutions to implement the five gates in a single workflow.
JIRA Service Desk approvals
Atlassian introduced approvals in version 3.2 of the JIRA Service Desk (see release notes).
This is a great addition to the product. And it works wonderfully for single-approval use cases where you can articulate the context of the request clearly. Such as ‘Purchase Laptop for staff member’, ‘Provide Access to the file system’, and so on.
The Jira Service Desk approval functionality is not sufficient though when you have to track multiple approvals for one single change.
It is impossible to provide the user with the exact context of what s/he is approving as the button is on top of the issue, and detailed information such as the document, budget, etc., cannot be easily provided.

It is a pity we couldn’t use this option because the Jira Service Desk is really a hit when talking about ease of use.
A single workflow to track all stages
The next approach in our quest to find a good solution is the single workflow.
By tweaking the JIRA permissions and settings, it is always possible to trim down the surrounding of an issue view, so that a user doesn’t have too many options.
Associating an attachment to a gate
As it always goes, we bumped into another problem.
It’s never a smooth ride.
But that’s part of the job of being an Atlassian Engineer.
One of the requirements is that a document needs to be associated with a stage in the workflow. So we have to track where that document is.
Given the five gates, we always end up with at least five different attachments.
And sometimes more. Because people just love the drag-and-drop capabilities of Jira.
To know what document a user has approved, we have to register the name of that document in a custom field.
Luckily, we are allowed to use Adaptavist and ScriptRunner (which, in my opinion, should be a mandatory add-on on every Jira instance).
With the following piece of code, we can easily capture the name of the document(s) uploaded during a ‘Request approval’ transition and store it in a text custom field.
/*
** Some required imports
*/

import com.atlassian.jira.component.ComponentAccessor
import com.atlassian.jira.issue.util.DefaultIssueChangeHolder
import com.atlassian.jira.issue.ModifiedValue


/*
** Check which attachments have been added during the transition
** - Retrieve the original issue and associated file list
** - Check what attachments have been added in the transition (and which didn't exist yet in the original issue)
*/

def originalIssue = ComponentAccessor.getIssueManager().getIssueObject(issue.id)
def originalFileListNames = originalIssue.attachments.collect { it.filename }
def newFileList = issue.attachments.findAll {  ! originalFileListNames.contains(it.filename)  }


/*
** The result is an array of strings, where each element contains the name formatted in such a way
** that if the wiki renderer is used, JIRA converts the name into a link to the document itself
*/

def result = newFileList.collect { "[^" + it.filename  + "]" }

/* Update the custom field
** - Retrieve the customfield object allowing to set its value
** - set the result by joining the array elements into a single string
*/

def customFieldManager = ComponentAccessor.getCustomFieldManager()
def documentField = customFieldManager.getCustomFieldObjects(issue).find {it.name == "Analysis Document"}

def changeHolder = new DefaultIssueChangeHolder()
documentField.updateValue(null, issue, new ModifiedValue(issue.getCustomFieldValue(documentField), result.join(",")),changeHolder)
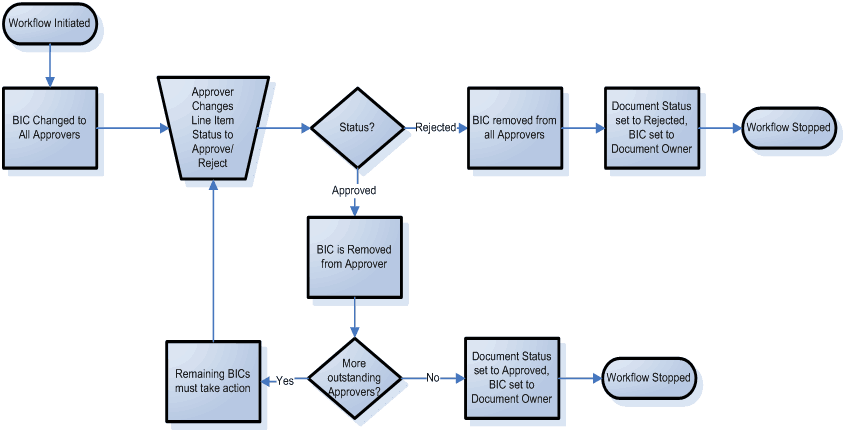
Building the workflow
In our configuration, we have five text custom fields, where the wiki renderer has been enabled (check here for more details).
We established the workflow where for each gate we have the following transaction layout:

- The Request Approval transition has the following settings:
- There is a dialog box that provides the user with all the details that s/he is approving
- Condition – only the current assignee can execute the transition
- Validation – the attachment field is not empty
- Postcondition
- The script which extracts the filename of the uploaded attachment
- You can set an assignee to the person who should provide the approval
- A customized notification allowing the person to preview what s/he needs to approve
Check the ‘send custom email‘ post function of the script runner.
- The Approve transition has the following settings:
- A transition dialog that details the context of the approval in a read-only mode
- Only the current assignee can approve
- You can add a comment which records the approval action
- You can reassign the change approval request to the project lead
- The Decline transition has the following settings:
- A transition dialog is presented allowing to enter a comment
- Only the current assignee can approve
- Entering a comment is mandatory (this is provided by the script runner) and is enforced in the validator of the transition
- You can push back the issue in the workflow and reassign it to the previous assignee
Reminding people about pending approvals
Of course, once you implemented the approval workflow, you want to be sure that it is being used. Sometimes, it is necessary to remind the users that they have to complete approval, and you can do it with either:
- The JIRA Filter Subscription
- Using the escalation service as provided by Script Runner
- The notification assistant from Riada
Conclusion
With the help of Jira, you can implement a change approval workflow based on documents at a specific gate. Using JIRA, it is easy to keep track of the work required to complete approvals. With Script Runner, you can implement advanced business logic.
Are you still using multiple-issue trackers?
Check out Exalate – It’s an advanced issue synchronization solution that supports cross-organization issue tracking.
Its flexibility comes from the built-in groovy scripting capability, allowing the implementation of almost any type of integration.