

As teams and companies grow bigger and new work management systems are introduced to facilitate collaboration, the need to integrate data becomes more evident. For instance, you might be working in Jira on-premise and you decide to synchronize some data with another team using Jira Cloud. So in this article, we’ll show you how to securely integrate multiple Jira instances without having to leave your familiar environment.
You should meanwhile address all the possible risks that might occur if the integration is not set up properly. Risks that can lead to unnecessary repeated work and inaccurate or outdated data. That’s why the security of the connection is a high priority which is covered here.
Here’s what you’ll read in this thorough guide:
- Why do we Need a Secure Synchronization between Multiple Jira Instances?
- Different Approaches to Syncing Multiple Jira Instances
- Choosing the Right Technology for Setting up a Jira Integration
- How to Integrate Multiple Jira Instances in 5 Steps
Why do We Need a Secure Synchronization between Multiple Jira Instances?
Some Use Case Examples
One example is companies getting their product feedback from customers and customers suggesting enhancements and extra features. This information can be really valuable both to the company and to the customers themselves. This kind of interaction also builds a community with everyone contributing to the development of the product. 
Implementing this is not easy though. There is a risk that too much information will be generated and managing it will become difficult for the company. On the other hand, customers may find their complaints are going unanswered.
A second example is when the business requirement is that companies will be involved in the co-creation of products and services with external parties. This could be a marketing agency working with a design company, for example. If these companies want to create campaigns for their customers, they need to share information and coordinate effectively.
A third example would be a product development company working with a quality control organization. In this case, the development team would work on a product, and the quality control team would validate releases, ensuring they complied with regulations, and met consumer standards. Both of these teams would need to track details. Much of this information would need to be shared, though not necessarily in the same format.
How integration leads to the most effective collaboration
In the above situations, the different groups need to exchange information. This is transactional in nature. So a structured approach is the most effective. That way, data can be shared quickly, regularly, and easily. A tool to do this can have a transformative effect on workflows. If data is transferred from one platform to another automatically, then there is no need for human involvement. 
This means all data will always be shared automatically, rather than just what people remember to manually share. A tool can also ensure data is modified according to the needs of each group.
A Customer Case
We’re going to look at one specific use case here – when a customer makes a request. We need to ensure that our system handles these requests in the same way, and goes through the same steps each time.
The steps are Open > Accept > Root Cause > Provide Workaround > Resolve > Close
The steps highlighted in bold are those that product engineering needs to be involved in. So the customer and support team will handle the creation of the request and the associated information capture. The developers will then investigate the issue, look for the cause of the problem, and try to find a solution. Then it will be fixed and closed.
In immature products, there will be more issues and they are likely to be more urgent. As products develop over time, the issues are likely to become minor, though major problems may occasionally arise.
Not everyone needs to be involved at every stage, but the information flow needs to be managed to keep everyone working efficiently as well as keep everyone updated when changes relevant to them occur. So we need a process that translates customer requests into effective changes in the product. Engineers will be using their own issue-tracking system and this needs to be integrated with that being used to track customer requests.
Some of the data entered by customers will be useful to the engineers, but not all of it. The internal discussion by the engineers needs to stay private, and much of the information they use internally will not be useful to anyone else. 
For our discussion, we’ll talk about two teams (the customer service and the product engineering team) working on two different systems, Jira Cloud and Jira on-premise. These teams may or may not be in the same location, they may be in the same open-plan office, or distributed all over the globe.
Different Approaches to Syncing Multiple Jira Instances
There are several potential solutions to integrate the systems. Let’s consider some of the available approaches and look at the advantages and disadvantages of each.
Single Project Configuration In One Shared Jira Instance
Approach:
- Either raise customer requests in the same environment used by the product engineers.
- Or have the engineers handle escalated issues in the context of the support environment (interacting directly with requests in the system).
The disadvantages are that the workflows are different by nature:
- Product engineers are not fully engaged in the support process and need to understand how support operates, as well as the language used when responding to customers.
- Support engineers are not fully engaged in the product development process and need to understand how product development operates.
- Customer requests are always unplanned work and need to be managed separately.

Two Configurations, One Jira Instance
Approach:
- A service desk environment and a product engineering environment are fully separated in the same Jira instance.
- Systems for escalating issues between each one.
- Needs to exchange comments, attachments, statuses, and other information.
- Easy to route issues to the correct team.
Several security-related disadvantages:
- Customers need to raise issues on the instance means it needs to be exposed to the internet. Since the product development system is also on the internet, it could become exposed too.
- Configuration changes might create a security hole.
- The integration of back-end product development support tools becomes a problem as these are supposed to be internal only. This includes continuous integration, testing, and source code.
- There are two separate configurations, which both require maintenance.
Two Configurations, Two Synchronized Jira Instances
Approach:
- Give each team its own instance. A public-facing instance hosts the service desk environment, and the product development team uses an internal, firewalled, instance.
- The public-facing instance can be on a company DMZ, adding additional security. Alternatively, it could be in the cloud.
The disadvantages of an on-premise, public-facing instance:
- Both instances need maintenance. This could include licensing and hardware, as well as work done on the systems.
- The separate systems need to be connected, so information can be exchanged between them.
Choosing the Right Technology for Setting Up a Jira Integration
To set up a connection from Jira Cloud to Jira on-premise, we’re going to use a cross-company integration solution called Exalate. Exalate is designed to solve our problem and avoid the potential disadvantages of using multiple systems to store and share information.
Exalate was designed with specific criteria in mind. Firstly, when different systems are integrated it is critical that they support decentralized integration (autonomy).
This means adjustments must be possible on each side separately without having to consult everyone. Teams need to be able to make changes, without affecting the configuration of the other side of the integration.

Autonomy also allows you to keep the information on your own systems private. You don’t necessarily want internal project discussion available to people on other teams, and certainly not clients.
Secondly, reliability is important when linking platforms. If changes or crashes at one part of the system affect the whole thing, then it increases the impact of problems. A well-designed system should be reliable enough to mitigate problems, not propagate them.
Flexibility is also a major concern. The integration needs to be adaptable, so future needs can be met. If this isn’t the case you may need to use a second solution that can meet the requirements and this is an inelegant solution. As your business grows and expands, your needs will change and your integration platform needs to meet the new challenges that emerge as a result.
As well as the benefits stemming from this core design philosophy, there are a number of other advantages to using Exalate. Its standard configuration is the same for both of the Jira environments, so it is easy to make sure both are working in the same way.
Exalate is quick and easy to set up. If everything goes smoothly, a basic configuration can be set up in less than an hour (assuming that the infrastructure and network allow for such a connection).
We can also replicate the process quickly for other platforms. The setup process below can easily be adapted to link other services. In addition to connecting Jira Cloud to Jira on-premise, we could connect Jira to Zendesk, ServiceNow, Azure DevOps, Github, Salesforce, and HP QC/ALM.
There are several good reasons to use Exalate. Now we’ve picked a solution, let’s see how to implement it.
How to Integrate Multiple Jira Instances in 5 Steps
Now we’ll move on to showing you how to set up the collaboration using Exalate. We’ll walk you through installing Exalate on both Jira instances, followed by a look at how we can control what information is exchanged, and the conditions under which that happens.
One advantage of using Exalate is that its interface is largely the same across different platforms, so if you have it working on Jira, you can go through similar steps to connect it to other platforms. In our example, we have a service desk application running on Jira Cloud, and a scrum application on Jira on-premise. We want to link the two so that customer requests can automatically go from the support team to the product development team. We then want the support system updated when production has dealt with the request.
Jira comes in 2 different deployment models – Jira Cloud and Jira on-premise (including Jira Data Center and Jira Server).
Note: Atlassian announced it is not going to sell more server licenses for Jira or new feature development from February 2, 2021, onwards. But the existing server customers will have access to maintenance and support for an additional three years, ending February 2, 2024.
The first step is to install Exalate on both versions of Jira, so let’s start with Jira on-premise.
You can refer to the Exalate Academy videos which are very informative or set up your first connection with the Getting Started guide.
Note: If you prefer video tutorials, watch this. Otherwise, keep reading.
Step 1: Install Exalate on Jira on-premise.
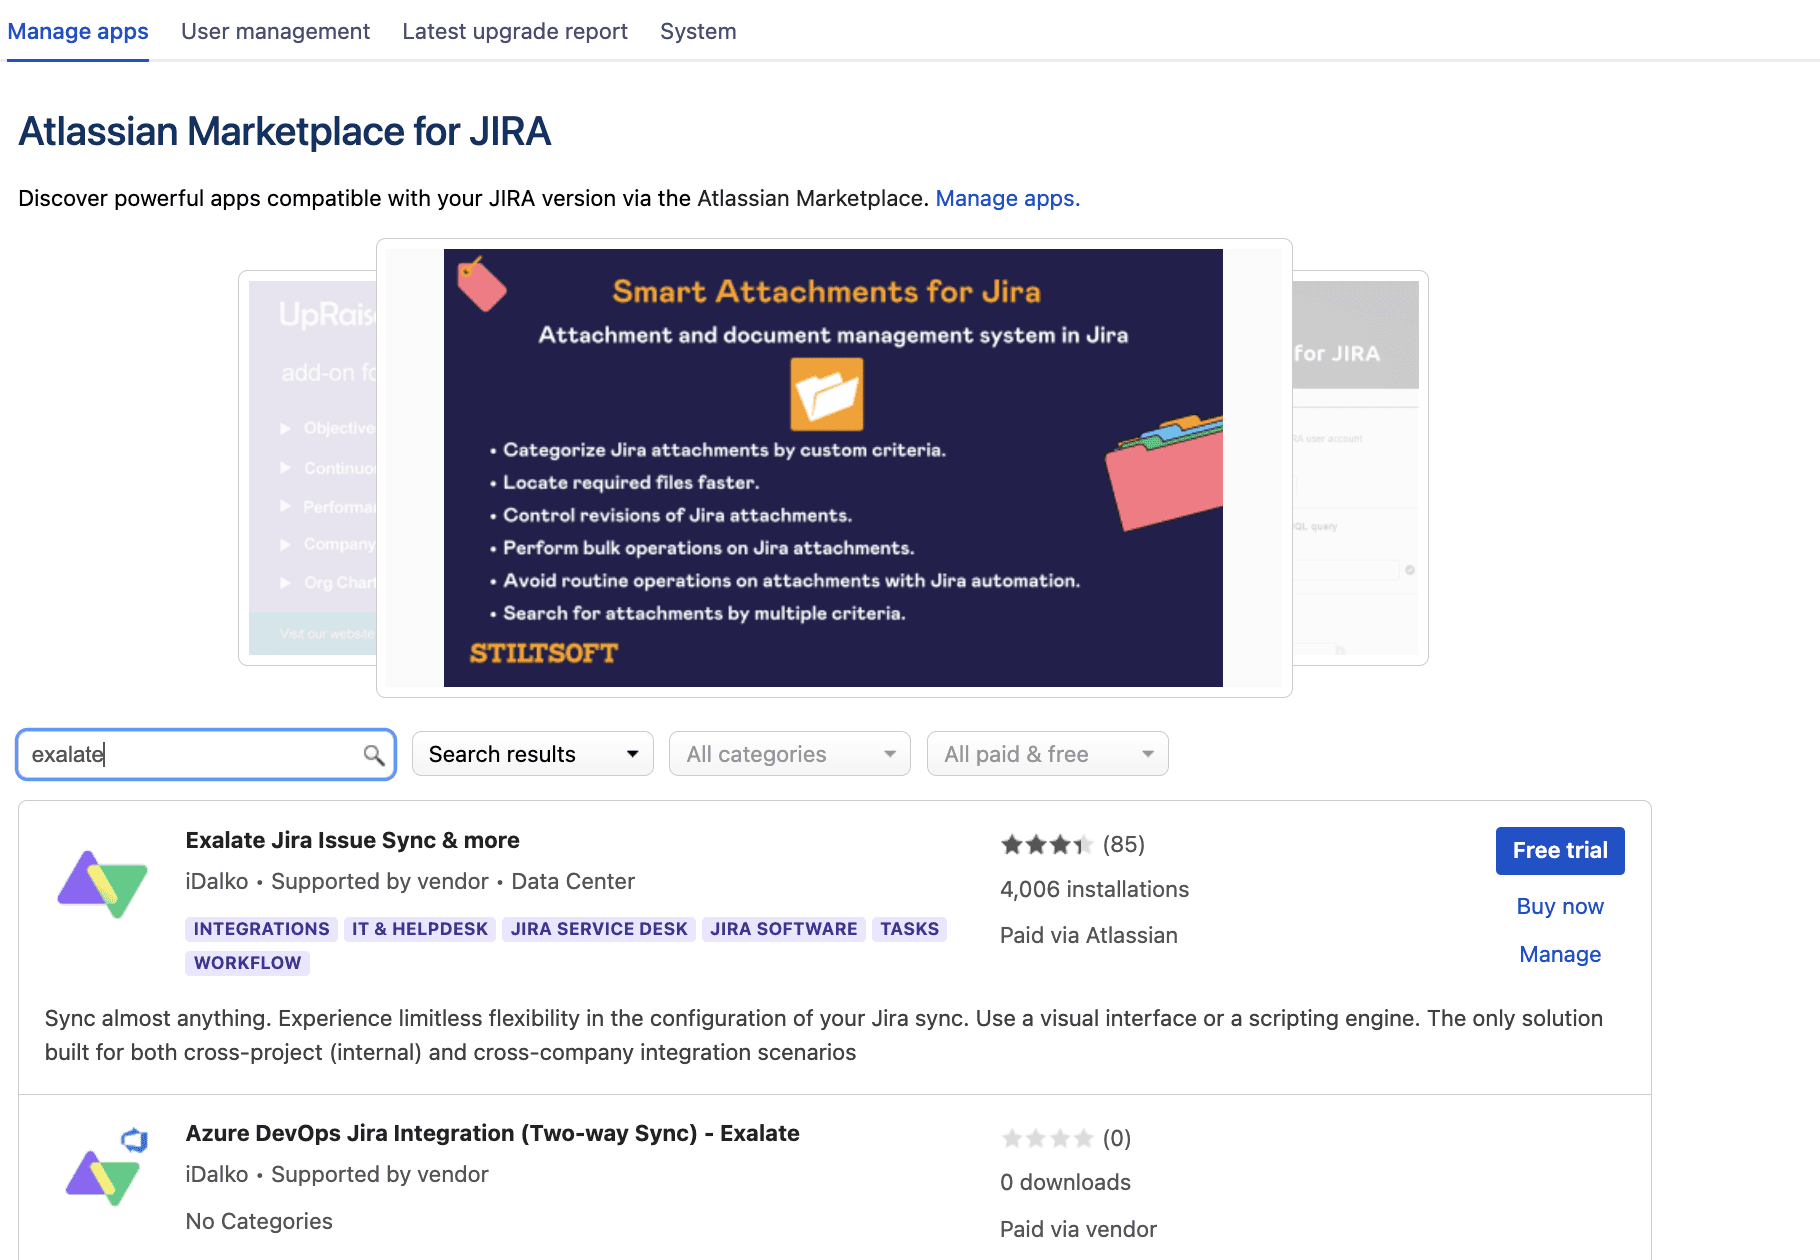
To install Exalate on Jira on-premise, first, find it in the Atlassian Marketplace for Jira. To access that, hover your mouse over the profile button in the top right of the screen and select “Atlassian Marketplace”. Several versions of Exalate will appear. The one we want is “Exalate Jira Issue Sync & more”, which should be at the top.
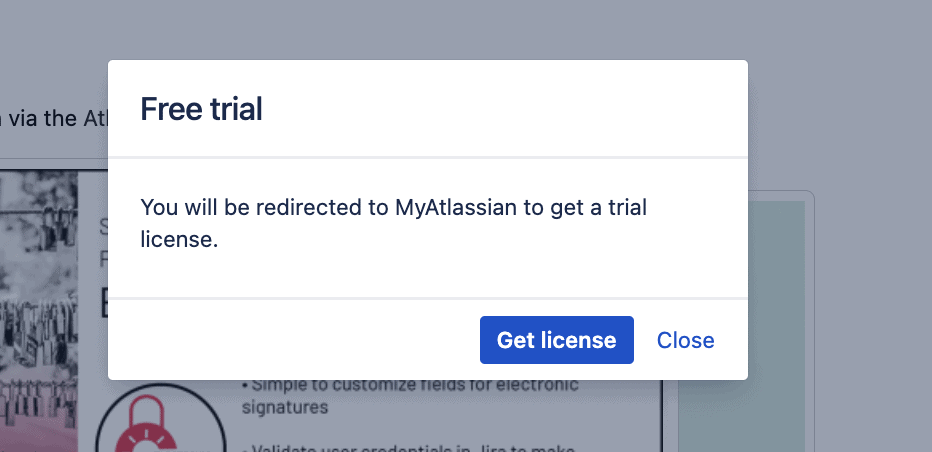
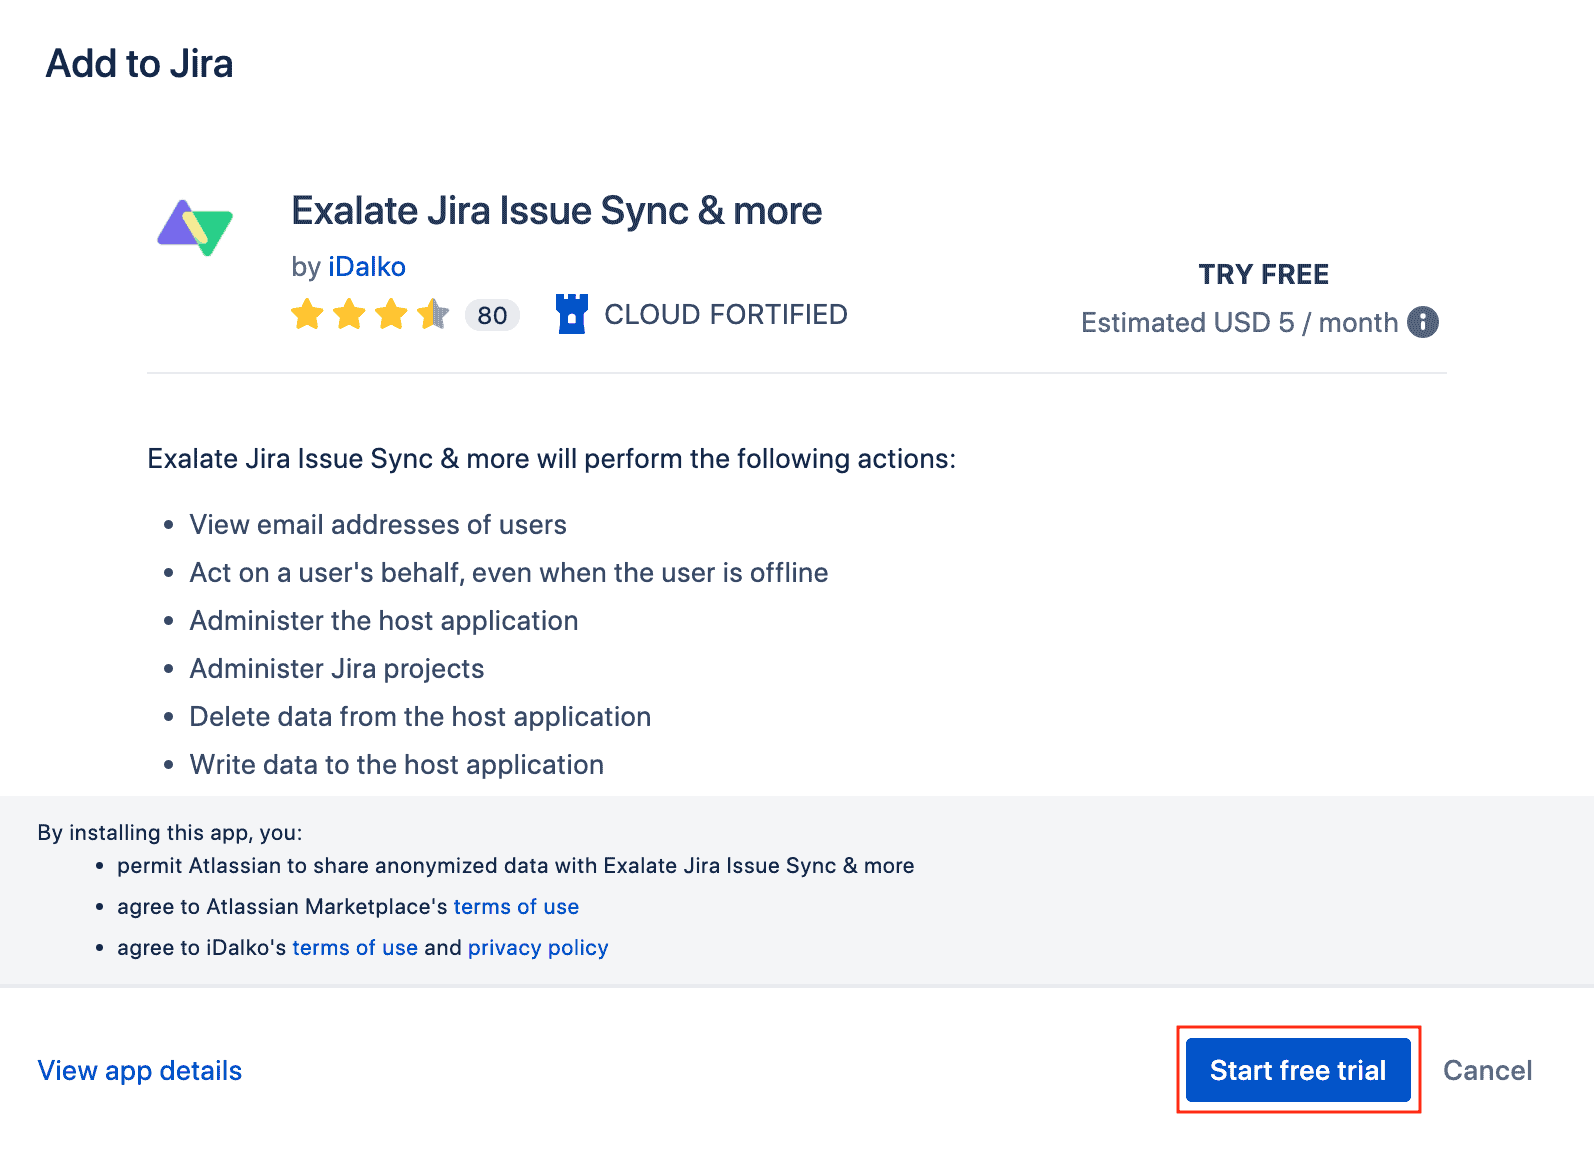
Click the “Free Trial” button to continue. If you don’t have a license, you’ll be taken to “MyAtlassian” to get one. Click the blue “Get license” button on the pop-up that appears.
You’ll need to log in with your email and agree to the terms and conditions. Then you can click “Generate license” to continue.
When your license is generated, a pop-up will appear and you can click the “Apply license” button to activate it. Back in Jira, you’ll get a pop-up to confirm activation. Click the “Get started” button, and we’re done. There’s also a guide to working with Jira on-premise in the documentation. Take a look here for more.
Step 2: Install Exalate on Jira Cloud
The process for installing Exalate on Jira Cloud is essentially the same. This time, to get to the Atlassian marketplace, go to the settings menu, and click “Apps”. 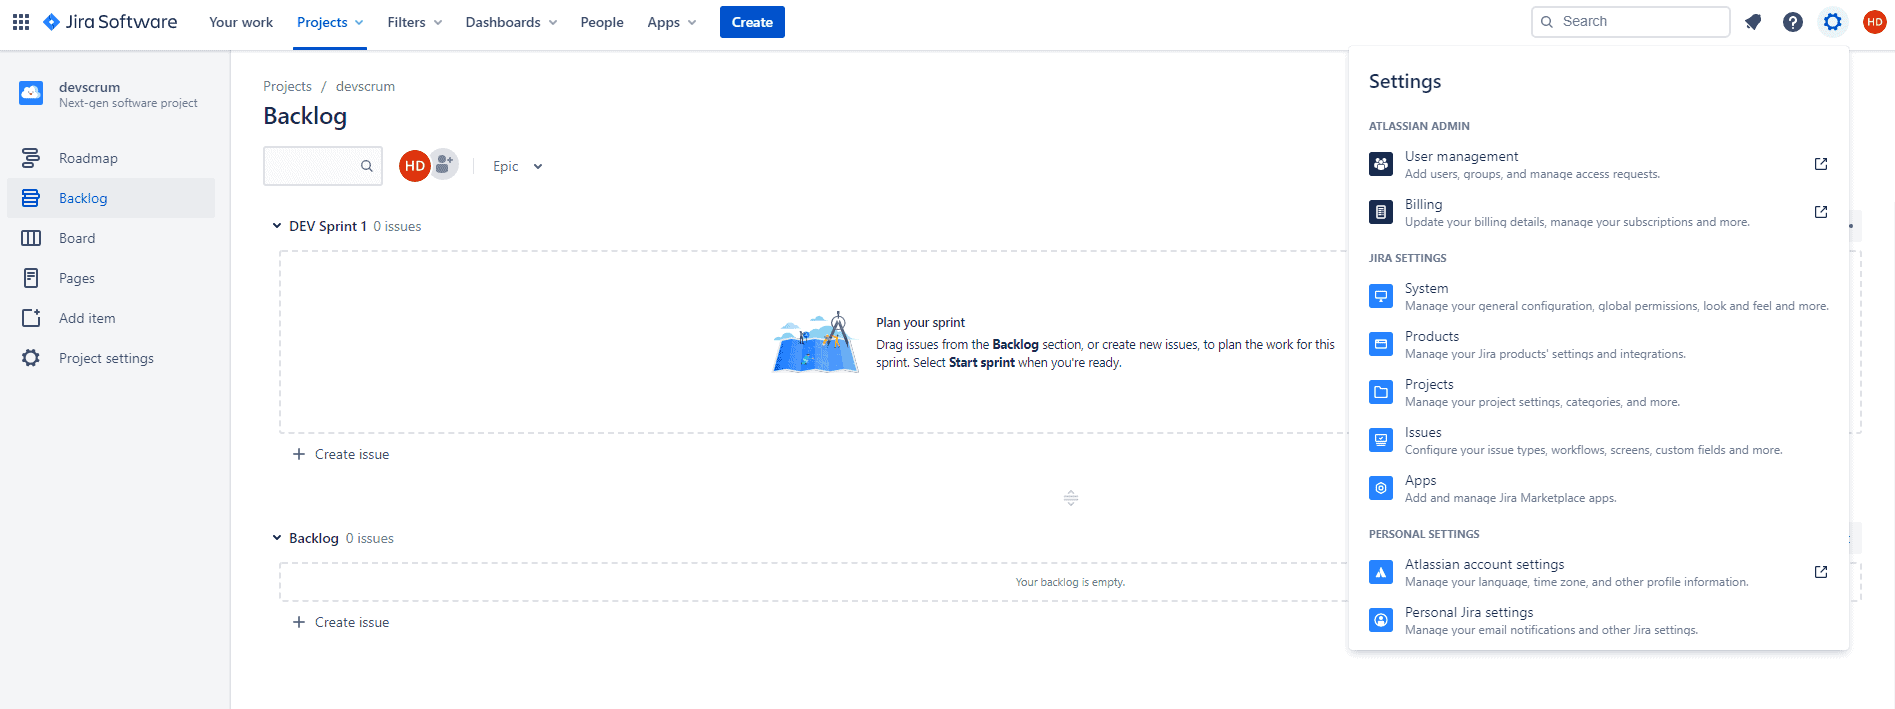
A small window briefly will appear while Jira installs Exalate, followed by a “Success” popup when it’s ready. From there you can click “Get started” to go to the Exalate screen. Next, we’ll initiate a connection between the two platforms. If you need more help, read the documentation on installing Exalate on Jira Cloud.
Step 3: Connect Jira Cloud to Jira Server
Now that we’ve installed Exalate on both of our Jira instances, we need to set up a connection between them. Connection defines the synchronization behavior between the 2 Jira instances.
To do this, we initiate the connection in one platform and then copy it into the other. We can use either one to initiate the invitation, but we’ll start in Jira Cloud. If you’ve just finished the Jira Cloud installation, you might be looking at the below screen already. If this isn’t your first time, you will see a list of connections on this tab, otherwise, it’ll be empty.
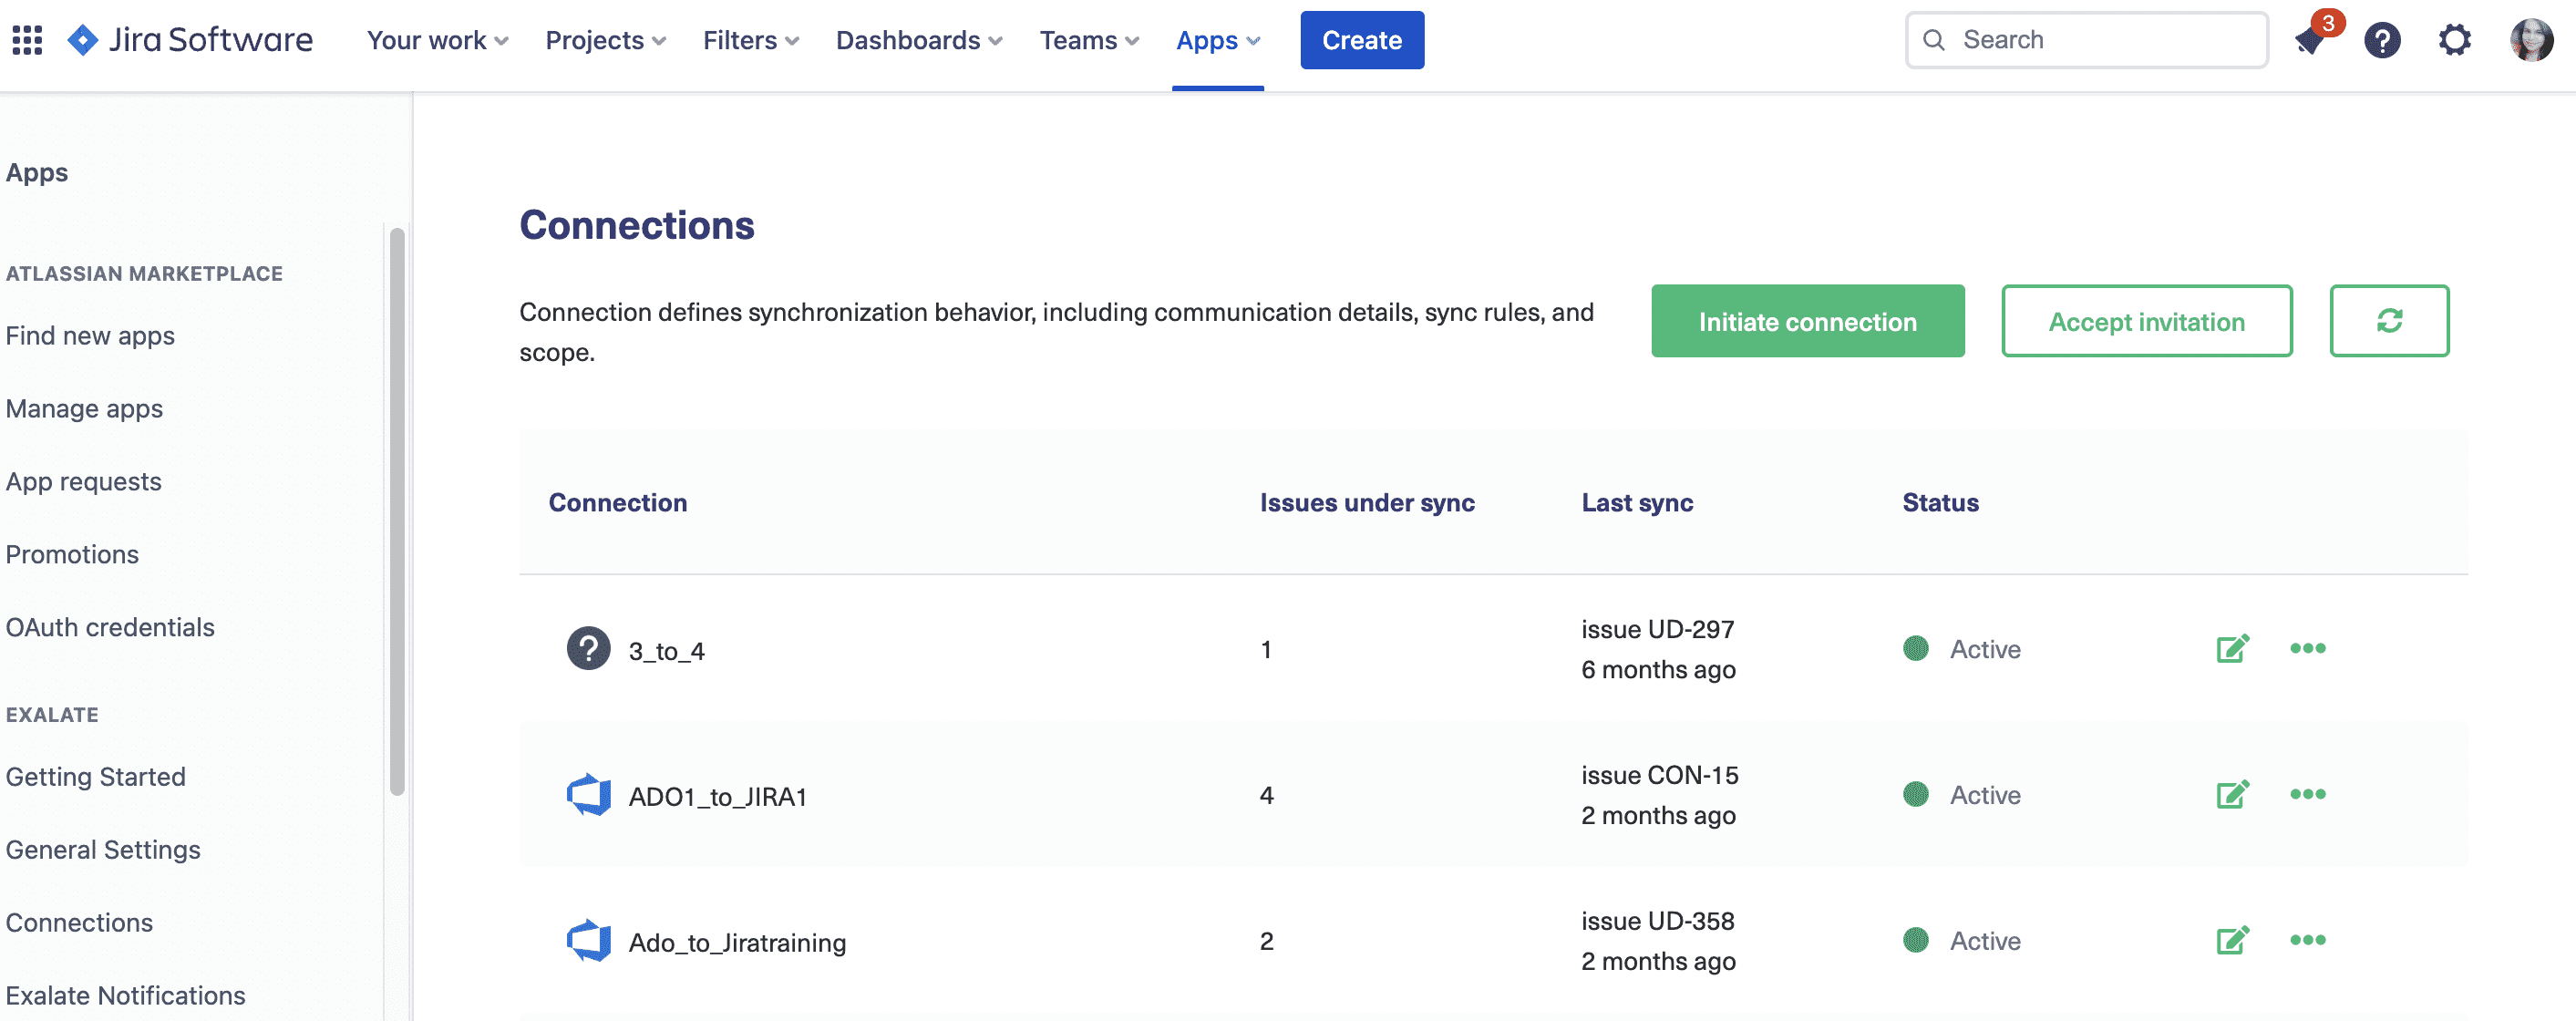
If not, you can get to it by clicking “Apps” at the top of the screen and then “Connections” in the left-hand menu, under the “EXALATE” heading. To start creating our connection, click the green “Initiate connection” button.
On the next screen, you’ll need to enter the address of your other Jira instance, i.e the Jira on-premise URL.
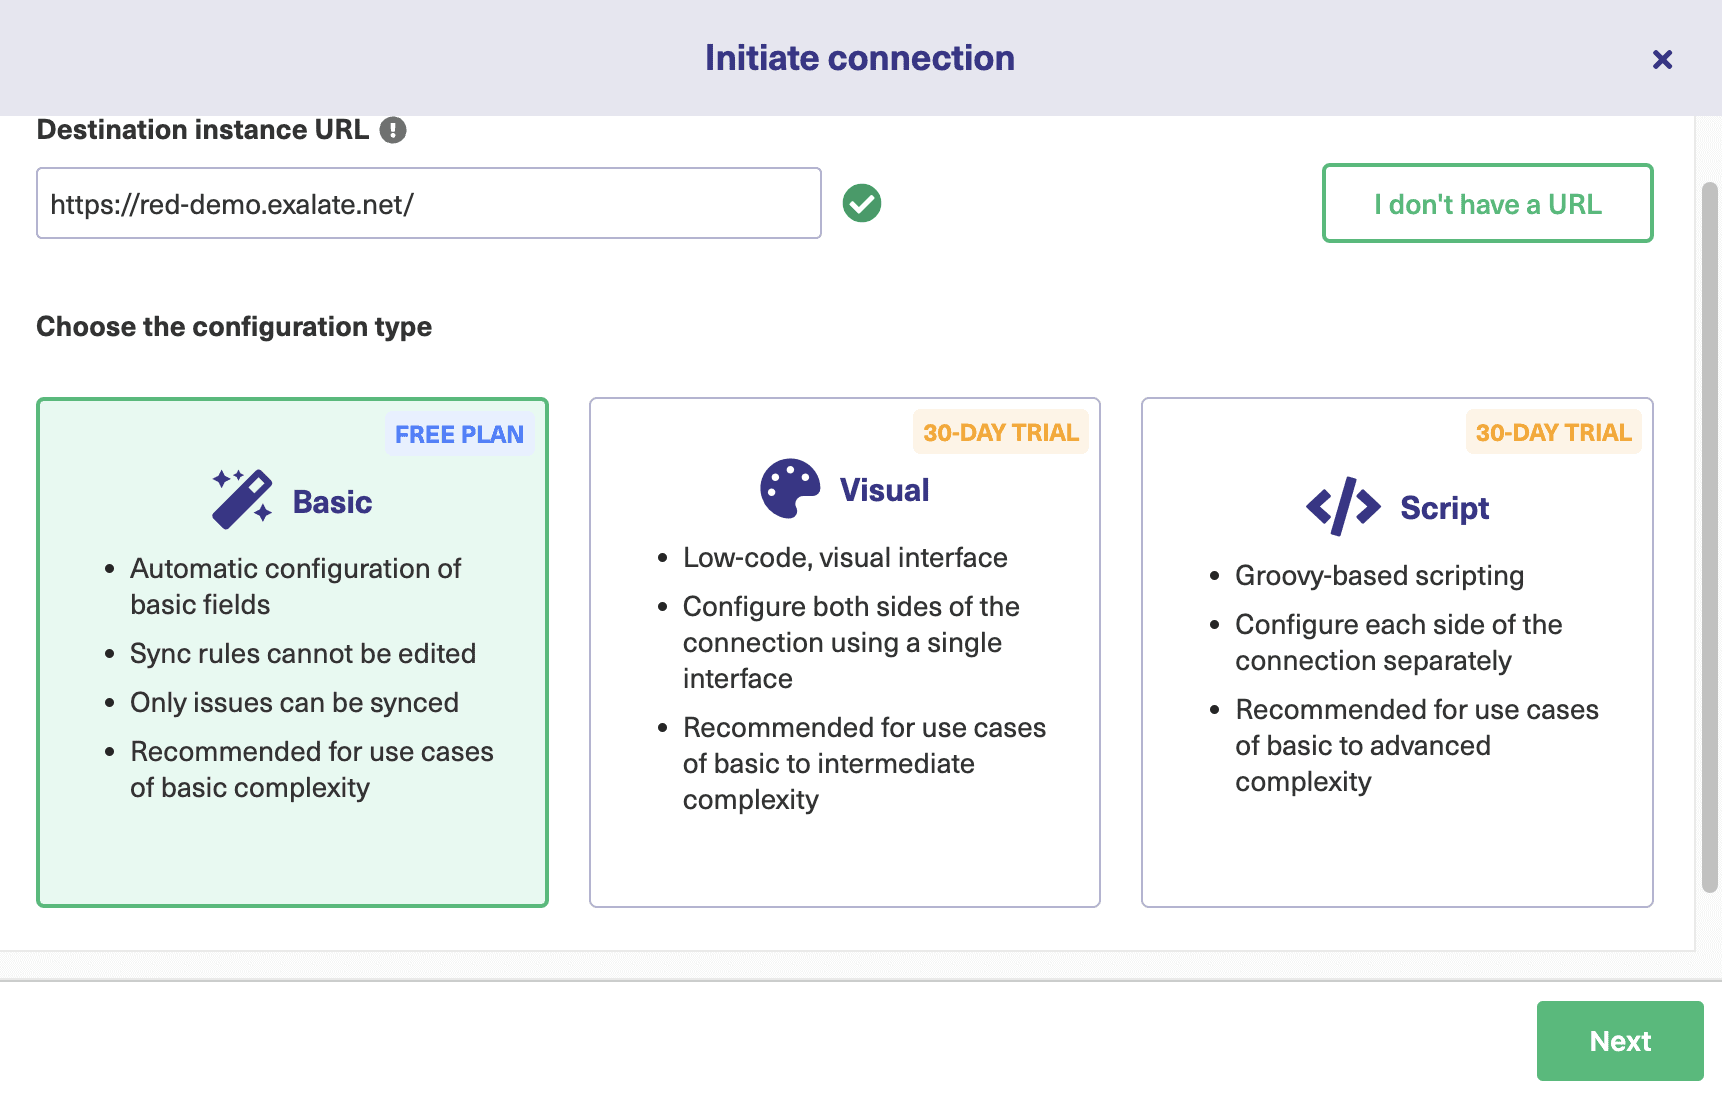
After you enter the address, more fields will appear, allowing you to choose the configuration type. Exalate offers 3 configuration modes: the Basic Mode, the Visual Mode, and the Script Mode.
The Basic mode connections can sync a basic set of issue fields like summary, description, comments, attachments, and issue types. You cannot change these default mappings as they are automatically provided by Exalate. If you want to change it you must use the Visual or the Script mode connections instead. You can use this mode for basic synchronization use cases.
The basic mode comes with a Free Plan that allows up to 1000 free syncs per month. You can get started here.
Note: Exalate also has an option where not only Global administrators but also Project administrators can set up Basic connections from the Project settings. This helps establish the connection on a project level. Visit this page to learn more about how to do it.
Visual mode connections allow you a low-code, easy-to-configure UI. You can even choose to use the Script mode which allows you to use advanced programming logic for your synchronizations. You can use both these modes for advanced or complex synchronization use cases.
We will take a look at all these modes one by one. But if you want you can skip directly to the relevant section.
Using the Basic mode
After you select Basic on the screen above, click “Next”.
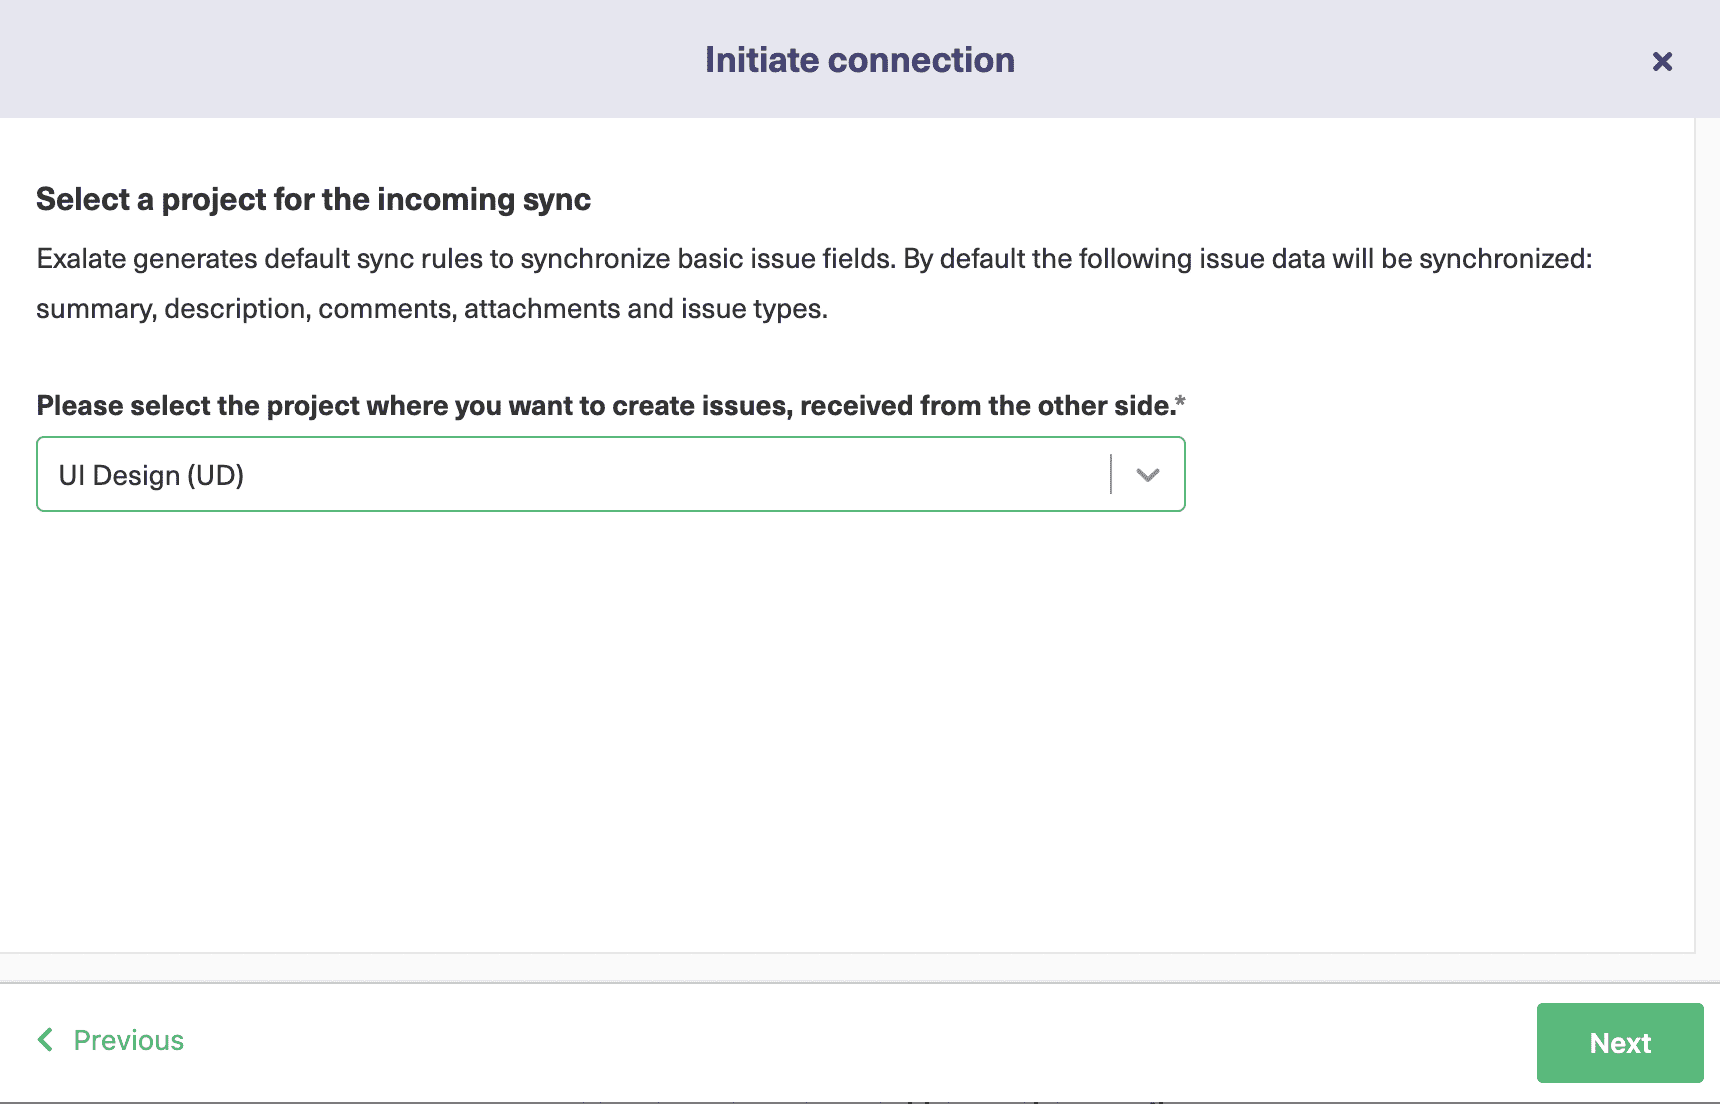
Then pick the local project to sync entities from the other end of the connection. That means new items sent over from the other Jira instance will appear in this instance, in the project we select. Pick from the available projects and click “Next”.
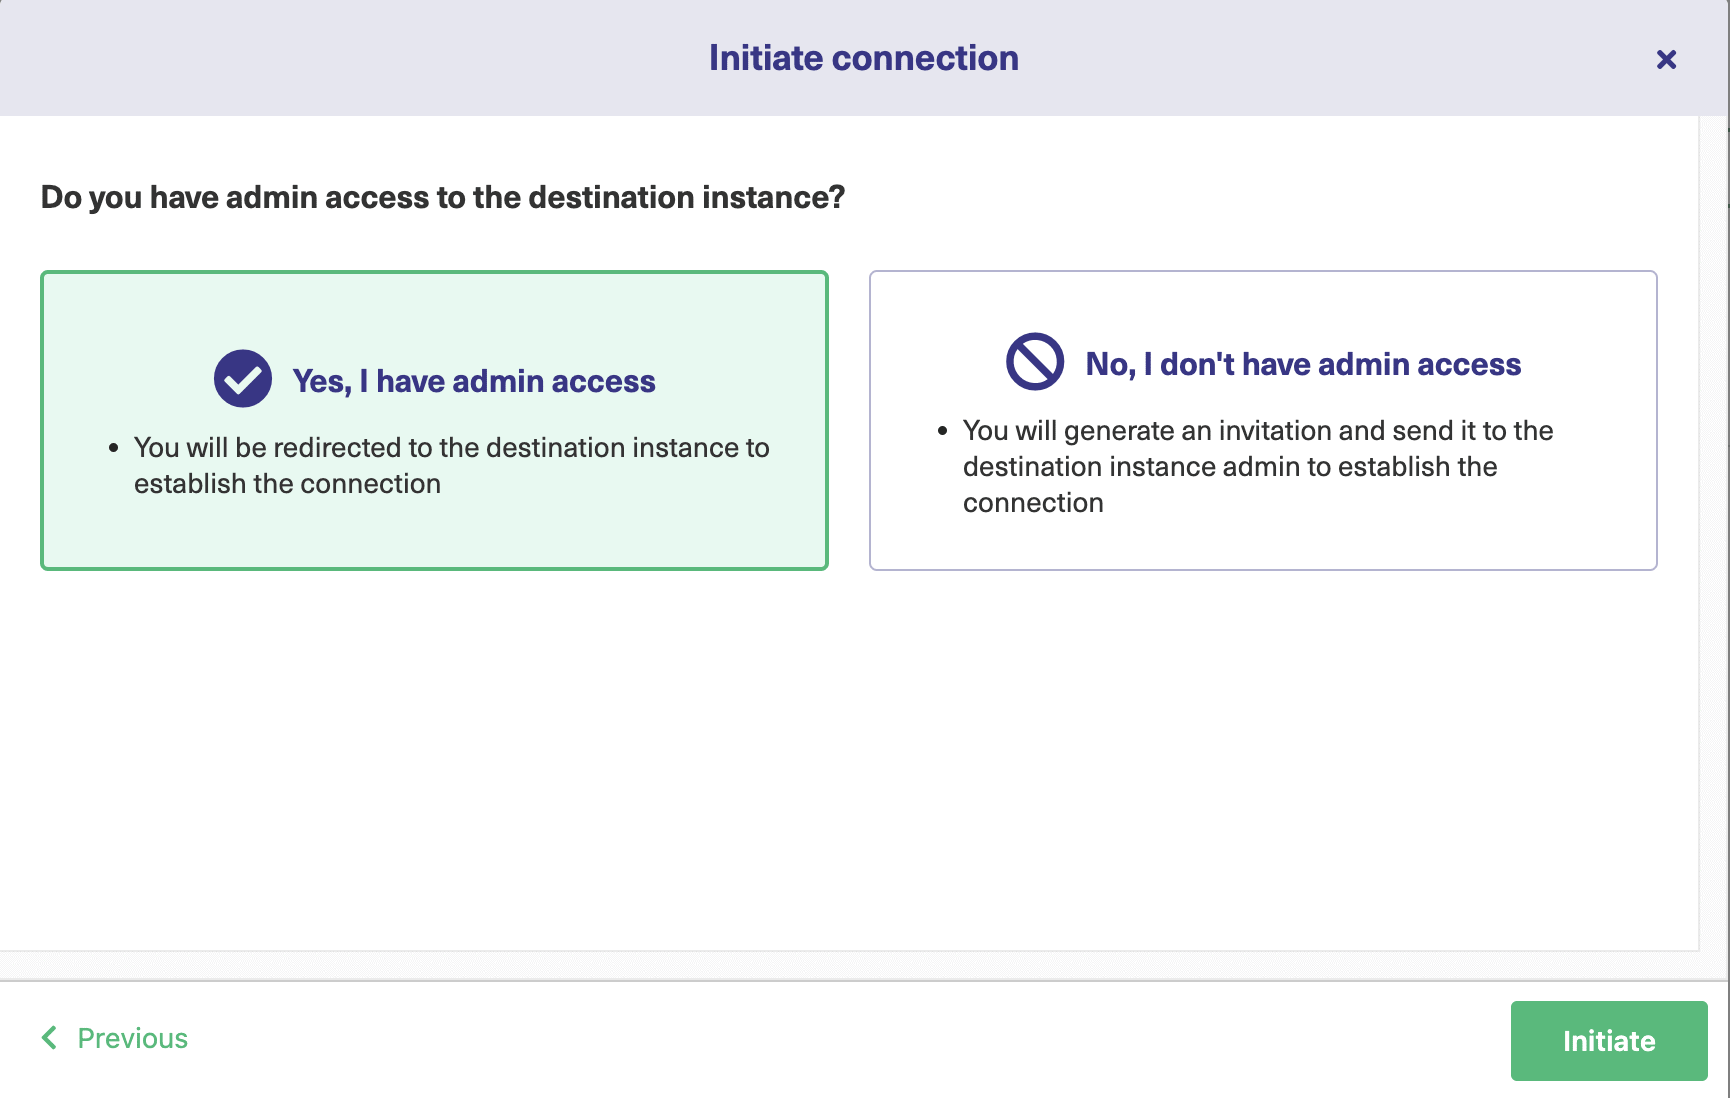
You will then be redirected to verify if you have admin access to the other Jira instance, in our case Jira on-premise. Click “Yes, I have admin access” and click “Initiate”. In case you don’t have access, an invitation code will be generated that needs to be copy-pasted on the other Jira instance. You will know more about how to do this in the Script mode section.
After a brief verification, you need to select a project on the Jira on-premise instance as well. Select one from the drop-down list as you did above. Once done, click the “Confirm” button.
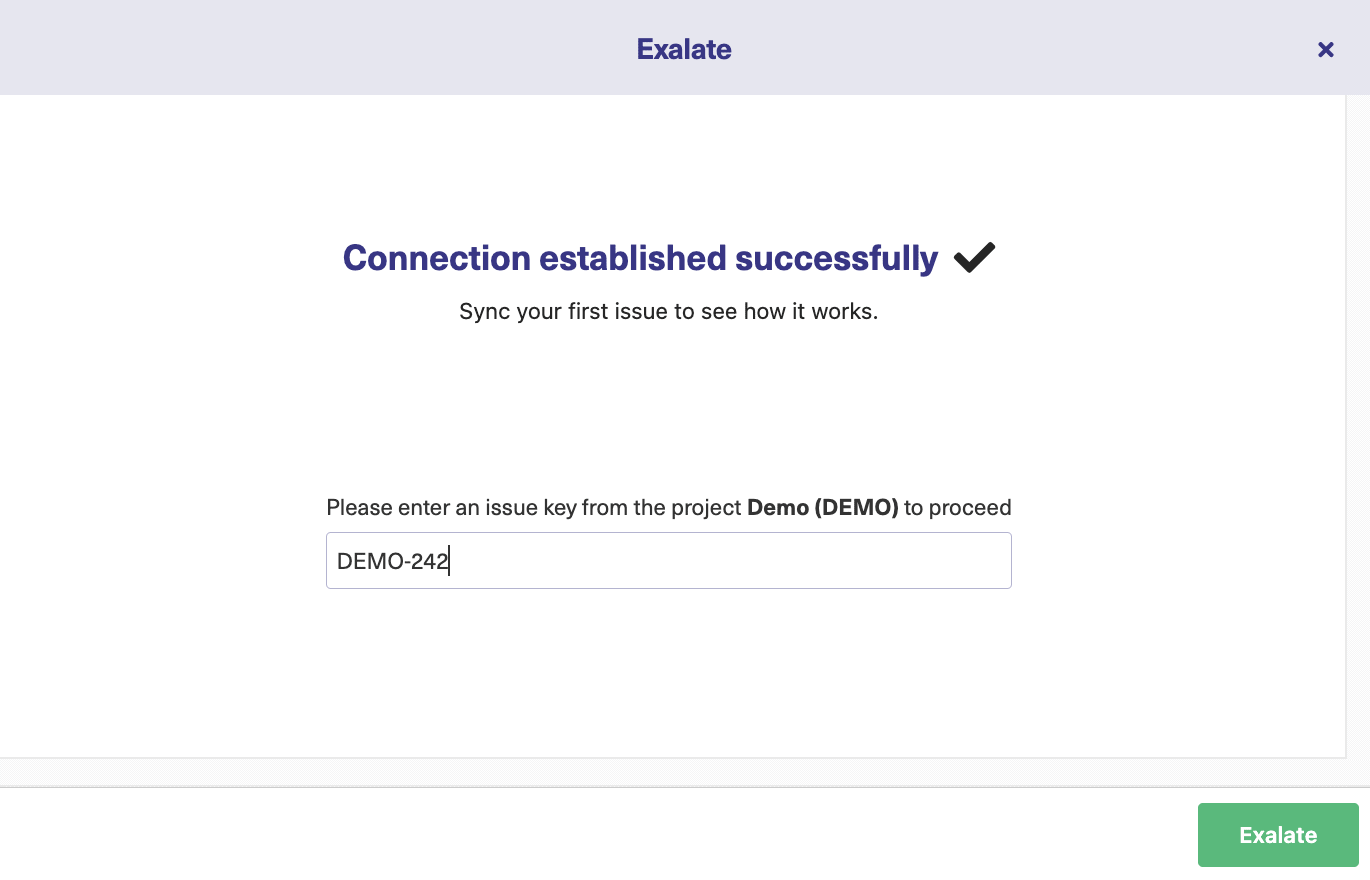
This will successfully establish a Basic connection between both Jira versions. You can instantly start syncing your first issue by entering the issue key as shown. You can even choose to create triggers for automatic synchronization or sync existing issues in bulk using the “Bulk Connect” option.
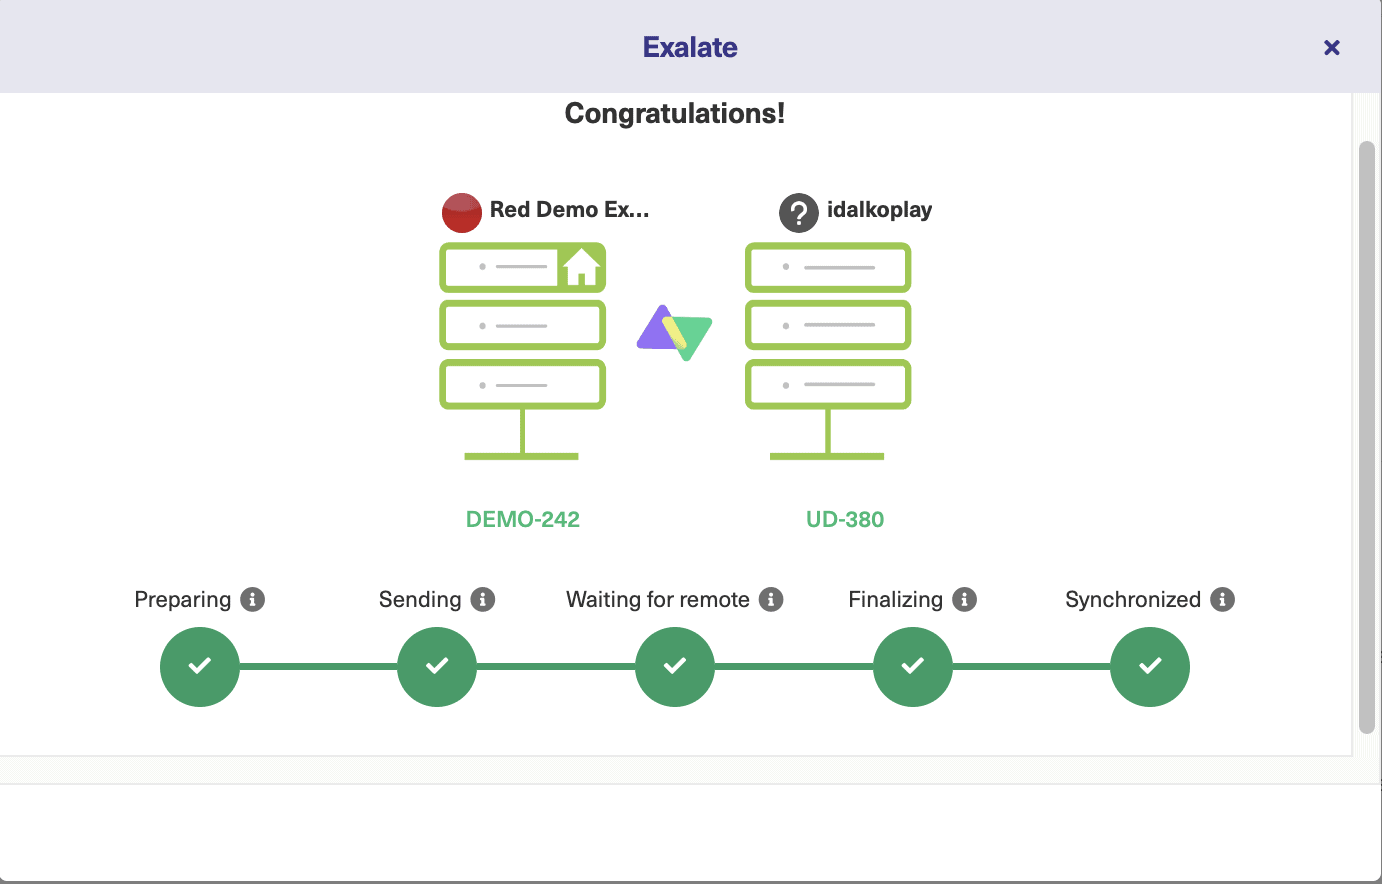
Wait for some time!
You can see your issue being synced as shown below. You can even follow the link to go to the remote or local issue if you want.
Using the Visual mode
After selecting “Visual”, click “Next”.
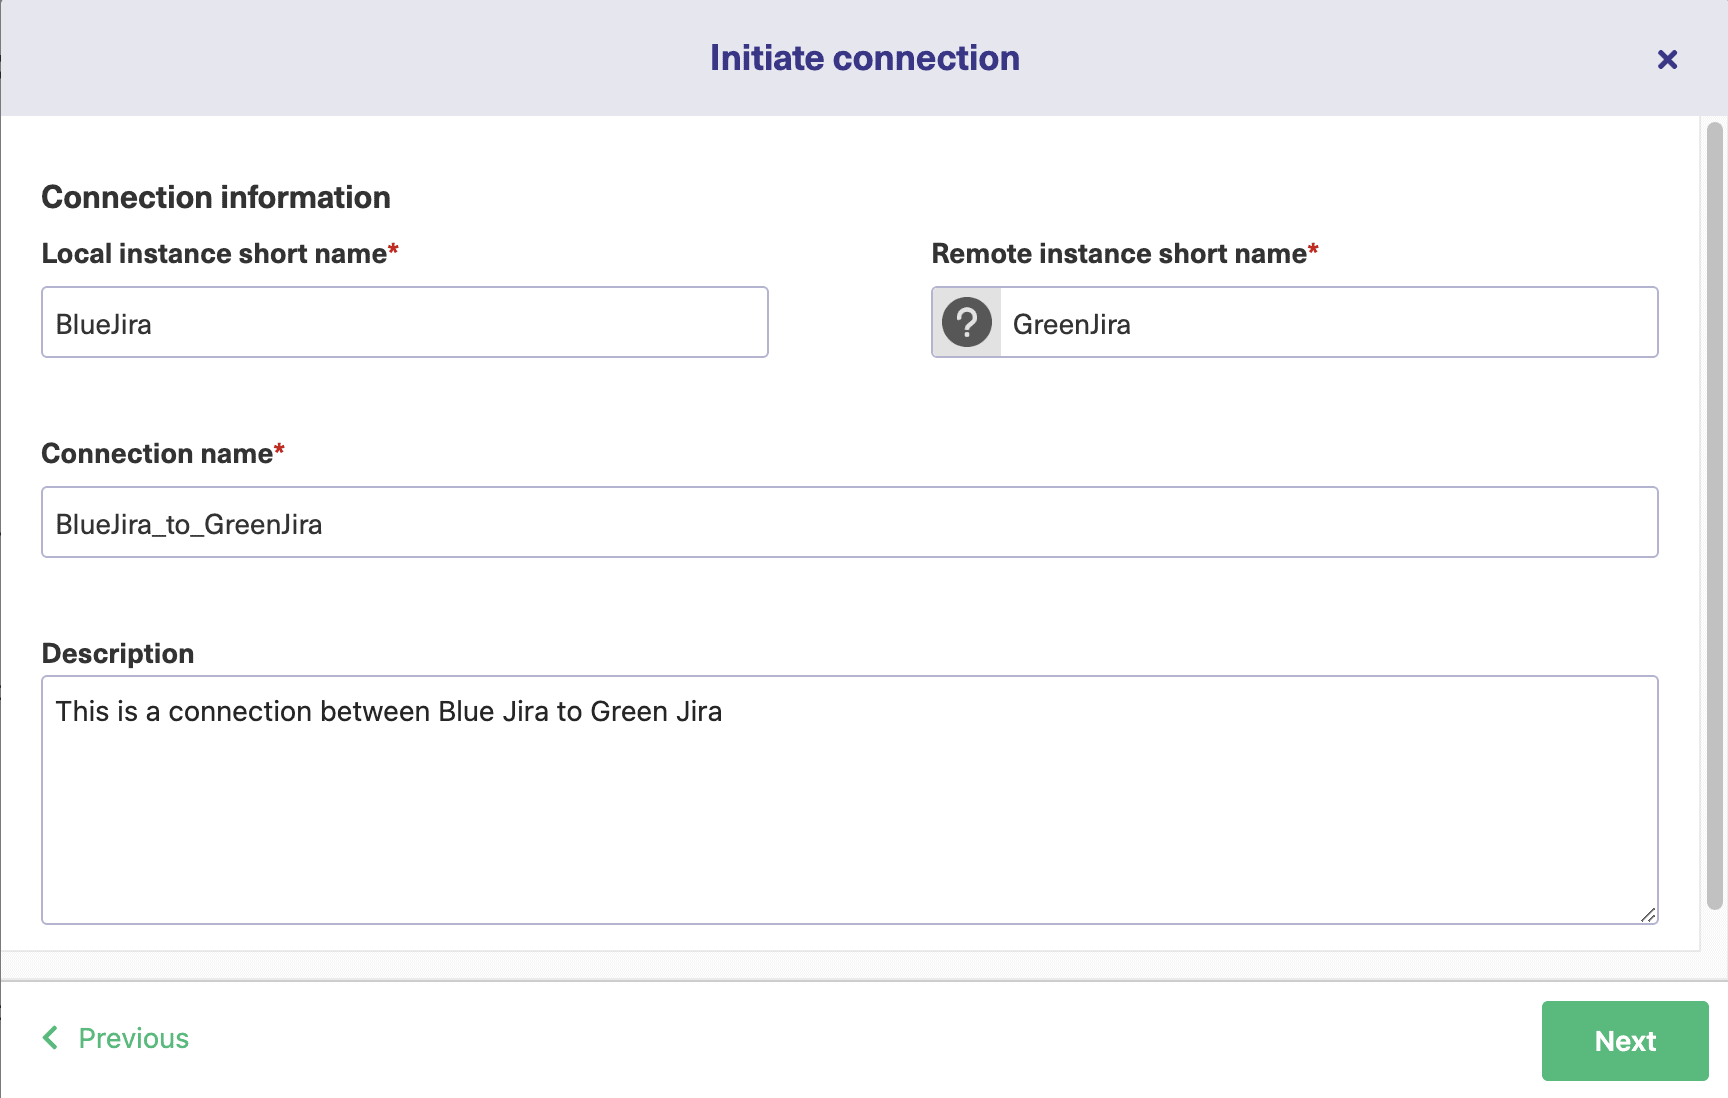
Then give a name to each end of the connection. Those will be used to generate the connection name. You can also enter a description. This is useful for describing what exactly your connection will be used for. Don’t forget, others may need to use it and may wonder what it is. Giving it a well-thought-out description will also help you if you have multiple connections used for different things. Click “Next” when done.
After that, you need to verify if you have admin access on the other Jira instance, and click “Initiate”.
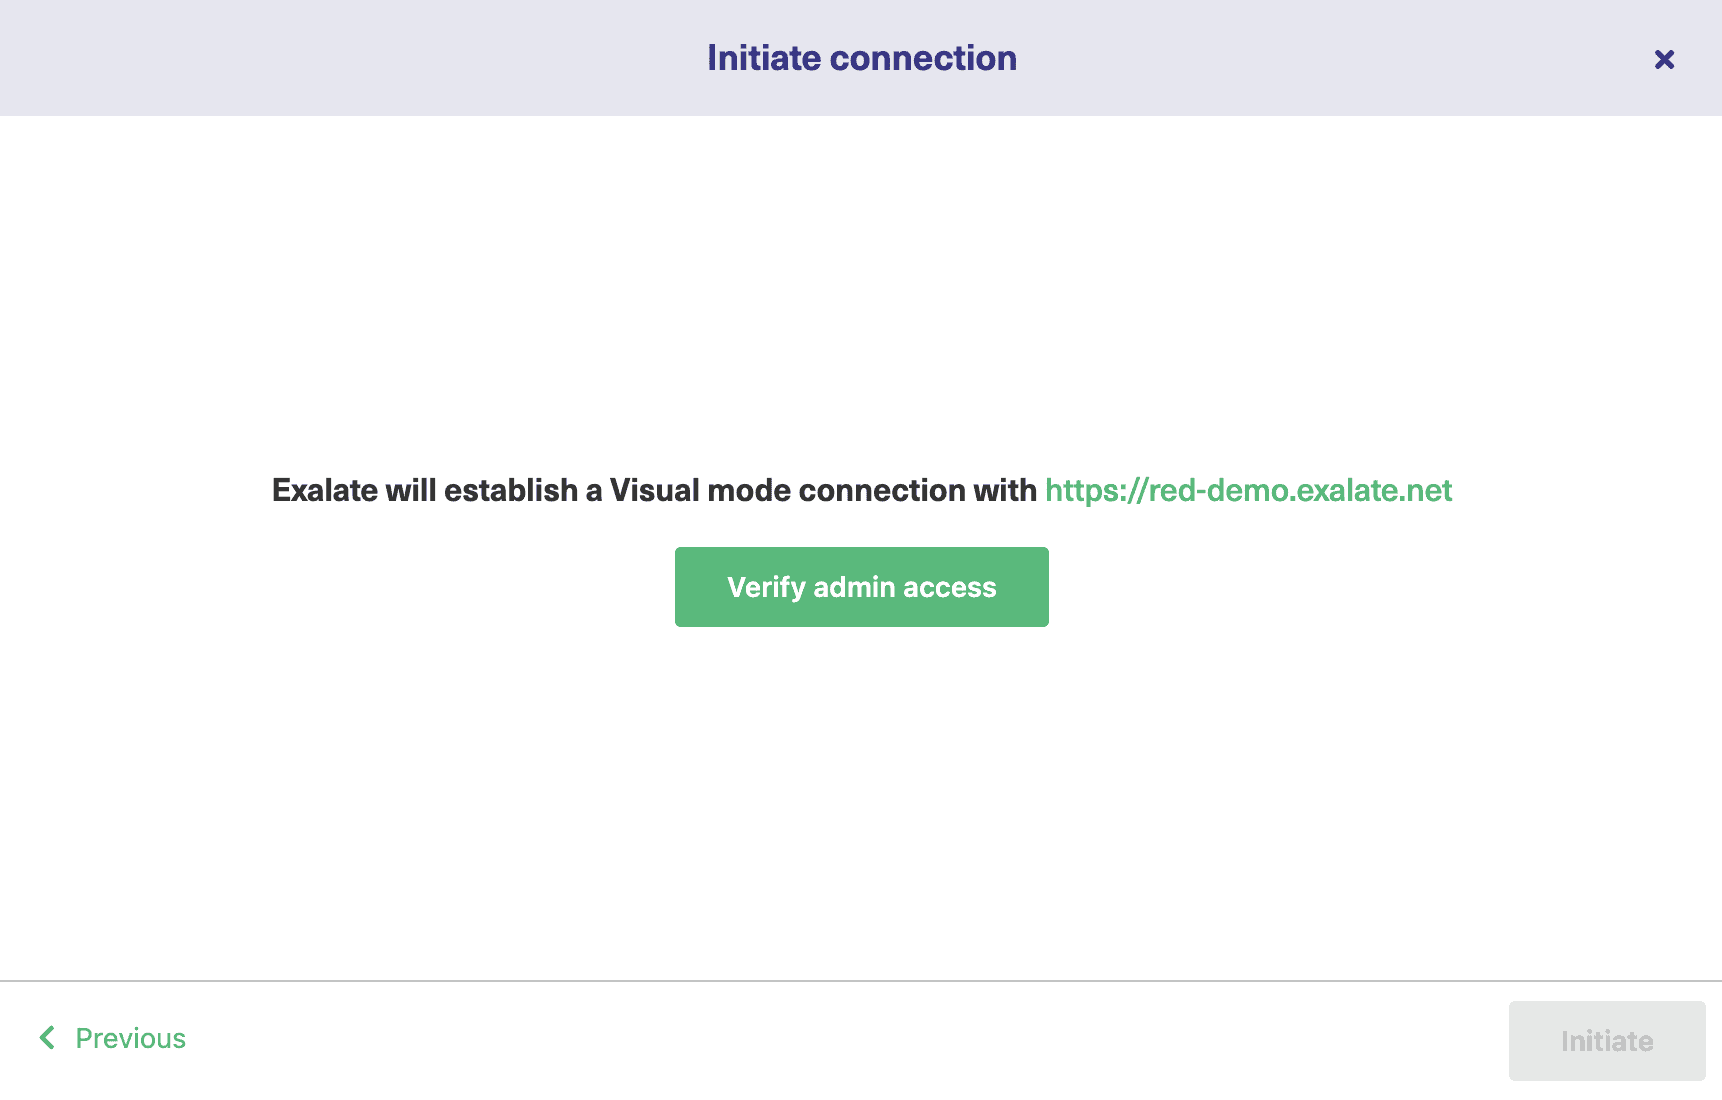
After a successful verification, your Visual mode connection has been successfully set up.
You can now proceed to “Configure Sync” by clicking the button on the screen below.

Configuring lets you control what information you want to send and receive. It also allows you to select the projects on both Jira versions and decide the direction of synchronization.
There are 2 parts to it: the “Scope” and the “Rules”.
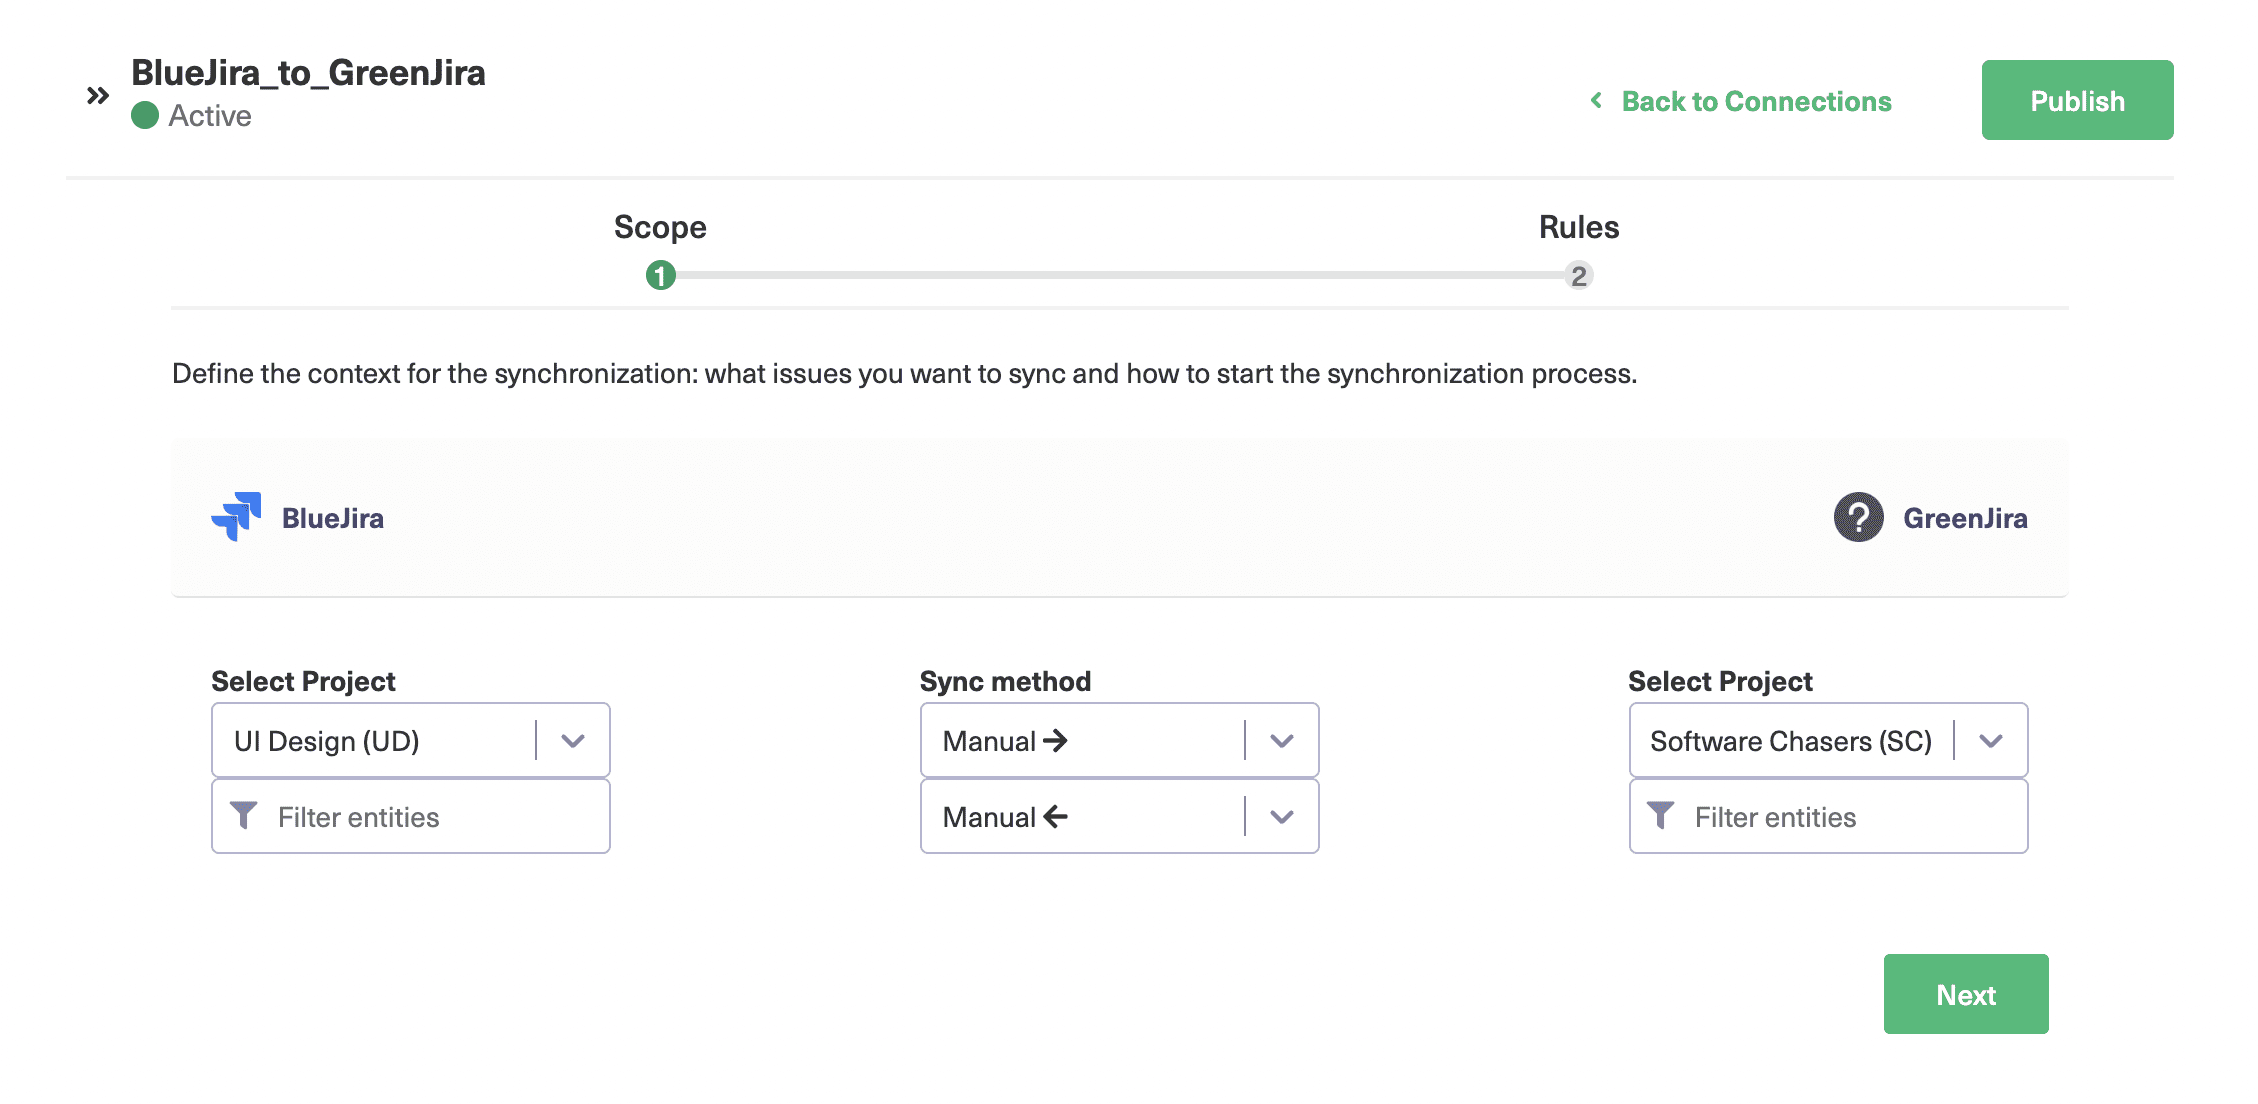
Under “Scope”, you need to select several fields that allow you to control the connection. For this, select the project from the drop-down list and filter entities on both Jira instances. The projects you select tell you which project synchronized items will be taken from and added to.
Then choose the “Sync method”. This means choosing whether the synchronization is automatic, manual, or disabled. The direction of the arrow points towards the direction of synchronization.
The “Filter entities” button pops up on the following screen.
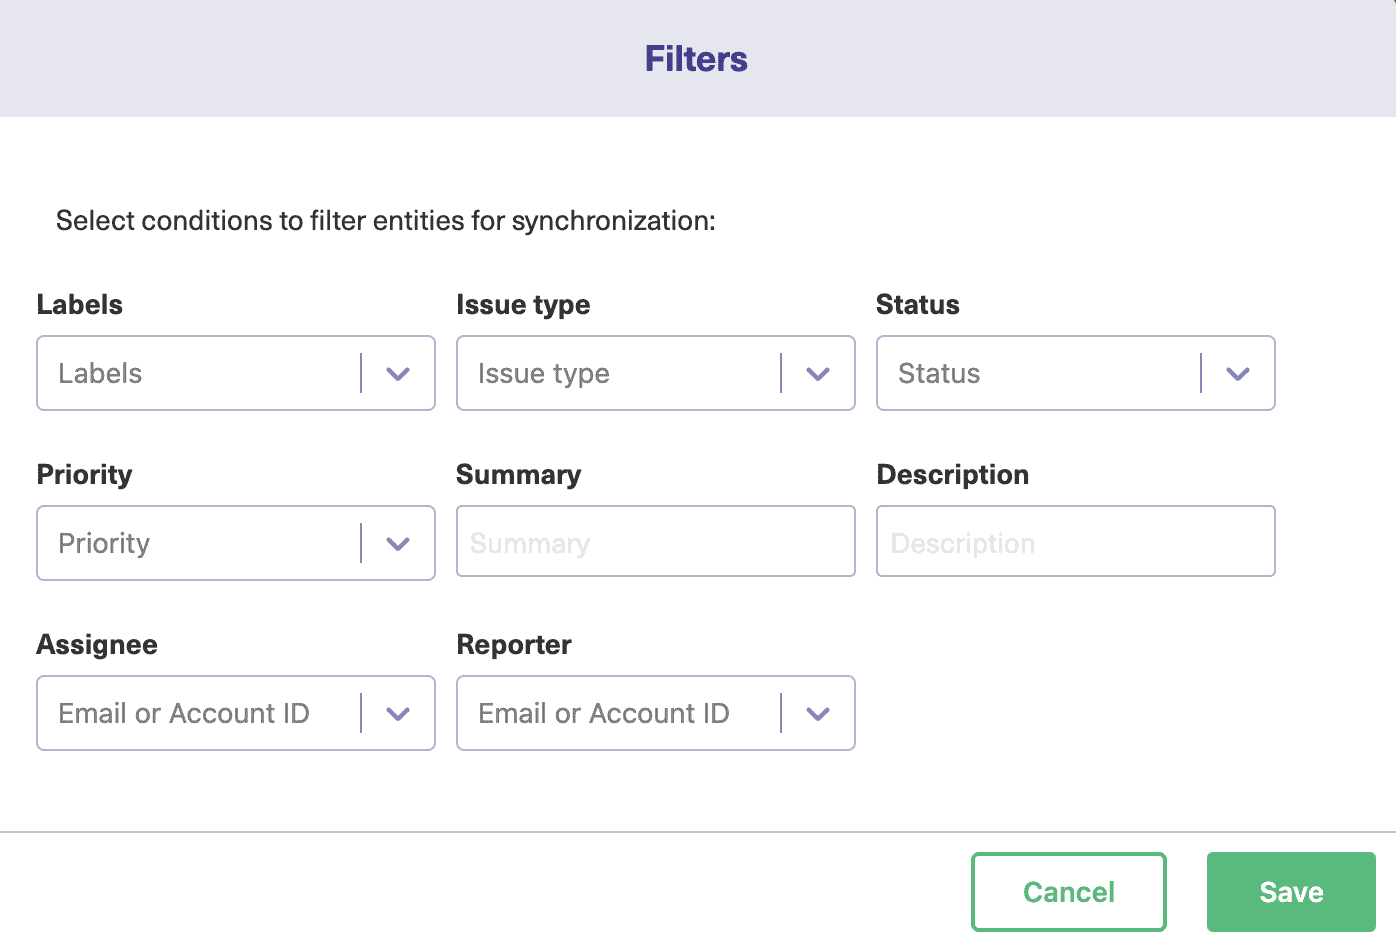
Here, you can select conditions to filter entities for synchronization. Clicking “More” expands the selection and more fields appear. These allow you to filter entities for various conditions like Labels, Issue Type, Status, and so on. For instance, you can filter entities belonging to a particular “Assignee” by adding it to the drop-down.
You can choose entities of a particular priority by selecting the priority from the drop-down. You can even apply multiple filters. Click “Save” after you make the changes and click “Next” to configure the sync further. These same things can be done on the other side of the connection as well.
Now, moving on to the “Rules” tab, it specifies the default mappings between the 2 Jira instances. You can see “Labels” being mapped to “Labels” and so on since Jira is present on both sides. You can choose to “Expand all” to view the mappings in detail. You can also reorder these entries by dragging them up or down. You can choose to edit to change the mappings of a particular entry or simply delete it if you don’t need it.

The “Edit mapping” screen looks like this. As seen you can edit the default mappings here. In the center of the screen, you can see a “Sync direction” control. This allows you to choose the direction of the sync, same as that for the “Scope” tab, but now specific to “Labels” only.
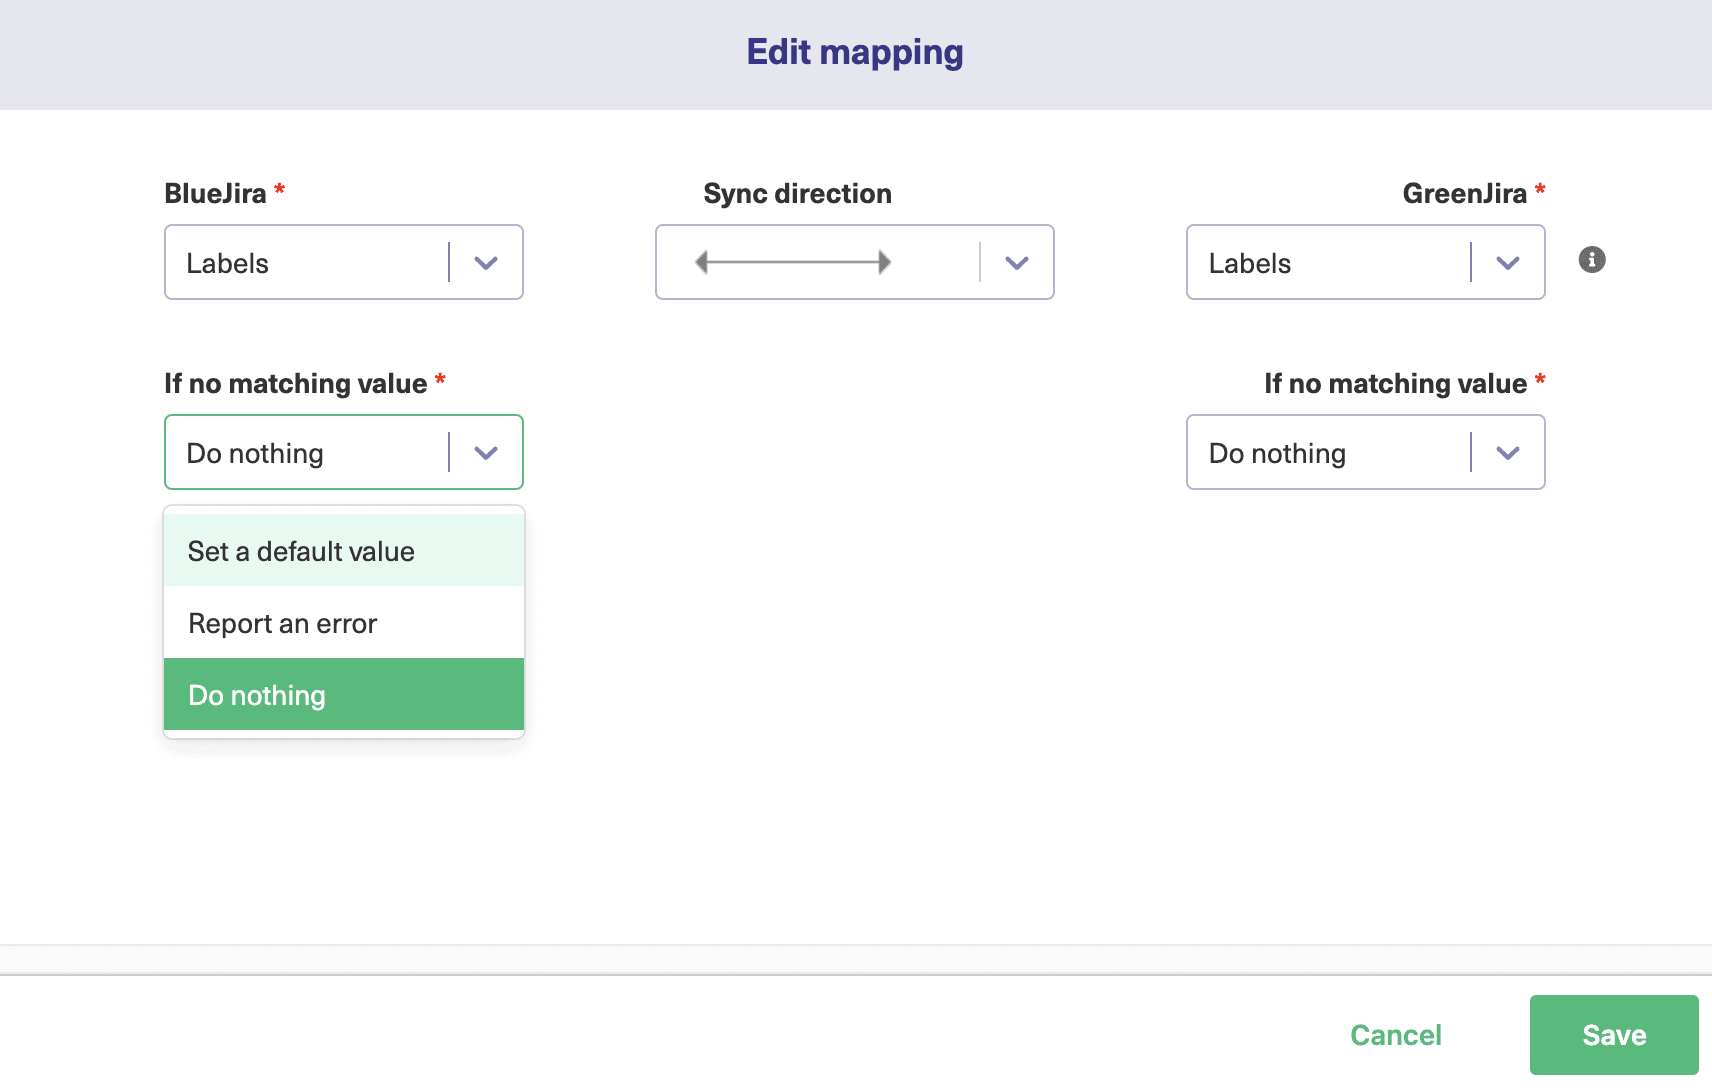
You can change the mappings here as per your requirement. Say, for instance, you want the “Priority” to be passed to the description on the other side so that the other team can prioritize on their own. You can also choose what should happen when the values at both ends do not match. You can do nothing, report an error or choose a default value. Click “Save” when done. You can “Cancel” anytime too!
Back on the “Rules” tab, you can also add new mappings by clicking the “Add mapping” button on the right of the screen. A screen that is similar to the edit mapping screen you just saw appears. But here, you need to choose entities that you want to map on both sides from the drop-down lists. Click “Save” once you are done.
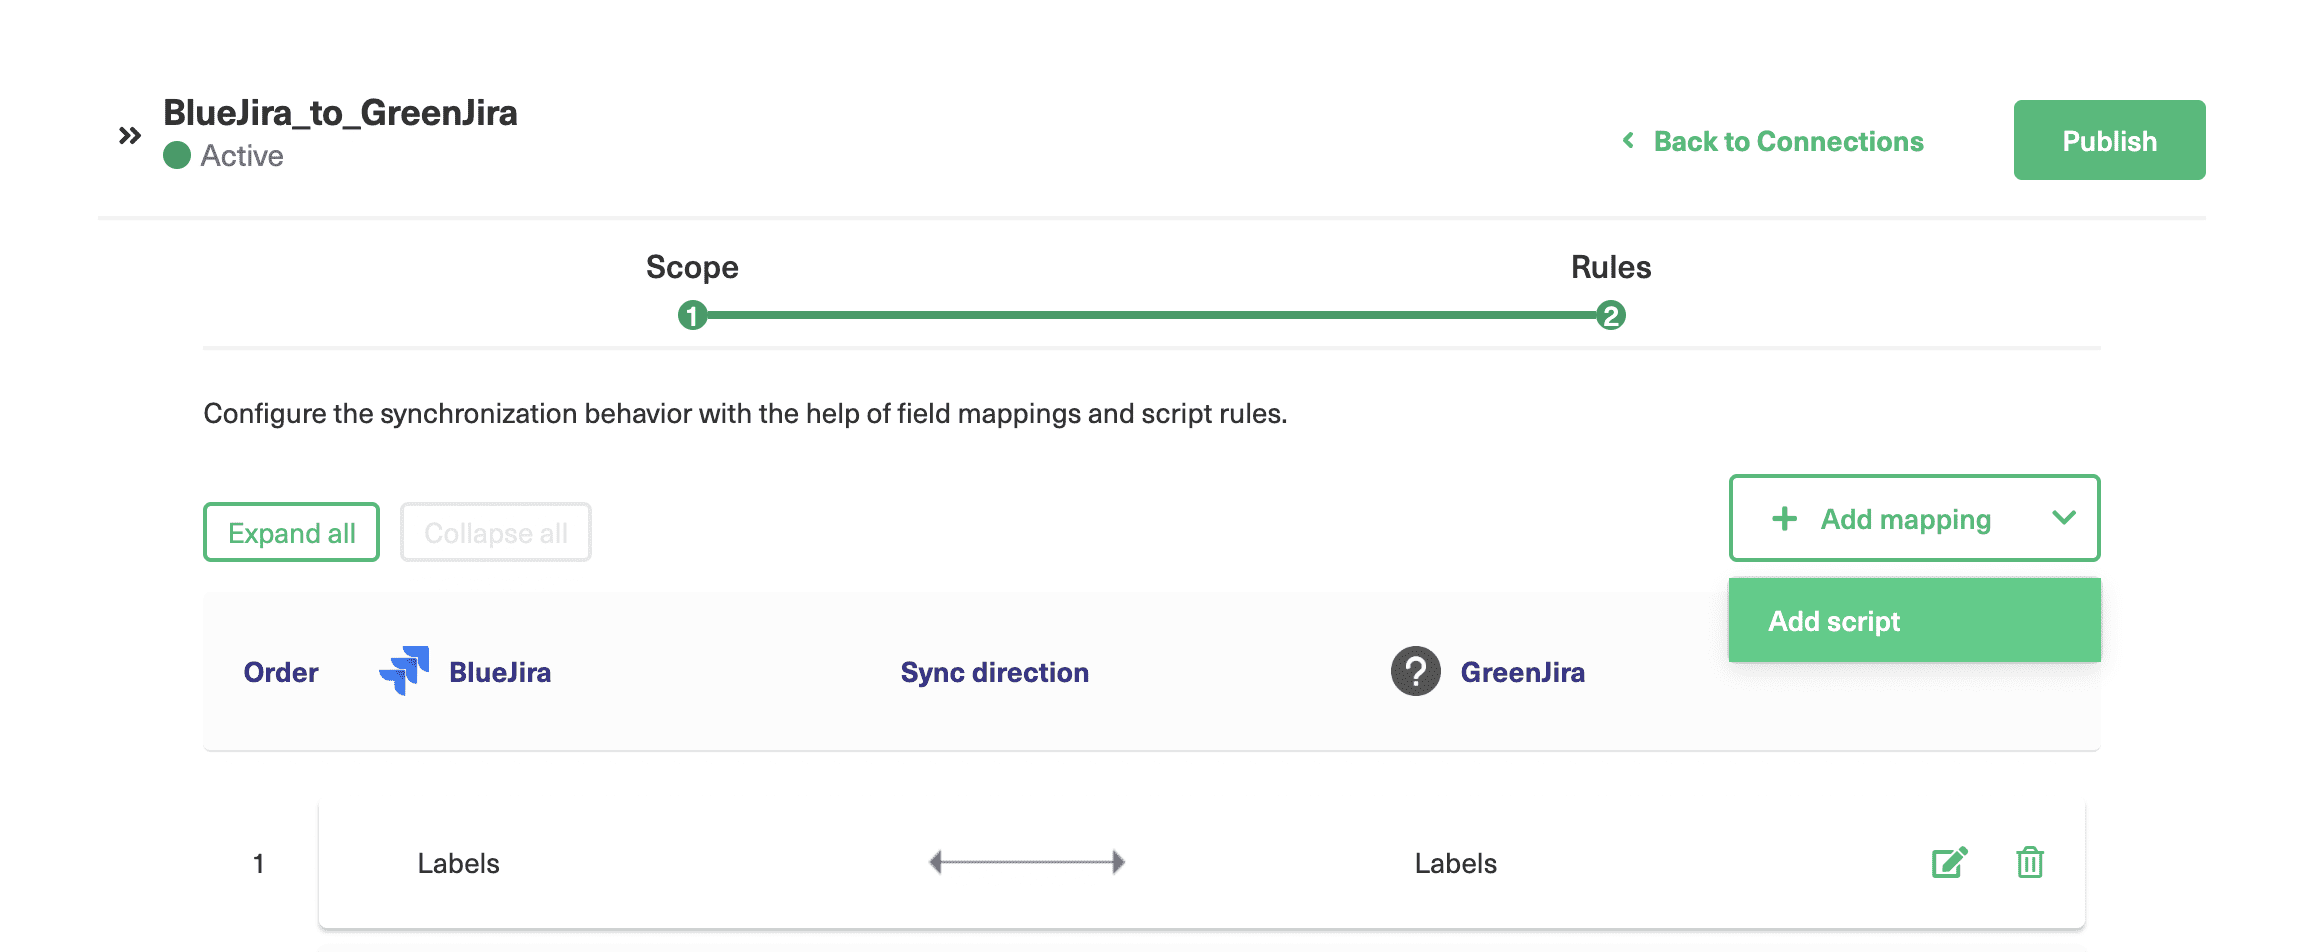
You can choose to add a script for advanced or unique configuration needs. To do so, click the small arrow on the “Add mapping” button. There is a text box area that allows you to add a script. Some script will already be there, but it disappears when you start editing it. For instance, in the script, the following line BlueJira.issue.labels = GreenJira.issue.labels means “BlueJira” and “GreenJira” are the names of the 2 Jira instances whose issue labels are mapped to each other. If you want a specific value to be mapped you can do something like this: BlueJira.issue.labels = ‘from Jira On-premise’ too.
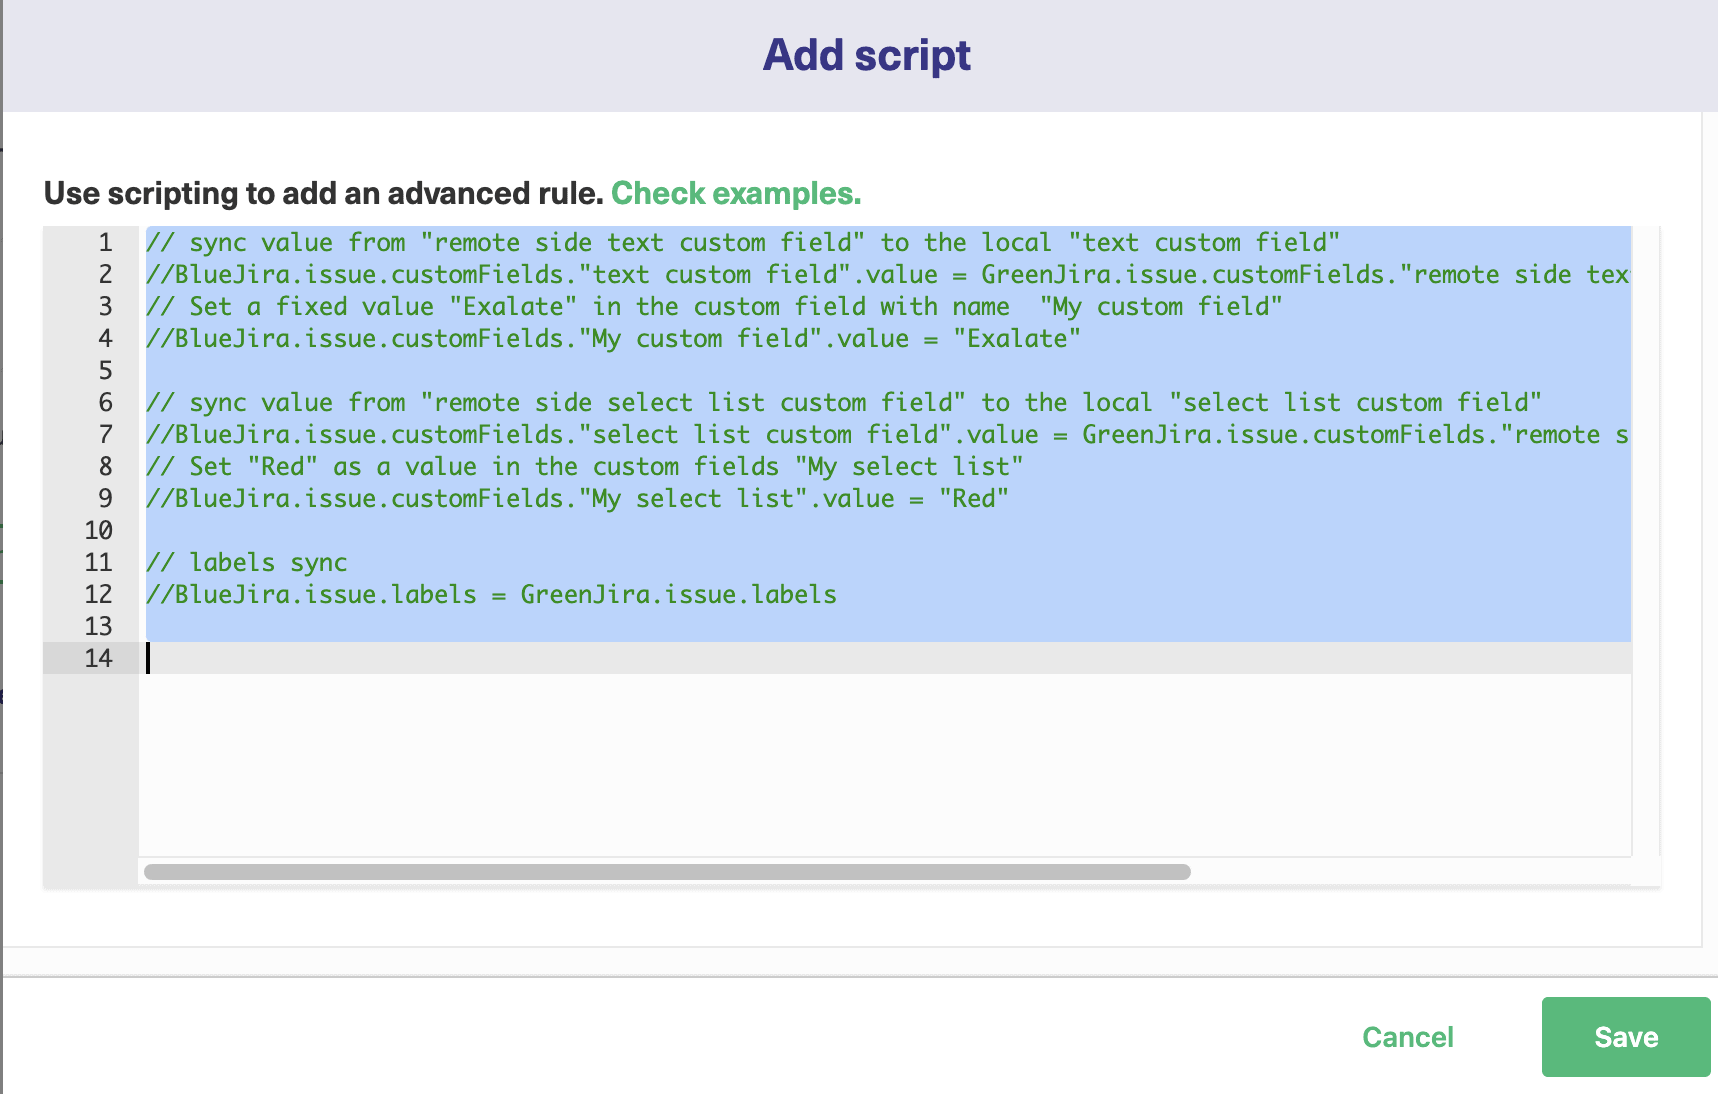
The “//” lines in front of the lines are called comments. They are used to enable or disable synchronization. Commented code is ignored at the time of synchronization. You can add comments to even know what a particular line of code does. Click “Save” when you are done. After you finish exploring all this, you can click “Publish” to apply the changes you have made to the connection. Exalate applies all your configurations in the next sync.
Using the Script mode:
To begin with, click “Next” after you select “Script”. Enter the connection details just like you did for the Visual mode. Enter the local and remote instance names and a connection name will be generated for you. You can edit it if you want. Then enter some description and click “Next”.
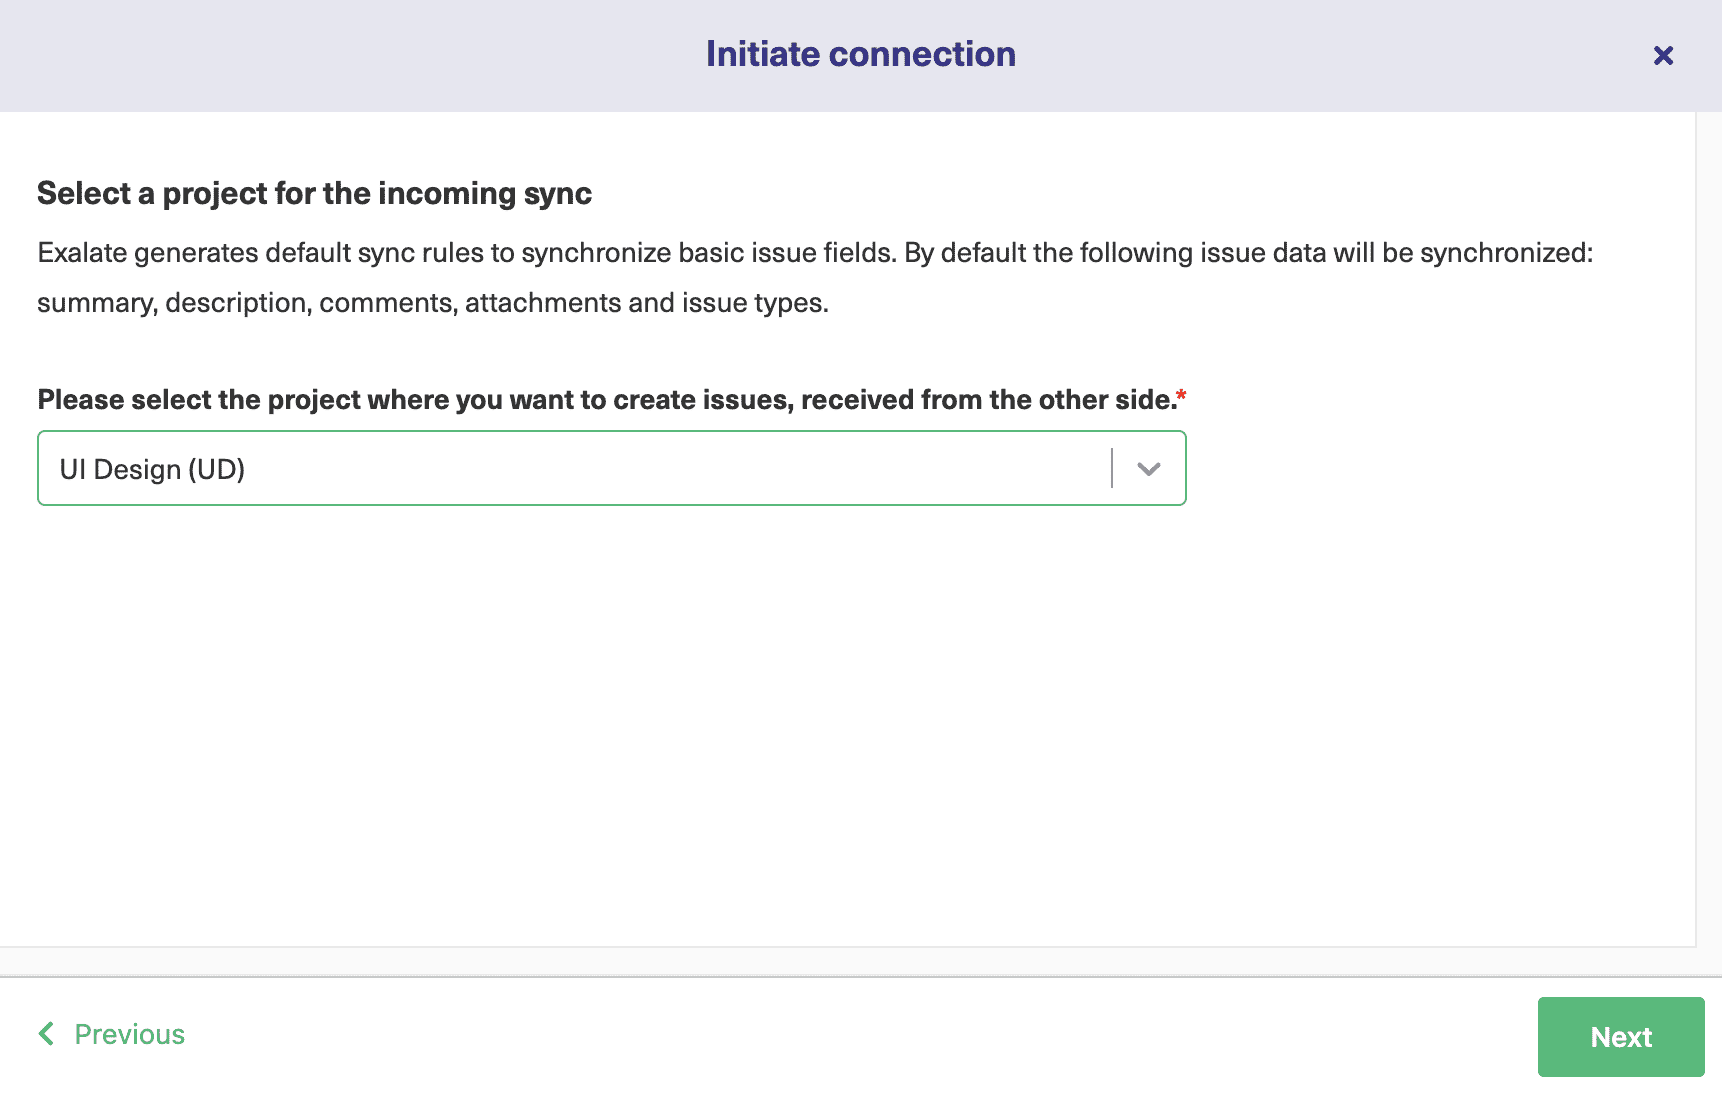
Select the project on the side initiating the connection, i.e your Jira cloud instance. Then click “Next”.
Our invitation code is generated next. Click the “Copy invitation code” button to copy it to your clipboard. It’s a good idea to paste this code somewhere safe.
Once you’ve done that, click “Done”. You’ll be taken back to the connections screen, where you can see our connection with “Pending” status.
To activate it fully, we’ll need to go into our Jira on-premise instance. There click the settings button and select “Add-ons”. You’ll see an Exalate section in the left-hand menu. Click “Connections”. 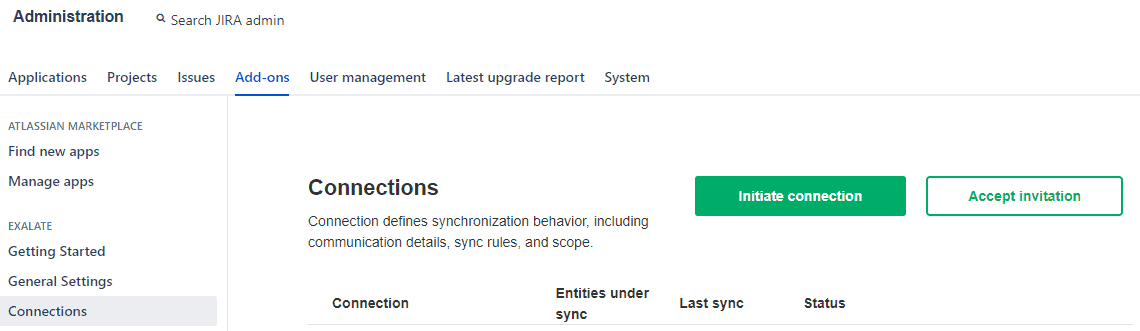

Once again, you’ll next need to pick the project to sync with on this Jira instance. Choose one and click “Confirm”.
We can now see our connection in the list of connections in the “Connections” tab.
Next, we’ll see how to set up our connection to control what information is sent and received and to start synchronization automatically. To do this you can click the “Configure Sync” button or choose to edit the connection as shown in step 4. Both ways will take you through the same screens.
Step 4: Configure your Connection to Determine What Information Gets Shared
Now our connection is in place, we need to make sure the data we’re exchanging matches our needs. Exalate is smart enough to match fields with equivalents on other platforms. It will create a set of defaults that should be adequate for most purposes. You might want to change how this is done, however. Perhaps you only want to share a few details. You might want some information on a private platform to be kept back from a public one. Comments by developers would be an example of this.
You may also want to pipe data to different fields. We’ll go through a quick example next, but for more information read our script helpers guide. That will explain how you can make the adjustments you need to control how data is exchanged. Let’s look at our Jira Cloud instance now. On the connections screen, which you can reach via the left-hand menu, look at the connection we created earlier. If you forgot how to get there, click “Apps” then “manage your apps” on the top menu, followed by “Connections” in the left-hand Exalate menu.
Our connection should be there, with whatever name you gave it. If you hover the mouse over it, three icons will appear. Click the left one, “edit”. You’ll see a screen like the one below.
The screen shown below will also be displayed if you click the “Configure Sync” button after the connection has been established.
Click “Rules”. We’ll come back to the triggers in the next step. You’ll see a list of sync rules that control how data on each Jira instance maps to that on the other. We’re looking at Jira cloud, so the outgoing sync shows how data is matched when Jira Cloud items are sent to Jira on-premise.
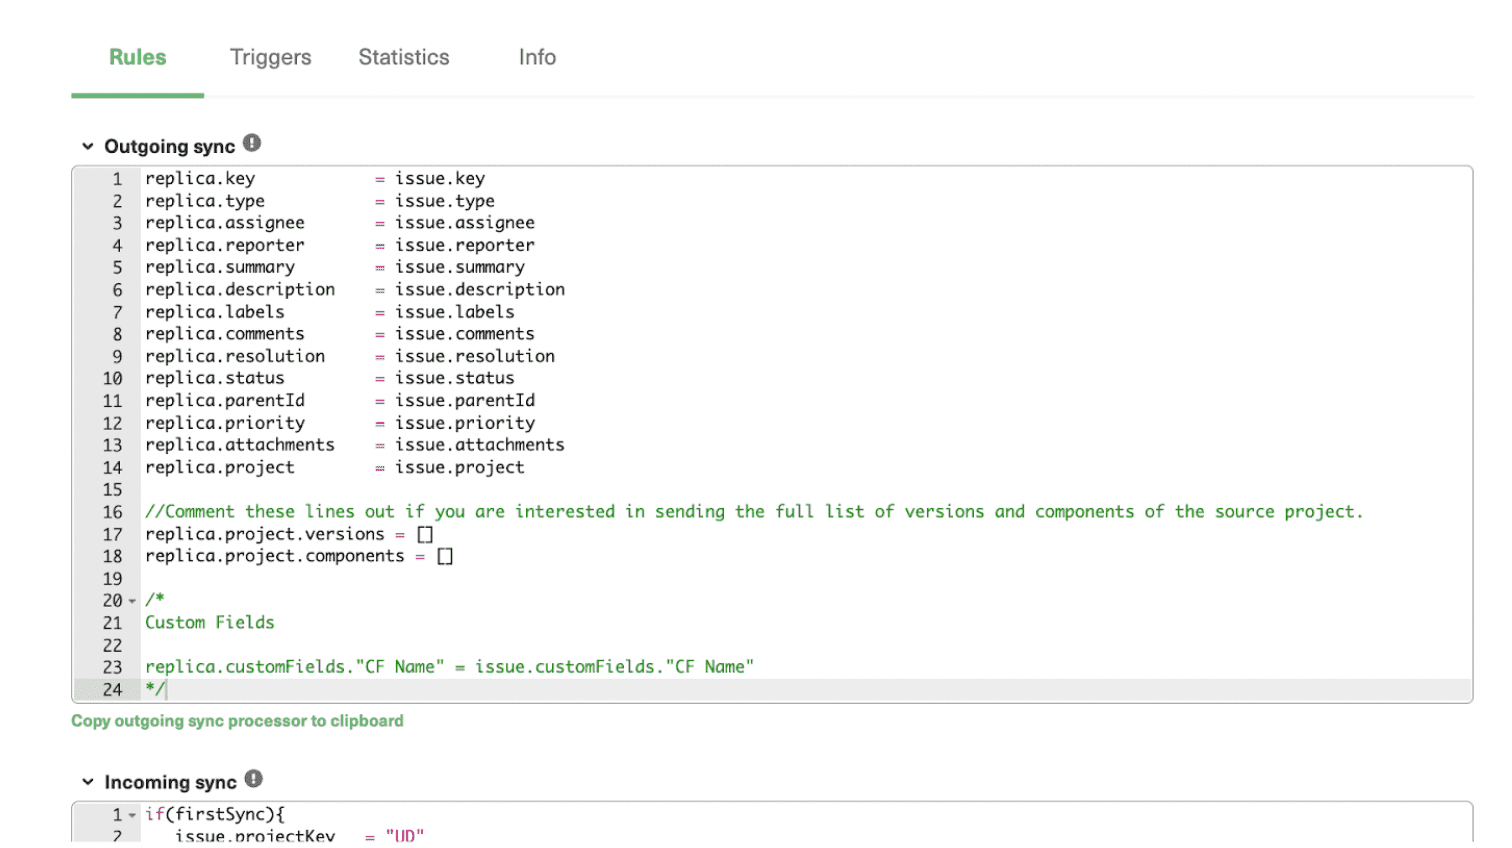
The incoming sync shows how data from Jira on-premise will be mapped when received by Jira Cloud. Since we’re using two Jira instances, the field names are identical, making it easy to match them. If you’re using a different platform, this won’t be the case and you should check more carefully, to make sure Exalate’s default settings match what you want.
All these rules can be customized. If you don’t want a particular field synced, remove it. If you want a field replaced with a fixed value, change the value to whatever you want. For example, change: issue.description = replica.description to issue.description = ‘from support desk’. To replace the description with text saying this issue came from the support desk.
There are also some sections grayed out and surrounded by /* and */. These are meant to provide you with some hints as to how the synchronization can be configured. You can remove the /* and */ to activate these sections if you need the described functionality. The sync rules let you make sure each instance stores the information relevant to the team that uses it. Adjusting these rules is a powerful way to automate your work.
Step 5: Set up Automated Synchronization Triggers
Now we look at the synchronization triggers. In the previous step, we changed what data was exchanged and how it was mapped. Here we’re choosing the conditions for sending data to synchronize. We’re still in Jira Cloud, so if you just completed the previous step, click the “Triggers” item to get here. Otherwise, it’s Apps >> Manage apps >> Notifications, then hover over your connection and click “edit”. Click the “Create trigger” button to get started.
There are several fields. The selection box at the top allows us to choose which type of entity we’re working with. If we pick “issue”, these rules will apply to issues. The next box is the key one. Here we have to enter the JQL code that defines when issues are sent. JQL stands for ‘Jira Query Language’ and can be used to select a subset of the issues maintained on this instance.
This sounds challenging, but it isn’t too hard to add a simple trigger, and if you use more advanced code the system becomes even more powerful. Read this guide or have a look here for more info regarding JQL.
In the notes section, you can add anything you like. This is useful for explaining what the trigger does in simple language, and is especially useful if you have multiple triggers and need to quickly see what they do. At the bottom is an “Active” switch, which lets you turn your triggers on and off as required. Don’t forget to activate your triggers, or they won’t work.
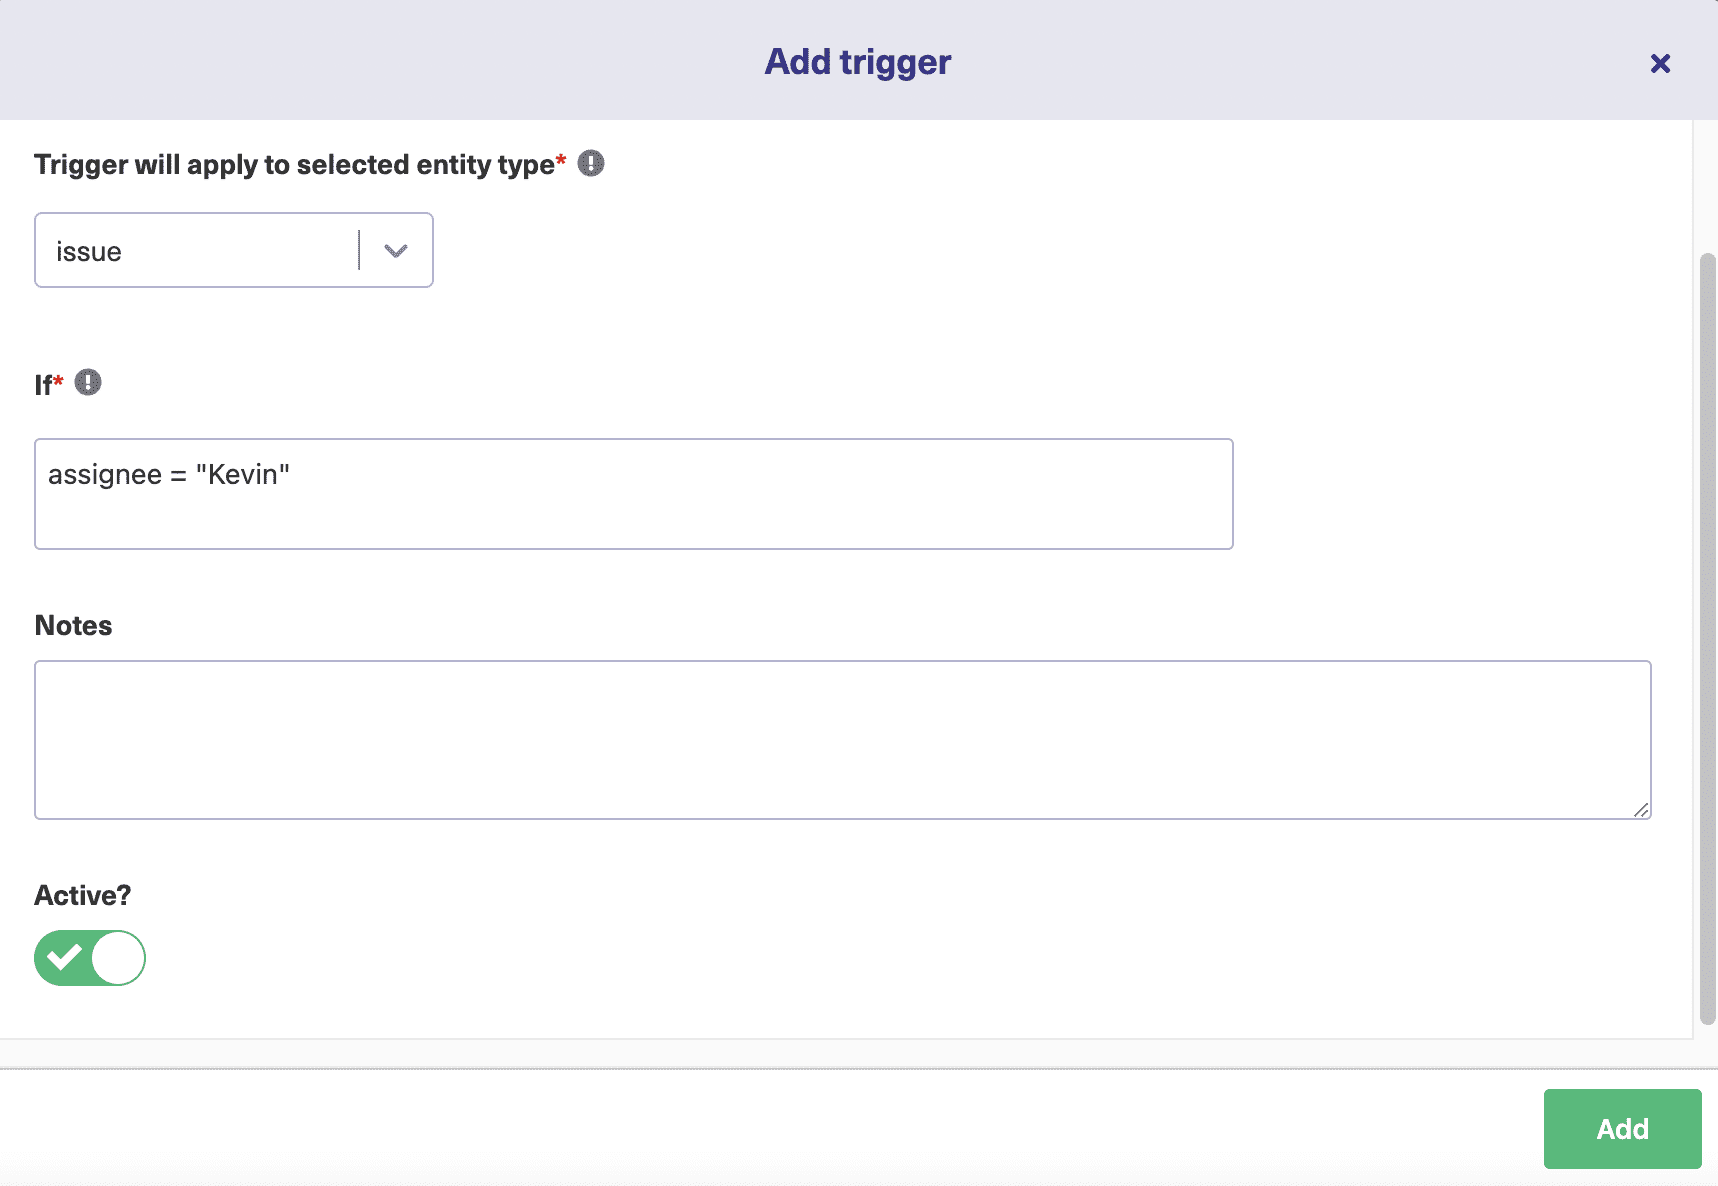
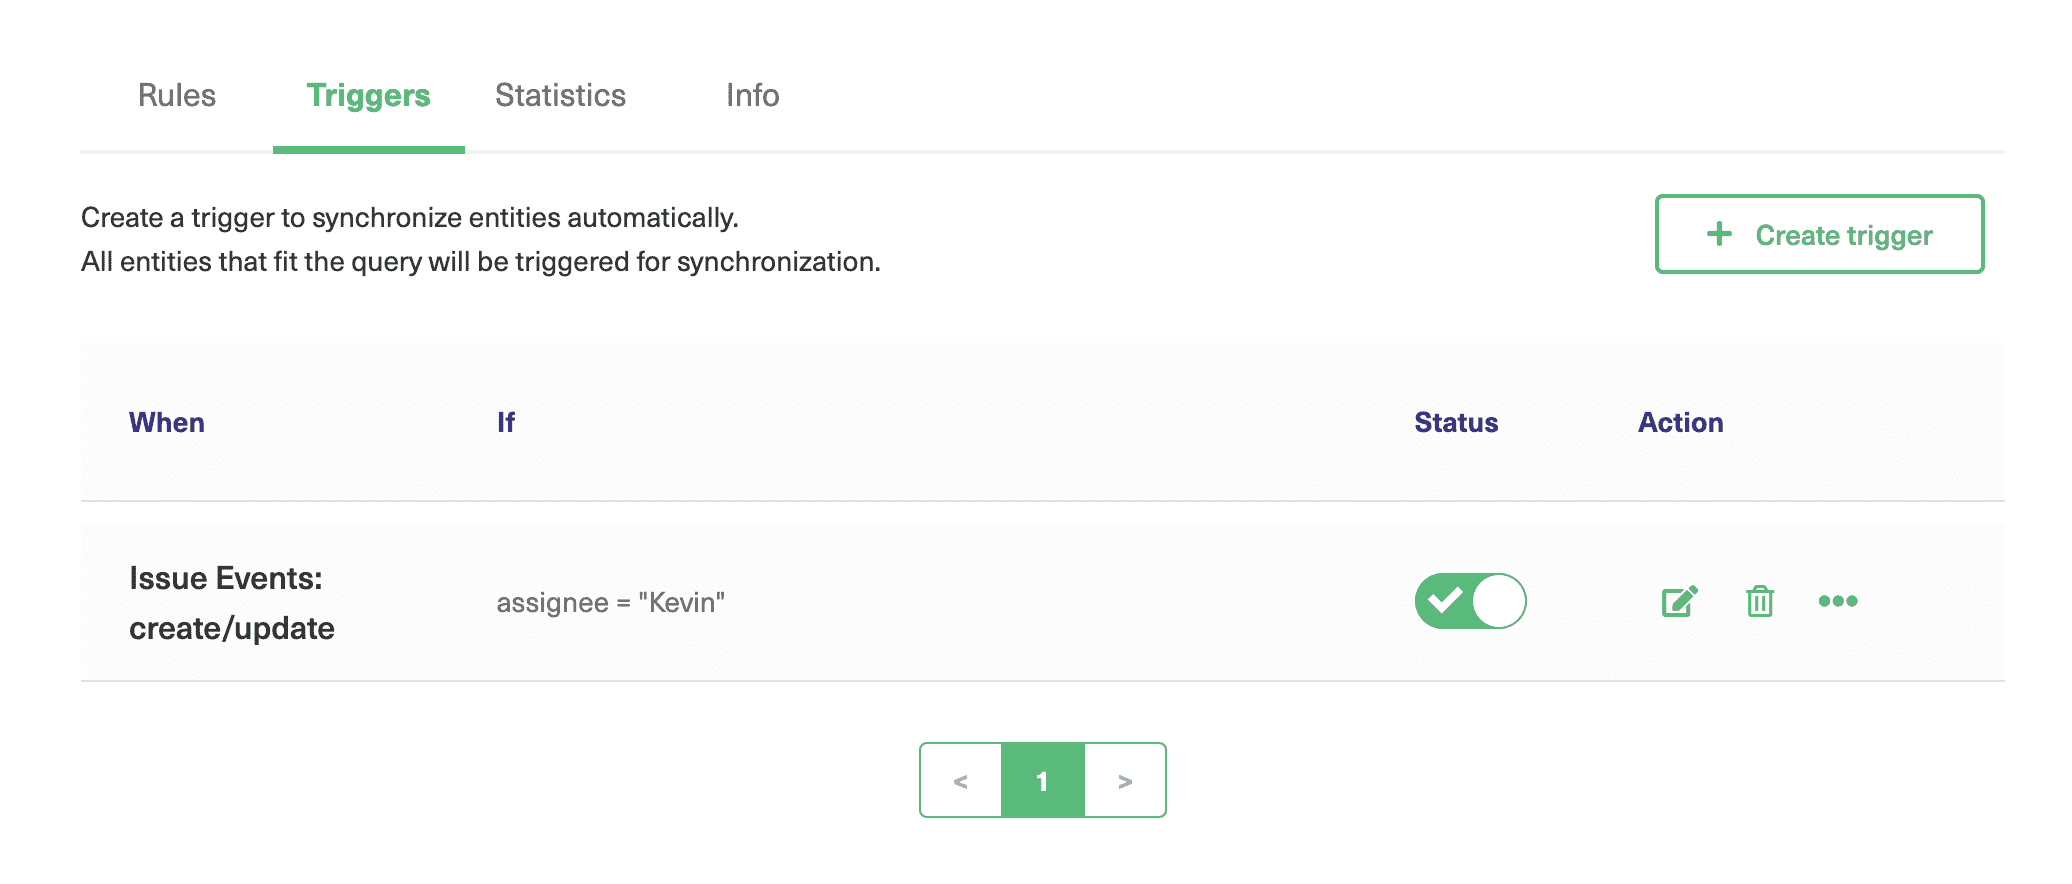
Here’s how our trigger form looks when we’ve added the details. We’ve used assignee = “Kevin” to apply this filter to a specific team member’s issues. We’ve also added a brief description, and set the trigger to “Active”. When you’ve finished, click the “Add” button, and your trigger will be active. It will be visible on the trigger screen.
Conclusion
Now that we have set up the connection between the instances, let’s test it by creating an issue and seeing if it syncs correctly. In Jira Cloud, we navigate to our project by clicking “Projects” in the top menu and then selecting the project we are using for the synchronization.
Then click the green “Create” button to create a new issue. Make the assigned user “Kevin” match our trigger (or whatever username you have used). Enter whatever other details you need, then click the “Create” button on the form to create the issue. 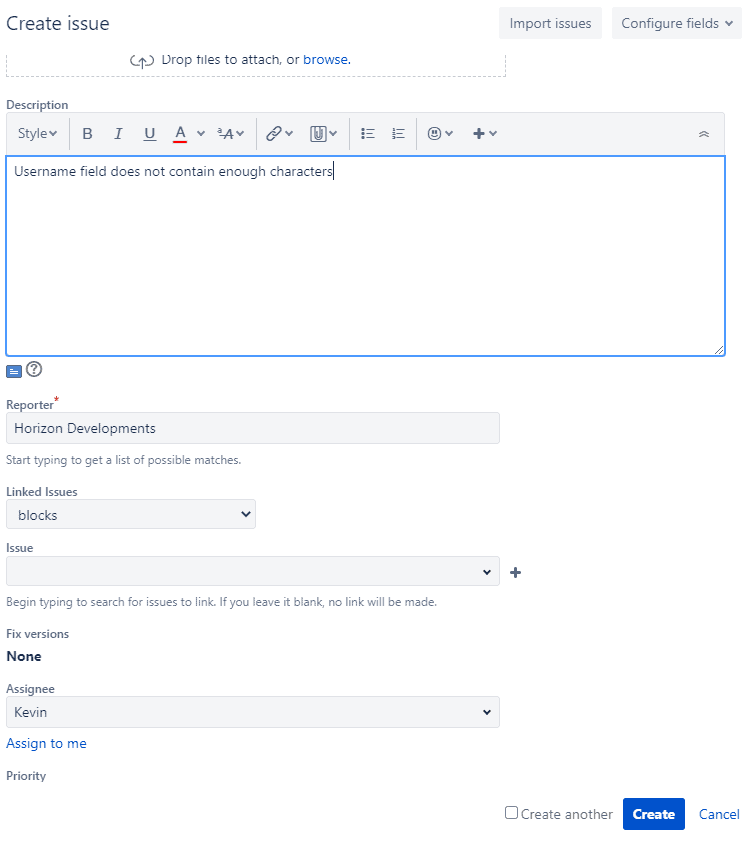
If you don’t see it, take a good look at the trigger conditions and make sure everything is active. You’ll also need to click the “Publish” button when making changes to ensure they are added to both platforms. We’ve given an example of how you can collaborate across platforms without having to compromise on security. Our system allows customers, service desk staff, and developers to share information without stepping on each other’s toes. Each of these groups gets a workflow tailored to them while playing a role in contributing to the product as a whole. Tools like Exalate can make this kind of task much easier. When you look for a software integration product, you need to check whether it meets your business needs and lets your teams integrate seamlessly.
Recommended Reads:
- Jira Integrations: Integrate Jira and Other Systems Bidirectionally
- How to set up a Jira Salesforce Integration
- How to Set up a ServiceNow Jira Integration
- How to Set up a Jira Azure DevOps Integration
- How to Set up a Jira Zednesk integration
- Jira GitHub Integration
- Jira to Jira Sync: How to Synchronize Multiple Jira Instances in 8 Steps